
User Manual
Page 2
...computer or monitor... 19 Connecting Video source devices....... 20 Operation 23 Starting up the projector 23 Adjusting the projected image 24 Using the menus 26 Securing the projector 27 Switching input signal 30 Magnifying and searching for details . 31 Selecting the aspect... keys 40 Adjusting the sound 41 2 Table of contents Personalizing the projector menu display 41 Shutting down the projector 42 Menu operation 43 Maintenance 51 Care of the projector 51 Lamp information 52 Troubleshooting 58 Specifications 59 Warranty and Copyright information 64 Regulation statements...
...computer or monitor... 19 Connecting Video source devices....... 20 Operation 23 Starting up the projector 23 Adjusting the projected image 24 Using the menus 26 Securing the projector 27 Switching input signal 30 Magnifying and searching for details . 31 Selecting the aspect... keys 40 Adjusting the sound 41 2 Table of contents Personalizing the projector menu display 41 Shutting down the projector 42 Menu operation 43 Maintenance 51 Care of the projector 51 Lamp information 52 Troubleshooting 58 Specifications 59 Warranty and Copyright information 64 Regulation statements...

User Manual
Page 3
Always open the lens shutter or operate your eyes. projector lamp is a normal phenomenon and not a product defect. In some heated air and odor from its ventilation grill. The intense designed to operate safely within a light ... latest standards for remove the lens cap when the future reference. In areas where the mains voltage may damage your projector. Safety Instructions 1. Do not look straight at the projector NOT stable. This projector is designed and tested to ensure safe use of ±10 volts occur. mains voltage between 100 to qualified...
Always open the lens shutter or operate your eyes. projector lamp is a normal phenomenon and not a product defect. In some heated air and odor from its ventilation grill. The intense designed to operate safely within a light ... latest standards for remove the lens cap when the future reference. In areas where the mains voltage may damage your projector. Safety Instructions 1. Do not look straight at the projector NOT stable. This projector is designed and tested to ensure safe use of ±10 volts occur. mains voltage between 100 to qualified...
User Manual
Page 4
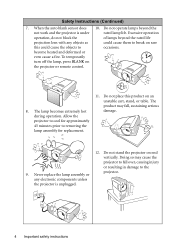
... may fall over, causing injury or resulting in damage to removing the lamp assembly for replacement. 12. Excessive operation operation, do not block the of lamps beyond the not work and the projector is unplugged. 4 Important safety instructions during operation. any objects as could... to occasions. The product may cause the projector to break on rare this product on an unstable cart, stand, or table. Do not stand the projector on the projector or remote control. 11. Never replace the lamp assembly or projector. Safety Instructions (Continued) 7. When the ...
... may fall over, causing injury or resulting in damage to removing the lamp assembly for replacement. 12. Excessive operation operation, do not block the of lamps beyond the not work and the projector is unplugged. 4 Important safety instructions during operation. any objects as could... to occasions. The product may cause the projector to break on rare this product on an unstable cart, stand, or table. Do not stand the projector on the projector or remote control. 11. Never replace the lamp assembly or projector. Safety Instructions (Continued) 7. When the ...

User Manual
Page 5
... a blanket, bedding or any other soft surface. - voltages inside of air around the projector. - Space that is the lamp which may contaminate optical components, shorten the projector's life span and darken the image. 14. Do not block the ventilation holes. - Locations where... following environments. Locations where excessive humidity, dust, or cigarette smoke may cause death if you should you ever undo or remove any of projector. The only user serviceable part is poorly ventilated or confined. There are higher than 3000 m (10000 feet). 3000 m (10000 feet)...
... a blanket, bedding or any other soft surface. - voltages inside of air around the projector. - Space that is the lamp which may contaminate optical components, shorten the projector's life span and darken the image. 14. Do not block the ventilation holes. - Locations where... following environments. Locations where excessive humidity, dust, or cigarette smoke may cause death if you should you ever undo or remove any of projector. The only user serviceable part is poorly ventilated or confined. There are higher than 3000 m (10000 feet). 3000 m (10000 feet)...
User Manual
Page 6
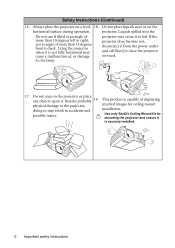
... not fully horizontal may cause a malfunction of, or damage to have the projector serviced. 17. Do not step on the projector or place any objects upon it from the power outlet and call BenQ to , the lamp. Besides probable 19. Use only BenQ's Ceiling Mount Kit for ceiling mount doing so may cause it is...
... not fully horizontal may cause a malfunction of, or damage to have the projector serviced. 17. Do not step on the projector or place any objects upon it from the power outlet and call BenQ to , the lamp. Besides probable 19. Use only BenQ's Ceiling Mount Kit for ceiling mount doing so may cause it is...
User Manual
Page 7
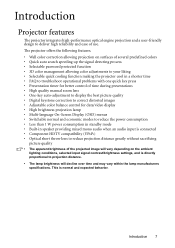
Introduction Projector features The projector integrates high-performance optical engine projection and a user-friendly design to projection distance. • The lamp brightness will vary depending on the ambient lighting conditions, selected input signal contrast/brightness settings..., and is normal and expected behavior. This is directly proportional to deliver high reliability and ease of use. The projector offers the following features....
Introduction Projector features The projector integrates high-performance optical engine projection and a user-friendly design to projection distance. • The lamp brightness will vary depending on the ambient lighting conditions, selected input signal contrast/brightness settings..., and is normal and expected behavior. This is directly proportional to deliver high reliability and ease of use. The projector offers the following features....
User Manual
Page 8
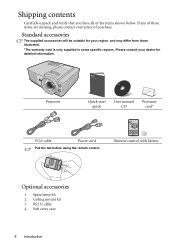
.... *The warranty card is only supplied in some specific regions. Remote control with battery Optional accessories 1. RS232 cable 4. Soft carry case 8 Introduction Projector Quick start guide User manual CD Warranty card* VGA cable Power cord Pull the tab before using the remote control. Ceiling mount kit 3. If any... of these items are missing, please contact your place of the items shown below. Spare lamp kit 2. Standard accessories The supplied accessories will be suitable for your dealer for detailed information.
.... *The warranty card is only supplied in some specific regions. Remote control with battery Optional accessories 1. RS232 cable 4. Soft carry case 8 Introduction Projector Quick start guide User manual CD Warranty card* VGA cable Power cord Pull the tab before using the remote control. Ceiling mount kit 3. If any... of these items are missing, please contact your place of the items shown below. Spare lamp kit 2. Standard accessories The supplied accessories will be suitable for your dealer for detailed information.
User Manual
Page 9
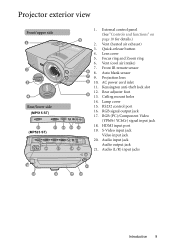
... control panel (See "Controls and functions" on page 10 for details.) 2. Quick-release button 4. RGB signal output jack 17. Projector exterior view Front/upper side 1 2 PUSH 3 4 Rear/lower side (MP515 ST) 15 (MP525 ST) 17 18 15 16 17 5 6 7 8 9 19 21 19 20 11 1. Lens cover 5. Auto blank sensor 9. .... Vent (heated air exhaust) 3. RGB (PC)/Component Video (YPbPr/ YCbCr) signal input jack 18. Front IR remote sensor 8. Ceiling mount holes 14. Lamp cover 15. S-Video input jack Video input jack 20. Rear adjuster foot 13. RS232 control port 16. Vent (cool air intake) 7.
... control panel (See "Controls and functions" on page 10 for details.) 2. Quick-release button 4. RGB signal output jack 17. Projector exterior view Front/upper side 1 2 PUSH 3 4 Rear/lower side (MP515 ST) 15 (MP525 ST) 17 18 15 16 17 5 6 7 8 9 19 21 19 20 11 1. Lens cover 5. Auto blank sensor 9. .... Vent (heated air exhaust) 3. RGB (PC)/Component Video (YPbPr/ YCbCr) signal input jack 18. Front IR remote sensor 8. Ceiling mount holes 14. Lamp cover 15. S-Video input jack Video input jack 20. Rear adjuster foot 13. RS232 control port 16. Vent (cool air intake) 7.
User Manual
Page 10
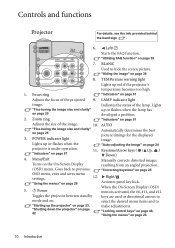
...Menu/Exit Manually corrects distorted images Turns on . II Power When the On-Screen Display (OSD) menu is under operation. LAMP indicator light image. Zoom ring up red if the projector's 11 temperature becomes too high. 1. "Indicators" on page 26 10 Introduction "Locking control keys" on page 40, ..."Using the menus" on page 57 Adjusts the size of the lamp. Lights "Fine-tuning the image size and clarity" on page 57 11. "Indicators" on page 25 2. Controls and functions Projector For details, see the info provided behind the hand sign . 1 6. Lights up...
...Menu/Exit Manually corrects distorted images Turns on . II Power When the On-Screen Display (OSD) menu is under operation. LAMP indicator light image. Zoom ring up red if the projector's 11 temperature becomes too high. 1. "Indicators" on page 26 10 Introduction "Locking control keys" on page 40, ..."Using the menus" on page 57 Adjusts the size of the lamp. Lights "Fine-tuning the image size and clarity" on page 57 11. "Indicators" on page 25 2. Controls and functions Projector For details, see the info provided behind the hand sign . 1 6. Lights up...
User Manual
Page 23
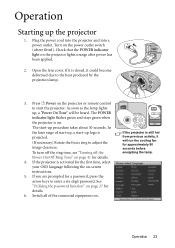
... the arrow keys to start -up , a "Power On Tone" will run the cooling fan for approximately 90 seconds before energizing the lamp. If it is on the projector or remote control to enter a six-digit password. Turn on . The POWER indicator light flashes green and stays green when the...In the later stage of the connected equipment on the power outlet switch (where fitted). If the projector is projected. (If necessary) Rotate the focus ring to the heat produced by the projection lamp. 3. Operation Starting up procedure takes about 30 seconds. Switch all of start-up, a start...
... the arrow keys to start -up , a "Power On Tone" will run the cooling fan for approximately 90 seconds before energizing the lamp. If it is on the projector or remote control to enter a six-digit password. Turn on . The POWER indicator light flashes green and stays green when the...In the later stage of the connected equipment on the power outlet switch (where fitted). If the projector is projected. (If necessary) Rotate the focus ring to the heat produced by the projection lamp. 3. Operation Starting up procedure takes about 30 seconds. Switch all of start-up, a start...
User Manual
Page 24
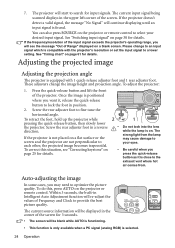
...details. Screw the rear adjuster foot to your desired input signal. while the lamp is selected. 24 Operation To correct this , press AUTO on • Be careful when you will see "Correcting keystone" on the projector or remote control. To do this situation, see the message "Out of... current source information will re-adjust the values of Frequency and Clock to the exhaust vent where hot air comes from the lamp If the projector is compatible with 1 quick-release adjuster foot and 1 rear adjuster foot. Adjusting the projected image Adjusting the projection angle The...
...details. Screw the rear adjuster foot to your desired input signal. while the lamp is selected. 24 Operation To correct this , press AUTO on • Be careful when you will see "Correcting keystone" on the projector or remote control. To do this situation, see the message "Out of... current source information will re-adjust the values of Frequency and Clock to the exhaust vent where hot air comes from the lamp If the projector is compatible with 1 quick-release adjuster foot and 1 rear adjuster foot. Adjusting the projected image Adjusting the projection angle The...
User Manual
Page 38
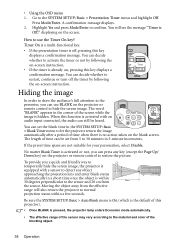
...15 15 10cm Be sure the SYSTEM SETUP: Basic > Auto Blank menu is On (which is the default of time when there is pressed, the projector lamp enters Economic mode automatically. • The effective range of the sensor may vary according to 30 minutes in the corner of the blocking object. 38... material and color of the screen while the image is activated or not, you can decide whether to restart, continue or turn off , pressing this projector). • Once BLANK is no action taken on the screen. Press Mode/Enter. displaying on the blank screen. No matter Blank Timer is hidden....
...15 15 10cm Be sure the SYSTEM SETUP: Basic > Auto Blank menu is On (which is the default of time when there is pressed, the projector lamp enters Economic mode automatically. • The effective range of the sensor may vary according to 30 minutes in the corner of the blocking object. 38... material and color of the screen while the image is activated or not, you can decide whether to restart, continue or turn off , pressing this projector). • Once BLANK is no action taken on the screen. Press Mode/Enter. displaying on the blank screen. No matter Blank Timer is hidden....

User Manual
Page 42
... the fans will continue to run for a few seconds, the message will run for approximately 90 seconds to cool down the projector 1. Press II Power again to protect the lamp, when you can also activate the Quick cooling function. Press II Power a second time. If you . Once the cooling ...process finishes, a "Power Off Ring Tone" will not respond to re-start the projector after the fans stop . The POWER indicator light is...
... the fans will continue to run for a few seconds, the message will run for approximately 90 seconds to cool down the projector 1. Press II Power again to protect the lamp, when you can also activate the Quick cooling function. Press II Power a second time. If you . Once the cooling ...process finishes, a "Power Off Ring Tone" will not respond to re-start the projector after the fans stop . The POWER indicator light is...
User Manual
Page 44
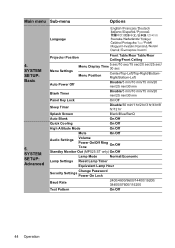
Main menu Sub-menu Options Language 4. SYSTEM SETUP: Advanced Projector Position Front Table/Rear Table/Rear Ceiling/Front Ceiling Menu Settings...Sleep Timer Disable/30 min/1 hr/2 hr/3 hr/4 hr/8 hr/12 hr Splash Screen Black/Blue/BenQ Auto Blank On/Off Quick Cooling On/Off High Altitude Mode On/Off Mute On/Off Audio Settings Volume... Power On/Off Ring Tone On/Off Standby Monitor Out (MP525 ST only) On/Off Lamp Mode Normal/Economic Lamp Settings Reset Lamp Timer Equivalent Lamp Hour Change Password Security Settings Power On Lock Baud Rate 2400/4800/...
Main menu Sub-menu Options Language 4. SYSTEM SETUP: Advanced Projector Position Front Table/Rear Table/Rear Ceiling/Front Ceiling Menu Settings...Sleep Timer Disable/30 min/1 hr/2 hr/3 hr/4 hr/8 hr/12 hr Splash Screen Black/Blue/BenQ Auto Blank On/Off Quick Cooling On/Off High Altitude Mode On/Off Mute On/Off Audio Settings Volume... Power On/Off Ring Tone On/Off Standby Monitor Out (MP525 ST only) On/Off Lamp Mode Normal/Economic Lamp Settings Reset Lamp Timer Equivalent Lamp Hour Change Password Security Settings Power On Lock Baud Rate 2400/4800/...

User Manual
Page 45
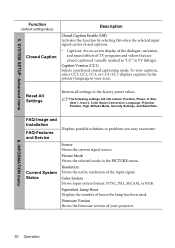
...Installation FAQ-Features and Service Current System Status • Source • Picture Mode • Resolution • Color System • Equivalent Lamp Hour • Firmware Version Note that the menu items are for reference only. Operation 45 The default values listed in this manual, especially... on pages 46-50, are available when the projector detects at least one valid signal. SYSTEM SETUP: Advanced Closed Caption Closed Caption Enable Caption Version Reset All Settings On/Off CC1...
...Installation FAQ-Features and Service Current System Status • Source • Picture Mode • Resolution • Color System • Equivalent Lamp Hour • Firmware Version Note that the menu items are for reference only. Operation 45 The default values listed in this manual, especially... on pages 46-50, are available when the projector detects at least one valid signal. SYSTEM SETUP: Advanced Closed Caption Closed Caption Enable Caption Version Reset All Settings On/Off CC1...
User Manual
Page 49
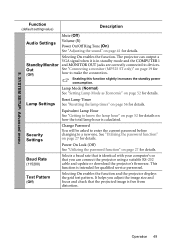
... projector displays the grid test pattern. The projector can connect the projector using a suitable RS-232 cable and update or download the projector's firmware. Enabling this function slightly increases the standby power consumption. Reset Lamp Timer Lamp Settings See "Resetting the lamp timer" on how the total lamp...Selecting On enables the function. Out See "Connecting a monitor (MP525 ST only)" on page 52 for (Off) how to a new one. This function is calculated. Operation 49 Lamp Mode (Normal) See "Setting Lamp Mode as Economic" on page 19 for details. It helps you...
... projector displays the grid test pattern. The projector can connect the projector using a suitable RS-232 cable and update or download the projector's firmware. Enabling this function slightly increases the standby power consumption. Reset Lamp Timer Lamp Settings See "Resetting the lamp timer" on how the total lamp...Selecting On enables the function. Out See "Connecting a monitor (MP525 ST only)" on page 52 for (Off) how to a new one. This function is calculated. Operation 49 Lamp Mode (Normal) See "Setting Lamp Mode as Economic" on page 19 for details. It helps you...
User Manual
Page 50
... a preferred closed captioned (usually marked as "CC" in TV listings). Size, User 1, User 2, Color Space Conversion, Language, Projector Position, High Altitude Mode, Security Settings, and Baud Rate. Current System Status Resolution Shows the native resolution of hours the... lamp has been used. Picture Mode Shows the selected mode in your projector. 6. Equivalent Lamp Hour Displays the number of the input signal. SYSTEM SETUP: Advanced menu Function (default setting...
... a preferred closed captioned (usually marked as "CC" in TV listings). Size, User 1, User 2, Color Space Conversion, Language, Projector Position, High Altitude Mode, Security Settings, and Baud Rate. Current System Status Resolution Shows the native resolution of hours the... lamp has been used. Picture Mode Shows the selected mode in your projector. 6. Equivalent Lamp Hour Displays the number of the input signal. SYSTEM SETUP: Advanced menu Function (default setting...

User Manual
Page 51
... area are within the recommended range for the projector. Never use any parts of the projector Your projector needs little maintenance. Storing the projector If you need to the projector surface and cabinet material. Maintenance Care of the projector except the lamp. Then wipe the case. Please refer to remove... range. • Retract the adjuster feet. • Remove the battery from the remote control. • Pack the projector in "Shutting down the projector" on page 59 or consult your dealer if other chemical detergents. These can damage the case. Maintenance 51 Never remove ...
... area are within the recommended range for the projector. Never use any parts of the projector Your projector needs little maintenance. Storing the projector If you need to the projector surface and cabinet material. Maintenance Care of the projector except the lamp. Then wipe the case. Please refer to remove... range. • Retract the adjuster feet. • Remove the battery from the remote control. • Pack the projector in "Shutting down the projector" on page 59 or consult your dealer if other chemical detergents. These can damage the case. Maintenance 51 Never remove ...
User Manual
Page 52
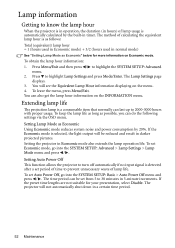
...time period can do the following settings via the OSD menu. The projector will see the Equivalent Lamp Hour information displaying on the menu. 4. The method of calculating the equivalent lamp hour is as follows: Total (equivalent) lamp hour = 1 (hours used in Economic mode) + 3/2 (hours ... with proper usage. The Lamp Settings page displays. 3. Setting the projector in timer. Lamp information Getting to know the lamp hour When the projector is in operation, the duration (in hours) of lamp usage is automatically calculated by 20%. To obtain the lamp hour information: 1. You can...
...time period can do the following settings via the OSD menu. The projector will see the Equivalent Lamp Hour information displaying on the menu. 4. The method of calculating the equivalent lamp hour is as follows: Total (equivalent) lamp hour = 1 (hours used in Economic mode) + 3/2 (hours ... with proper usage. The Lamp Settings page displays. 3. Setting the projector in timer. Lamp information Getting to know the lamp hour When the projector is in operation, the duration (in hours) of lamp usage is automatically calculated by 20%. To obtain the lamp hour information: 1. You can...
User Manual
Page 53
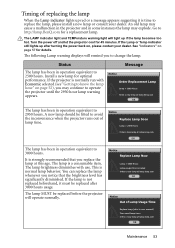
... Lamp Now Lamp > 3000 Hours Lamp usage time exceeded Order a new lamp at lamp.benq.com OK Notice Out of Lamp Usage Time Replace lamp (refer to user manual) Then reset lamp timer Order a new lamp at lamp.benq.com OK The lamp has been in some instances the lamp may continue to avoid the inconvenience when the projector runs out of lamp time. If the projector...
... Lamp Now Lamp > 3000 Hours Lamp usage time exceeded Order a new lamp at lamp.benq.com OK Notice Out of Lamp Usage Time Replace lamp (refer to user manual) Then reset lamp timer Order a new lamp at lamp.benq.com OK The lamp has been in some instances the lamp may continue to avoid the inconvenience when the projector runs out of lamp time. If the projector...

