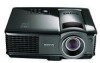

User Manual
Page 2
...image size 14 Connection 18 Connecting a computer or monitor... 18 Connecting Video source devices....... 20 Operation 24 Starting up the projector 24 Using the menus 25 Utilizing the password function ......... 26 Switching input signal 28 Adjusting the projected image 28 Magnifying and... in a high altitude environment 38 Personalizing the projector menu display 39 Shutting down the projector 39 Menu operation 40 Maintenance 47 Care of the projector 47 Lamp information 48 Troubleshooting 54 Specifications 55 Projector specifications 55 Dimensions 56 Timing chart 56 Warranty ...
...image size 14 Connection 18 Connecting a computer or monitor... 18 Connecting Video source devices....... 20 Operation 24 Starting up the projector 24 Using the menus 25 Utilizing the password function ......... 26 Switching input signal 28 Adjusting the projected image 28 Magnifying and... in a high altitude environment 38 Personalizing the projector menu display 39 Shutting down the projector 39 Menu operation 40 Maintenance 47 Care of the projector 47 Lamp information 48 Troubleshooting 54 Specifications 55 Projector specifications 55 Dimensions 56 Timing chart 56 Warranty ...
User Manual
Page 3
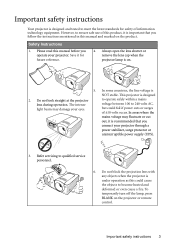
Save it is important that you connect your eyes. Always open the lens shutter or remove the lens cap when the projector lamp is designed 2. This projector is on. 5. to operate safely within a mains voltage between 100 to 240 volts AC, but could cause the objects to become heated and ...deformed or even cause a fire. To temporarily turn off the lamp, press BLANK on the product. In some countries, the line voltage is NOT stable. Do not block the projection lens with any objects when the projector is under operation as this manual before you follow the instructions mentioned ...
Save it is important that you connect your eyes. Always open the lens shutter or remove the lens cap when the projector lamp is designed 2. This projector is on. 5. to operate safely within a mains voltage between 100 to 240 volts AC, but could cause the objects to become heated and ...deformed or even cause a fire. To temporarily turn off the lamp, press BLANK on the product. In some countries, the line voltage is NOT stable. Do not block the projection lens with any objects when the projector is under operation as this manual before you follow the instructions mentioned ...
User Manual
Page 4
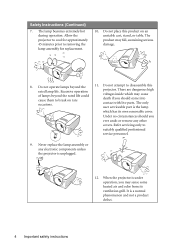
...if you may sense some heated air and odor from its own removable cover. Excessive operation projector. Under no circumstances should come into occasions. When the projector is the lamp which may fall, sustaining serious damage. 8. Do not attempt to break on an unstable cart...should you ever undo or remove any electronic components unless the projector is a normal phenomenon and not a product defect. 4 Important safety instructions The lamp becomes extremely hot during operation. Do not operate lamps beyond the rated life could voltages inside which has its ventilation...
...if you may sense some heated air and odor from its own removable cover. Excessive operation projector. Under no circumstances should come into occasions. When the projector is the lamp which may fall, sustaining serious damage. 8. Do not attempt to break on an unstable cart...should you ever undo or remove any electronic components unless the projector is a normal phenomenon and not a product defect. 4 Important safety instructions The lamp becomes extremely hot during operation. Do not operate lamps beyond the rated life could voltages inside which has its ventilation...
User Manual
Page 5
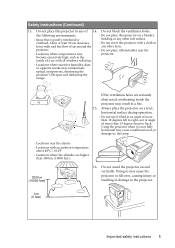
Do not place this projector in a fire. 15. If the ventilation holes are higher than 3000 m (10000 feet). 3000 m (10000 feet) 16. Do not use if tilted at an angle of more than 15 degrees front to , the lamp. - Locations where the altitudes are seriously obstructed..., overheating inside of , or damage to back. Safety Instructions (Continued) 13. Do not block the ventilation holes. Locations where temperatures may become excessively high, such as the inside the projector may cause a malfunction ...
Do not place this projector in a fire. 15. If the ventilation holes are higher than 3000 m (10000 feet). 3000 m (10000 feet) 16. Do not use if tilted at an angle of more than 15 degrees front to , the lamp. - Locations where the altitudes are seriously obstructed..., overheating inside of , or damage to back. Safety Instructions (Continued) 13. Do not block the ventilation holes. Locations where temperatures may become excessively high, such as the inside the projector may cause a malfunction ...
User Manual
Page 7
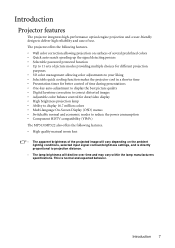
... projection purposes • 3D color management allowing color adjustments to your liking • Selectable quick cooling function makes the projector cool in a shorter time • Presentation timer for better control of time during presentations • One-key auto-...the lamp manufacturers specifications. This is directly proportional to reduce the power consumption • Component HDTV compatibility (YPbPr) The MP513/MP522 also offers the following features. • High quality manual zoom lens • The apparent brightness of use. Introduction 7 The projector offers...
... projection purposes • 3D color management allowing color adjustments to your liking • Selectable quick cooling function makes the projector cool in a shorter time • Presentation timer for better control of time during presentations • One-key auto-...the lamp manufacturers specifications. This is directly proportional to reduce the power consumption • Component HDTV compatibility (YPbPr) The MP513/MP522 also offers the following features. • High quality manual zoom lens • The apparent brightness of use. Introduction 7 The projector offers...
User Manual
Page 8
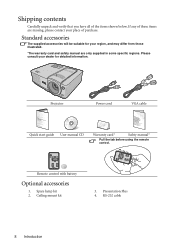
Standard accessories The supplied accessories will be suitable for your dealer for detailed information. Projector Power cord VGA cable Quick start guide User manual CD Warranty card* Safety manual* Pull the tab before using the remote control. Ceiling mount kit 3. ... that you have all of purchase. If any of these items are only supplied in some specific regions. Remote control with battery Optional accessories 1. Spare lamp kit 2.
Standard accessories The supplied accessories will be suitable for your dealer for detailed information. Projector Power cord VGA cable Quick start guide User manual CD Warranty card* Safety manual* Pull the tab before using the remote control. Ceiling mount kit 3. ... that you have all of purchase. If any of these items are only supplied in some specific regions. Remote control with battery Optional accessories 1. Spare lamp kit 2.

User Manual
Page 9
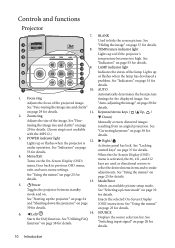
External control panel (See "Projector" on page 10 for details.) 2. S-Video input socket 14. Rear adjuster foot 15 16 17 Introduction 9 Front IR remote sensor 5 7. Projection lens 6 7 8. Kensington anti-theft .... RS-232 control port 10. Vent (heated air exhaust) 3. Focus ring and Zoom ring (Zoom ring is not available with the MP512.) 6. RGB signal output socket 11. Quick-release button 4. Lamp cover 17. RGB (PC)/Component video 14 (YPbPr/ YCbCr) signal input socket 12. AC power cord inlet 9. Lens cover 5. Video input...
External control panel (See "Projector" on page 10 for details.) 2. S-Video input socket 14. Rear adjuster foot 15 16 17 Introduction 9 Front IR remote sensor 5 7. Projection lens 6 7 8. Kensington anti-theft .... RS-232 control port 10. Vent (heated air exhaust) 3. Focus ring and Zoom ring (Zoom ring is not available with the MP512.) 6. RGB signal output socket 11. Quick-release button 4. Lamp cover 17. RGB (PC)/Component video 14 (YPbPr/ YCbCr) signal input socket 12. AC power cord inlet 9. Lens cover 5. Video input...
User Manual
Page 10
... make adjustments. See "Indicators" on page 29 for details. Mode/Enter Selects an available picture setup mode. Focus ring Adjusts the focus of the lamp. See "Fine-tuning the image size and clarity" on page 53 for details. 11. 2. See "Fine- See "Auto-adjusting the image" ...keys" on page 29 for details. See "Using the menus" on page 37 for details. 4. See "Starting up or flashes when the projector is not available with the MP512.) 3. See "Hiding the image" on page 25 for details. 6. Right/ Activates panel key lock. See "Indicators" on page 53 for...
... make adjustments. See "Indicators" on page 29 for details. Mode/Enter Selects an available picture setup mode. Focus ring Adjusts the focus of the lamp. See "Fine-tuning the image size and clarity" on page 53 for details. 11. 2. See "Fine- See "Auto-adjusting the image" ...keys" on page 29 for details. See "Using the menus" on page 37 for details. 4. See "Starting up or flashes when the projector is not available with the MP512.) 3. See "Hiding the image" on page 25 for details. 6. Right/ Activates panel key lock. See "Indicators" on page 53 for...
User Manual
Page 24
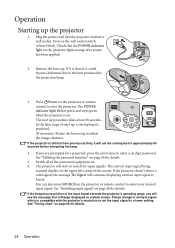
...If you will see the message 'Out of the input signal exceeds the projector's operating range, you are prompted for approximately 90 seconds before energizing the lamp. 4. The projector will start up the projector 1. Operation Starting up , a startup logo is still hot from previous ...activity, it is compatible with the projector's resolution or set the input signal to enter a six ...
...If you will see the message 'Out of the input signal exceeds the projector's operating range, you are prompted for approximately 90 seconds before energizing the lamp. 4. The projector will start up the projector 1. Operation Starting up , a startup logo is still hot from previous ...activity, it is compatible with the projector's resolution or set the input signal to enter a six ...
User Manual
Page 29
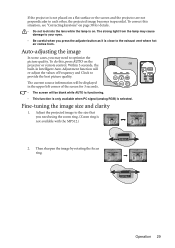
... upper left corner of the screen for details. • Do not look into the lens while the lamp is on. The strong light from . Auto-adjusting the image In some cases, you may cause damage... to the exhaust vent where hot air comes from the lamp may need using the zoom ring. (Zoom ring is not placed on the projector or remote control. The current source information will be displayed... becomes trapezoidal. To correct this , press AUTO on a flat surface or the screen and the projector are not perpendicular to the size that you press the adjuster button as it is selected. Then sharpen...
... upper left corner of the screen for details. • Do not look into the lens while the lamp is on. The strong light from . Auto-adjusting the image In some cases, you may cause damage... to the exhaust vent where hot air comes from the lamp may need using the zoom ring. (Zoom ring is not placed on the projector or remote control. The current source information will be displayed... becomes trapezoidal. To correct this , press AUTO on a flat surface or the screen and the projector are not perpendicular to the size that you press the adjuster button as it is selected. Then sharpen...
User Manual
Page 39
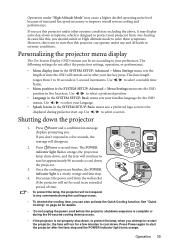
... under other extreme conditions excluding the above, it may cause a higher decibel operating noise level because of time. • To protect the lamp, the projector will disappear. 2. Use / to improve overall system cooling and performance. Disconnect the power cord from 5 to 30 seconds in a few minutes... to cool down symptoms, which is not properly shut down, to protect the lamp, when you attempt to start -up. Press Power again to re-start the projector, the fans will run for a few seconds, the message will not respond to protect your preferences....
... under other extreme conditions excluding the above, it may cause a higher decibel operating noise level because of time. • To protect the lamp, the projector will disappear. 2. Use / to improve overall system cooling and performance. Disconnect the power cord from 5 to 30 seconds in a few minutes... to cool down symptoms, which is not properly shut down, to protect the lamp, when you attempt to start -up. Press Power again to re-start the projector, the fans will run for a few seconds, the message will not respond to protect your preferences....

User Manual
Page 40
... Service 6. Main menu Sub-menu Options 1. INFORMATI ON Current System Status 40 Operation • Source • Picture Mode • Resolution • Color System • Equivalent Lamp Hour PICTURE Wall Color Off/Light Yellow/Pink/Light Green/Blue/Blackboard Aspect Ratio Auto/Real/4:3/16:9 Keystone Position Phase H. Size Digital Zoom Picture Mode...
... Service 6. Main menu Sub-menu Options 1. INFORMATI ON Current System Status 40 Operation • Source • Picture Mode • Resolution • Color System • Equivalent Lamp Hour PICTURE Wall Color Off/Light Yellow/Pink/Light Green/Blue/Blackboard Aspect Ratio Auto/Real/4:3/16:9 Keystone Position Phase H. Size Digital Zoom Picture Mode...

User Manual
Page 41
..., limited menu items are available when the projector detects at least one valid signal. Operation 41 SYSTEM SETUP: Advanced Language Projector Position Front Table/Rear Table/Rear Ceiling/Front...Disable/30 min/1 hr/2 hr/3 hr/4 hr/8 hr/12 hr Splash Screen Black/Blue/BenQ Quick Cooling On/Off High Altitude Mode On/Off Menu Settings Menu display time Menu position 5...-left/Top-right/Bottomright/Bottom-left Standby D-Sub Output On/Off Lamp mode Normal/Economic Lamp Settings Reset lamp timer Equivalent lamp hour Security Settings Change password Power on lock On/Off Baud Rate...
..., limited menu items are available when the projector detects at least one valid signal. Operation 41 SYSTEM SETUP: Advanced Language Projector Position Front Table/Rear Table/Rear Ceiling/Front...Disable/30 min/1 hr/2 hr/3 hr/4 hr/8 hr/12 hr Splash Screen Black/Blue/BenQ Quick Cooling On/Off High Altitude Mode On/Off Menu Settings Menu display time Menu position 5...-left/Top-right/Bottomright/Bottom-left Standby D-Sub Output On/Off Lamp mode Normal/Economic Lamp Settings Reset lamp timer Equivalent lamp hour Security Settings Change password Power on lock On/Off Baud Rate...

User Manual
Page 45
... closed captioning mode. Operation 45 This function is free from distortion. Size, User 1, User 2, Language, Projector Position, High Altitude Mode, Security Settings, Baud Rate. 5. SYSTEM SETUP: Advanced menu FUNCTION (default setting/ value) Standby DSub Output (Off) Lamp Settings Security Settings Baud Rate (115200) Test Pattern (Off) Closed Caption Reset All Settings DESCRIPTION...
... closed captioning mode. Operation 45 This function is free from distortion. Size, User 1, User 2, Language, Projector Position, High Altitude Mode, Security Settings, Baud Rate. 5. SYSTEM SETUP: Advanced menu FUNCTION (default setting/ value) Standby DSub Output (Off) Lamp Settings Security Settings Baud Rate (115200) Test Pattern (Off) Closed Caption Reset All Settings DESCRIPTION...

User Manual
Page 46
Source Shows the current signal source. Color System Shows input system format, NTSC, PAL, SECAM, or RGB. Equivalent Lamp Hour Displays the number of the input signal. 6. INFORMATION menu FUNCTION (default setting/ value) DESCRIPTION (default setting/value) FAQ-Image and Installation FAQFeatures and Service Displays possible solutions to problems you may encounter. Current System Status Picture Mode Shows the selected mode in the PICTURE menu. Resolution Shows the native resolution of hours the lamp has been used. 46 Operation
Source Shows the current signal source. Color System Shows input system format, NTSC, PAL, SECAM, or RGB. Equivalent Lamp Hour Displays the number of the input signal. 6. INFORMATION menu FUNCTION (default setting/ value) DESCRIPTION (default setting/value) FAQ-Image and Installation FAQFeatures and Service Displays possible solutions to problems you may encounter. Current System Status Picture Mode Shows the selected mode in the PICTURE menu. Resolution Shows the native resolution of hours the lamp has been used. 46 Operation
User Manual
Page 47
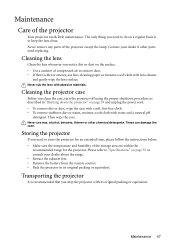
... the instructions below: • Make sure the temperature and humidity of compressed air to keep the lens clean. Maintenance Care of the projector except the lamp. Contact your dealer about the range. • Retract the adjuster feet. • Remove the battery from the remote control. • ...Pack the projector in "Shutting down the projector" on page 39 and unplug the power cord. • To remove dirt or dust, wipe the case with a soft,...
... the instructions below: • Make sure the temperature and humidity of compressed air to keep the lens clean. Maintenance Care of the projector except the lamp. Contact your dealer about the range. • Retract the adjuster feet. • Remove the battery from the remote control. • ...Pack the projector in "Shutting down the projector" on page 39 and unplug the power cord. • To remove dirt or dust, wipe the case with a soft,...
User Manual
Page 48
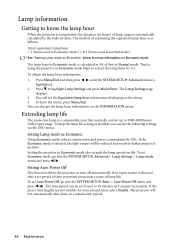
...noise and power consumption by the built-in Economic mode helps to 3000-4000 hours with proper usage. Setting the projector in Normal mode. The method of calculating the equivalent lamp hour is detected after a set from 5 to prevent unnecessary waste of time to 30 minutes in normal mode...in a certain time period. 48 Maintenance To set Economic mode, go into the SYSTEM SETUP: Advanced > Lamp Settings > Lamp mode menu and press / . Press to know the lamp hour When the projector is in operation, the duration (in hours) of that normally can do the following settings via the OSD...
...noise and power consumption by the built-in Economic mode helps to 3000-4000 hours with proper usage. Setting the projector in Normal mode. The method of calculating the equivalent lamp hour is detected after a set from 5 to prevent unnecessary waste of time to 30 minutes in normal mode...in a certain time period. 48 Maintenance To set Economic mode, go into the SYSTEM SETUP: Advanced > Lamp Settings > Lamp mode menu and press / . Press to know the lamp hour When the projector is in operation, the duration (in hours) of that normally can do the following settings via the OSD...
User Manual
Page 49
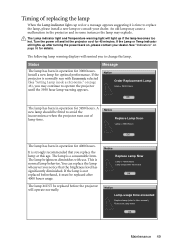
... fitted to operate the projector until the 3950 hour lamp warning appears. This is not replaced beforehand, it is time to change the lamp. If the lamp is normal lamp behavior. Notice Replace Lamp Now Lamp > 4000 Hours Lamp usage time exceeded OK Notice Lamp-usage time exceeded Replace lamp (refer to User manual) Then reset lamp timer OK Maintenance 49...
... fitted to operate the projector until the 3950 hour lamp warning appears. This is not replaced beforehand, it is time to change the lamp. If the lamp is normal lamp behavior. Notice Replace Lamp Now Lamp > 4000 Hours Lamp usage time exceeded OK Notice Lamp-usage time exceeded Replace lamp (refer to User manual) Then reset lamp timer OK Maintenance 49...

User Manual
Page 50
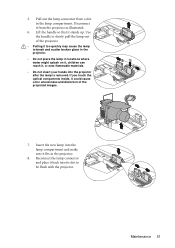
... inside the projector may cause injuries. 4. Replacing the lamp • If lamp replacement is performed while the projector is suspended upside-down from the projector. • Do not turn the projector off and disconnect the projector from the projector, it is recommended that secures the lamp. 50 Maintenance Turn the projector over. Loosen the screw that you purchase a BenQ projector lamp for approximately...
... inside the projector may cause injuries. 4. Replacing the lamp • If lamp replacement is performed while the projector is suspended upside-down from the projector. • Do not turn the projector off and disconnect the projector from the projector, it is recommended that secures the lamp. 50 Maintenance Turn the projector over. Loosen the screw that you purchase a BenQ projector lamp for approximately...
User Manual
Page 51
... optical components inside, it stands up. Disconnect it back into the projector after the lamp is removed. Pull out the lamp connector from the projector as illustrated. 6. Maintenance 51 Reconnect the lamp connector and place it from a slot in the projector. 8. 5. Insert the new lamp into the lamp compartment and make sure it , or near flammable materials. •...
... optical components inside, it stands up. Disconnect it back into the projector after the lamp is removed. Pull out the lamp connector from the projector as illustrated. 6. Maintenance 51 Reconnect the lamp connector and place it from a slot in the projector. 8. 5. Insert the new lamp into the lamp compartment and make sure it , or near flammable materials. •...

