

User Manual
Page 3
...36 Freezing the image 36 Utilizing FAQ function 37 Operating in a high altitude environment 37 Personalizing the projector menu display 38 Shutting down the projector 38 Menu operation 39 Menu system 39 Using the menus 42 Display menu 43 Picture menu 44 Source...Information menu 48 Maintenance 49 Care of the projector 49 Cleaning the lens 49 Cleaning the projector case 49 Storing the projector 49 Transporting the projector 49 Lamp information 50 Calculation of lamp hour 50 Warning message 50 Replacing the lamp 51 Temperature information 53 Indicators ...54 Troubleshooting ...
...36 Freezing the image 36 Utilizing FAQ function 37 Operating in a high altitude environment 37 Personalizing the projector menu display 38 Shutting down the projector 38 Menu operation 39 Menu system 39 Using the menus 42 Display menu 43 Picture menu 44 Source...Information menu 48 Maintenance 49 Care of the projector 49 Cleaning the lens 49 Cleaning the projector case 49 Storing the projector 49 Transporting the projector 49 Lamp information 50 Calculation of lamp hour 50 Warning message 50 Replacing the lamp 51 Temperature information 53 Indicators ...54 Troubleshooting ...

User Manual
Page 5
... 4. Important safety instructions 5 Always open the lens shutter or remove the lens cap when the projector lamp is on the projector or remote control. Important safety instructions Your BenQ projector is designed and tested to 240 volts AC, but could cause the objects to qualified service personnel.... supply (UPS). 3. Do not look straight at the projector lens during operation. Do not block the projection lens with any objects when the projector is recommended that you connect your projector. To temporarily turn off the lamp, press BLANK on . 5. Save it is under operation...
... 4. Important safety instructions 5 Always open the lens shutter or remove the lens cap when the projector lamp is on the projector or remote control. Important safety instructions Your BenQ projector is designed and tested to 240 volts AC, but could cause the objects to qualified service personnel.... supply (UPS). 3. Do not look straight at the projector lens during operation. Do not block the projection lens with any objects when the projector is recommended that you connect your projector. To temporarily turn off the lamp, press BLANK on . 5. Save it is under operation...

User Manual
Page 6
...unstable cart, stand, or table. Do not place this 8. projector. Under no circumstances should you should come into contact with live parts. Safety Instructions (Continued) 7. Do not operate lamps beyond the rated life could cause them to suitably qualified professional ...service personnel. 9. Never replace the lamp assembly or any electronic components unless the projector is the lamp which may fall, sustaining serious damage. 11. Excessive operation of lamps beyond the rated lamp life. The lamp becomes extremely hot during operation. The product...
...unstable cart, stand, or table. Do not place this 8. projector. Under no circumstances should you should come into contact with live parts. Safety Instructions (Continued) 7. Do not operate lamps beyond the rated life could cause them to suitably qualified professional ...service personnel. 9. Never replace the lamp assembly or any electronic components unless the projector is the lamp which may fall, sustaining serious damage. 11. Excessive operation of lamps beyond the rated lamp life. The lamp becomes extremely hot during operation. The product...

User Manual
Page 7
...). 3000 m (10000 feet) 15. Do not place inflammables near fire alarms - Do not place this projector with a cloth or any other item. - Locations where the altitudes are seriously obstructed, overheating inside of , or damage to, the lamp. - following environments. - Doing so may cause a malfunction of a car with an ambient temperature above 40...
...). 3000 m (10000 feet) 15. Do not place inflammables near fire alarms - Do not place this projector with a cloth or any other item. - Locations where the altitudes are seriously obstructed, overheating inside of , or damage to, the lamp. - following environments. - Doing so may cause a malfunction of a car with an ambient temperature above 40...

User Manual
Page 9
This is directly proportional to projection distance. • The lamp brightness will decline over time and may vary within the lamp manufacturers specifications. Introduction 9 The projector offers the following features. • Wall color correction allowing projection on surfaces of ...on the ambient lighting conditions, selected input source contrast/brightness settings, and is normal and expected behavior. Introduction Projector features The projector integrates high-performance optical engine projection and a user-friendly design to 11 sets of picture modes providing multiple...
This is directly proportional to projection distance. • The lamp brightness will decline over time and may vary within the lamp manufacturers specifications. Introduction 9 The projector offers the following features. • Wall color correction allowing projection on surfaces of ...on the ambient lighting conditions, selected input source contrast/brightness settings, and is normal and expected behavior. Introduction Projector features The projector integrates high-performance optical engine projection and a user-friendly design to 11 sets of picture modes providing multiple...

User Manual
Page 10
...accessories will be suitable for your place of purchase. Soft carry case 10 Introduction If any of the items shown below. Projector Remote control with the cables required for detailed information. Ceiling mount kit 3. Presentation Plus 4. Carefully unpack and verify that you...in some specific regions. Optional accessories 1. Please consult your dealer for connection to a PC or video equipment. Spare lamp kit 2. Shipping contents The projector is shipped with batteries Quick start guide User manual CD User manual Warranty Card* Safety manual* Power cord VGA cable...
...accessories will be suitable for your place of purchase. Soft carry case 10 Introduction If any of the items shown below. Projector Remote control with the cables required for detailed information. Ceiling mount kit 3. Presentation Plus 4. Carefully unpack and verify that you...in some specific regions. Optional accessories 1. Please consult your dealer for connection to a PC or video equipment. Spare lamp kit 2. Shipping contents The projector is shipped with batteries Quick start guide User manual CD User manual Warranty Card* Safety manual* Power cord VGA cable...

User Manual
Page 11
AC power cord inlet 12. S-Video input socket 18. Ceiling mounting screw holes 20 10 Introduction 11 Lamp cover 20. Rear adjuster foot 11. USB socket (for details. 12 13 14 15 16 17 11 10 10. Video input socket 17. Rear IR ...remote sensor 13. RGB (PC)/Component video (YPbPr/ YCbCr) signal input socket 16. External control panel (See "Projector" on page 12 for details.) Vent (heated air exhaust) Projection lens Quick-release button Lens cap Focus ring Kensington anti-theft lock slot Vent (cool...
AC power cord inlet 12. S-Video input socket 18. Ceiling mounting screw holes 20 10 Introduction 11 Lamp cover 20. Rear adjuster foot 11. USB socket (for details. 12 13 14 15 16 17 11 10 10. Video input socket 17. Rear IR ...remote sensor 13. RGB (PC)/Component video (YPbPr/ YCbCr) signal input socket 16. External control panel (See "Projector" on page 12 for details.) Vent (heated air exhaust) Projection lens Quick-release button Lens cap Focus ring Kensington anti-theft lock slot Vent (cool...

User Manual
Page 12
Lights up or flashes when the projector is selected, selects an available picture setup under operation. page 31 for 8. (OSD) menu item. See "Indicators" on 54 for details. 12 Introduction MENU/Exit Adjusts the focus of the lamp. See "Selecting a picture mode" on page ... page mode. To restore the image, press any button on page 29 for details. 7. See "Correcting keystone" on the projector or remote control. Lamp indicator light Indicates the status of the projected image. "Indicators" on or off. Focus ring 6. Power Enacts the selected On...
Lights up or flashes when the projector is selected, selects an available picture setup under operation. page 31 for 8. (OSD) menu item. See "Indicators" on 54 for details. 12 Introduction MENU/Exit Adjusts the focus of the lamp. See "Selecting a picture mode" on page ... page mode. To restore the image, press any button on page 29 for details. 7. See "Correcting keystone" on the projector or remote control. Lamp indicator light Indicates the status of the projected image. "Indicators" on or off. Focus ring 6. Power Enacts the selected On...

User Manual
Page 24
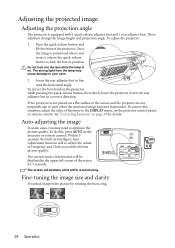
... signal is on page 58 for details. 5. PUSH 3. If the frequency/resolution of the input signal exceeds the projector's operating range, you are prompted for approximately 120 seconds before energizing the lamp. 4. If the projector doesn't detect a valid signal, the 'No Signal' message will run the cooling fan for a password, press the arrow...
... signal is on page 58 for details. 5. PUSH 3. If the frequency/resolution of the input signal exceeds the projector's operating range, you are prompted for approximately 120 seconds before energizing the lamp. 4. If the projector doesn't detect a valid signal, the 'No Signal' message will run the cooling fan for a password, press the arrow...
User Manual
Page 28
... to lock the foot in the DISPLAY menu, on . If the projector is functioning. The screen will be displayed in the upper left corner of Keystone in position. Do not look into the lens while the lamp is positioned where you may cause damage to each other, the projected ...image becomes trapezoidal. Within 3 seconds, the built-in a reverse direction. To correct this , press AUTO on a flat surface or the screen and the projector are not perpendicular to your eyes. 2....
... to lock the foot in the DISPLAY menu, on . If the projector is functioning. The screen will be displayed in the upper left corner of Keystone in position. Do not look into the lens while the lamp is positioned where you may cause damage to each other, the projected ...image becomes trapezoidal. Within 3 seconds, the built-in a reverse direction. To correct this , press AUTO on a flat surface or the screen and the projector are not perpendicular to your eyes. 2....
User Manual
Page 38
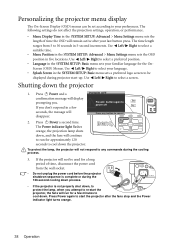
...period of time the OSD will run for a few Press button again to be displayed during projector start-up. The Power indicator light flashes orange, the projection lamp shuts down the projector. Press Power again to your familiar language for the OnScreen (OSD) Menus. The time ...8226; Language in 5-second increments. Press any commands during the cooling process. 3. To protect the lamp, the projector will not be used for approximately 120 seconds to select a screen. Personalizing the projector menu display The On-Screen Display (OSD) menus can be set according to start the...
...period of time the OSD will run for a few Press button again to be displayed during projector start-up. The Power indicator light flashes orange, the projection lamp shuts down the projector. Press Power again to your familiar language for the OnScreen (OSD) Menus. The time ...8226; Language in 5-second increments. Press any commands during the cooling process. 3. To protect the lamp, the projector will not be used for approximately 120 seconds to select a screen. Personalizing the projector menu display The On-Screen Display (OSD) menus can be set according to start the...
User Manual
Page 40
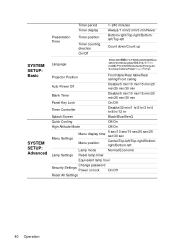
...Top-right/Bottomleft/Top-left Count down/Count up SYSTEM SETUP: Basic SYSTEM SETUP: Advanced Language Projector Position Front table/Rear table/Rear ceiling/Front ceiling Auto Power Off Disable/5 min/10 min...Disable/30 min/1 hr/2 hr/3 hr/4 hr/8 hr/12 hr Splash Screen Black/Blue/BenQ Quick Cooling Off/On High Altitude Mode Off/On Menu Settings Menu display time 5 sec/10...position Center/Top-left/Top-right/Bottomright/Bottom-left Lamp mode Normal/Economic Lamp Settings Reset lamp timer Equivalent lamp hour Change password Security Settings Power on lock On/Off Reset All...
...Top-right/Bottomleft/Top-left Count down/Count up SYSTEM SETUP: Basic SYSTEM SETUP: Advanced Language Projector Position Front table/Rear table/Rear ceiling/Front ceiling Auto Power Off Disable/5 min/10 min...Disable/30 min/1 hr/2 hr/3 hr/4 hr/8 hr/12 hr Splash Screen Black/Blue/BenQ Quick Cooling Off/On High Altitude Mode Off/On Menu Settings Menu display time 5 sec/10...position Center/Top-left/Top-right/Bottomright/Bottom-left Lamp mode Normal/Economic Lamp Settings Reset lamp timer Equivalent lamp hour Change password Security Settings Power on lock On/Off Reset All...

User Manual
Page 41
If there is no equipment connected to the projector or no signal detected, limited menu items are available when the projector detects at least one valid signal. FAQ-Image and Installation FAQ-Features and Service Current System Status Information • Source • Picture Mode • Resolution • Color System • Equivalent Lamp Hour Note that the menu items are accessible. Operation 41
If there is no equipment connected to the projector or no signal detected, limited menu items are available when the projector detects at least one valid signal. FAQ-Image and Installation FAQ-Features and Service Current System Status Information • Source • Picture Mode • Resolution • Color System • Equivalent Lamp Hour Note that the menu items are accessible. Operation 41
User Manual
Page 47
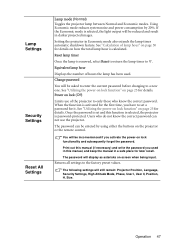
... the password you have to only those who do not know the correct password. Lamp Settings Security Settings Reset All Settings Lamp mode (Normal) Toggles the projector lamp between Normal and Economic modes. Equivalent lamp hour Displays the number of the projector to set and this manual, and keep the manual in Economic mode also extends...
... the password you have to only those who do not know the correct password. Lamp Settings Security Settings Reset All Settings Lamp mode (Normal) Toggles the projector lamp between Normal and Economic modes. Equivalent lamp hour Displays the number of the projector to set and this manual, and keep the manual in Economic mode also extends...

User Manual
Page 48
... Installation FAQ-Features and Service Current System Status DESCRIPTION Displays possible solutions to problems you the current operating status of hours the lamp has been used. 48 Operation Picture mode Shows the selected mode in use. Color system Shows input system format, NTSC, PAL..., SECAM, or RGB. Source Shows the current signal source. Equivalent lamp hour Displays the number of the projector. Resolution Shows the native resolution of the input signal. Some picture adjustments are available only when certain input sources ...
... Installation FAQ-Features and Service Current System Status DESCRIPTION Displays possible solutions to problems you the current operating status of hours the lamp has been used. 48 Operation Picture mode Shows the selected mode in use. Color system Shows input system format, NTSC, PAL..., SECAM, or RGB. Source Shows the current signal source. Equivalent lamp hour Displays the number of the projector. Resolution Shows the native resolution of the input signal. Some picture adjustments are available only when certain input sources ...

User Manual
Page 49
... about the range. • Retract the adjuster feet. • Remove the batteries from the remote control. • Pack the projector in "Shutting down the projector" on a regular basis is dirt or smears, use wax, alcohol, benzene, thinner or other parts need to do on page 38...To remove stubborn dirt or stains, moisten a soft cloth with abrasive materials. Maintenance Care of the projector except the lamp. Please refer to remove dust. • If there is to store the projector for an extended time, please follow the instructions below: • Make sure the temperature and humidity...
... about the range. • Retract the adjuster feet. • Remove the batteries from the remote control. • Pack the projector in "Shutting down the projector" on a regular basis is dirt or smears, use wax, alcohol, benzene, thinner or other parts need to do on page 38...To remove stubborn dirt or stains, moisten a soft cloth with abrasive materials. Maintenance Care of the projector except the lamp. Please refer to remove dust. • If there is to store the projector for an extended time, please follow the instructions below: • Make sure the temperature and humidity...

User Manual
Page 50
... the brightness level has significantly diminished. An old lamp may cause a malfunction in the projector and in some instances the lamp may continue to change the lamp. Message Notice Order Replacement Lamp Lamp > 2000 Hours OK Status The lamp has been in operation for details. See "Indicators...47), you to operate the projector until the 2950 hour lamp warning appears. The Lamp indicator light and Temperature warning light will remind you may explode. OK Notice Replace Lamp Now Lamp > 3000 Hours Lamp usage time exceeded OK 50 Maintenance The lamp has been in timer. ...
... the brightness level has significantly diminished. An old lamp may cause a malfunction in the projector and in some instances the lamp may continue to change the lamp. Message Notice Order Replacement Lamp Lamp > 2000 Hours OK Status The lamp has been in operation for details. See "Indicators...47), you to operate the projector until the 2950 hour lamp warning appears. The Lamp indicator light and Temperature warning light will remind you may explode. OK Notice Replace Lamp Now Lamp > 3000 Hours Lamp usage time exceeded OK 50 Maintenance The lamp has been in timer. ...

User Manual
Page 51
... into sharp pieces. • To reduce the risk of this lamp in a proper manner. • To assure optimal performance from the projector, it is recommended that you purchase a BenQ projector lamp for lamp replacement. 1. Turn the power off and disconnect the power cord before changing the lamp. • To reduce the risk of severe burns, allow the...
... into sharp pieces. • To reduce the risk of this lamp in a proper manner. • To assure optimal performance from the projector, it is recommended that you purchase a BenQ projector lamp for lamp replacement. 1. Turn the power off and disconnect the power cord before changing the lamp. • To reduce the risk of severe burns, allow the...

User Manual
Page 52
... could cause color unevenness and distortion of the projector. • Pulling it too quickly may cause the lamp to break and scatter broken glass in the projector. • Do not place the lamp in the projector, and then insert the lamp all the way into the projector after the lamp is removed. If you touch the optical components...
... could cause color unevenness and distortion of the projector. • Pulling it too quickly may cause the lamp to break and scatter broken glass in the projector. • Do not place the lamp in the projector, and then insert the lamp all the way into the projector after the lamp is removed. If you touch the optical components...

User Manual
Page 53
... as this could cause damage. Do not turn the power on the projector. 13. After the startup logo, open the On-Screen Display (OSD) menu. The Lamp Settings page displays. Turn the projector off and contact qualified service personnel for further help. For more detailed information..., please refer to reset the lamp timer. The lamp time will be reset to the slots. 12. Do ...
... as this could cause damage. Do not turn the power on the projector. 13. After the startup logo, open the On-Screen Display (OSD) menu. The Lamp Settings page displays. Turn the projector off and contact qualified service personnel for further help. For more detailed information..., please refer to reset the lamp timer. The lamp time will be reset to the slots. 12. Do ...


