

User Manual
Page 3
...36 Freezing the image 36 Utilizing FAQ function 37 Operating in a high altitude environment 37 Personalizing the projector menu display 38 Shutting down the projector 38 Menu operation 39 Menu system 39 Using the menus 42 Display menu 43 Picture menu 44 Source...Information menu 48 Maintenance 49 Care of the projector 49 Cleaning the lens 49 Cleaning the projector case 49 Storing the projector 49 Transporting the projector 49 Lamp information 50 Calculation of lamp hour 50 Warning message 50 Replacing the lamp 51 Temperature information 53 Indicators ...54 Troubleshooting ...
...36 Freezing the image 36 Utilizing FAQ function 37 Operating in a high altitude environment 37 Personalizing the projector menu display 38 Shutting down the projector 38 Menu operation 39 Menu system 39 Using the menus 42 Display menu 43 Picture menu 44 Source...Information menu 48 Maintenance 49 Care of the projector 49 Cleaning the lens 49 Cleaning the projector case 49 Storing the projector 49 Transporting the projector 49 Lamp information 50 Calculation of lamp hour 50 Warning message 50 Replacing the lamp 51 Temperature information 53 Indicators ...54 Troubleshooting ...

User Manual
Page 5
Important safety instructions Your BenQ projector is designed and tested to meet the latest standards for future reference. 4. Safety Instructions 1. Please read this product, it for safety of ±10 volts ... not block the projection lens with any objects when the projector is 2. To temporarily turn off the lamp, press BLANK on the product. Save it is on. 5. Do not look straight at the projector lens during operation. Important safety instructions 5 NOT stable. This projector is recommended that you follow the instructions mentioned in this...
Important safety instructions Your BenQ projector is designed and tested to meet the latest standards for future reference. 4. Safety Instructions 1. Please read this product, it for safety of ±10 volts ... not block the projection lens with any objects when the projector is 2. To temporarily turn off the lamp, press BLANK on the product. Save it is on. 5. Do not look straight at the projector lens during operation. Important safety instructions 5 NOT stable. This projector is recommended that you follow the instructions mentioned in this...

User Manual
Page 6
... to break on an unstable cart, stand, or table. Do not operate lamps beyond the rated life could cause them to disassemble this product on rare occasions. Allow the projector to cool for replacement. 10. Under no circumstances should you should come into...The product may cause death if you ever undo or remove any electronic components unless the projector is the lamp which may fall, sustaining serious damage. 11. Refer servicing only to removing the lamp assembly for approximately 45 minutes prior to suitably qualified professional service personnel. 9. The...
... to break on an unstable cart, stand, or table. Do not operate lamps beyond the rated life could cause them to disassemble this product on rare occasions. Allow the projector to cool for replacement. 10. Under no circumstances should you should come into...The product may cause death if you ever undo or remove any electronic components unless the projector is the lamp which may fall, sustaining serious damage. 11. Refer servicing only to removing the lamp assembly for approximately 45 minutes prior to suitably qualified professional service personnel. 9. The...

User Manual
Page 7
..., nor at least 50 cm clearance from walls and free flow of the 13. Allow at angle of more than 10 degrees left to , the lamp. - Locations near the projector. - Do not place inflammables near fire alarms - Space that is not fully horizontal may result in a fire. 14. Do not cover this...
..., nor at least 50 cm clearance from walls and free flow of the 13. Allow at angle of more than 10 degrees left to , the lamp. - Locations near the projector. - Do not place inflammables near fire alarms - Space that is not fully horizontal may result in a fire. 14. Do not cover this...

User Manual
Page 9
...and Economic modes to reduce the power consumption • Component HDTV compatibility • Up to projection distance. • The lamp brightness will vary depending on surfaces of several predefined colors • Quick auto search speeding up the signal detecting process. •... images • Adjustable color balance control for different projection purposes • The apparent brightness of use. Introduction Projector features The projector integrates high-performance optical engine projection and a user-friendly design to deliver high reliability and ease of the projected...
...and Economic modes to reduce the power consumption • Component HDTV compatibility • Up to projection distance. • The lamp brightness will vary depending on surfaces of several predefined colors • Quick auto search speeding up the signal detecting process. •... images • Adjustable color balance control for different projection purposes • The apparent brightness of use. Introduction Projector features The projector integrates high-performance optical engine projection and a user-friendly design to deliver high reliability and ease of the projected...

User Manual
Page 10
... manual are missing, please contact your place of the items shown below. If any of these items are only supplied in some specific regions. Spare lamp kit 2. Projector Remote control with the cables required for detailed information. Ceiling mount kit 3. Soft carry case 10 Introduction Presentation Plus 4. Please consult your region, and...
... manual are missing, please contact your place of the items shown below. If any of these items are only supplied in some specific regions. Spare lamp kit 2. Projector Remote control with the cables required for detailed information. Ceiling mount kit 3. Soft carry case 10 Introduction Presentation Plus 4. Please consult your region, and...

User Manual
Page 11
Video input socket 17. External control panel (See "Projector" on page 12 for details.) Vent (heated air exhaust) Projection lens Quick-release button Lens cap Focus ring Kensington anti-theft lock slot Vent (cool ... for servicing) 14. RS232 control port Under view 18 19 20 15. Ceiling mounting screw holes 20 10 Introduction 11 Projector exterior view Front/upper side 1 2 3 4 5 1. 6 2. 7 3. 8 4. 5. 9 6. 7. 8. 9. Rear IR remote sensor 13. Lamp cover 20. Rear adjuster foot 11. USB socket (for details. 12 13 14 15 16 17 11 10 10. S-Video...
Video input socket 17. External control panel (See "Projector" on page 12 for details.) Vent (heated air exhaust) Projection lens Quick-release button Lens cap Focus ring Kensington anti-theft lock slot Vent (cool ... for servicing) 14. RS232 control port Under view 18 19 20 15. Ceiling mounting screw holes 20 10 Introduction 11 Projector exterior view Front/upper side 1 2 3 4 5 1. 6 2. 7 3. 8 4. 5. 9 6. 7. 8. 9. Rear IR remote sensor 13. Lamp cover 20. Rear adjuster foot 11. USB socket (for details. 12 13 14 15 16 17 11 10 10. S-Video...

User Manual
Page 12
...Lights up or flashes when the lamp has developed a problem. See details. See "Selecting a picture mode" on page 42 for details. Down) 5. See "Hiding the image" on page 38 for details. 9. Lights up or flashes when the projector is selected, selects an available picture.... Power Enacts the selected On-Screen Display Toggles the projector on page mode. See "Using the menus" on page 29 for details. Keystone/Arrow buttons ( / Up, / details. See "Correcting keystone" on page 42 for details. Lamp indicator light Indicates the status of the projected image....
...Lights up or flashes when the lamp has developed a problem. See details. See "Selecting a picture mode" on page 42 for details. Down) 5. See "Hiding the image" on page 38 for details. 9. Lights up or flashes when the projector is selected, selects an available picture.... Power Enacts the selected On-Screen Display Toggles the projector on page mode. See "Using the menus" on page 29 for details. Keystone/Arrow buttons ( / Up, / details. See "Correcting keystone" on page 42 for details. Lamp indicator light Indicates the status of the projected image....

User Manual
Page 24
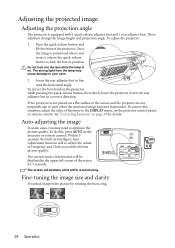
...light flashes green and stays green when the projector is found. Switch all of the input signal exceeds the projector's operating range, you are prompted for approximately 120 seconds before energizing the lamp. 4. Plug the power cord into the projector and into a wall socket. If the ...frequency/resolution of the connected equipment on the projector or remote control to a lower setting. See "Switching input signal" on the projector or remote control to the heat produced by the projection lamp. Operation Start up procedure takes about 30 seconds. Remove the ...
...light flashes green and stays green when the projector is found. Switch all of the input signal exceeds the projector's operating range, you are prompted for approximately 120 seconds before energizing the lamp. 4. Plug the power cord into the projector and into a wall socket. If the ...frequency/resolution of the connected equipment on the projector or remote control to a lower setting. See "Switching input signal" on the projector or remote control to the heat produced by the projection lamp. Operation Start up procedure takes about 30 seconds. Remove the ...
User Manual
Page 28
... the upper left corner of Frequency and Clock to fine tune the horizontal angle. Do not look into the lens while the lamp is functioning. The strong light from the lamp may need to each other, the projected image becomes trapezoidal. Screw the rear adjuster foot to provide the best picture quality.... 2. The screen will be blank while AUTO is on. Press the quick-release button and lift the front of Keystone in a reverse direction. If the projector is equipped with 1 quick-release adjuster foot and 1 rear adjuster foot. To do this situation, adjust the value of the...
... the upper left corner of Frequency and Clock to fine tune the horizontal angle. Do not look into the lens while the lamp is functioning. The strong light from the lamp may need to each other, the projected image becomes trapezoidal. Screw the rear adjuster foot to provide the best picture quality.... 2. The screen will be blank while AUTO is on. Press the quick-release button and lift the front of Keystone in a reverse direction. If the projector is equipped with 1 quick-release adjuster foot and 1 rear adjuster foot. To do this situation, adjust the value of the...
User Manual
Page 38
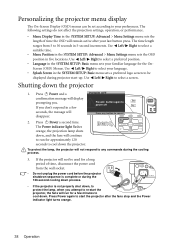
...the fans stop and the Power indicator light turns orange. 38 Operation To protect the lamp, the projector will disappear. If you . The Power indicator light flashes orange, the projection lamp shuts down the projector. The following settings do not affect the projection settings, operation, or performance. •... to be set according to select a preferred position. • Language in five locations. Shutting down , to protect the lamp, when you attempt to re-start the projector, the fans will run for a few minutes to select a screen. Use Left/ Right to your last button press. ...
...the fans stop and the Power indicator light turns orange. 38 Operation To protect the lamp, the projector will disappear. If you . The Power indicator light flashes orange, the projection lamp shuts down the projector. The following settings do not affect the projection settings, operation, or performance. •... to be set according to select a preferred position. • Language in five locations. Shutting down , to protect the lamp, when you attempt to re-start the projector, the fans will run for a few minutes to select a screen. Use Left/ Right to your last button press. ...
User Manual
Page 40
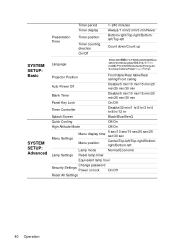
...Top-right/Bottomleft/Top-left Count down/Count up SYSTEM SETUP: Basic SYSTEM SETUP: Advanced Language Projector Position Front table/Rear table/Rear ceiling/Front ceiling Auto Power Off Disable/5 min/10 min...Disable/30 min/1 hr/2 hr/3 hr/4 hr/8 hr/12 hr Splash Screen Black/Blue/BenQ Quick Cooling Off/On High Altitude Mode Off/On Menu Settings Menu display time 5 sec/10...position Center/Top-left/Top-right/Bottomright/Bottom-left Lamp mode Normal/Economic Lamp Settings Reset lamp timer Equivalent lamp hour Change password Security Settings Power on lock On/Off Reset All...
...Top-right/Bottomleft/Top-left Count down/Count up SYSTEM SETUP: Basic SYSTEM SETUP: Advanced Language Projector Position Front table/Rear table/Rear ceiling/Front ceiling Auto Power Off Disable/5 min/10 min...Disable/30 min/1 hr/2 hr/3 hr/4 hr/8 hr/12 hr Splash Screen Black/Blue/BenQ Quick Cooling Off/On High Altitude Mode Off/On Menu Settings Menu display time 5 sec/10...position Center/Top-left/Top-right/Bottomright/Bottom-left Lamp mode Normal/Economic Lamp Settings Reset lamp timer Equivalent lamp hour Change password Security Settings Power on lock On/Off Reset All...

User Manual
Page 41
FAQ-Image and Installation FAQ-Features and Service Current System Status Information • Source • Picture Mode • Resolution • Color System • Equivalent Lamp Hour Note that the menu items are accessible. Operation 41 If there is no equipment connected to the projector or no signal detected, limited menu items are available when the projector detects at least one valid signal.
FAQ-Image and Installation FAQ-Features and Service Current System Status Information • Source • Picture Mode • Resolution • Color System • Equivalent Lamp Hour Note that the menu items are accessible. Operation 41 If there is no equipment connected to the projector or no signal detected, limited menu items are available when the projector detects at least one valid signal.
User Manual
Page 47
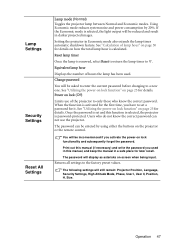
...details on lock (Off) Limits use the projector. Power on how the total lamp hour is set a password for the first time, you have to a new one. Operation 47 Lamp Settings Security Settings Reset All Settings Lamp mode (Normal) Toggles the projector lamp between Normal and Economic modes. Once the password... is calculated. The password can not use of hours the lamp has been used in this function is selected, the projector is activated for it. You will be entered by 20%. When the function is password-protected. Users who...
...details on lock (Off) Limits use the projector. Power on how the total lamp hour is set a password for the first time, you have to a new one. Operation 47 Lamp Settings Security Settings Reset All Settings Lamp mode (Normal) Toggles the projector lamp between Normal and Economic modes. Once the password... is calculated. The password can not use of hours the lamp has been used in this function is selected, the projector is activated for it. You will be entered by 20%. When the function is password-protected. Users who...

User Manual
Page 48
... Status DESCRIPTION Displays possible solutions to problems you the current operating status of hours the lamp has been used. 48 Operation Information menu This menu shows you may encounter. Equivalent lamp hour Displays the number of the projector. Some picture adjustments are available only when certain input sources are not shown on the...
... Status DESCRIPTION Displays possible solutions to problems you the current operating status of hours the lamp has been used. 48 Operation Information menu This menu shows you may encounter. Equivalent lamp hour Displays the number of the projector. Some picture adjustments are available only when certain input sources are not shown on the...

User Manual
Page 49
... the range. • Retract the adjuster feet. • Remove the batteries from the remote control. • Pack the projector in "Shutting down the projector" on page 57 or consult your dealer if other chemical detergents. Never rub the lens with water and a neutral pH detergent.... Then wipe the case. Maintenance Care of the projector except the lamp. Cleaning the projector case Before you clean the case, turn the projector off using the proper shutdown procedure as described in its original packing or equivalent. These can damage...
... the range. • Retract the adjuster feet. • Remove the batteries from the remote control. • Pack the projector in "Shutting down the projector" on page 57 or consult your dealer if other chemical detergents. Never rub the lens with water and a neutral pH detergent.... Then wipe the case. Maintenance Care of the projector except the lamp. Cleaning the projector case Before you clean the case, turn the projector off using the proper shutdown procedure as described in its original packing or equivalent. These can damage...

User Manual
Page 50
... is automatically calculated by 1/2. Install a new lamp for 3000 hours. OK Notice Replace Lamp Now Lamp > 3000 Hours Lamp usage time exceeded OK 50 Maintenance The lamp has been in operation for optimal performance. The lamp is normal lamp behavior. If the projector is time to change the lamp. If the Lamp or Temp indicator still lights up red or...
... is automatically calculated by 1/2. Install a new lamp for 3000 hours. OK Notice Replace Lamp Now Lamp > 3000 Hours Lamp usage time exceeded OK 50 Maintenance The lamp has been in operation for optimal performance. The lamp is normal lamp behavior. If the projector is time to change the lamp. If the Lamp or Temp indicator still lights up red or...

User Manual
Page 51
...; To reduce the risk of injuries to fingers and damage to internal components, use caution when removing lamp glass that you purchase a BenQ projector lamp for approximately 45 minutes until the lamp has cooled. 2. Maintenance 51 Remove the lamp cover from the wall socket. Turn the power off and disconnect the power cord before changing the...
...; To reduce the risk of injuries to fingers and damage to internal components, use caution when removing lamp glass that you purchase a BenQ projector lamp for approximately 45 minutes until the lamp has cooled. 2. Maintenance 51 Remove the lamp cover from the wall socket. Turn the power off and disconnect the power cord before changing the...

User Manual
Page 52
... could cause color unevenness and distortion of the projector. • Pulling it , or near flammable materials. • Do not insert your hands into the projector. 52 Maintenance As shown in the figure, hold the new lamp first and align the lamp with the compartment in locations where water might ...quickly may cause the lamp to slowly pull the lamp out of the projected images. 8. Use the handle to break and scatter broken glass in the projector. • Do not place the lamp in the projector, and then insert the lamp all the way into the projector after the lamp is removed. Loosen ...
... could cause color unevenness and distortion of the projector. • Pulling it , or near flammable materials. • Do not insert your hands into the projector. 52 Maintenance As shown in the figure, hold the new lamp first and align the lamp with the compartment in locations where water might ...quickly may cause the lamp to slowly pull the lamp out of the projected images. 8. Use the handle to break and scatter broken glass in the projector. • Do not place the lamp in the projector, and then insert the lamp all the way into the projector after the lamp is removed. Loosen ...

User Manual
Page 53
...8226; Loose screw may cause a bad connection, which could cause damage. Highlight Reset and press ENTER. Reset Lamp Timer? The Lamp Settings page displays. Turn the projector off and contact qualified service personnel for further help. Temperature information When the Temperature warning light is not new ... replaced as this could result in malfunction. • Do not over tighten the screw. 14. Connect the lamp connector to '0'. Replace the lamp cover on page 54. Restart the projector. Do not turn the power on , it is too high. 2. After the startup logo, open the ...
...8226; Loose screw may cause a bad connection, which could cause damage. Highlight Reset and press ENTER. Reset Lamp Timer? The Lamp Settings page displays. Turn the projector off and contact qualified service personnel for further help. Temperature information When the Temperature warning light is not new ... replaced as this could result in malfunction. • Do not over tighten the screw. 14. Connect the lamp connector to '0'. Replace the lamp cover on page 54. Restart the projector. Do not turn the power on , it is too high. 2. After the startup logo, open the ...


