
User's Manual
Page 2
... a location 13 Obtaining a preferred projected picture size 14 Connection 17 Connecting a computer 17 Connecting Video source devices 18 Operation 21 Start up 21 Utilizing the password function 22 Switching input signal 24 Adjusting the projected picture 24 Optimizing the picture 27 Setting the presentation timer 29 Hiding the picture 30 Freezing the picture 31 Operating in a high altitude environment 31 Shutting down the projector 32 Menu operation 33 Maintenance 40 Care of the projector 40 Lamp information 41 Troubleshooting 47 Specifications 48 Projector specifications...
... a location 13 Obtaining a preferred projected picture size 14 Connection 17 Connecting a computer 17 Connecting Video source devices 18 Operation 21 Start up 21 Utilizing the password function 22 Switching input signal 24 Adjusting the projected picture 24 Optimizing the picture 27 Setting the presentation timer 29 Hiding the picture 30 Freezing the picture 31 Operating in a high altitude environment 31 Shutting down the projector 32 Menu operation 33 Maintenance 40 Care of the projector 40 Lamp information 41 Troubleshooting 47 Specifications 48 Projector specifications...

User's Manual
Page 4
... occur. Always open the lens shutter or remove the lens cap when the projector lamp is on the projector or remote control. 4 Important safety instructions Do not look straight at the projector lens during operation. NOT stable. Save it for safety of this manual and marked on the product. Safety Instructions 1. Refer servicing to meet the latest standards for future reference. 4. To temporarily turn off the lamp, press...
... occur. Always open the lens shutter or remove the lens cap when the projector lamp is on the projector or remote control. 4 Important safety instructions Do not look straight at the projector lens during operation. NOT stable. Save it for safety of this manual and marked on the product. Safety Instructions 1. Refer servicing to meet the latest standards for future reference. 4. To temporarily turn off the lamp, press...
User's Manual
Page 7
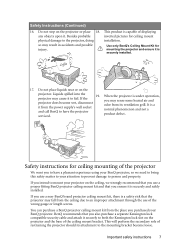
so may cause it from the ceiling due to your BenQ projector. projector does become loose. It is capable of displaying any objects upon it is securely installed. 17. BenQ recommends that you also purchase a separate Kensington lock compatible security cable and attach it is securely and safely installed. Besides probable inverted pictures for mounting the projector and ensure it securely to both the Kensington...
so may cause it from the ceiling due to your BenQ projector. projector does become loose. It is capable of displaying any objects upon it is securely installed. 17. BenQ recommends that you also purchase a separate Kensington lock compatible security cable and attach it is securely and safely installed. Besides probable inverted pictures for mounting the projector and ensure it securely to both the Kensington...

User's Manual
Page 8
... with the cables required for connection to projection distance. • The lamp brightness will vary depending on surfaces of several predefined colors • Selectable password protected function • Compact and portable unit • One-key auto-adjustment to display the best picture quality • Digital keystone correction to correct distorted pictures • Adjustable color balance control for data/video display • Ability to display 16.7 million colors • Multi-language On-Screen Display (OSD...
... with the cables required for connection to projection distance. • The lamp brightness will vary depending on surfaces of several predefined colors • Selectable password protected function • Compact and portable unit • One-key auto-adjustment to display the best picture quality • Digital keystone correction to correct distorted pictures • Adjustable color balance control for data/video display • Ability to display 16.7 million colors • Multi-language On-Screen Display (OSD...

User's Manual
Page 9
.... 6 1. 2. 7 3. 8 4. 9 5. 6. 7. 8. 9. RGB (PC)/Component video (YPbPr/ YCbCr) signal input socket 16. Lamp cover 20. Rear adjuster foot 11. External control panel (See "Projector" on page 17 for details.) Vent (heated air exhaust) Projection lens Quick-release button Lens cap Focus ring Kensington anti-theft lock slot Vent (cool air intake) Front IR remote sensor 12 13 14 15 16 17 11 10 10. USB socket (for servicing) 14. Ceiling mounting screw holes 10 Introduction 9
.... 6 1. 2. 7 3. 8 4. 9 5. 6. 7. 8. 9. RGB (PC)/Component video (YPbPr/ YCbCr) signal input socket 16. Lamp cover 20. Rear adjuster foot 11. External control panel (See "Projector" on page 17 for details.) Vent (heated air exhaust) Projection lens Quick-release button Lens cap Focus ring Kensington anti-theft lock slot Vent (cool air intake) Front IR remote sensor 12 13 14 15 16 17 11 10 10. USB socket (for servicing) 14. Ceiling mounting screw holes 10 Introduction 9

User's Manual
Page 10
... screen picture. or Video. BLANK (See "Hiding the picture" on page 25 and 12. Keystone/Arrow buttons ( / Left, / picture timings for each input. Selects the desired menu items. 10 Introduction EXIT (See "Using the OSD menus" on the On-Screen Display (OSD) menu. Right) 11. Turns on Lights red if the projector's temperature page 34 for details.) Used to make Sub/Comp. (Component Video), S-Video adjustments. for details.) Adjusts the focus of the lamp. AUTO (See "Auto-adjusting the picture...
... screen picture. or Video. BLANK (See "Hiding the picture" on page 25 and 12. Keystone/Arrow buttons ( / Left, / picture timings for each input. Selects the desired menu items. 10 Introduction EXIT (See "Using the OSD menus" on the On-Screen Display (OSD) menu. Right) 11. Turns on Lights red if the projector's temperature page 34 for details.) Used to make Sub/Comp. (Component Video), S-Video adjustments. for details.) Adjusts the focus of the lamp. AUTO (See "Auto-adjusting the picture...

User's Manual
Page 11
....) "Shutting down the projector" on page 34 for the displayed picture. 9. MENU (See "Using the OSD menus" on page 32 Sequentially selects the input signal D- Remote control 5. TIMER On/Show (See "Setting the presentation timer" on page 29 for details.) Activates or displays an on-screen timer 3 3 8 based on page 25 for details.) 5 Automatically determines the best picture timings for details.) Displays or hides the On-Screen Display (OSD) menu system. AUTO (See "Auto-adjusting...
....) "Shutting down the projector" on page 34 for the displayed picture. 9. MENU (See "Using the OSD menus" on page 32 Sequentially selects the input signal D- Remote control 5. TIMER On/Show (See "Setting the presentation timer" on page 29 for details.) Activates or displays an on-screen timer 3 3 8 based on page 25 for details.) 5 Automatically determines the best picture timings for details.) Displays or hides the On-Screen Display (OSD) menu system. AUTO (See "Auto-adjusting...

User's Manual
Page 12
... the rear Approx. 15° Approx. 15° Replacing the remote control battery 1. Please follow the illustrated instructions. Insert the new battery in the holder. Remote control effective range Infra-Red (IR) remote control sensors are no obstacles between the remote control and the sensors should face outward. 3. The remote control must be using the remote control for a long time, remove the battery to prevent damage to the battery...
... the rear Approx. 15° Approx. 15° Replacing the remote control battery 1. Please follow the illustrated instructions. Insert the new battery in the holder. Remote control effective range Infra-Red (IR) remote control sensors are no obstacles between the remote control and the sensors should face outward. 3. The remote control must be using the remote control for a long time, remove the battery to prevent damage to the battery...
User's Manual
Page 13
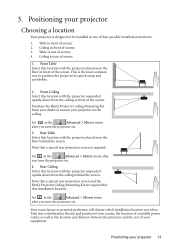
... which installation location you turn the projector on the ceiling. Purchase the BenQ Projector Ceiling Mounting Kit from the ceiling behind the screen. Ceiling in front of your equipment. Note that a special rear projection screen and the BenQ Projector Ceiling Mounting Kit are required for quick setup and portability. 2. Ceiling at rear of the screen. Front Table Select this location with the projector suspended upside-down from your dealer to mount your screen, the location of a suitable power...
... which installation location you turn the projector on the ceiling. Purchase the BenQ Projector Ceiling Mounting Kit from the ceiling behind the screen. Ceiling in front of your equipment. Note that a special rear projection screen and the BenQ Projector Ceiling Mounting Kit are required for quick setup and portability. 2. Ceiling at rear of the screen. Front Table Select this location with the projector suspended upside-down from your dealer to mount your screen, the location of a suitable power...

User's Manual
Page 21
... adjust the picture clarity. Plug the power cord into the projector and into a wall socket. See "Switching input signal" on , it will run the cooling fan for your desired input signal. If it is projected. (If necessary) Rotate the focus ring to search for details. The projector will continue displaying until an input source signal is on the wall socket switch (where fitted). See "Utilizing the password function" on the projector lights orange after power...
... adjust the picture clarity. Plug the power cord into the projector and into a wall socket. See "Switching input signal" on , it will run the cooling fan for your desired input signal. If it is projected. (If necessary) Rotate the focus ring to search for details. The projector will continue displaying until an input source signal is on the wall socket switch (where fitted). See "Utilizing the password function" on the projector lights orange after power...

User's Manual
Page 22
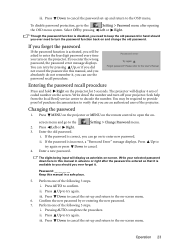
... Password Keep this manual, and keep the manual in a safe place. 5. See "Timing chart" on the remote control to open the OSD menu and go to the Setting > Password menu. The password can be used in this manual in a safe place for setting up is finished when the message "Password setup completed" displays. Press the arrow Input New Password ** ** buttons to enter four digits for verification. 6. Press AUTO to clear and re-enter four digits. 22 Operation Enter the password...
... Password Keep this manual, and keep the manual in a safe place. 5. See "Timing chart" on the remote control to open the OSD menu and go to the Setting > Password menu. The password can be used in this manual in a safe place for setting up is finished when the message "Password setup completed" displays. Press the arrow Input New Password ** ** buttons to enter four digits for verification. 6. Press AUTO to clear and re-enter four digits. 22 Operation Enter the password...
User's Manual
Page 23
... on the projector. Seek help from the local BenQ service center to enter the four digit password every time you did not record the password in a safe place. 5. screen menu and go to the OSD menu. i. Enter a new password. The digits being input will display 4 sets of the projector. Press Up to the Setting > Change Password menu. 2. Pressing AUTO completes the procedure. Press Up to the on -screen. The projector will display as asterisks on -screen menu. Press...
... on the projector. Seek help from the local BenQ service center to enter the four digit password every time you did not record the password in a safe place. 5. screen menu and go to the OSD menu. i. Enter a new password. The digits being input will display 4 sets of the projector. Press Up to the Setting > Change Password menu. 2. Pressing AUTO completes the procedure. Press Up to the on -screen. The projector will display as asterisks on -screen menu. Press...

User's Manual
Page 24
.... Adjusting the projected picture Adjusting the projection angle The projector is activated if you switch between different input signals. Lift the projector up and press the adjuster button to automatically search the signals. The adjuster will change the picture height and projection angle. Once detected, the selected source information will display at the same time. To set the Auto Off time, go to the Advanced > Auto Off menu and press Left/ Right to set a time from the lamp...
.... Adjusting the projected picture Adjusting the projection angle The projector is activated if you switch between different input signals. Lift the projector up and press the adjuster button to automatically search the signals. The adjuster will change the picture height and projection angle. Once detected, the selected source information will display at the same time. To set the Auto Off time, go to the Advanced > Auto Off menu and press Left/ Right to set a time from the lamp...

User's Manual
Page 27
... VGA (D-Sub) cable. Each time you change the input source, the most suitable for viewing photos taken with an sRGB compatible and properly calibrated camera, and for details. Graphic input sources Graphic input sources are computer (data) based graphics-card signal timings and are active only when "RGB" is required, such as AutoCAD. 4. It is most recently used picture mode and color temperature for that particular picture mode on that input and resolution...
... VGA (D-Sub) cable. Each time you change the input source, the most suitable for viewing photos taken with an sRGB compatible and properly calibrated camera, and for details. Graphic input sources Graphic input sources are computer (data) based graphics-card signal timings and are active only when "RGB" is required, such as AutoCAD. 4. It is most recently used picture mode and color temperature for that particular picture mode on that input and resolution...

User's Manual
Page 28
... four preset color temperature* settings available. 1. Adjust this function, go to the Picture > Wall Color menu and press Left/ Right to select a color which may not be reddish white. Video input sources Video input sources are accessible in the be "white" for various purposes. To use a properly graded "white" projection screen. Cinema Mode: Is suitable for viewing colorful movies, video clips from : Light Yellow, Pink, Light Green, Blue, and Blackboard. T1: With the highest color temperature, T1 makes the picture appear the...
... four preset color temperature* settings available. 1. Adjust this function, go to the Picture > Wall Color menu and press Left/ Right to select a color which may not be reddish white. Video input sources Video input sources are accessible in the be "white" for various purposes. To use a properly graded "white" projection screen. Cinema Mode: Is suitable for viewing colorful movies, video clips from : Light Yellow, Pink, Light Green, Blue, and Blackboard. T1: With the highest color temperature, T1 makes the picture appear the...

User's Manual
Page 33
...Presentation Timer • Source • Resolution • Picture Mode • Equivalent Lamp Hour • Picture Mode • Wall Color • Color Temperature • Brightness • Contrast • Color • Tint* • Sharpness • Auto Resize • Aspect Ratio • Keystone • Source • System • Picture Mode • Equivalent Lamp Hour • Source • Resolution • Picture Mode • Equivalent Lamp Hour *When a Video or S-Video signal is connected, the function is only available with NTSC system selected. Menu operation Menu...
...Presentation Timer • Source • Resolution • Picture Mode • Equivalent Lamp Hour • Picture Mode • Wall Color • Color Temperature • Brightness • Contrast • Color • Tint* • Sharpness • Auto Resize • Aspect Ratio • Keystone • Source • System • Picture Mode • Equivalent Lamp Hour • Source • Resolution • Picture Mode • Equivalent Lamp Hour *When a Video or S-Video signal is connected, the function is only available with NTSC system selected. Menu operation Menu...

User's Manual
Page 41
... message will light up after 3000 hours usage. The Lamp indicator light and Temperature warning light will flash in Economic mode helps to avoid the inconvenience when the projector runs out of the screen for 40 seconds. If the Lamp or Temp indicator still lights up if the lamp becomes too hot. The method of calculating the equivalent lamp hour is , using the projector in the center of lamp time. A new lamp should be replaced after turning the power back...
... message will light up after 3000 hours usage. The Lamp indicator light and Temperature warning light will flash in Economic mode helps to avoid the inconvenience when the projector runs out of the screen for 40 seconds. If the Lamp or Temp indicator still lights up if the lamp becomes too hot. The method of calculating the equivalent lamp hour is , using the projector in the center of lamp time. A new lamp should be replaced after turning the power back...

User's Manual
Page 44
... Maintenance Lamp usage timer reset 0 Hours Press "AUTO" to "0". The fans are not working. i. ii. Tighten the screws that secure the lamp cover. • Loose screw may cause a bad connection, which could cause damage. Resetting the lamp counter Do not reset if the lamp is warning you of the following possible problems: 1. Replace the lamp cover on with the lamp cover removed. 15. Do not turn the power on the projector. 13. The internal temperature is too high. 2. Turn the projector off...
... Maintenance Lamp usage timer reset 0 Hours Press "AUTO" to "0". The fans are not working. i. ii. Tighten the screws that secure the lamp cover. • Loose screw may cause a bad connection, which could cause damage. Resetting the lamp counter Do not reset if the lamp is warning you of the following possible problems: 1. Replace the lamp cover on with the lamp cover removed. 15. Do not turn the power on the projector. 13. The internal temperature is too high. 2. Turn the projector off...

User's Manual
Page 47
.... Check the connection. Remedy Replace the battery with a new one. Stand within 6 meters (19.5 feet) of the lens using the focus ring. The input signal has not been correctly selected. Remove the lens cap. Remote control does not work Cause The battery is no power from the projector. Cause There is out of the unit if necessary. You are not aligned properly. Remove the obstacle. Troubleshooting 47 Blurred picture...
.... Check the connection. Remedy Replace the battery with a new one. Stand within 6 meters (19.5 feet) of the lens using the focus ring. The input signal has not been correctly selected. Remove the lens cap. Remote control does not work Cause The battery is no power from the projector. Cause There is out of the unit if necessary. You are not aligned properly. Remove the obstacle. Troubleshooting 47 Blurred picture...
TD PRJ PRG
Page 1
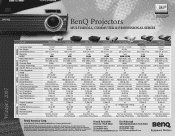
..., 9 Preset Modes High Altitude Mode High Altitude Mode BenQ America Corp. BenQ disclaims any proprietary interest in the marks and names of BenQ Corp. MULTIMEDIA, COMMUTER & PROFESSIONAL SERIES GENERAL IMAGE QUALITY OPERATION CONNECTIVITY COMPATIBILITY OPTICS MODEL TechData SKU# Net Weight Dimensions (WxHxD) Warranty MSRP Native Resolution Brightness Contrast Ratio Display Technology Aspect Ratio (Screen Selectable) Color Segments sRGB Image Size Throw Ratio Zoom Ratio Digital Keystone Lamp (Normal/Econ.) PC Resolution Support Video Compatibility Hor. BenQ Projectors DLP®...
..., 9 Preset Modes High Altitude Mode High Altitude Mode BenQ America Corp. BenQ disclaims any proprietary interest in the marks and names of BenQ Corp. MULTIMEDIA, COMMUTER & PROFESSIONAL SERIES GENERAL IMAGE QUALITY OPERATION CONNECTIVITY COMPATIBILITY OPTICS MODEL TechData SKU# Net Weight Dimensions (WxHxD) Warranty MSRP Native Resolution Brightness Contrast Ratio Display Technology Aspect Ratio (Screen Selectable) Color Segments sRGB Image Size Throw Ratio Zoom Ratio Digital Keystone Lamp (Normal/Econ.) PC Resolution Support Video Compatibility Hor. BenQ Projectors DLP®...


