
User Manual
Page 1
LCD Monitor User Manual GL950A / GL950AM G950A / G950AM GL951A / GL951AM / G951A G955A GL2250 / GL2250M / GL2250HM / GL2250TM G2250 / G2250HM G2255A / G2255 G2251M / G2251TM GL2450 / GL2450M / GL2450HM G2450 / G2450HM GL2750HM / G2750 / G2750HM
LCD Monitor User Manual GL950A / GL950AM G950A / G950AM GL951A / GL951AM / G951A G955A GL2250 / GL2250M / GL2250HM / GL2250TM G2250 / G2250HM G2255A / G2255 G2251M / G2251TM GL2450 / GL2450M / GL2450HM G2450 / G2450HM GL2750HM / G2750 / G2750HM
User Manual
Page 2
...pluggable equipment. Avoid using any liquid, aerosol or glass cleaners. • Slots and openings on the marked label. Further, BenQ Corporation reserves the right to revise this equipment from the wall outlet before cleaning. Always unplug your monitor. Clean the LCD ... covers may be blocked or covered. Copyright Copyright 2011 by any means, electronic, mechanical, magnetic, optical, chemical, manual or otherwise, without obligation of BenQ Corporation to notify any particular purpose. All rights reserved. Please follow these safety instructions for best performance, and long...
...pluggable equipment. Avoid using any liquid, aerosol or glass cleaners. • Slots and openings on the marked label. Further, BenQ Corporation reserves the right to revise this equipment from the wall outlet before cleaning. Always unplug your monitor. Clean the LCD ... covers may be blocked or covered. Copyright Copyright 2011 by any means, electronic, mechanical, magnetic, optical, chemical, manual or otherwise, without obligation of BenQ Corporation to notify any particular purpose. All rights reserved. Please follow these safety instructions for best performance, and long...
User Manual
Page 14
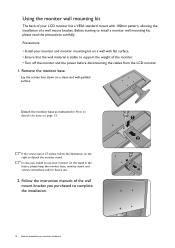
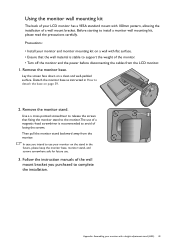
... support the weight of the monitor. • Turn off the monitor and the power before disconnecting the cables from the LCD monitor. 1. Follow the instruction manuals of the wall mount bracket you intend to use . 2. Remove the monitor base. Detach the monitor base as instructed in the future, please keep the...
... support the weight of the monitor. • Turn off the monitor and the power before disconnecting the cables from the LCD monitor. 1. Follow the instruction manuals of the wall mount bracket you intend to use . 2. Remove the monitor base. Detach the monitor base as instructed in the future, please keep the...
User Manual
Page 18
How to upgrade the monitor on an existing computer This instruction details the procedure for manually updating the existing monitor driver software on your model may well function perfectly with other versions of Windows, however, as compatible for your Microsoft Windows ... on page 19. • How to automate the task and guide you have connected, and letting Windows install the corresponding driver files from your BenQ monitor The BenQ LCD Monitor driver for Windows Vista and Windows 7 Operating System (OS). See: • How to install on Windows 7 system on page 20. 18 Getting...
How to upgrade the monitor on an existing computer This instruction details the procedure for manually updating the existing monitor driver software on your model may well function perfectly with other versions of Windows, however, as compatible for your Microsoft Windows ... on page 19. • How to automate the task and guide you have connected, and letting Windows install the corresponding driver files from your BenQ monitor The BenQ LCD Monitor driver for Windows Vista and Windows 7 Operating System (OS). See: • How to install on Windows 7 system on page 20. 18 Getting...
User Manual
Page 21
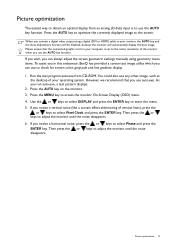
...monitor. 3. Use the or keys to select DISPLAY and press the ENTER key to the screen. If you can always adjust the screen geometric settings manually using a digital (DVI or HDMI) cable to your computer is to use the AUTO key function. When you connect a digital video output using geometry... menu items. To assist you in this endeavour, BenQ has provided a screen test image utility which you notice a horizontal noise, press the or keys to select Phase and press the ENTER key. Please...
...monitor. 3. Use the or keys to select DISPLAY and press the ENTER key to the screen. If you can always adjust the screen geometric settings manually using a digital (DVI or HDMI) cable to your computer is to use the AUTO key function. When you connect a digital video output using geometry... menu items. To assist you in this endeavour, BenQ has provided a screen test image utility which you notice a horizontal noise, press the or keys to select Phase and press the ENTER key. Please...
User Manual
Page 31
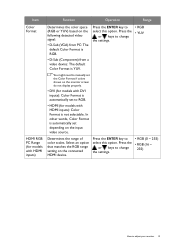
... (for models with HDMI inputs): Color Format is YUV. Press the or keys to change the settings. • RGB • YUV You might need to manually set the Color Format if colors shown on the connected HDMI device.
... (for models with HDMI inputs): Color Format is YUV. Press the or keys to change the settings. • RGB • YUV You might need to manually set the Color Format if colors shown on the connected HDMI device.
User Manual
Page 43
Follow the instruction manuals of the wall mount bracket you intend to use your monitor and monitor mounting kit on page 39. 2. Before starting to detach the base on a ...
Follow the instruction manuals of the wall mount bracket you intend to use your monitor and monitor mounting kit on page 39. 2. Before starting to detach the base on a ...
User Manual
Page 45
...CD, and then select the correct resolution, refresh rate and make adjustments based on these instructions. If your problems remain after checking this manual, please contact your dealer to the monitor). • Check whether the headphone jack is properly connected. • If the external speakers...In is properly connected. • Increase the volume (volume may appear distorted or stretched on the monitor running the monitor at : Support@BenQ.com. The image is displaced in speakers (for models with speakers only): • Remove your headphone and/or external speakers. (If ...
...CD, and then select the correct resolution, refresh rate and make adjustments based on these instructions. If your problems remain after checking this manual, please contact your dealer to the monitor). • Check whether the headphone jack is properly connected. • If the external speakers...In is properly connected. • Increase the volume (volume may appear distorted or stretched on the monitor running the monitor at : Support@BenQ.com. The image is displaced in speakers (for models with speakers only): • Remove your headphone and/or external speakers. (If ...

