GL2450 Series User Manual
Page 7
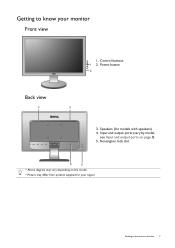
Kensington lock slot 4 5 • Above diagram may vary depending on page 8) 5. Speakers (for your region. Getting to know your monitor Front view 1. Power button 2 Back view 3 3 3. Input and output ports (vary by model, see Input and output ports on the model. • Picture may differ from product supplied for models with speakers) 4. Getting to know your monitor 7 Control buttons 1 2.
Kensington lock slot 4 5 • Above diagram may vary depending on page 8) 5. Speakers (for your region. Getting to know your monitor Front view 1. Power button 2 Back view 3 3 3. Input and output ports (vary by model, see Input and output ports on the model. • Picture may differ from product supplied for models with speakers) 4. Getting to know your monitor 7 Control buttons 1 2.

GL2450 Series User Manual
Page 8
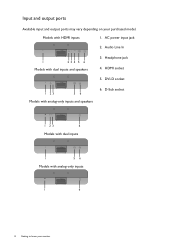
DVI-D socket 1 23 56 Models with HDMI inputs 1. Headphone jack 4. Models with analog-only inputs and speakers 6. AC power input jack 2. Audio Line In 1 23 4 5 6 Models with analog-only inputs 1 6 8 Getting to know your purchased model. D-Sub socket 1 23 6 Models with dual inputs 1 56 Models with dual inputs and speakers 3. HDMI socket 5. Input and output ports Available input and output ports may vary depending on your monitor
DVI-D socket 1 23 56 Models with HDMI inputs 1. Headphone jack 4. Models with analog-only inputs and speakers 6. AC power input jack 2. Audio Line In 1 23 4 5 6 Models with analog-only inputs 1 6 8 Getting to know your purchased model. D-Sub socket 1 23 6 Models with dual inputs 1 56 Models with dual inputs and speakers 3. HDMI socket 5. Input and output ports Available input and output ports may vary depending on your monitor
GL2450 Series User Manual
Page 11
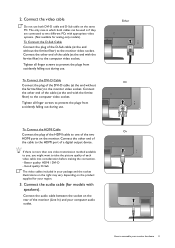
... (at the end with speakers). Connect the audio cable between the socket on the product supplied for models with the ferrite filter) to the HDMI port of the monitor (Line In) and your region. 3. Either Or Or How to assemble your package and the socket illustrations on the right may vary... socket. If there is if they are connected to two different PCs with the ferrite filter) to take the picture quality of the two HDMI ports on the same PC. Better quality: HDMI / DVI-D -
... (at the end with speakers). Connect the audio cable between the socket on the product supplied for models with the ferrite filter) to the HDMI port of the monitor (Line In) and your region. 3. Either Or Or How to assemble your package and the socket illustrations on the right may vary... socket. If there is if they are connected to two different PCs with the ferrite filter) to take the picture quality of the two HDMI ports on the same PC. Better quality: HDMI / DVI-D -
GL2450 Series User Manual
Page 12
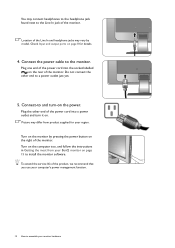
... a power outlet and turn -on the rear of the Line In and headphone jacks may vary by pressing the power button on page 8 for your BenQ monitor on . Location of the monitor. Do not connect the other end of the monitor. Connect-to a power outlet just yet. 5. Connect the power cable... to assemble your computer's power management function. 12 How to the monitor. Turn on the monitor by model. Check Input and output ports on the right of the power cord into the socket labelled on the power. Plug the other end to and turn it on page 15...
... a power outlet and turn -on the rear of the Line In and headphone jacks may vary by pressing the power button on page 8 for your BenQ monitor on . Location of the monitor. Do not connect the other end of the monitor. Connect-to a power outlet just yet. 5. Connect the power cable... to assemble your computer's power management function. 12 How to the monitor. Turn on the monitor by model. Check Input and output ports on the right of the power cord into the socket labelled on the power. Plug the other end to and turn it on page 15...
GL2450 Series User Manual
Page 35
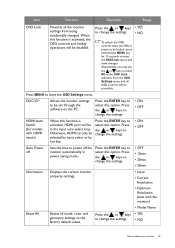
... All Displays the current monitor property settings. • Input • Current Resolution • Optimum Resolution (best with HDMI inputs) When this function is activated, HDMI port will be in the OSD Lock submenu from the OSD Settings menu, and all the monitor settings from being accidentally changed.
... All Displays the current monitor property settings. • Input • Current Resolution • Optimum Resolution (best with HDMI inputs) When this function is activated, HDMI port will be in the OSD Lock submenu from the OSD Settings menu, and all the monitor settings from being accidentally changed.

User Manual
Page 7
Getting to know your monitor 7 Speakers (for your region. Kensington lock slot 4 5 • Above diagram may vary depending on page 8) 5. Getting to know your monitor Front view 1. Control buttons 1 2. Power button 2 Back view 3 3 3. Input and output ports (vary by model, see Input and output ports on the model. • Picture may differ from product supplied for models with speakers) 4.
Getting to know your monitor 7 Speakers (for your region. Kensington lock slot 4 5 • Above diagram may vary depending on page 8) 5. Getting to know your monitor Front view 1. Control buttons 1 2. Power button 2 Back view 3 3 3. Input and output ports (vary by model, see Input and output ports on the model. • Picture may differ from product supplied for models with speakers) 4.
User Manual
Page 8
AC power input jack 2. Input and output ports Available input and output ports may vary depending on your monitor D-Sub socket 1 23 6 Models with dual inputs 1 56 Models with HDMI inputs 1. HDMI socket 5. Audio Line In 1 23 4 5 6 Models with analog-only inputs and speakers 6. DVI-D socket 1 23 56 Models with dual inputs and speakers 3. Headphone jack 4. Models with analog-only inputs 1 6 8 Getting to know your purchased model.
AC power input jack 2. Input and output ports Available input and output ports may vary depending on your monitor D-Sub socket 1 23 6 Models with dual inputs 1 56 Models with HDMI inputs 1. HDMI socket 5. Audio Line In 1 23 4 5 6 Models with analog-only inputs and speakers 6. DVI-D socket 1 23 56 Models with dual inputs and speakers 3. Headphone jack 4. Models with analog-only inputs 1 6 8 Getting to know your purchased model.

User Manual
Page 11
... of the DVI-D cable (at the end without the ferrite filter) to assemble your computer audio outlet. Connect the other end of the two HDMI ports on the same PC. Tighten all finger screws to take the picture quality of the monitor (Line In) and your monitor hardware 11 Better quality... D-Sub cable on the monitor. Connect the audio cable between the socket on the product supplied for models with the ferrite filter) to the HDMI port of the cable to the computer video socket. Connect the other end of a digital output device. To Connect the D-Sub Cable Connect the plug of...
... of the DVI-D cable (at the end without the ferrite filter) to assemble your computer audio outlet. Connect the other end of the two HDMI ports on the same PC. Tighten all finger screws to take the picture quality of the monitor (Line In) and your monitor hardware 11 Better quality... D-Sub cable on the monitor. Connect the audio cable between the socket on the product supplied for models with the ferrite filter) to the HDMI port of the cable to the computer video socket. Connect the other end of a digital output device. To Connect the D-Sub Cable Connect the plug of...

User Manual
Page 12
... install the monitor software. Plug one end of the product, we recommend that you use your computer's power management function. 12 How to assemble your BenQ monitor on the right of the monitor. Turn on the power. To extend the service life of the power cord into a power outlet and turn... the headphone jack found next to and turn it on the rear of the monitor. Turn on page 8 for your region. Check Input and output ports on the monitor by model. You may differ from your monitor hardware Plug the other end to the monitor.
... install the monitor software. Plug one end of the product, we recommend that you use your computer's power management function. 12 How to assemble your BenQ monitor on the right of the monitor. Turn on the power. To extend the service life of the power cord into a power outlet and turn... the headphone jack found next to and turn it on the rear of the monitor. Turn on page 8 for your region. Check Input and output ports on the monitor by model. You may differ from your monitor hardware Plug the other end to the monitor.

User Manual
Page 35
... when the OSD is preset to be locked, press and hold the MENU key for models with HDMI inputs) When this function is activated, HDMI port will be in the input auto select loop. Otherwise, HDMI can only be selected by input select or by hot key.
... when the OSD is preset to be locked, press and hold the MENU key for models with HDMI inputs) When this function is activated, HDMI port will be in the input auto select loop. Otherwise, HDMI can only be selected by input select or by hot key.
