User Manual
Page 13
... stand arm, and then push the screwdriver against the release button inside the hole. Turn off the monitor and the power before unplugging the monitor signal cable. Sliding or scraping the monitor around on the right to detach the monitor base. 1 2 1 2 1 2 3 How to assemble your desk will crack the glass or...
... stand arm, and then push the screwdriver against the release button inside the hole. Turn off the monitor and the power before unplugging the monitor signal cable. Sliding or scraping the monitor around on the right to detach the monitor base. 1 2 1 2 1 2 3 How to assemble your desk will crack the glass or...
User Manual
Page 23
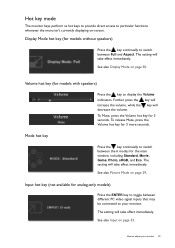
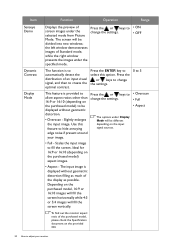
Display Mode hot key (for analog-only models) Press the ENTER key to toggle between different PC video signal inputs that may be connected to your monitor 23 The setting will take effect immediately. See also Input on page 30. How to adjust your ...
Display Mode hot key (for analog-only models) Press the ENTER key to toggle between different PC video signal inputs that may be connected to your monitor 23 The setting will take effect immediately. See also Input on page 30. How to adjust your ...
User Manual
Page 25
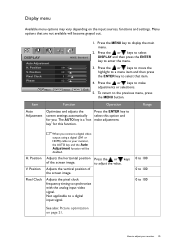
... menu, press the MENU button. How to select that are not available will be disabled. To return to synchronize with the analog input video signal. Adjusts the horizontal position of the screen image. Menu options that item. 4. Press the or keys to display the main menu. 2. Position... on the input sources, functions and settings. Adjusts the vertical position of the screen image. Not applicable to a digital input signal. 0 to 100 0 to 100 0 to enter the menu. 3. Position V. Display menu Available menu options may vary depending on page 21.
... menu, press the MENU button. How to select that are not available will be disabled. To return to synchronize with the analog input video signal. Adjusts the horizontal position of the screen image. Menu options that item. 4. Press the or keys to display the main menu. 2. Position... on the input sources, functions and settings. Adjusts the vertical position of the screen image. Not applicable to a digital input signal. 0 to 100 0 to 100 0 to enter the menu. 3. Position V. Display menu Available menu options may vary depending on page 21.

User Manual
Page 26
Range 0 to 63 See also: Picture optimization on page 21. 26 How to synchronize with the analog input video signal. Item Phase Function Operation Adjusts the pixel clock phase timing to adjust your monitor Press the or keys to a digital input signal. Not applicable to adjust the value.
Range 0 to 63 See also: Picture optimization on page 21. 26 How to synchronize with the analog input video signal. Item Phase Function Operation Adjusts the pixel clock phase timing to adjust your monitor Press the or keys to a digital input signal. Not applicable to adjust the value.
User Manual
Page 30
... or keys to change the settings. • ON • OFF The function is to automatically detect the distribution of an input visual signal, and then to hide annoying edge noise if present around your monitor Depending on the purchased model) aspect images. • Aspect - ...8226; Overscan - Use this option. To find out the monitor aspect ratio of the purchased model, please check the Specification document on the input signal sources. • Overscan • Full • Aspect • Full - Slightly enlarges the input image. Item Senseye Demo Dynamic Contrast Display ...
... or keys to change the settings. • ON • OFF The function is to automatically detect the distribution of an input visual signal, and then to hide annoying edge noise if present around your monitor Depending on the purchased model) aspect images. • Aspect - ...8226; Overscan - Use this option. To find out the monitor aspect ratio of the purchased model, please check the Specification document on the input signal sources. • Overscan • Full • Aspect • Full - Slightly enlarges the input image. Item Senseye Demo Dynamic Contrast Display ...
User Manual
Page 31
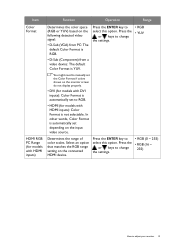
Press the ENTER key to select this option. Select an option that matches the RGB range setting on the following detected video signal: • D-Sub (VGA) from PC: The default Color Format is RGB. • D-Sub (Component) from a video device: The default Color Format is YUV. HDMI RGB ...
Press the ENTER key to select this option. Select an option that matches the RGB range setting on the following detected video signal: • D-Sub (VGA) from PC: The default Color Format is RGB. • D-Sub (Component) from a video device: The default Color Format is YUV. HDMI RGB ...
User Manual
Page 39
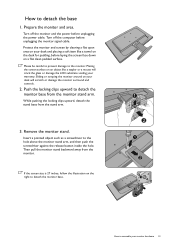
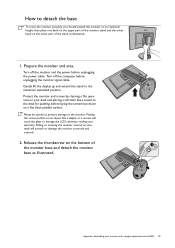
... power before unplugging the power cable. Turn off the computer before laying the screen face down on the desk for padding, before unplugging the monitor signal cable. How to detach the base To move the monitor properly, you should extend the monitor to the maximum extended position. Prepare the monitor and...
... power before unplugging the power cable. Turn off the computer before laying the screen face down on the desk for padding, before unplugging the monitor signal cable. How to detach the base To move the monitor properly, you should extend the monitor to the maximum extended position. Prepare the monitor and...
User Manual
Page 44
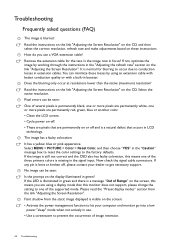
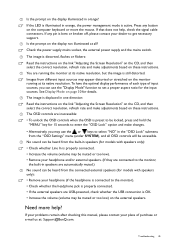
...illuminated in green and there is a message "Out of Range" on the screen, this means one of the three primary colors is missing in the signal input. Troubleshooting Frequently asked questions (FAQ) The image is blurred: Read the instructions on the link "Adjusting the Screen Resolution" on the CD, and... seen: One of image retention. 44 Troubleshooting If any pin is bent or broken off and is normal for the test. Now check the signal cable connectors. Remove the extension cable for blurring to occur due to conduction losses in use a VGA extension cable? Read the instructions on the...
...illuminated in green and there is a message "Out of Range" on the screen, this means one of the three primary colors is missing in the signal input. Troubleshooting Frequently asked questions (FAQ) The image is blurred: Read the instructions on the link "Adjusting the Screen Resolution" on the CD, and... seen: One of image retention. 44 Troubleshooting If any pin is bent or broken off and is normal for the test. Now check the signal cable connectors. Remove the extension cable for blurring to occur due to conduction losses in use a VGA extension cable? Read the instructions on the...
User Manual
Page 45
... Screen Resolution" on the CD, and then select the correct resolution, refresh rate and make adjustments based on the monitor running the monitor at : Support@BenQ.com. If your problems remain after checking this manual, please contact your place of input sources, you may appear distorted or stretched on these instructions... the computer keyboard or move the mouse. The OSD controls are USB-powered, check whether the USB connection is active. Need more help , check the signal cable connectors. Is the prompt on the external speakers.
... Screen Resolution" on the CD, and then select the correct resolution, refresh rate and make adjustments based on the monitor running the monitor at : Support@BenQ.com. If your problems remain after checking this manual, please contact your place of input sources, you may appear distorted or stretched on these instructions... the computer keyboard or move the mouse. The OSD controls are USB-powered, check whether the USB connection is active. Need more help , check the signal cable connectors. Is the prompt on the external speakers.
GL2250 Data Sheet
Page 1
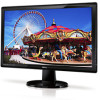
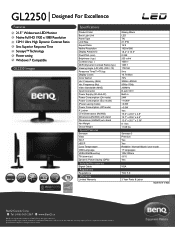
...HD 1920 x 1080 Resolution 12M:1 Ultra High Dynamic Contrast Ratio 5ms Superior Response Time Senseye™ Technology Power saving Windows 7 Compatible GL2250 Images Specifications Product Color Back Light Unit Panel Type LCD Size Aspect Ratio Native Resolution Display Area(inch) Pixel Pitch (mm) Brightness... Features Senseye Vista Win7 HDCP Color Temperature OSD Language VESA Wall Mounting Tilt (down/up) Dynamic Power Saving (DPS) Included Accessories Signal Cable Regulations Regulations Warranty Limited Warranty Glossy Black LED TN 21.5"W 16:9 1920x1080 18.4" X 10.5" 0.248 250 cd/㎡ ...
...HD 1920 x 1080 Resolution 12M:1 Ultra High Dynamic Contrast Ratio 5ms Superior Response Time Senseye™ Technology Power saving Windows 7 Compatible GL2250 Images Specifications Product Color Back Light Unit Panel Type LCD Size Aspect Ratio Native Resolution Display Area(inch) Pixel Pitch (mm) Brightness... Features Senseye Vista Win7 HDCP Color Temperature OSD Language VESA Wall Mounting Tilt (down/up) Dynamic Power Saving (DPS) Included Accessories Signal Cable Regulations Regulations Warranty Limited Warranty Glossy Black LED TN 21.5"W 16:9 1920x1080 18.4" X 10.5" 0.248 250 cd/㎡ ...


