
User Manual
Page 3
... to choose the right Refresh Rate 42 How to set the Picture Optimization 45 How to adjust your Monitor 46 An Overview of the Control Panel 46 Hot Key Mode ...46 Main Menu Mode ...47 Troubleshooting ...55 Frequently Asked Questions (FAQ 55 Need More Help? ...56 Supported operating modes 57 Specifications...
... to choose the right Refresh Rate 42 How to set the Picture Optimization 45 How to adjust your Monitor 46 An Overview of the Control Panel 46 Hot Key Mode ...46 Main Menu Mode ...47 Troubleshooting ...55 Frequently Asked Questions (FAQ 55 Need More Help? ...56 Supported operating modes 57 Specifications...

User Manual
Page 12
After connecting the power cord to an AC power socket, turn on your computer and press the Power button on the top panel of your monitor is designed to allow you to the place. Adjust the viewing angle Your LCD monitor is specifically designed for plugging your monitor ... install your WebCam in order and fix the back cover to plug them into the USB ports on the side panel of the monitor. Note: The USB port on the side panel of power. Collect cables in . 8. If you wish to attach other USB devices, we recommend you to adjust it to...
After connecting the power cord to an AC power socket, turn on your computer and press the Power button on the top panel of your monitor is designed to allow you to the place. Adjust the viewing angle Your LCD monitor is specifically designed for plugging your monitor ... install your WebCam in order and fix the back cover to plug them into the USB ports on the side panel of the monitor. Note: The USB port on the side panel of power. Collect cables in . 8. If you wish to attach other USB devices, we recommend you to adjust it to...
User Manual
Page 14
From the "Display properties" window, select the "Settings" tab. button in the Control Panel. 4. Double click the "Display" icon in the bottom right corner. 14 How to install your monitor's software Click the "Advanced..." 3.
From the "Display properties" window, select the "Settings" tab. button in the Control Panel. 4. Double click the "Display" icon in the bottom right corner. 14 How to install your monitor's software Click the "Advanced..." 3.

User Manual
Page 18
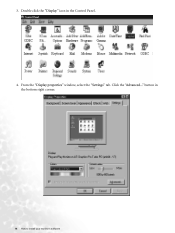
1. From the "Display Properties" window, select the "Settings" tab. button in the bottom right corner. 18 How to install your monitor's software Open the control panel and double-click "Display" icon. 2. Click the "Advanced..."
1. From the "Display Properties" window, select the "Settings" tab. button in the bottom right corner. 18 How to install your monitor's software Open the control panel and double-click "Display" icon. 2. Click the "Advanced..."

User Manual
Page 23
Open the Control Panel and double click on the "Display" icon. Click "Start" then "Settings". 3. How to install your monitor's software 23 2.
Open the Control Panel and double click on the "Display" icon. Click "Start" then "Settings". 3. How to install your monitor's software 23 2.
User Manual
Page 29
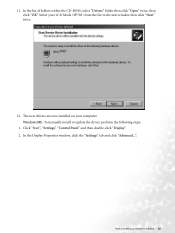
Select your computer. The new drivers are now installed on your LCD Mode (FP783) from the list in the next window then click "Next" twice. 12. Windows ME. How to install your monitor's software 29 In the Display Properties window, click the "Settings" tab and click "Advanced...". In the list of folders within the CD-ROM, select "Drivers" folder then click "Open" twice, then click "OK". Click "Start", "Settings", "Control Panel" and then double-click "Display". 2. 11. To manually install or update the driver, perform the following steps: 1.
Select your computer. The new drivers are now installed on your LCD Mode (FP783) from the list in the next window then click "Next" twice. 12. Windows ME. How to install your monitor's software 29 In the Display Properties window, click the "Settings" tab and click "Advanced...". In the list of folders within the CD-ROM, select "Drivers" folder then click "Open" twice, then click "OK". Click "Start", "Settings", "Control Panel" and then double-click "Display". 2. 11. To manually install or update the driver, perform the following steps: 1.
User Manual
Page 40
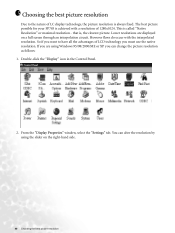
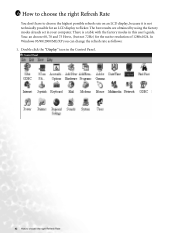
... to the nature of LCD technology you must use the native resolution. This is , the clearest picture. Double-click the "Display" icon in the Control Panel. 2. The best picture possible for your FP783 is always fixed.
... to the nature of LCD technology you must use the native resolution. This is , the clearest picture. Double-click the "Display" icon in the Control Panel. 2. The best picture possible for your FP783 is always fixed.
User Manual
Page 42
... Rate The best results are obtained by using the factory modes already set in this user's guide. Double click the "Display" icon in the Control Panel. 42 How to flicker. There is not technically possible for the native resolution of 1280x1024. In Windows 95/98/2000/ME/XP you can change...
... Rate The best results are obtained by using the factory modes already set in this user's guide. Double click the "Display" icon in the Control Panel. 42 How to flicker. There is not technically possible for the native resolution of 1280x1024. In Windows 95/98/2000/ME/XP you can change...

User Manual
Page 45
As you can also use the ikey function. Press "Enter" on control panel to select "Phase" and also press "Enter" key again. To make sure the "iKey" function performs well, you have to use one of the supported ... u to adjust the monitor untill the noise disappears. 4. If the "iKey" does not work properly and the "NON PRESET MODE" message is on the control panel and the monitor will find a list of the supported modes. this manual. Now, press t or u key to adjust the monitor untill the noise disappears. You...
As you can also use the ikey function. Press "Enter" on control panel to select "Phase" and also press "Enter" key again. To make sure the "iKey" function performs well, you have to use one of the supported ... u to adjust the monitor untill the noise disappears. 4. If the "iKey" does not work properly and the "NON PRESET MODE" message is on the control panel and the monitor will find a list of the supported modes. this manual. Now, press t or u key to adjust the monitor untill the noise disappears. You...
User Manual
Page 46
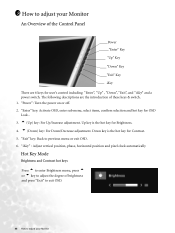
... t or u key to adjust the degree of brightness and press "Exit" to exit OSD. 46 How to adjust your Monitor An Overview of the Control Panel Power "Enter" Key "Up" Key "Down" Key "Exit" Key iKey There are the introduction of these keys & switch. 1. 8 How to adjust your Monitor "Exit" key...
... t or u key to adjust the degree of brightness and press "Exit" to exit OSD. 46 How to adjust your Monitor An Overview of the Control Panel Power "Enter" Key "Up" Key "Down" Key "Exit" Key iKey There are the introduction of these keys & switch. 1. 8 How to adjust your Monitor "Exit" key...
