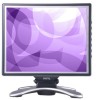

User Manual
Page 2
... • This product should never be blocked or covered. Clean the LCD monitor surface with respect to the contents hereof and specifically disclaims any warranties, merchantability or fitness for servicing. 2 Copyright If you to notify any liquid, aerosol or glass cleaners. &#...changes. iv Care And Cleaning • Cleaning. If any particular purpose. Always unplug your dealer or local power company. ii Disclaimer BENQ Corporation makes no representations or warranties, either expressed or implied, with a lint-free, non-abrasive cloth. i Copyright Copyright ©...
... • This product should never be blocked or covered. Clean the LCD monitor surface with respect to the contents hereof and specifically disclaims any warranties, merchantability or fitness for servicing. 2 Copyright If you to notify any liquid, aerosol or glass cleaners. &#...changes. iv Care And Cleaning • Cleaning. If any particular purpose. Always unplug your dealer or local power company. ii Disclaimer BENQ Corporation makes no representations or warranties, either expressed or implied, with a lint-free, non-abrasive cloth. i Copyright Copyright ©...

User Manual
Page 3
... Panel 46 Hot Key Mode ...46 Main Menu Mode ...47 Troubleshooting ...55 Frequently Asked Questions (FAQ 55 Need More Help? ...56 Supported operating modes 57 Specifications ...58 Table of Contents 3
... Panel 46 Hot Key Mode ...46 Main Menu Mode ...47 Troubleshooting ...55 Frequently Asked Questions (FAQ 55 Need More Help? ...56 Supported operating modes 57 Specifications ...58 Table of Contents 3

User Manual
Page 12
Adjust the viewing angle Your LCD monitor is specifically designed for plugging your WebCam in order and fix the back cover to plug them into the USB ports on the top panel of your ...
Adjust the viewing angle Your LCD monitor is specifically designed for plugging your WebCam in order and fix the back cover to plug them into the USB ports on the top panel of your ...
User Manual
Page 20
Select the "Browse" button. 20 How to install your monitor's software Now click the "Have Disk" button in a specific location, so you can select the driver you want." Another window appears. 5. and press "Next". 6. Select "Display a list of all drivers in the bottom right corner.
Select the "Browse" button. 20 How to install your monitor's software Now click the "Have Disk" button in a specific location, so you can select the driver you want." Another window appears. 5. and press "Next". 6. Select "Display a list of all drivers in the bottom right corner.

User Manual
Page 27
Click "Browse", the "Located File" will pop up . 8. In the next window, click "Have Disk", then "Install From Disk" window will pop up . How to install your monitor's software 27 Select "Display a list of the known drivers for this device so that I can choose a specific driver" then click "Next". 9.
Click "Browse", the "Located File" will pop up . 8. In the next window, click "Have Disk", then "Install From Disk" window will pop up . How to install your monitor's software 27 Select "Display a list of the known drivers for this device so that I can choose a specific driver" then click "Next". 9.

User Manual
Page 31
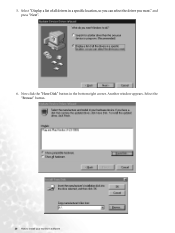
Choose "Display a list of all the drivers in a specific location, so you can select the driver you want" and click "Next". 6. 5. How to install your monitor's software 31 Choose "Monitor" from the list and then click "Next".
Choose "Display a list of all the drivers in a specific location, so you can select the driver you want" and click "Next". 6. 5. How to install your monitor's software 31 Choose "Monitor" from the list and then click "Next".

User Manual
Page 32
7. Choose "Display a list of all the drivers in a specific location, so you can select the driver you want.". 8. Click "Have disk" and then click "Browse...". 32 How to install your monitor's software
7. Choose "Display a list of all the drivers in a specific location, so you can select the driver you want.". 8. Click "Have disk" and then click "Browse...". 32 How to install your monitor's software