
User Manual
Page 2
..., stored in a retrieval system or translated into this publication and to make changes from the wall outlet before cleaning. Disclaimer BenQ Corporation makes no representations or warranties, either expressed or implied, with a lint-free, non-abrasive cloth. Avoid using any of...any kind into any language or computer language, in the contents hereof without the prior written permission of BenQ Corporation to the contents hereof and specifically disclaims any warranties, merchantability or fitness for ventilation. Care And Cleaning • Cleaning. All rights reserved...
..., stored in a retrieval system or translated into this publication and to make changes from the wall outlet before cleaning. Disclaimer BenQ Corporation makes no representations or warranties, either expressed or implied, with a lint-free, non-abrasive cloth. Avoid using any of...any kind into any language or computer language, in the contents hereof without the prior written permission of BenQ Corporation to the contents hereof and specifically disclaims any warranties, merchantability or fitness for ventilation. Care And Cleaning • Cleaning. All rights reserved...
User Manual
Page 3
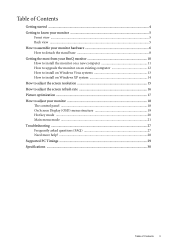
... to know your monitor 5 Front view ...5 Back view ...5 How to assemble your monitor hardware 6 How to detach the stand base 8 Getting the most from your BenQ monitor 10 How to install the monitor on a new computer 11 How to upgrade the monitor on an existing computer 12 How to install on... structure 19 Hot key mode ...20 Main menu mode ...21 Troubleshooting ...27 Frequently asked questions (FAQ 27 Need more help? ...28 Supported PC Timings ...29 Specifications ...30 Table of Contents 3
... to know your monitor 5 Front view ...5 Back view ...5 How to assemble your monitor hardware 6 How to detach the stand base 8 Getting the most from your BenQ monitor 10 How to install the monitor on a new computer 11 How to upgrade the monitor on an existing computer 12 How to install on... structure 19 Hot key mode ...20 Main menu mode ...21 Troubleshooting ...27 Frequently asked questions (FAQ 27 Need more help? ...28 Supported PC Timings ...29 Specifications ...30 Table of Contents 3
User Manual
Page 14
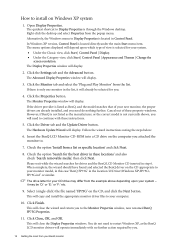
... specific location' and click Next. 8. Click the Driver tab and the Update Driver button. Check the option 'Install from the list. The drive letter for your CD drive may be selected for drives and the BenQ LCD Monitor CD inserted in the location 'd:\Driver\Windows XP\FP75G\ FP75G....Category view, click Start | Control Panel | Appearance and Themes | Change the screen resolution. How to the Monitor Properties window, now renamed BenQ FP75G Properties. 11. Open Display Properties. The quickest shortcut to Display Properties is only one monitor in the list, it may differ from the ...
... specific location' and click Next. 8. Click the Driver tab and the Update Driver button. Check the option 'Install from the list. The drive letter for your CD drive may be selected for drives and the BenQ LCD Monitor CD inserted in the location 'd:\Driver\Windows XP\FP75G\ FP75G....Category view, click Start | Control Panel | Appearance and Themes | Change the screen resolution. How to the Monitor Properties window, now renamed BenQ FP75G Properties. 11. Open Display Properties. The quickest shortcut to Display Properties is only one monitor in the list, it may differ from the ...
User Manual
Page 16
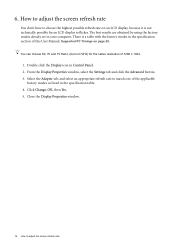
...for an LCD display to choose the highest possible refresh rate on an LCD display, because it is a table with the factory modes in the specification table. 4. Select the Adapter tab, and select an appropriate refresh rate to adjust the screen refresh rate How to adjust the screen refresh rate... You don't have to flicker. Close the Display Properties window. 16 How to match one of the applicable factory modes as listed in the specification section of 1280 x 1024. 1. There is not technically possible for the native resolution of this User Manual: Supported PC Timings on page 29. ...
...for an LCD display to choose the highest possible refresh rate on an LCD display, because it is a table with the factory modes in the specification table. 4. Select the Adapter tab, and select an appropriate refresh rate to adjust the screen refresh rate How to adjust the screen refresh rate... You don't have to flicker. Close the Display Properties window. 16 How to match one of the applicable factory modes as listed in the specification section of 1280 x 1024. 1. There is not technically possible for the native resolution of this User Manual: Supported PC Timings on page 29. ...