

User Manual
Page 2
Disclaimer BenQ Corporation makes no representations or warranties, either expressed or implied, with a lint-free, non-abrasive cloth. Clean the LCD monitor surface with respect to the contents hereof and specifically disclaims any warranties, merchantability or fitness for any particular purpose. If... device for ventilation. Always unplug your monitor from time to time in the contents hereof without the prior written permission of BenQ Corporation. Avoid using any of the above mentioned misuse or other risks. Servicing • Do not attempt to service this product. Further...
Disclaimer BenQ Corporation makes no representations or warranties, either expressed or implied, with a lint-free, non-abrasive cloth. Clean the LCD monitor surface with respect to the contents hereof and specifically disclaims any warranties, merchantability or fitness for any particular purpose. If... device for ventilation. Always unplug your monitor from time to time in the contents hereof without the prior written permission of BenQ Corporation. Avoid using any of the above mentioned misuse or other risks. Servicing • Do not attempt to service this product. Further...

User Manual
Page 4
The fitted foam packing is ideal for a replacement. Getting started 1. BenQ LCD Monitor Quick Start Guide CD-ROM Power Cord (Picture may differ from product supplied for your region) Signal Cable: D-Sub Consider keeping the box and packaging in storage for use in the future when you have the following items. If any are missing or damaged, please contact the place of purchase for protecting the monitor during transport. 4 Getting started When unpacking please check you may need to transport the monitor.
The fitted foam packing is ideal for a replacement. Getting started 1. BenQ LCD Monitor Quick Start Guide CD-ROM Power Cord (Picture may differ from product supplied for your region) Signal Cable: D-Sub Consider keeping the box and packaging in storage for use in the future when you have the following items. If any are missing or damaged, please contact the place of purchase for protecting the monitor during transport. 4 Getting started When unpacking please check you may need to transport the monitor.

User Manual
Page 6
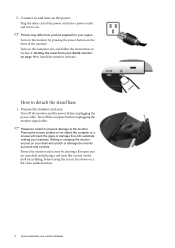
... lay the screen face down on a flat even surface. Sliding or scraping the monitor around on your desk will crack the glass or damage the LCD substrate voiding your desk and placing a soft item like a stapler or a mouse will scratch or damage the monitor surround and controls. Orient and align the...
... lay the screen face down on a flat even surface. Sliding or scraping the monitor around on your desk will crack the glass or damage the LCD substrate voiding your desk and placing a soft item like a stapler or a mouse will scratch or damage the monitor surround and controls. Orient and align the...
User Manual
Page 8
... padding, before laying the screen face down on . Sliding or scraping the monitor around on your desk will crack the glass or damage the LCD substrate voiding your BenQ monitor on page 10 to and turn it on a flat clean padded surface. 8 How to assemble your region. 5. Connect-to install the monitor...
... padding, before laying the screen face down on . Sliding or scraping the monitor around on your desk will crack the glass or damage the LCD substrate voiding your BenQ monitor on page 10 to and turn it on a flat clean padded surface. 8 How to assemble your region. 5. Connect-to install the monitor...

User Manual
Page 10
...monitor, you must be logged on as an Administrator or as provided on your computer. 10 Getting the most benefit from installing software on the BenQ LCD Monitor CD-ROM. See: • How to install the monitor on a new computer on page 11. • How to upgrade the monitor...on your computer (after connecting the monitor to your Windows computer, you should install the custom BenQ LCD Monitor driver software as a member of the Administrators group in order to successfully install the BenQ LCD Monitor driver software. In either case however, the very next time you turn on page 12...
...monitor, you must be logged on as an Administrator or as provided on your computer. 10 Getting the most benefit from installing software on the BenQ LCD Monitor CD-ROM. See: • How to install the monitor on a new computer on page 11. • How to upgrade the monitor...on your computer (after connecting the monitor to your Windows computer, you should install the custom BenQ LCD Monitor driver software as a member of the Administrators group in order to successfully install the BenQ LCD Monitor driver software. In either case however, the very next time you turn on page 12...

User Manual
Page 11
Follow the instructions in How to assemble your monitor as "BenQ FP75G" and click Next. 6. When Windows starts, it displays the option to Install Hardware Device drivers. 2. Check the option for which the BenQ LCD Monitor is only suitable for a computer which has never had another monitor connected to... a monitor driver installed before , and for CD-ROM drives (uncheck all others) and click Next. 5. Restart the computer. Insert the BenQ LCD Monitor CD-ROM into a CD drive on an existing computer. 1. This instruction is the first ever monitor to be connected to it (...
Follow the instructions in How to assemble your monitor as "BenQ FP75G" and click Next. 6. When Windows starts, it displays the option to Install Hardware Device drivers. 2. Check the option for which the BenQ LCD Monitor is only suitable for a computer which has never had another monitor connected to... a monitor driver installed before , and for CD-ROM drives (uncheck all others) and click Next. 5. Restart the computer. Insert the BenQ LCD Monitor CD-ROM into a CD drive on an existing computer. 1. This instruction is the first ever monitor to be connected to it (...
User Manual
Page 12
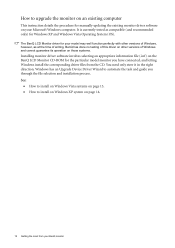
... other versions of Windows and cannot guarantee its operation on those systems. Installing monitor driver software involves selecting an appropriate information file (.inf) on the BenQ LCD Monitor CD-ROM for the particular model monitor you through the file selection and installation process. How to upgrade the monitor on an existing computer... other versions of Windows, however, as compatible (and recommended only) for your Microsoft Windows computer. You need only steer it in the right direction. The BenQ LCD Monitor driver for Windows XP and Windows Vista Operating System (OS).
... other versions of Windows and cannot guarantee its operation on those systems. Installing monitor driver software involves selecting an appropriate information file (.inf) on the BenQ LCD Monitor CD-ROM for the particular model monitor you through the file selection and installation process. How to upgrade the monitor on an existing computer... other versions of Windows, however, as compatible (and recommended only) for your Microsoft Windows computer. You need only steer it in the right direction. The BenQ LCD Monitor driver for Windows XP and Windows Vista Operating System (OS).

User Manual
Page 13
...computer. 7. Open Display Settings. This will copy and install the appropriate monitor driver files to restart Windows Vista, as the BenQ LCD monitor drivers will operate immediately with no further action required by you. Click the Advanced Settings button. The Generic PnP Monitor... Properties window will display. 2. Click Close. Click 'Browse' and select Driver>Windows Vista>FP75G from the popup menu. In the Update Driver Software window, select the option 'Browse my computer for driver software'. 8. Select Display ...
...computer. 7. Open Display Settings. This will copy and install the appropriate monitor driver files to restart Windows Vista, as the BenQ LCD monitor drivers will operate immediately with no further action required by you. Click the Advanced Settings button. The Generic PnP Monitor... Properties window will display. 2. Click Close. Click 'Browse' and select Driver>Windows Vista>FP75G from the popup menu. In the Update Driver Software window, select the option 'Browse my computer for driver software'. 8. Select Display ...
User Manual
Page 14
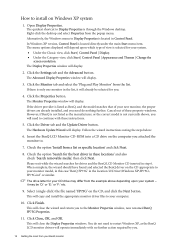
... monitor model, in this case 'BenQ FP75G' in the location 'd:\Driver\Windows XP\FP75G\ FP75G.inf ' or similar. This will close the Display Properties windows. The Monitor Properties window will display. If the driver provider is not listed as the BenQ LCD monitor drivers will close the wizard ... CD, and click the Next button. Click Finish. Alternatively, the Windows menu to the Monitor Properties window, now renamed BenQ FP75G Properties. 11. Insert the BenQ LCD Monitor CD-ROM into a CD drive on Windows XP system 1. You do nothing further. Right-click the desktop and select...
... monitor model, in this case 'BenQ FP75G' in the location 'd:\Driver\Windows XP\FP75G\ FP75G.inf ' or similar. This will close the Display Properties windows. The Monitor Properties window will display. If the driver provider is not listed as the BenQ LCD monitor drivers will close the wizard ... CD, and click the Next button. Click Finish. Alternatively, the Windows menu to the Monitor Properties window, now renamed BenQ FP75G Properties. 11. Insert the BenQ LCD Monitor CD-ROM into a CD drive on Windows XP system 1. You do nothing further. Right-click the desktop and select...

User Manual
Page 15
...tab. Click OK then Yes. 4. How to adjust the screen resolution. You can occur with a resolution of 1280 x 1024 on your FP75G is achieved with the interpolated resolution depending upon the image type and its initial resolution. If you should select the native resolution setting of 1280... x 1024. Select the recommended resolution of liquid crystal display (LCD) technology, the picture resolution is interpolated and may not accurately display the screen image as well as it could do at the native ...
...tab. Click OK then Yes. 4. How to adjust the screen resolution. You can occur with a resolution of 1280 x 1024 on your FP75G is achieved with the interpolated resolution depending upon the image type and its initial resolution. If you should select the native resolution setting of 1280... x 1024. Select the recommended resolution of liquid crystal display (LCD) technology, the picture resolution is interpolated and may not accurately display the screen image as well as it could do at the native ...
User Manual
Page 16
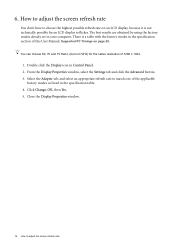
You can choose 60, 70 and 75 Hertz, (but not 72Hz) for an LCD display to match one of 1280 x 1024. 1. From the Display Properties window, select the Settings tab and click the Advanced button. 3. Select the Adapter tab, .... 4. The best results are obtained by using the factory modes already set in the specification section of this User Manual: Supported PC Timings on an LCD display, because it is a table with the factory modes in your computer. 6.
You can choose 60, 70 and 75 Hertz, (but not 72Hz) for an LCD display to match one of 1280 x 1024. 1. From the Display Properties window, select the Settings tab and click the Advanced button. 3. Select the Adapter tab, .... 4. The best results are obtained by using the factory modes already set in the specification section of this User Manual: Supported PC Timings on an LCD display, because it is a table with the factory modes in your computer. 6.
User Manual
Page 27
... blurring to occur due to prevent the occurrence of several pixels is permanently black, one or more pixels are permanently on the display illuminated in LCD technology. Pixel errors can be seen: One of image retention. Is the prompt on or off . • These are pixels that occurs in orange?... If the LED is a natural defect that are permanently red, green, blue or another color. • Clean the LCD screen. • Cycle power on-off and is illuminated in the signal input. 9. Is the image now in the "Caution" message box to reset the...
... blurring to occur due to prevent the occurrence of several pixels is permanently black, one or more pixels are permanently on the display illuminated in LCD technology. Pixel errors can be seen: One of image retention. Is the prompt on or off . • These are pixels that occurs in orange?... If the LED is a natural defect that are permanently red, green, blue or another color. • Clean the LCD screen. • Cycle power on-off and is illuminated in the signal input. 9. Is the image now in the "Caution" message box to reset the...


