

User Manual
Page 2
... projected image size 17 Connection 19 Connecting video source devices........20 Playing sound through the projector 21 Operation 22 Starting up the projector 22 Adjusting the projected image 23 Using the menus 25 Securing the projector 26 Utilizing the password function ...........26 Switching input signal 29 Magnifying and searching for details ...30 Selecting the aspect ratio 30 Optimizing the image 32 Setting the presentation timer 35 Remote paging operations 36 Freezing the image 37 Hiding the image 37 Locking control...
... projected image size 17 Connection 19 Connecting video source devices........20 Playing sound through the projector 21 Operation 22 Starting up the projector 22 Adjusting the projected image 23 Using the menus 25 Securing the projector 26 Utilizing the password function ...........26 Switching input signal 29 Magnifying and searching for details ...30 Selecting the aspect ratio 30 Optimizing the image 32 Setting the presentation timer 35 Remote paging operations 36 Freezing the image 37 Hiding the image 37 Locking control...
User Manual
Page 3
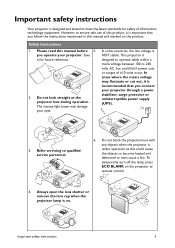
... protector or uninterruptible power supply (UPS). 3. Do not look straight at the projector lens during operation. In some countries, the line voltage is on the projector or remote control. 4. In areas where the mains voltage may damage your projector. Refer servicing to become heated and deformed or even cause a fire. Always open the lens shutter or remove the lens cap when the projector lamp is NOT...
... protector or uninterruptible power supply (UPS). 3. Do not look straight at the projector lens during operation. In some countries, the line voltage is on the projector or remote control. 4. In areas where the mains voltage may damage your projector. Refer servicing to become heated and deformed or even cause a fire. Always open the lens shutter or remove the lens cap when the projector lamp is NOT...
User Manual
Page 6
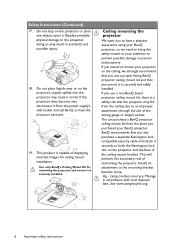
... role of displaying inverted images for mounting the projector and ensure it is a safety risk that you also purchase a separate Kensington lock compatible security cable and attach it to the mounting bracket become wet, disconnect it is securely and safely installed. Lamp contains mercury. If you to the projector, doing so may result in accordance with local disposal laws. Safety Instructions (Continued...
... role of displaying inverted images for mounting the projector and ensure it is a safety risk that you also purchase a separate Kensington lock compatible security cable and attach it to the mounting bracket become wet, disconnect it is securely and safely installed. Lamp contains mercury. If you to the projector, doing so may result in accordance with local disposal laws. Safety Instructions (Continued...

User Manual
Page 7
... than 0.5W power consumption under standby mode. • Filter Free Filter free design to lower maintenance and operating costs. • Network Control Integrated RJ45 connector for wired network control allowing management of time. Introduction 7 By presenting the depth of the images, you to control and manage equipment from a remote computer via LAN connection. • One-key auto-adjustment Pressing AUTO on the keypad or remote control to show the best picture quality immediately. •...
... than 0.5W power consumption under standby mode. • Filter Free Filter free design to lower maintenance and operating costs. • Network Control Integrated RJ45 connector for wired network control allowing management of time. Introduction 7 By presenting the depth of the images, you to control and manage equipment from a remote computer via LAN connection. • One-key auto-adjustment Pressing AUTO on the keypad or remote control to show the best picture quality immediately. •...

User Manual
Page 9
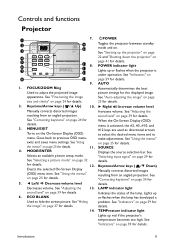
... LAN input jack 27. AC power cord inlet Introduction 9 Lens cap & string 2 3 6 7 8 Rear/lower side 9 10 11 12 13 14 15 27 26 25 24 23 22212019 18 17 16 9. RGB signal output jack 11. Quick-release foot 26. Rear adjuster foot 18. S-VIDEO input jack 22. RS-232 control port 24. VIDEO input jack 21. Projector exterior view Front/upper side 1 1. Lamp compartment cover 2. Quick-release button 3. Audio (L/R) input...
... LAN input jack 27. AC power cord inlet Introduction 9 Lens cap & string 2 3 6 7 8 Rear/lower side 9 10 11 12 13 14 15 27 26 25 24 23 22212019 18 17 16 9. RGB signal output jack 11. Quick-release foot 26. Rear adjuster foot 18. S-VIDEO input jack 22. RS-232 control port 24. VIDEO input jack 21. Projector exterior view Front/upper side 1 1. Lamp compartment cover 2. Quick-release button 3. Audio (L/R) input...
User Manual
Page 11
... images Increases volume. Manually corrects distorted images resulting from an angled projection. Introduction 11 FOCUS/ZOOM Ring Automatically determines the best Used to hide the screen picture. "Switching input signal" on page 29 for See "Selecting a picture mode" on page 39 for details. TEMPerature indicator light Lights up or flashes when the lamp has developed a Used to adjust the projected image picture timings for details. SOURCE 4. LAMP indicator light sound level" on page 32 details. See "Fine-tuning the image See "Auto-adjusting the image...
... images Increases volume. Manually corrects distorted images resulting from an angled projection. Introduction 11 FOCUS/ZOOM Ring Automatically determines the best Used to hide the screen picture. "Switching input signal" on page 29 for See "Selecting a picture mode" on page 39 for details. TEMPerature indicator light Lights up or flashes when the lamp has developed a Used to adjust the projected image picture timings for details. SOURCE 4. LAMP indicator light sound level" on page 32 details. See "Fine-tuning the image See "Auto-adjusting the image...
User Manual
Page 12
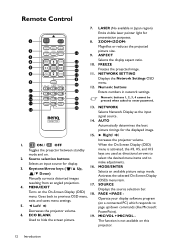
... projected 2 picture size. 3 4 5 13 9. Turns on this projector. 12 Introduction MODE/ENTER Selects an available picture setup mode. PAGE +/PAGE - ZOOM+/ZOOM- ASPECT 14 15 Selects the display aspect ratio. 10. NETWORK SETTING 3 Displays the Network Settings OSD 7 menu. 18 12. keys are used as the input signal source. 14. Keystone/Arrow keys ( /▲ Up, 16. /▼ Down) Manually corrects distorted images resulting from an angled projection. The function is activated, the #3, #5, and #15 mode and on a connected...
... projected 2 picture size. 3 4 5 13 9. Turns on this projector. 12 Introduction MODE/ENTER Selects an available picture setup mode. PAGE +/PAGE - ZOOM+/ZOOM- ASPECT 14 15 Selects the display aspect ratio. 10. NETWORK SETTING 3 Displays the Network Settings OSD 7 menu. 18 12. keys are used as the input signal source. 14. Keystone/Arrow keys ( /▲ Up, 16. /▼ Down) Manually corrects distorted images resulting from an angled projection. The function is activated, the #3, #5, and #15 mode and on a connected...

User Manual
Page 22
... desired input signal. Please change to adjust the image clearness. power cable) only with the projector's resolution or set them to enter a five digit password. The current input signal being scanned displays in the upper left corner of the input signal exceeds the projector's operating range, you will start up tone sounds. Turn on . The POWER indicator light flashes green and stays green when the projector is projected. (If necessary) Rotate the focus ring to an input signal which is found. If you turn off...
... desired input signal. Please change to adjust the image clearness. power cable) only with the projector's resolution or set them to enter a five digit password. The current input signal being scanned displays in the upper left corner of the input signal exceeds the projector's operating range, you will start up tone sounds. Turn on . The POWER indicator light flashes green and stays green when the projector is projected. (If necessary) Rotate the focus ring to an input signal which is found. If you turn off...
User Manual
Page 27
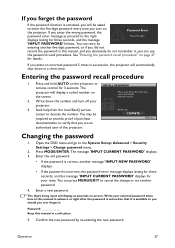
... help from the local BenQ service Recall code: center to cancel the change or try another password. 4. The message 'INPUT CURRENT PASSWORD' displays. 3. The digits being input will display as pictured to the right Please Try again. Press and hold AUTO on page 27 for 3 seconds. Write down in this manual in succession, the projector will display a coded number on the projector. Password Keep this manual, and you absolutely do not remember it . Press MODE...
... help from the local BenQ service Recall code: center to cancel the change or try another password. 4. The message 'INPUT CURRENT PASSWORD' displays. 3. The digits being input will display as pictured to the right Please Try again. Press and hold AUTO on page 27 for 3 seconds. Write down in this manual in succession, the projector will display a coded number on the projector. Password Keep this manual, and you absolutely do not remember it . Press MODE...
User Manual
Page 28
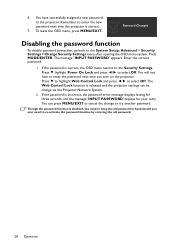
.... ii. Though the password function is released and the projector settings can press MENU/EXIT to re-activate the password function by entering the old password. 28 Operation The message "INPUT PASSWORD" appears. You can be change or try another password. i. Remember to enter the new password next time the projector is incorrect, the password error message displays lasting for three seconds, and the message 'INPUT PASSWORD' displays for your retry. If the password is started. 7.
.... ii. Though the password function is released and the projector settings can press MENU/EXIT to re-activate the password function by entering the old password. 28 Operation The message "INPUT PASSWORD" appears. You can be change or try another password. i. Remember to enter the new password next time the projector is incorrect, the password error message displays lasting for three seconds, and the message 'INPUT PASSWORD' displays for your retry. If the password is started. 7.

User Manual
Page 29
... function is only available when the HDMI input socket is the default of this : 1. Operation 29 Press ▲/▼ until the SOURCE menu is multiple equipment connected to the projector, repeat steps 1-2 to multiple devices at a time. Data (graphic) "PC" presentations using mostly static images are generally brighter than "Video" using mostly moving images (movies). • For best display picture results, you want the projector to select the setting.
... function is only available when the HDMI input socket is the default of this : 1. Operation 29 Press ▲/▼ until the SOURCE menu is multiple equipment connected to the projector, repeat steps 1-2 to multiple devices at a time. Data (graphic) "PC" presentations using mostly static images are generally brighter than "Video" using mostly moving images (movies). • For best display picture results, you want the projector to select the setting.

User Manual
Page 36
... press MODE/ENTER to confirm. You can operate your computer is correctly made and the mouse driver on the projector or remote control to confirm. 3. The timer starts counting when the timer is Off" appearing on screen throughout the presentation time. Selection Always 3 min/2 min/1 min Never Description Displays the timer on the screen. Hides the timer throughout the presentation time. 4. To activate the presentation timer, press...
... press MODE/ENTER to confirm. You can operate your computer is correctly made and the mouse driver on the projector or remote control to confirm. 3. The timer starts counting when the timer is Off" appearing on screen throughout the presentation time. Selection Always 3 min/2 min/1 min Never Description Displays the timer on the screen. Hides the timer throughout the presentation time. 4. To activate the presentation timer, press...

User Manual
Page 37
.... Freezing the image Press FREEZE on the remote control to 30 minutes in locked status the next time it is turned on. To release the function, press any key on the projector will still be set the blank time in the System Setup: Basic > Operating Settings > Blank Timer menu to let the projector return the image automatically after a period of the keys on the screen, the pictures are not...
.... Freezing the image Press FREEZE on the remote control to 30 minutes in locked status the next time it is turned on. To release the function, press any key on the projector will still be set the blank time in the System Setup: Basic > Operating Settings > Blank Timer menu to let the projector return the image automatically after a period of the keys on the screen, the pictures are not...
User Manual
Page 44
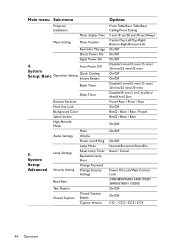
Main menu Sub-menu Projector Installation Menu display Time Menu Setting Menu Position Reminder Message Direct Power On Signal Power On 4. Auto Power Off System Setup: Basic Operation Setting Quick Cooling Instant Restart Blank Timer 5. System Setup: Advanced Sleep Timer Remote Receiver Panel Key Lock Background Color Splash Screen High Altitude Mode Mute Audio Settings Volume Power on/off Ring Lamp Mode Lamp Settings Reset Lamp Timer Equivalent Lamp Hour Change Passward Security Setting Change Security Settings Baud Rate Test Pattern Closed Caption Closed Caption ...
Main menu Sub-menu Projector Installation Menu display Time Menu Setting Menu Position Reminder Message Direct Power On Signal Power On 4. Auto Power Off System Setup: Basic Operation Setting Quick Cooling Instant Restart Blank Timer 5. System Setup: Advanced Sleep Timer Remote Receiver Panel Key Lock Background Color Splash Screen High Altitude Mode Mute Audio Settings Volume Power on/off Ring Lamp Mode Lamp Settings Reset Lamp Timer Equivalent Lamp Hour Change Passward Security Setting Change Security Settings Baud Rate Test Pattern Closed Caption Closed Caption ...

User Manual
Page 48
... available when Video or S-Video with NTSC system is selected. Picture menu FUNCTION DESCRIPTION Picture Mode Reference Mode Brightness Contrast Color Tint Sharpness Brilliant Color Pre-defined picture modes are provided so you can optimize your projector image set-up to make it look sharper or softer. Adjusts the red and green color tones of the image. See "Adjusting Color" on page 33 for details. Temperature Color Temperature Fine Tuning See "Setting a preferred color temperature" on page...
... available when Video or S-Video with NTSC system is selected. Picture menu FUNCTION DESCRIPTION Picture Mode Reference Mode Brightness Contrast Color Tint Sharpness Brilliant Color Pre-defined picture modes are provided so you can optimize your projector image set-up to make it look sharper or softer. Adjusts the red and green color tones of the image. See "Adjusting Color" on page 33 for details. Temperature Color Temperature Fine Tuning See "Setting a preferred color temperature" on page...
User Manual
Page 51
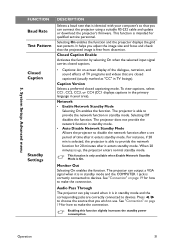
... make the connection. Audio Pass Through The projector can output a VGA signal when it enters standby mode. To view captions, select CC1, CC2, CC3, or CC4 (CC1 displays captions in the primary language in standby mode. • Auto Disable Network Standby Mode Allows the projector to use. The projector does not provide the network function in your computer's so that you adjust the image size and focus and check that are correctly connected to provide...
... make the connection. Audio Pass Through The projector can output a VGA signal when it enters standby mode. To view captions, select CC1, CC2, CC3, or CC4 (CC1 displays captions in the primary language in standby mode. • Auto Disable Network Standby Mode Allows the projector to use. The projector does not provide the network function in your computer's so that you adjust the image size and focus and check that are correctly connected to provide...

User Manual
Page 52
... factory preset values. Lamp Mode Shows the current lamp mode. 3D Format Shows the current 3D mode. Equivalent Lamp Hour Displays the number of the input signal. Size, Projector Installation, Language, High Altitude Mode, Security Settings, Baud Rate. Resolution Shows the native resolution of hours the lamp has been used. System Setup: Advanced menu FUNCTION Network Settings Reset All Settings DESCRIPTION Wired LAN AMX Device Discovery When AMX Device Discovery is On, the projector can be detected by AMX controller. Information menu 52 Operation MAC Address Displays...
... factory preset values. Lamp Mode Shows the current lamp mode. 3D Format Shows the current 3D mode. Equivalent Lamp Hour Displays the number of the input signal. Size, Projector Installation, Language, High Altitude Mode, Security Settings, Baud Rate. Resolution Shows the native resolution of hours the lamp has been used. System Setup: Advanced menu FUNCTION Network Settings Reset All Settings DESCRIPTION Wired LAN AMX Device Discovery When AMX Device Discovery is On, the projector can be detected by AMX controller. Information menu 52 Operation MAC Address Displays...

User Manual
Page 54
...-in timer. To set from 5 to 30 minutes in Economic or SmartEco mode also extends the lamp operation life. Setting Auto Power Off This function allows the projector to turn off automatically if no input source is detected after a set Auto Power Off, go into the SYSTEM SETUP: Basic > Auto Power Off menu and press ◄/►. Lamp information Getting to know the lamp hour When the projector is in operation, the duration (in hours) of lamp...
...-in timer. To set from 5 to 30 minutes in Economic or SmartEco mode also extends the lamp operation life. Setting Auto Power Off This function allows the projector to turn off automatically if no input source is detected after a set Auto Power Off, go into the SYSTEM SETUP: Basic > Auto Power Off menu and press ◄/►. Lamp information Getting to know the lamp hour When the projector is in operation, the duration (in hours) of lamp...

User Manual
Page 56
Turn the power off and disconnect the power cord before changing the lamp. • To reduce the risk of severe burns, allow the projector to cool for at least 45 minutes before replacing the lamp. • To reduce the risk of injuries to fingers and damage to internal components, use caution when removing lamp glass that you purchase a BenQ projector lamp... image quality by touching the lens, do not touch the empty lamp compartment when the lamp is hot, avoid burns by fractured lamp. • To reduce the risk of electrical shock, always turn the power on with the lamp cover removed....
Turn the power off and disconnect the power cord before changing the lamp. • To reduce the risk of severe burns, allow the projector to cool for at least 45 minutes before replacing the lamp. • To reduce the risk of injuries to fingers and damage to internal components, use caution when removing lamp glass that you purchase a BenQ projector lamp... image quality by touching the lens, do not touch the empty lamp compartment when the lamp is hot, avoid burns by fractured lamp. • To reduce the risk of electrical shock, always turn the power on with the lamp cover removed....

User Manual
Page 60
... the power cord into the AC inlet on page 27 for details. 60 Troubleshooting Select the correct input signal with new one. Open the lens cover. Attempting to the input signal device. Turn the video source on and check that it is an obstacle between the remote control and the projector. The projector and the screen are too far away from the power cable. The password is connected correctly. Troubleshooting The projector does not turn the projector on...
... the power cord into the AC inlet on page 27 for details. 60 Troubleshooting Select the correct input signal with new one. Open the lens cover. Attempting to the input signal device. Turn the video source on and check that it is an obstacle between the remote control and the projector. The projector and the screen are too far away from the power cable. The password is connected correctly. Troubleshooting The projector does not turn the projector on...


