User Manual
Page 2
... 2 What You Can Connect to Your TuneStudio 2 WHAT'S IN THE BOX? 3 Cables You May Need 3 iPod, WINDOWS, AND Mac COMPATIBILITY 4 iPod 4 Windows 4 Macintosh 4 SETTING UP YOUR TUNESTUDIO 5 To set up your TuneStudio 5 TUNESTUDIO TOUR 6 TuneStudio Inputs and Outputs 7 SETTING THE RECORDING LEVEL 10 RECORDING WITH MICROPHONES 11 Types of Microphones 11 Recording with Multiple Microphones 11 RECORDING A PODCAST 12 Tips for Record ing a Podcast 13 RECORDING LIVE MUSIC 14 Tips for...
... 2 What You Can Connect to Your TuneStudio 2 WHAT'S IN THE BOX? 3 Cables You May Need 3 iPod, WINDOWS, AND Mac COMPATIBILITY 4 iPod 4 Windows 4 Macintosh 4 SETTING UP YOUR TUNESTUDIO 5 To set up your TuneStudio 5 TUNESTUDIO TOUR 6 TuneStudio Inputs and Outputs 7 SETTING THE RECORDING LEVEL 10 RECORDING WITH MICROPHONES 11 Types of Microphones 11 Recording with Multiple Microphones 11 RECORDING A PODCAST 12 Tips for Record ing a Podcast 13 RECORDING LIVE MUSIC 14 Tips for...

User Manual
Page 3
PROTECTING YOUR HEARING TROUBLESHOOTING If the Recording Menu button doesn't work If your TuneStudio won't turn on If you don't hear anything in the studio monitors or headphones If the microphone volume is too low If an instrument's volume is too low If the sound is distorted If you hear a "hum" sound in the recording If your recordings are only in the left channel If your computer doesn't see...
PROTECTING YOUR HEARING TROUBLESHOOTING If the Recording Menu button doesn't work If your TuneStudio won't turn on If you don't hear anything in the studio monitors or headphones If the microphone volume is too low If an instrument's volume is too low If the sound is distorted If you hear a "hum" sound in the recording If your recordings are only in the left channel If your computer doesn't see...
User Manual
Page 4
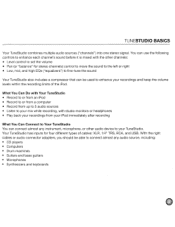
... that allows convenient and comfortable access to the screen and click wheel. Have fun! Each audio input channel includes equalization (EO), pan, and level controls. Key Features • Record directly to your iPod in 16-bit, 44kHz digital audio quality • Record to and from your PC or Mac computer using USB 1.1 or higher • Instantly play back your recordings directly from novice pod casters to four instruments...
... that allows convenient and comfortable access to the screen and click wheel. Have fun! Each audio input channel includes equalization (EO), pan, and level controls. Key Features • Record directly to your iPod in 16-bit, 44kHz digital audio quality • Record to and from your PC or Mac computer using USB 1.1 or higher • Instantly play back your recordings directly from novice pod casters to four instruments...
User Manual
Page 5
You can use the following controls to enhance each channel's sound before it is mixed with studio monitors or headphones • Play back your recordings from your iPod immediately after recording What You Can Connect to Your TuneStudio You can connect almost any audio source, including: • CD players • Computers • Drum machines • Guitars and bass guitars • Microphones • Synthesizers and keyboards What You...
You can use the following controls to enhance each channel's sound before it is mixed with studio monitors or headphones • Play back your recordings from your iPod immediately after recording What You Can Connect to Your TuneStudio You can connect almost any audio source, including: • CD players • Computers • Drum machines • Guitars and bass guitars • Microphones • Synthesizers and keyboards What You...

User Manual
Page 6
...; TuneStudio • CD with recording software • 1/8" (3.5mm) to 1/4" (6.35mm) headphone cable adapter • AC power supply and power cable • Adapter inserts for iPod • Warranty card • This user guide Cables You May Need You will need the following cables to connect microphones ("mics"), instruments, and other devices to your TuneStudio: Device Electronic audio sources (such as CD players) Cable Type RCA stereo Example ) Instruments TRS 1/4" Computers USB Microphones and XLR high-end...
...; TuneStudio • CD with recording software • 1/8" (3.5mm) to 1/4" (6.35mm) headphone cable adapter • AC power supply and power cable • Adapter inserts for iPod • Warranty card • This user guide Cables You May Need You will need the following cables to connect microphones ("mics"), instruments, and other devices to your TuneStudio: Device Electronic audio sources (such as CD players) Cable Type RCA stereo Example ) Instruments TRS 1/4" Computers USB Microphones and XLR high-end...
User Manual
Page 8
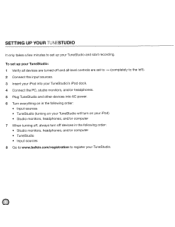
... left). 2 Connect the input sources. 3 Insert your iPod into your TuneStudio's iPod dock. 4 Connect the PC, studio monitors, and/or headphones. 5 Plug TuneStudio and other devices into AC power. 6 Turn everything on in the following order: • Input sources • TuneStudio (turning on your TuneStudio will turn on your iPod) • Studio monitors, headphones, and/or computer 7 When turning off, always turn off and all level controls are set up your...
... left). 2 Connect the input sources. 3 Insert your iPod into your TuneStudio's iPod dock. 4 Connect the PC, studio monitors, and/or headphones. 5 Plug TuneStudio and other devices into AC power. 6 Turn everything on in the following order: • Input sources • TuneStudio (turning on your TuneStudio will turn on your iPod) • Studio monitors, headphones, and/or computer 7 When turning off, always turn off and all level controls are set up your...

User Manual
Page 9
LOW---- ® PAN - - - - @ PEAK INDICATORS - - - @LEVEL---- @BALANCE ® LHEADPHONES HEADPHONES PLAYBACK @ @ iPod PLAYBACK ® LEFT & RIGHT Q RECORDING LEOs @ USB LEVEL INPUT @ COMPRESSOR @ AUDIO MIX IN RATIO @ MASTER LEVEL MONITOR ~ PLAYBACK LEVEL @! @ RECORDING MENU BUTTON 17 • MED - - - TUNESTUDIO TOUR Take a few minutes to learn how to use the inputs and controls on your TuneStudio. ® 1/4" TRS o 0) ® RCA MONITOR USB INPUTS OUT AUDIO f1\ XLR MIC - - - - \V INPUTS (j) GAIN - - - - HIGH - - -
LOW---- ® PAN - - - - @ PEAK INDICATORS - - - @LEVEL---- @BALANCE ® LHEADPHONES HEADPHONES PLAYBACK @ @ iPod PLAYBACK ® LEFT & RIGHT Q RECORDING LEOs @ USB LEVEL INPUT @ COMPRESSOR @ AUDIO MIX IN RATIO @ MASTER LEVEL MONITOR ~ PLAYBACK LEVEL @! @ RECORDING MENU BUTTON 17 • MED - - - TUNESTUDIO TOUR Take a few minutes to learn how to use the inputs and controls on your TuneStudio. ® 1/4" TRS o 0) ® RCA MONITOR USB INPUTS OUT AUDIO f1\ XLR MIC - - - - \V INPUTS (j) GAIN - - - - HIGH - - -
User Manual
Page 10
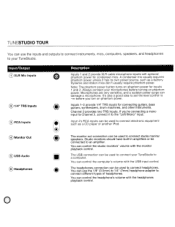
... the studio monitors' volume with the USB input control. Always connect your TuneStudio. It's also a good idea to set the level control to the "Left/Mono" input. Input/Output CD XLR Mic Inputs ® 1/4" TRS Inputs o RCA Inputs Description Inputs 1 and 2 provide XLR cable microphone inputs with the headphones playback control. The USB connection can use the inputs and outputs to connect instruments, mics, computers, speakers, and headphones to your microphones before you 're connecting a mono input to Channel 3, connect it has its own power source, such as a CD player or...
... the studio monitors' volume with the USB input control. Always connect your TuneStudio. It's also a good idea to set the level control to the "Left/Mono" input. Input/Output CD XLR Mic Inputs ® 1/4" TRS Inputs o RCA Inputs Description Inputs 1 and 2 provide XLR cable microphone inputs with the headphones playback control. The USB connection can use the inputs and outputs to connect instruments, mics, computers, speakers, and headphones to your microphones before you 're connecting a mono input to Channel 3, connect it has its own power source, such as a CD player or...

User Manual
Page 11
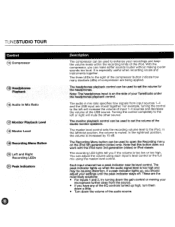
... volume is connected to input 3, then the balance control works like the pan control. If the gain is increased by 15 dB. The level control specifies how much of gain to soften vocals. In the rightmost position, the volume is too low,...used to control which part of the signal is sent to fine-tune and monitor your iPod. If a mono source is muted. In the rightmost position, the volume is increased by up to 60 dB of gain to the XLR inputs and 40 dB of the source signal is sent to your recordings. The iPod playback control sets the volume when listening to the mix...
... volume is connected to input 3, then the balance control works like the pan control. If the gain is increased by 15 dB. The level control specifies how much of gain to soften vocals. In the rightmost position, the volume is too low,...used to control which part of the signal is sent to fine-tune and monitor your iPod. If a mono source is muted. In the rightmost position, the volume is increased by up to 60 dB of gain to the XLR inputs and 40 dB of the source signal is sent to your recordings. The iPod playback control sets the volume when listening to the mix...
User Manual
Page 12
... left will mute the other source. . The master level control sets the recording volume level to the right of the compressor button indicate how many decibels (dBs) of the EO controls turned up , you have any of compression are mixed together. Note thatth;s button does not work with the iPodnano 3rd'generation (video) 01" iPod classic. You can adjust the volume using each input's level control or the full mix using the master level control. is...
... left will mute the other source. . The master level control sets the recording volume level to the right of the compressor button indicate how many decibels (dBs) of the EO controls turned up , you have any of compression are mixed together. Note thatth;s button does not work with the iPodnano 3rd'generation (video) 01" iPod classic. You can adjust the volume using each input's level control or the full mix using the master level control. is...
User Manual
Page 13
... the LEOs and adjust your levels as necessary. 12 If it's difficult to keep the signals from exceeding the recording level limits. • You should set the "Gain" control completely to the left. 2 Set the "Low", "Mid", and "High" EO controls to O. 3 Set the "Pan" control to O. 4 Set the "Level" control to -00. 5 Connect the microphone or instrument cable to the channel's input. 6 Set the "iPod Playback" control to O. 7 Set the "Master Level" control to O. 8 Play the instrument...
... the LEOs and adjust your levels as necessary. 12 If it's difficult to keep the signals from exceeding the recording level limits. • You should set the "Gain" control completely to the left. 2 Set the "Low", "Mid", and "High" EO controls to O. 3 Set the "Pan" control to O. 4 Set the "Level" control to -00. 5 Connect the microphone or instrument cable to the channel's input. 6 Set the "iPod Playback" control to O. 7 Set the "Master Level" control to O. 8 Play the instrument...

User Manual
Page 14
... times. Sounds farther from the mic will have low sensitivities and require a high gain setting. To avoid this problem, the distance between the mics and their own power supply, such as a battery, condenser mics use the phantom power from the source, they work well with microphone placement to select and place a mic when recording. Condenser mics are many types of dynamic microphone) normally have their source. Using a well-placed microphone will cancel each mic...
... times. Sounds farther from the mic will have low sensitivities and require a high gain setting. To avoid this problem, the distance between the mics and their own power supply, such as a battery, condenser mics use the phantom power from the source, they work well with microphone placement to select and place a mic when recording. Condenser mics are many types of dynamic microphone) normally have their source. Using a well-placed microphone will cancel each mic...

User Manual
Page 18
... use the pan controls to move one mic directly into the guitar's monitor speaker and the other mic to record. Tips for a live sound, try placing one mic 1-6 inches from the sound hole. For a live sound. A 01 box will probably need to your TuneStudio. RECORDING LIVE MUSIC Tips for Recording Acoustic Instruments Acoustic instruments can create a very engaging stereo effect. • For acoustic guitars, try recording with two mics...
... use the pan controls to move one mic directly into the guitar's monitor speaker and the other mic to record. Tips for a live sound, try placing one mic 1-6 inches from the sound hole. For a live sound. A 01 box will probably need to your TuneStudio. RECORDING LIVE MUSIC Tips for Recording Acoustic Instruments Acoustic instruments can create a very engaging stereo effect. • For acoustic guitars, try recording with two mics...

User Manual
Page 21
... "Output" tab. 5 Select "USB Audio Codec" as the default "Sound playback" and "Sound recording" device. 6 For best audio quality, select the "Volume" tab and set the "Device volume" to "High." To record to or from a Mac computer: 1 Connect your TuneStudio to or from the Start menu. 3 Double-click "Sounds and Audio Devices". 4 Click the "Audio" tab. 5 Select your TuneStudio as your Windows USB port. 2 Select "Settings> Control Panel" from a Mac computer or Windows PC...
... "Output" tab. 5 Select "USB Audio Codec" as the default "Sound playback" and "Sound recording" device. 6 For best audio quality, select the "Volume" tab and set the "Device volume" to "High." To record to or from a Mac computer: 1 Connect your TuneStudio to or from the Start menu. 3 Double-click "Sounds and Audio Devices". 4 Click the "Audio" tab. 5 Select your TuneStudio as your Windows USB port. 2 Select "Settings> Control Panel" from a Mac computer or Windows PC...
User Manual
Page 23
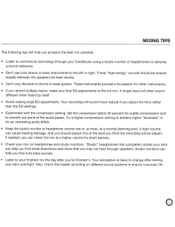
... help you adjust the mics rather than the EO settings. • Experiment with the compressor setting. Try a higher compression setting to achieve higher "loudness" or for other instruments. • If you can cause hearing damage, and you should be played. Also, check the master recording on headphones and studio monitors. Studio monitors can help you fine-tune bass sounds. • Listen to your finished mix the...
... help you adjust the mics rather than the EO settings. • Experiment with the compressor setting. Try a higher compression setting to achieve higher "loudness" or for other instruments. • If you can cause hearing damage, and you should be played. Also, check the master recording on headphones and studio monitors. Studio monitors can help you fine-tune bass sounds. • Listen to your finished mix the...
User Manual
Page 26
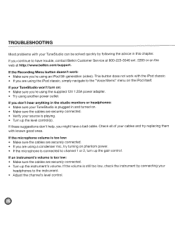
... securely connected. • Verify your source is playing. • Turn up the instrument's volume. TROUBLESHOOTING Most problems with your TuneStudio can be solved quickly by connecting your headphones to the instrument. • Adjust the channel's level control. If these suggestions don't help, you are using the iPod classic, simply navigate to the "Voice Memo" menu on . • Make sure the cables are using a condenser mic, try replacing them...
... securely connected. • Verify your source is playing. • Turn up the instrument's volume. TROUBLESHOOTING Most problems with your TuneStudio can be solved quickly by connecting your headphones to the instrument. • Adjust the channel's level control. If these suggestions don't help, you are using the iPod classic, simply navigate to the "Voice Memo" menu on . • Make sure the cables are using a condenser mic, try replacing them...
User Manual
Page 27
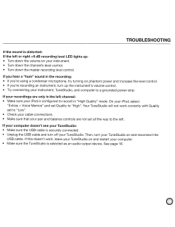
... the TuneStudio is selected as an audio output device. If this doesn't work correctly with Quality set Quality to record in the recording: • If you hear a "hum" sound in "High Quality" mode. See page 18. TROUBLESHOOTING If the sound is distorted: If the left or right +6 dB recording level LED lights up the instrument's volume control. • Try connecting your instrument, TuneStudio, and computer to...
... the TuneStudio is selected as an audio output device. If this doesn't work correctly with Quality set Quality to record in the recording: • If you hear a "hum" sound in "High Quality" mode. See page 18. TROUBLESHOOTING If the sound is distorted: If the left or right +6 dB recording level LED lights up the instrument's volume control. • Try connecting your instrument, TuneStudio, and computer to...

User Manual
Page 28
... (0 dBV) Level Fader Cutoff 80 dB Difference in output level with channel level control set to -inf then +15 dB Specific I/O Performance and Characteristics CH1 and CH2 XLR Microphone Inputs Specification Value EIN (Equivalent Input Noise) 121 dB, -123 dB (A-weighted) Max Input Level 600mVrms (-2.6 dBu) Input Impedance 4kQ balanced Notes Mic gain +60 dB, 150-0hm source impedance Mic gain at +10 dB CH1 and CH2 1/4" TRS Inputs Specification Value Max Input Level, Balanced...
... (0 dBV) Level Fader Cutoff 80 dB Difference in output level with channel level control set to -inf then +15 dB Specific I/O Performance and Characteristics CH1 and CH2 XLR Microphone Inputs Specification Value EIN (Equivalent Input Noise) 121 dB, -123 dB (A-weighted) Max Input Level 600mVrms (-2.6 dBu) Input Impedance 4kQ balanced Notes Mic gain +60 dB, 150-0hm source impedance Mic gain at +10 dB CH1 and CH2 1/4" TRS Inputs Specification Value Max Input Level, Balanced...

User Manual
Page 29
..., 87 dB (A-weighted) Stereo Separation > 80 dB THD+N 0.03% Frequency Response ±1 dB, 20Hz-20kHz USB Input (from Computer to TuneStudio) Specification Value Signal to Noise Ratio 83 dB Stereo Separation > 80 dB THD+N 0.007% Frequency Response ±1 dB, 20Hz-20kHz Level Fader Cutoff 80 dB TUNESTUDIO SPECIFICATIONS Notes Notes Notes USB mix control set to 100% USB Difference in output level with channel level control set to ..:..inf then +15...
..., 87 dB (A-weighted) Stereo Separation > 80 dB THD+N 0.03% Frequency Response ±1 dB, 20Hz-20kHz USB Input (from Computer to TuneStudio) Specification Value Signal to Noise Ratio 83 dB Stereo Separation > 80 dB THD+N 0.007% Frequency Response ±1 dB, 20Hz-20kHz Level Fader Cutoff 80 dB TUNESTUDIO SPECIFICATIONS Notes Notes Notes USB mix control set to 100% USB Difference in output level with channel level control set to ..:..inf then +15...

User Manual
Page 31
... used to amplifiers. RCA invented these cables in a signal. The name "XLR" is positioned too close to computers. XLR: XLR cables are used to connect mono, not stereo, sources, or headphones. Distortion: An undesired sound caused by the power supply's voltage. Boost: An increase in volume, especially at higher frequencies. RCA ("Radio Corporation of an audio signal. TRS ("Tip-Ring-Sleeve"): TRS cables are often used when recording and mixing audio...
... used to amplifiers. RCA invented these cables in a signal. The name "XLR" is positioned too close to computers. XLR: XLR cables are used to connect mono, not stereo, sources, or headphones. Distortion: An undesired sound caused by the power supply's voltage. Boost: An increase in volume, especially at higher frequencies. RCA ("Radio Corporation of an audio signal. TRS ("Tip-Ring-Sleeve"): TRS cables are often used when recording and mixing audio...
