User Manual
Page 3
P74080-F5U209-man_8-02.qxd 8/26/02 12:36 PM Page c TABLE OF CONTENTS Introduction 1 System Requirements 2 Assembling Your Drive Enclosure 3 Driver Installation 8 Safe Removal of the USB Disk 10 Format the USB 2.0 External Drive 11 Information 16
P74080-F5U209-man_8-02.qxd 8/26/02 12:36 PM Page c TABLE OF CONTENTS Introduction 1 System Requirements 2 Assembling Your Drive Enclosure 3 Driver Installation 8 Safe Removal of the USB Disk 10 Format the USB 2.0 External Drive 11 Information 16

User Manual
Page 5
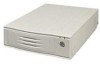
...-F5U209-man_8-02.qxd 8/26/02 12:36 PM Page 1 INTRODUCTION The Hi-Speed USB 2.0 External Drive Enclosure (the External Drive) is running. The Plug-and-Play feature gives you great convenience on the road, the External Drive can be easily connected to your computer must be disconnected and reconnected while the computer is a portable compact storage drive...
...-F5U209-man_8-02.qxd 8/26/02 12:36 PM Page 1 INTRODUCTION The Hi-Speed USB 2.0 External Drive Enclosure (the External Drive) is running. The Plug-and-Play feature gives you great convenience on the road, the External Drive can be easily connected to your computer must be disconnected and reconnected while the computer is a portable compact storage drive...

User Manual
Page 6
P74080-F5U209-man_8-02.qxd 8/26/02 12:36 PM Page 2 SYSTEM REQUIREMENTS Hardware Notebook and desktop computer with USB 1.0 or USB 2.0 port Operating System Windows® 98 SE, Me, 2000, or XP 2
P74080-F5U209-man_8-02.qxd 8/26/02 12:36 PM Page 2 SYSTEM REQUIREMENTS Hardware Notebook and desktop computer with USB 1.0 or USB 2.0 port Operating System Windows® 98 SE, Me, 2000, or XP 2
User Manual
Page 7
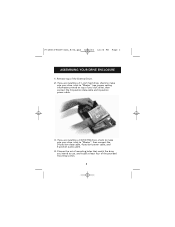
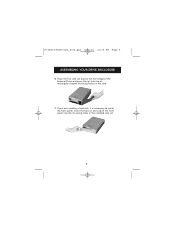
... on top of your drive is set of mounting holes that match the drive you are installing a 31/2-inch hard drive, check to use, and install at least four of the External Drive. 2. If you intend to make sure your disk drive), then connect the 34-position data cable and 4-position power cable. 3. Remove top of the provided mounting screws. 3 P74080-F5U209-man_8-02.qxd 8/26...
... on top of your drive is set of mounting holes that match the drive you are installing a 31/2-inch hard drive, check to use, and install at least four of the External Drive. 2. If you intend to make sure your disk drive), then connect the 34-position data cable and 4-position power cable. 3. Remove top of the provided mounting screws. 3 P74080-F5U209-man_8-02.qxd 8/26...
User Manual
Page 8
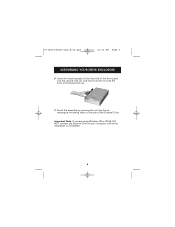
Replace top cover and make sure it is aligned with your drive. Be sure to force a course-threaded screw into a fine-threaded mounting hole. 5. P74080-F5U209-man_8-02.qxd 8/26/02 12:36 PM Page 4 ASSEMBLING YOUR DRIVE ENCLOSURE Note: There are four fine-threaded screws, and four course-threaded screws included with bottom cover. 4 Do not try to choose the screws that match the mounting holes for your Hi-Speed External Drive Enclosure Kit.
Replace top cover and make sure it is aligned with your drive. Be sure to force a course-threaded screw into a fine-threaded mounting hole. 5. P74080-F5U209-man_8-02.qxd 8/26/02 12:36 PM Page 4 ASSEMBLING YOUR DRIVE ENCLOSURE Note: There are four fine-threaded screws, and four course-threaded screws included with bottom cover. 4 Do not try to choose the screws that match the mounting holes for your Hi-Speed External Drive Enclosure Kit.
User Manual
Page 9
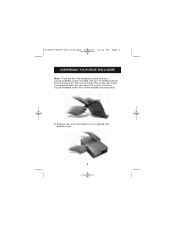
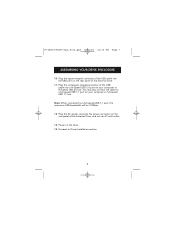
P74080-F5U209-man_8-02.qxd 8/26/02 12:36 PM Page 5 ASSEMBLING YOUR DRIVE ENCLOSURE 6. Insert the tabs on one side of the External Drive and press the rail into the mounting holes in the installed side rail. 5 If you are installing a hard disk, it is necessary to install the front panel. Hook the first side rail around the front edge of the front panel into the six rectangular-shaped mounting holes on the side. 7.
P74080-F5U209-man_8-02.qxd 8/26/02 12:36 PM Page 5 ASSEMBLING YOUR DRIVE ENCLOSURE 6. Insert the tabs on one side of the External Drive and press the rail into the mounting holes in the installed side rail. 5 If you are installing a hard disk, it is necessary to install the front panel. Hook the first side rail around the front edge of the front panel into the six rectangular-shaped mounting holes on the side. 7.
User Manual
Page 10
Finish the assembly by pressing the rail into the second side rail, and hook the side rail onto the front of the External Drive. Important Note: If you are using Windows 98 or 98 SE, DO NOT connect the External Drive to your computer until driver installation is completed. 6 Insert the mounting tabs on the free end of the front panel into the six rectangular mounting holes in the side of the External Drive. 9. P74080-F5U209-man_8-02.qxd 8/26/02 12:36 PM Page 6 ASSEMBLING YOUR DRIVE ENCLOSURE 8.
Finish the assembly by pressing the rail into the second side rail, and hook the side rail onto the front of the External Drive. Important Note: If you are using Windows 98 or 98 SE, DO NOT connect the External Drive to your computer until driver installation is completed. 6 Insert the mounting tabs on the free end of the front panel into the six rectangular mounting holes in the side of the External Drive. 9. P74080-F5U209-man_8-02.qxd 8/26/02 12:36 PM Page 6 ASSEMBLING YOUR DRIVE ENCLOSURE 8.
User Manual
Page 11
.... Plug the square-shaped connector of the USB cable into the USB port on your computer or Hi-Speed USB 2.0 hub. Note: When connected to Driver Installation section. 7 P74080-F5U209-man_8-02.qxd 8/26/02 12:36 PM Page 7 ASSEMBLING YOUR DRIVE ENCLOSURE 10. Plug the AC power cord into the power connector on the rear panel of the External...
.... Plug the square-shaped connector of the USB cable into the USB port on your computer or Hi-Speed USB 2.0 hub. Note: When connected to Driver Installation section. 7 P74080-F5U209-man_8-02.qxd 8/26/02 12:36 PM Page 7 ASSEMBLING YOUR DRIVE ENCLOSURE 10. Plug the AC power cord into the power connector on the rear panel of the External...
User Manual
Page 12
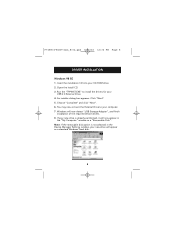
... "My Computer" window as a standard Windows fixed disk. 8 An installer dialog box appears. You may now connect the External Drive to install the drivers for your new drive will appear as a "Removable Disk". Windows will now appear in the Device Manager Settings window, your USB 2.0 External Drive. 4. Open the Install CD. 3. Run the "TPPINST.EXE" to your CD-ROM drive. 2. Click "Next". 5. P74080-F5U209-man_8-02.qxd...
... "My Computer" window as a standard Windows fixed disk. 8 An installer dialog box appears. You may now connect the External Drive to install the drivers for your new drive will appear as a "Removable Disk". Windows will now appear in the Device Manager Settings window, your USB 2.0 External Drive. 4. Open the Install CD. 3. Run the "TPPINST.EXE" to your CD-ROM drive. 2. Click "Next". 5. P74080-F5U209-man_8-02.qxd...
User Manual
Page 13
... prepare your USB 2.0 hard disk drive. A green "Unplug or Eject Hardware" icon will detect "USB 2.0 Storage Device" and install the USB mass storage device class driver, which is built into your computer for the first time, Windows will appear in the "My Computer" window as a "USB Disk". If you are plugging the External Drive into Windows. 2. Your new drive will now appear in...
... prepare your USB 2.0 hard disk drive. A green "Unplug or Eject Hardware" icon will detect "USB 2.0 Storage Device" and install the USB mass storage device class driver, which is built into your computer for the first time, Windows will appear in the "My Computer" window as a "USB Disk". If you are plugging the External Drive into Windows. 2. Your new drive will now appear in...

User Manual
Page 14
...in the system tray. 2. Choose the USB 2.0 External Drive that you want to disconnect, then click on the "Unplug or Eject Hardware" icon in the system tray and select the device that you want to remove. 2. Select the "USB Mass Storage Device" then click "Stop". 3. When the system ...prompts "You may safely remove this device", unplug the USB cable from the USB port of your computer. P74080-F5U209-man_8-02.qxd 8/26/02 12:36 PM Page 10 SAFE REMOVAL OF THE USB DISK FROM WINDOWS Windows 98 1. Double-click on...
...in the system tray. 2. Choose the USB 2.0 External Drive that you want to disconnect, then click on the "Unplug or Eject Hardware" icon in the system tray and select the device that you want to remove. 2. Select the "USB Mass Storage Device" then click "Stop". 3. When the system ...prompts "You may safely remove this device", unplug the USB cable from the USB port of your computer. P74080-F5U209-man_8-02.qxd 8/26/02 12:36 PM Page 10 SAFE REMOVAL OF THE USB DISK FROM WINDOWS Windows 98 1. Double-click on...
User Manual
Page 15
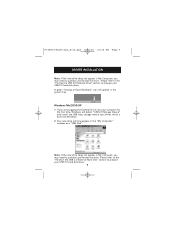
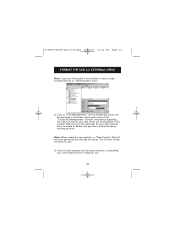
Boot-up the computer into the Windows operating system. 2. Click "Start" and choose "Setting". 2. The following screen will appear. 11 P74080-F5U209-man_8-02.qxd 8/26/02 12:36 PM Page 11 FORMAT THE USB 2.0 EXTERNAL DRIVE Format under Windows 98/Me 1. Choose "Control Panel". 3. Double-click on "System", then "Device Manager". 4. There are two methods to partition and format your External Drive. Plug in your USB 2.0 hard disk drive. Control Panel Method 1.
Boot-up the computer into the Windows operating system. 2. Click "Start" and choose "Setting". 2. The following screen will appear. 11 P74080-F5U209-man_8-02.qxd 8/26/02 12:36 PM Page 11 FORMAT THE USB 2.0 EXTERNAL DRIVE Format under Windows 98/Me 1. Choose "Control Panel". 3. Double-click on "System", then "Device Manager". 4. There are two methods to partition and format your External Drive. Plug in your USB 2.0 hard disk drive. Control Panel Method 1.
User Manual
Page 16
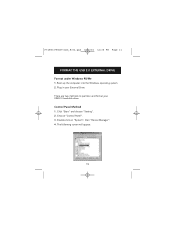
Select "Settings". The following screen will appear in size to restart your hard disk. 12 After Windows restarts, a "Removable Disk" icon will appear. 7. P74080-F5U209-man_8-02.qxd 8/26/02 12:36 PM Page 12 FORMAT THE USB 2.0 EXTERNAL DRIVE 5. Your removable hard drive is now ready for your removable hard drive will appear in the hard drive list (in the "Disconnect", "Sync Data Transfer", "Removable...
Select "Settings". The following screen will appear in size to restart your hard disk. 12 After Windows restarts, a "Removable Disk" icon will appear. 7. P74080-F5U209-man_8-02.qxd 8/26/02 12:36 PM Page 12 FORMAT THE USB 2.0 EXTERNAL DRIVE 5. Your removable hard drive is now ready for your removable hard drive will appear in the hard drive list (in the "Disconnect", "Sync Data Transfer", "Removable...

User Manual
Page 17
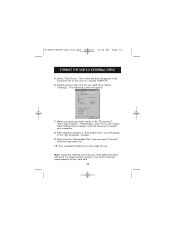
...your new disk from the list of available drives. 5. In the "Change Current Fixed Disk Drive" screen, enter the disk drive number that is assigned to create a partition smaller than 2GB. At the DOS prompt, type "FDISK" and press "Enter". Note: If the FDISK utility terminates without displaying an error message, ...than 2GB. 4. Click on "Start", and choose "Programs". When Windows restarts, reconnect the External Drive and go back to Windows and disconnect the External Drive. Enter "Y" if you want to enable large disk support?" P74080-F5U209-man_8-02.qxd 8/26/02 12:36 PM Page 13 FORMAT ...
...your new disk from the list of available drives. 5. In the "Change Current Fixed Disk Drive" screen, enter the disk drive number that is assigned to create a partition smaller than 2GB. At the DOS prompt, type "FDISK" and press "Enter". Note: If the FDISK utility terminates without displaying an error message, ...than 2GB. 4. Click on "Start", and choose "Programs". When Windows restarts, reconnect the External Drive and go back to Windows and disconnect the External Drive. Enter "Y" if you want to enable large disk support?" P74080-F5U209-man_8-02.qxd 8/26/02 12:36 PM Page 13 FORMAT ...
User Manual
Page 18
.... 14 Failure to create one internal drive, your new External Drive will see the screen on the next page. After completing the disk partition procedure, exit FDISK and restart Windows. If your computer is equipped with two internal disk drives, your external disk drive, or if you select option 5 and change the "Current Fixed Disk" from "Disk 1" to the disk number assigned to...
.... 14 Failure to create one internal drive, your new External Drive will see the screen on the next page. After completing the disk partition procedure, exit FDISK and restart Windows. If your computer is equipped with two internal disk drives, your external disk drive, or if you select option 5 and change the "Current Fixed Disk" from "Disk 1" to the disk number assigned to...
User Manual
Page 19
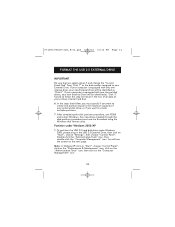
... ready for your disk drives will be displayed in this window. Click on the status bar for use. 15 Note: When creating a new partition, a "New Partition Wizard" will also format the drive for you through the setup. Information regarding the status of each of the "Computer Management" window. This will start and guide you . 3. P74080-F5U209-man_8-02...
... ready for your disk drives will be displayed in this window. Click on the status bar for use. 15 Note: When creating a new partition, a "New Partition Wizard" will also format the drive for you through the setup. Information regarding the status of each of the "Computer Management" window. This will start and guide you . 3. P74080-F5U209-man_8-02...
User Manual
Page 20
...SET FORTH ABOVE ARE EXCLUSIVE IN LIEU OF ALL OTHERS, WHETHER ORAL OR WRITTEN, EXPRESSED OR IMPLIED. If a defect is discovered, Belkin...F5U209, to the authorized Belkin dealer from whom you purchased the product. No Belkin dealer, agent, or employee is authorized to make any Belkin serial number has been removed or defaced. Operation is in materials and workmanship for its option, repair or replace...-3-3. BELKIN SPECIFICALLY DISCLAIMS ANY AND ALL IMPLIED WARRANTIES, INCLUDING, WITHOUT LIMITATION, WARRANTIES OF MERCHANTABILITY AND FITNESS FOR A PARTICULAR PURPOSE. P74080-F5U209-man_8...
...SET FORTH ABOVE ARE EXCLUSIVE IN LIEU OF ALL OTHERS, WHETHER ORAL OR WRITTEN, EXPRESSED OR IMPLIED. If a defect is discovered, Belkin...F5U209, to the authorized Belkin dealer from whom you purchased the product. No Belkin dealer, agent, or employee is authorized to make any Belkin serial number has been removed or defaced. Operation is in materials and workmanship for its option, repair or replace...-3-3. BELKIN SPECIFICALLY DISCLAIMS ANY AND ALL IMPLIED WARRANTIES, INCLUDING, WITHOUT LIMITATION, WARRANTIES OF MERCHANTABILITY AND FITNESS FOR A PARTICULAR PURPOSE. P74080-F5U209-man_8...
User Manual
Page 21
... of respective manufacturers listed. P74080 All rights reserved. Express Business Park Shipton Way • Rushden • NN10 6GL United Kingdom Tel: +44 (0) 1933 35 2000 Fax: +44 (0) 1933 31 2000 Belkin Components B.V. P74080-F5U209-man_8-02.qxd 8/26/02 12:36 PM Page 17 Belkin Corporation 501 West...The Netherlands Tel: +31 (0) 20 654 7300 Fax: +31 (0) 20 654 7349 Belkin Components Ltd. 7 Bowen Crescent • West Gosford NSW 2250 • Australia Tel: +61 (0) 2 4372 8600 Fax: +61 (0) 2 4372 8603 Belkin Tech Support US: 310.898.1100 ext. 2263 800.223.5546 ext. 2263 Europe: 00 ...
... of respective manufacturers listed. P74080 All rights reserved. Express Business Park Shipton Way • Rushden • NN10 6GL United Kingdom Tel: +44 (0) 1933 35 2000 Fax: +44 (0) 1933 31 2000 Belkin Components B.V. P74080-F5U209-man_8-02.qxd 8/26/02 12:36 PM Page 17 Belkin Corporation 501 West...The Netherlands Tel: +31 (0) 20 654 7300 Fax: +31 (0) 20 654 7349 Belkin Components Ltd. 7 Bowen Crescent • West Gosford NSW 2250 • Australia Tel: +61 (0) 2 4372 8600 Fax: +61 (0) 2 4372 8603 Belkin Tech Support US: 310.898.1100 ext. 2263 800.223.5546 ext. 2263 Europe: 00 ...