User Guide
Page 1
.... 4 Pioneer Avenue Tuggerah Business Park Tuggerah, NSW 2259, Australia +61 (0) 2 4350 4600 +61 (0) 2 4350 4700 fax © 2007 Belkin International, Inc. Network USB Hub Belkin Tech Support US: 800-223-5546, ext. 2263 310-898-1100, ext. 2263 UK: 0845 607 77 87 Australia: 1800 235 546 New Zealand...: 0800 235 546 Singapore: 800 616 1790 Europe: www.belkin.com/support Belkin International, Inc. 501 West Walnut Street Los Angeles, CA 90220, USA ...
.... 4 Pioneer Avenue Tuggerah Business Park Tuggerah, NSW 2259, Australia +61 (0) 2 4350 4600 +61 (0) 2 4350 4700 fax © 2007 Belkin International, Inc. Network USB Hub Belkin Tech Support US: 800-223-5546, ext. 2263 310-898-1100, ext. 2263 UK: 0845 607 77 87 Australia: 1800 235 546 New Zealand...: 0800 235 546 Singapore: 800 616 1790 Europe: www.belkin.com/support Belkin International, Inc. 501 West Walnut Street Los Angeles, CA 90220, USA ...
User Guide
Page 3
Using the Network USB Hub Control Center 5 4. Operation/Compatibility Notes 15 5. Appendix - Introduction 1 2. Information 16 Table of Contents 1. Setting Up your Network USB Hub 2 3.
Using the Network USB Hub Control Center 5 4. Operation/Compatibility Notes 15 5. Appendix - Introduction 1 2. Information 16 Table of Contents 1. Setting Up your Network USB Hub 2 3.
User Guide
Page 4
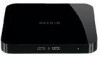
Now you can easily print to the USB printer 3 in your home office from Belkin. Introduction Congratulations and thank you for purchasing the Network USB Hub (the Hub) from your living room or bedroom-through any wireless router. 4 5 1 It lets you a great way to your network 1 router, this innovative sharing tool gives you access 2 your USB devices remotely without the hassle of all the USB devices connected throughout your network. By connecting to enhance its capabilities, as well as those of setting up network software.
Now you can easily print to the USB printer 3 in your home office from Belkin. Introduction Congratulations and thank you for purchasing the Network USB Hub (the Hub) from your living room or bedroom-through any wireless router. 4 5 1 It lets you a great way to your network 1 router, this innovative sharing tool gives you access 2 your USB devices remotely without the hassle of all the USB devices connected throughout your network. By connecting to enhance its capabilities, as well as those of setting up network software.
User Guide
Page 5
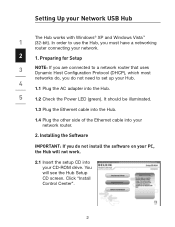
... install the software on your CD-ROM drive. Preparing for Setup 3 NOTE: If you are connected to set up your network. 2 1. You will not work. 2.1 Insert the setup CD into your Network USB Hub The Hub works with Windows® XP and Windows Vista™ 1 (32-bit). Click "Install Control Center". 2 Installing the Software IMPORTANT...
... install the software on your CD-ROM drive. Preparing for Setup 3 NOTE: If you are connected to set up your network. 2 1. You will not work. 2.1 Insert the setup CD into your Network USB Hub The Hub works with Windows® XP and Windows Vista™ 1 (32-bit). Click "Install Control Center". 2 Installing the Software IMPORTANT...
User Guide
Page 6
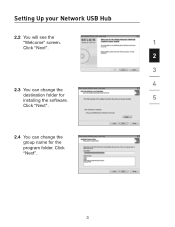
Click "Next". 3 Setting Up your Network USB Hub 2.2 You will see the "Welcome" screen. 1 Click "Next". 2 3 4 2.3 You can change the destination folder for installing the software. 5 Click "Next". 2.4 You can change the group name for the program folder.
Click "Next". 3 Setting Up your Network USB Hub 2.2 You will see the "Welcome" screen. 1 Click "Next". 2 3 4 2.3 You can change the destination folder for installing the software. 5 Click "Next". 2.4 You can change the group name for the program folder.
User Guide
Page 7
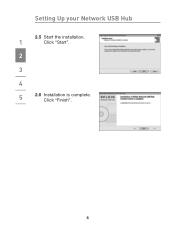
Setting Up your Network USB Hub 2.5 Start the installation. 1 Click "Start". 2 3 4 5 2.6 Installation is complete. Click "Finish". 4
Setting Up your Network USB Hub 2.5 Start the installation. 1 Click "Start". 2 3 4 5 2.6 Installation is complete. Click "Finish". 4
User Guide
Page 8
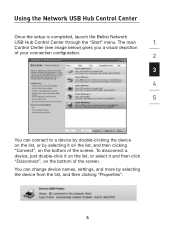
... Center Once the setup is completed, launch the Belkin Network USB Hub Control Center through the "Start" menu. You can connect to a device by double-clicking the device on the list, or by selecting the device from ...
... Center Once the setup is completed, launch the Belkin Network USB Hub Control Center through the "Start" menu. You can connect to a device by double-clicking the device on the list, or by selecting the device from ...
User Guide
Page 9
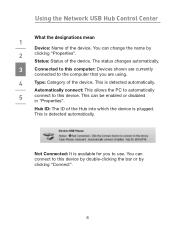
... ID of the device. Status: Status of the Hub into which the device is available for you are currently connected to the computer that you to this device. Automatically connect: This allows the PC ... device. Not Connected: It is plugged. You can change the name by clicking "Connect". 6 This can connect to use. This is detected automatically. Using the Network USB Hub Control Center What the designations mean 1 Device: Name of the device. You can be enabled or disabled in "Properties". This is detected automatically.
... ID of the device. Status: Status of the Hub into which the device is available for you are currently connected to the computer that you to this device. Automatically connect: This allows the PC ... device. Not Connected: It is plugged. You can change the name by clicking "Connect". 6 This can connect to use. This is detected automatically. Using the Network USB Hub Control Center What the designations mean 1 Device: Name of the device. You can be enabled or disabled in "Properties". This is detected automatically.

User Guide
Page 10
It will be removed from the Hub. You can make a request for the device by someone else and it is not available. Using the Network USB Hub Control Center 1 2 Not Connected: The device is being used by clicking "Request Use". 3 4 5 Unavailable: The device has been disconnected from the list when you click "Refresh". 7
It will be removed from the Hub. You can make a request for the device by someone else and it is not available. Using the Network USB Hub Control Center 1 2 Not Connected: The device is being used by clicking "Request Use". 3 4 5 Unavailable: The device has been disconnected from the list when you click "Refresh". 7
User Guide
Page 11
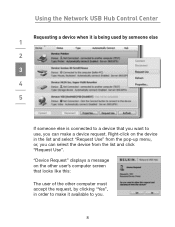
"Device Request" displays a message on the device in order to make a device request. Right-click on the other user's computer screen that looks like this: The user of the other computer must accept the request, by clicking "Yes", in the list and select "Request Use" from the pop-up menu, or, you can make it is being used by someone else 1 2 3 4 5 If someone else is connected to a device that you want to you can select the device from the list and click "Request Use". Using the Network USB Hub Control Center Requesting a device when it available to use, you . 8
"Device Request" displays a message on the device in order to make a device request. Right-click on the other user's computer screen that looks like this: The user of the other computer must accept the request, by clicking "Yes", in the list and select "Request Use" from the pop-up menu, or, you can make it is being used by someone else 1 2 3 4 5 If someone else is connected to a device that you want to you can select the device from the list and click "Request Use". Using the Network USB Hub Control Center Requesting a device when it available to use, you . 8
User Guide
Page 12
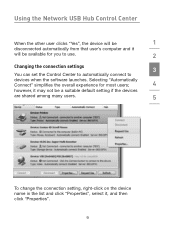
Using the Network USB Hub Control Center When the other user clicks "Yes", the device will be 1 disconnected automatically from that user's computer and it will be available for most ...
Using the Network USB Hub Control Center When the other user clicks "Yes", the device will be 1 disconnected automatically from that user's computer and it will be available for most ...
User Guide
Page 13
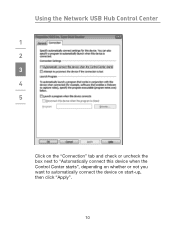
Using the Network USB Hub Control Center 1 2 3 4 5 Click on the "Connection" tab and check or uncheck the box next to "Automatically connect this device when the Control Center starts", depending on whether or not you want to automatically connect the device on start-up, then click "Apply". 10
Using the Network USB Hub Control Center 1 2 3 4 5 Click on the "Connection" tab and check or uncheck the box next to "Automatically connect this device when the Control Center starts", depending on whether or not you want to automatically connect the device on start-up, then click "Apply". 10
User Guide
Page 14
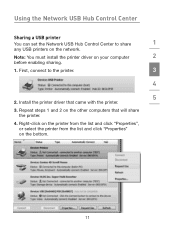
Right-click on the printer from the list and click "Properties", or select the printer from the list and click "Properties" on your computer 2 before enabling sharing. 1. Install the printer driver that will share the printer. 4. First, connect to share 1 any USB printers on the other computers that came with the printer. 3. Repeat steps 1 and 2 on the network. Using the Network USB Hub Control Center Sharing a USB printer You can set the Network USB Hub Control Center to the printer. 3 4 5 2. Note: You must install the printer driver on the bottom. 11
Right-click on the printer from the list and click "Properties", or select the printer from the list and click "Properties" on your computer 2 before enabling sharing. 1. Install the printer driver that will share the printer. 4. First, connect to share 1 any USB printers on the other computers that came with the printer. 3. Repeat steps 1 and 2 on the network. Using the Network USB Hub Control Center Sharing a USB printer You can set the Network USB Hub Control Center to the printer. 3 4 5 2. Note: You must install the printer driver on the bottom. 11
User Guide
Page 15
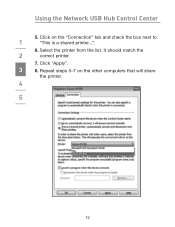
Click "Apply". 3 8. Select the printer from the list. It should match the 2 correct printer. 7. Using the Network USB Hub Control Center 5. Repeat steps 5-7 on the "Connection" tab and check the box next to 1 "This is a shared printer...". 6. Click on the other computers that will share the printer. 4 5 12
Click "Apply". 3 8. Select the printer from the list. It should match the 2 correct printer. 7. Using the Network USB Hub Control Center 5. Repeat steps 5-7 on the "Connection" tab and check the box next to 1 "This is a shared printer...". 6. Click on the other computers that will share the printer. 4 5 12
User Guide
Page 16
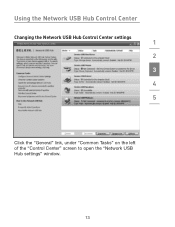
Using the Network USB Hub Control Center Changing the Network USB Hub Control Center settings 1 2 3 4 5 Click the "General" link, under "Common Tasks" on the left of the "Control Center" screen to open the "Network USB Hub settings" window. 13
Using the Network USB Hub Control Center Changing the Network USB Hub Control Center settings 1 2 3 4 5 Click the "General" link, under "Common Tasks" on the left of the "Control Center" screen to open the "Network USB Hub settings" window. 13
User Guide
Page 17
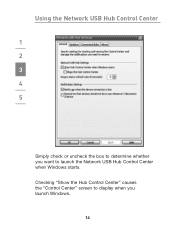
Checking "Show the Hub Control Center" causes the "Control Center" screen to display when you want to determine whether you launch Windows. 14 Using the Network USB Hub Control Center 1 2 3 4 5 Simply check or uncheck the box to launch the Network USB Hub Control Center when Windows starts.
Checking "Show the Hub Control Center" causes the "Control Center" screen to display when you want to determine whether you launch Windows. 14 Using the Network USB Hub Control Center 1 2 3 4 5 Simply check or uncheck the box to launch the Network USB Hub Control Center when Windows starts.
User Guide
Page 18
...Appendix - Operation/Compatibility Notes Certain USB devices may see a warning message like the one connection. If you experience difficulty with the Network USB Hub or connected USB devices, please make sure that ...Hub. 15 some USB devices (e.g., TV tuners, webcams, and USB audio devices) may not work with the Hub. Since the Network USB Hub uses virtual network 1 technology, some devices involve more than one illustrated below. 3 4 WLAN connection 5 The Network USB Hub's virtual network technology may not be compatible with VPN enabled. The Network USB Hub...
...Appendix - Operation/Compatibility Notes Certain USB devices may see a warning message like the one connection. If you experience difficulty with the Network USB Hub or connected USB devices, please make sure that ...Hub. 15 some USB devices (e.g., TV tuners, webcams, and USB audio devices) may not work with the Hub. Since the Network USB Hub uses virtual network 1 technology, some devices involve more than one illustrated below. 3 4 WLAN connection 5 The Network USB Hub's virtual network technology may not be compatible with VPN enabled. The Network USB Hub...