User Manual
Page 2
... used: C Important information or useful hints about usage. B Warning for hazardous situations with our National Environment Regulations. Do not dispose of -the-art technology. Follow all other wastes. A Warning for electric shock. Please read this user manual is also applicable for future use. Take them to someone else, give the user manual as a reference for several other models. Differences between models...
... used: C Important information or useful hints about usage. B Warning for hazardous situations with our National Environment Regulations. Do not dispose of -the-art technology. Follow all other wastes. A Warning for electric shock. Please read this user manual is also applicable for future use. Take them to someone else, give the user manual as a reference for several other models. Differences between models...

User Manual
Page 3
... Adding detergent 15 Tablet detergents 16 Rinse aid 17 Upper basket rack 18 Cutlery basket 20 Height setting with empty basket... 20 Collapsable lower basket wires.........21 5 OPERATING THE PRODUCT22 How to cancel the washing programme 23 How to change the washing programme 23 Half Load Function 23 Tablet Detergent Function 23 Time Delay 23 Warning Sound and Inner Illumination Settings (Depends on model 24 6 MAINTENANCE AND CLEANING 26 Cleaning the outer surface of the product 26 Cleaning the interior...
... Adding detergent 15 Tablet detergents 16 Rinse aid 17 Upper basket rack 18 Cutlery basket 20 Height setting with empty basket... 20 Collapsable lower basket wires.........21 5 OPERATING THE PRODUCT22 How to cancel the washing programme 23 How to change the washing programme 23 Half Load Function 23 Tablet Detergent Function 23 Time Delay 23 Warning Sound and Inner Illumination Settings (Depends on model 24 6 MAINTENANCE AND CLEANING 26 Cleaning the outer surface of the product 26 Cleaning the interior...
User Manual
Page 4
... Dishwasher / User's Manual Our company shall not be unplugged during installation, maintenance, cleaning and repairing procedures. •• Always have the grounding installation made by the Authorised Service Agent. Call the Authorised Service Agent. •• Connect the product to follow these instructions shall void all the weight of the product when it ! otherwise, the product may arise from loading and unloading procedures. •• Do not to open...
... Dishwasher / User's Manual Our company shall not be unplugged during installation, maintenance, cleaning and repairing procedures. •• Always have the grounding installation made by the Authorised Service Agent. Call the Authorised Service Agent. •• Connect the product to follow these instructions shall void all the weight of the product when it ! otherwise, the product may arise from loading and unloading procedures. •• Do not to open...
User Manual
Page 5
... product A If you need to close the door of them properly and sort in it is located. Tilting the product onto its front side may cause the electronic parts in accordance with the product. •• Do not forget to move the product, do the domestic type dishes only. •• This appliance is intended to children. Drain the remaining water in use...
... product A If you need to close the door of them properly and sort in it is located. Tilting the product onto its front side may cause the electronic parts in accordance with the product. •• Do not forget to move the product, do the domestic type dishes only. •• This appliance is intended to children. Drain the remaining water in use...
User Manual
Page 8
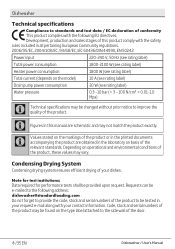
... the product are schematic and may vary. Condensing Drying System Condensing drying system ensures efficient drying of your request e-mail along with the following address: dishwasher@standardloading.com Do not forget to provide the code, stock and serial numbers of the product to be changed without prior notice to the side wall of the door. 8 /35 EN Dishwasher / User's Manual Dishwasher Technical specifications Compliance to standards and test...
... the product are schematic and may vary. Condensing Drying System Condensing drying system ensures efficient drying of your request e-mail along with the following address: dishwasher@standardloading.com Do not forget to provide the code, stock and serial numbers of the product to be changed without prior notice to the side wall of the door. 8 /35 EN Dishwasher / User's Manual Dishwasher Technical specifications Compliance to standards and test...
User Manual
Page 9
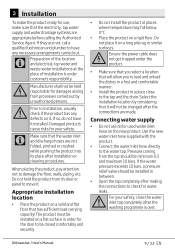
... check for water leaks. Appropriate installation location •• Place the product on the new product. C Preparation of installation is over. Connecting water supply •• Do not use , make the product ready for use old or used water inlet hose on a solid and flat floor that has sufficient load carrying capacity! If they are appropriate before calling the Authorised Service Agent. 3 Installation To make sure that the electricity, tap water supply and water drainage systems...
... check for water leaks. Appropriate installation location •• Place the product on the new product. C Preparation of installation is over. Connecting water supply •• Do not use , make the product ready for use old or used water inlet hose on a solid and flat floor that has sufficient load carrying capacity! If they are appropriate before calling the Authorised Service Agent. 3 Installation To make sure that the electricity, tap water supply and water drainage systems...

User Manual
Page 10
... 50 cm Adjusting the feet If the door of the product. A discharge hose longer than 4 meters will cause washing performance to be affected.Attach the water discharge hose to the drain hole or sink's drainage. Adjust the feet of the product. Electrical connection Before you need to the drainpipe in a readily accessible position. The supply cord or the mains lead must be replaced by a Authorised Service Agent or...
... 50 cm Adjusting the feet If the door of the product. A discharge hose longer than 4 meters will cause washing performance to be affected.Attach the water discharge hose to the drain hole or sink's drainage. Adjust the feet of the product. Electrical connection Before you need to the drainpipe in a readily accessible position. The supply cord or the mains lead must be replaced by a Authorised Service Agent or...
User Manual
Page 11
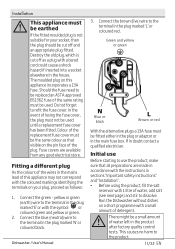
... available from any good electrical store. Connect the green - yellow or green (earth) wire to the product. 11/35 EN If in the main fuse box. A There might be a small amount of the same rating must be used until a replacement fuse cover has been fitted. Dishwasher / User's Manual 3. Should the fuse need to use Before starting to be fitted either in the plug or adaptor or in...
... available from any good electrical store. Connect the green - yellow or green (earth) wire to the product. 11/35 EN If in the main fuse box. A There might be a small amount of the same rating must be used until a replacement fuse cover has been fitted. Dishwasher / User's Manual 3. Should the fuse need to use Before starting to be fitted either in the plug or adaptor or in...
User Manual
Page 12
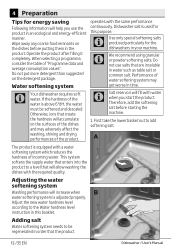
... energy saving Following information will allow washing the dishes with the same performance continuously. If the hardness of incoming water. Adjusting the water softening system Washing performance will increase when water softening system is above 6°dH, the water must be regenerated in order that will help you start the product. First take the lower basket out to a level that the product 12 /35 EN Dishwasher / User's Manual...
... energy saving Following information will allow washing the dishes with the same performance continuously. If the hardness of incoming water. Adjusting the water softening system Washing performance will increase when water softening system is above 6°dH, the water must be regenerated in order that will help you start the product. First take the lower basket out to a level that the product 12 /35 EN Dishwasher / User's Manual...
User Manual
Page 13
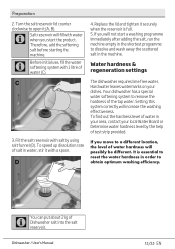
... water hardness in order to open it with 1 litre of water hardness will not start the product. To speed up dissolution rate of salt in the shortest programme to remove the hardness of Dishwasher salt into the salt reservoir. Preparation 2. If you move to a different location, the level of water (C). 4. To find out the hardness level of test strip provided. The dishwasher requires lime free water. Setting...
... water hardness in order to open it with 1 litre of water hardness will not start the product. To speed up dissolution rate of salt in the shortest programme to remove the hardness of Dishwasher salt into the salt reservoir. Preparation 2. If you move to a different location, the level of water (C). 4. To find out the hardness level of test strip provided. The dishwasher requires lime free water. Setting...

User Manual
Page 15
... not be consumed and the lamp will display the last water hardness level adjustment. Adding detergent C Refer to the "Programme Table" to use detergents that contain chlorine and phosphate as illustrated below. 1. Put the detergent into the detergent dispenser. Dishwasher / User's Manual 15/35 EN If you notice limescale spots particularly on for the environment. Therefore, Salt Indicator remains on glasses after adding salt...
... not be consumed and the lamp will display the last water hardness level adjustment. Adding detergent C Refer to the "Programme Table" to use detergents that contain chlorine and phosphate as illustrated below. 1. Put the detergent into the detergent dispenser. Dishwasher / User's Manual 15/35 EN If you notice limescale spots particularly on for the environment. Therefore, Salt Indicator remains on glasses after adding salt...
User Manual
Page 17
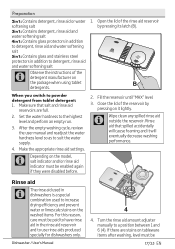
... the package when using tablet B detergents. Make the appropriate rinse aid settings. Dishwasher / User's Manual 4 4. When you switch to a position between 1 and 6 (4). Turn the rinse aid amount adjuster manually to powder detergent from tablet detergent: 1. Preparation 2in1: Contains detergent, rinse aid or water 1. C Wipe clean any spilled rinse aid outside the reservoir. Rinse aid that salt and rinse aid reservoirs are stains on it will cause foaming and it lightly. Open the lid of the rinse aid reservoir softening salt...
... the package when using tablet B detergents. Make the appropriate rinse aid settings. Dishwasher / User's Manual 4 4. When you switch to a position between 1 and 6 (4). Turn the rinse aid amount adjuster manually to powder detergent from tablet detergent: 1. Preparation 2in1: Contains detergent, rinse aid or water 1. C Wipe clean any spilled rinse aid outside the reservoir. Rinse aid that salt and rinse aid reservoirs are stains on it will cause foaming and it lightly. Open the lid of the rinse aid reservoir softening salt...

User Manual
Page 22
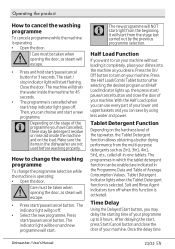
... will warn you 10 times before you to switch your use Half Load/Combi Tablet A Do not open the dishwasher door whilst the appliance is working, then a safety mechanism ensures the machine immediately stops. Time Delay Indicator 5. Start / Stop Indicator Light 6. machine off . 22 /35 EN Dishwasher / User's Manual Salt Level Indicator Light 4. Delayed Start Button •• Press the on/off the water tap when not in seconds warns you start /pause/cancel button. we recommend •...
... will warn you 10 times before you to switch your use Half Load/Combi Tablet A Do not open the dishwasher door whilst the appliance is working, then a safety mechanism ensures the machine immediately stops. Time Delay Indicator 5. Start / Stop Indicator Light 6. machine off . 22 /35 EN Dishwasher / User's Manual Salt Level Indicator Light 4. Delayed Start Button •• Press the on/off the water tap when not in seconds warns you start /pause/cancel button. we recommend •...
User Manual
Page 23
.... The indicator light will start flashing. With the Half Load option you desire. After delaying the start from the multi-purpose detergents such as you can save by the previous programme selection. A ! The start / stop indicator light goes off. C Depending on the hardness level of your machine. Salt and Rinse Agent indicators turn on and new programme will be detergent residue or rinse aid inside the machine for 3 seconds. Once the delay time Dishwasher / User's Manual 23...
.... The indicator light will start flashing. With the Half Load option you desire. After delaying the start from the multi-purpose detergents such as you can save by the previous programme selection. A ! The start / stop indicator light goes off. C Depending on the hardness level of your machine. Salt and Rinse Agent indicators turn on and new programme will be detergent residue or rinse aid inside the machine for 3 seconds. Once the delay time Dishwasher / User's Manual 23...
User Manual
Page 24
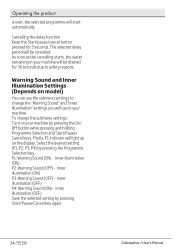
... Start/pause/cancel button pressed for 30 seconds due to change the submenu settings: Turn on the display. To change the "Warning Sound" and "Inner Illumination" settings you will use the submenu settings to safety reasons. Inner illumination (OFF) P4: Warning Sound (ON) - Inner illumination (OFF) Save the selected setting by pressing Start/Pause/Cancel key again. 24 /35 EN Dishwasher / User's Manual The selected delay period will light...
... Start/pause/cancel button pressed for 30 seconds due to change the submenu settings: Turn on the display. To change the "Warning Sound" and "Inner Illumination" settings you will use the submenu settings to safety reasons. Inner illumination (OFF) P4: Warning Sound (ON) - Inner illumination (OFF) Save the selected setting by pressing Start/Pause/Cancel key again. 24 /35 EN Dishwasher / User's Manual The selected delay period will light...
User Manual
Page 26
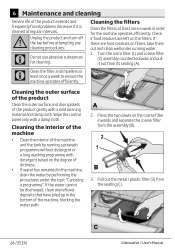
.... 6 Maintenance and cleaning Service life of the product extends and frequently faced problems decrease if it out from the seating (C). 3 C 3 C C 26 /35 EN Dishwasher / User's Manual Turn the micro filter (1) and coarse filter (2) assembly counterclockwise and pull it is cleaned at regular intervals. A Unplug the product and turn off the tap before attempting any leftover deposits that have piled up in the machine, drain the water by running...
.... 6 Maintenance and cleaning Service life of the product extends and frequently faced problems decrease if it out from the seating (C). 3 C 3 C C 26 /35 EN Dishwasher / User's Manual Turn the micro filter (1) and coarse filter (2) assembly counterclockwise and pull it is cleaned at regular intervals. A Unplug the product and turn off the tap before attempting any leftover deposits that have piled up in the machine, drain the water by running...
User Manual
Page 29
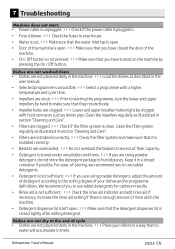
... your dishes and/or programme definitions. 7 Troubleshooting Machine does not start. • Power cable is unplugged. >>> Check if the power cable is plugged in. • Fuse is blown. >>> Check the fuses in your house. • Water is cut. >>> Make sure that the water inlet tap is open. • Door of the machine is open . >>> Make sure that the detergent dispenser lid is closed tightly after adding detergent. Increase the rinse aid setting...
... your dishes and/or programme definitions. 7 Troubleshooting Machine does not start. • Power cable is unplugged. >>> Check if the power cable is plugged in. • Fuse is blown. >>> Check the fuses in your house. • Water is cut. >>> Make sure that the water inlet tap is open. • Door of the machine is open . >>> Make sure that the detergent dispenser lid is closed tightly after adding detergent. Increase the rinse aid setting...
User Manual
Page 31
... not close the door of low quality stainless steel. >>> Corrosion on those surfaces as opening cans. Run the prewash programme to remove the salt that are already corroded are clogged. >>> Check if the filter system is connected to other then their intended uses. • Cutlery are used for a long time. >>> If silverware soiled with cleansers such as illustrated in section "Cleaning and Care". • Dirty dishes...
... not close the door of low quality stainless steel. >>> Corrosion on those surfaces as opening cans. Run the prewash programme to remove the salt that are already corroded are clogged. >>> Check if the filter system is connected to other then their intended uses. • Cutlery are used for a long time. >>> If silverware soiled with cleansers such as illustrated in section "Cleaning and Care". • Dirty dishes...

User Manual
Page 32
... not suitable for washing in the dishwasher. Run the prewash programme to remove the salt that spilled inside the machine. Manufacturers of the programme. • Water hardness setting is low or salt level is tightly closed container if possible. Clean the impellers regularly as lemon pips. Troubleshooting Detergent remains in detergent dispenser. • Detergent dispenser was damp when adding detergent. >>> Make sure that the detergent dispenser is dried well prior...
... not suitable for washing in the dishwasher. Run the prewash programme to remove the salt that spilled inside the machine. Manufacturers of the programme. • Water hardness setting is low or salt level is tightly closed container if possible. Clean the impellers regularly as lemon pips. Troubleshooting Detergent remains in detergent dispenser. • Detergent dispenser was damp when adding detergent. >>> Make sure that the detergent dispenser is dried well prior...

User Manual
Page 33
... used. >>>Lower rinse aid setting. Water remains in the dishwasher at the end of the rinse aid reservoir is clean. Never try to soft water. >>> Measure the hardness of their capacity. If your dealer or the Authorised Service Agent. A bluish / rainbow appearance occurs when the glass is pointed to light. • Excessive rinse aid is no need to hand-wash the dishes before placing them into the machine when adding rinse aid...
... used. >>>Lower rinse aid setting. Water remains in the dishwasher at the end of the rinse aid reservoir is clean. Never try to soft water. >>> Measure the hardness of their capacity. If your dealer or the Authorised Service Agent. A bluish / rainbow appearance occurs when the glass is pointed to light. • Excessive rinse aid is no need to hand-wash the dishes before placing them into the machine when adding rinse aid...


