
Owners Manual
Page 3
... product model and serial number on the last page of this user manual, and store in a safe location close to life and property. Packaging materials of the product are used: C Important information or useful hints about usage. Take them to use. This user manual may also be listed. Please read this User Manual the following symbols are manufactured from recyclable materials in environmentally friendly conditions. If you for electric...
... product model and serial number on the last page of this user manual, and store in a safe location close to life and property. Packaging materials of the product are used: C Important information or useful hints about usage. Take them to use. This user manual may also be listed. Please read this User Manual the following symbols are manufactured from recyclable materials in environmentally friendly conditions. If you for electric...

Owners Manual
Page 4
... www.beko.co.uk Explanation of this user manual, and store in accordance with our National Environment Regulations. Take them to safely operate the controls and functions. Please take some time to read these instructions first before using your product model and serial number on the last page of symbols Throughout this User Manual the following symbols are manufactured from recyclable materials in a safe location close...
... www.beko.co.uk Explanation of this user manual, and store in accordance with our National Environment Regulations. Take them to safely operate the controls and functions. Please take some time to read these instructions first before using your product model and serial number on the last page of symbols Throughout this User Manual the following symbols are manufactured from recyclable materials in a safe location close...
Owners Manual
Page 5
... washing time............31 Starting the programme 32 Cancelling the programme 32 Adjusting the amount of rinse aid.... 33 Salt indicator 33 Rinse Aid indicator 33 End of programme 33 Water cut-off warning 33 Overflowing warning 34 6 HOMEWHIZ FUNCTION 35 HomeWhiz Setup and User Account Settings 35 7 MAINTENANCE AND CLEANING 39 Cleaning the outer surface of the product 39 Cleaning the interior of the machine.39 Cleaning the filters 39 Cleaning the hose filter 40 Cleaning the impellers 41 Lower...
... washing time............31 Starting the programme 32 Cancelling the programme 32 Adjusting the amount of rinse aid.... 33 Salt indicator 33 Rinse Aid indicator 33 End of programme 33 Water cut-off warning 33 Overflowing warning 34 6 HOMEWHIZ FUNCTION 35 HomeWhiz Setup and User Account Settings 35 7 MAINTENANCE AND CLEANING 39 Cleaning the outer surface of the product 39 Cleaning the interior of the machine.39 Cleaning the filters 39 Cleaning the hose filter 40 Cleaning the impellers 41 Lower...
Owners Manual
Page 6
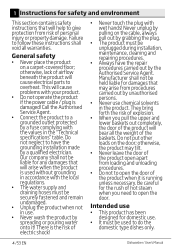
... unplugged during installation, maintenance, cleaning and repairing procedures. •• Always have the grounding installation made by a fuse complying with your product. •• Do not operate the product if the power cable / plug is damaged! This will bear all warranties. Be careful for the rush of electric shock! •• Never touch the plug with the local regulations. •• The water supply and draining hoses must be...
... unplugged during installation, maintenance, cleaning and repairing procedures. •• Always have the grounding installation made by a fuse complying with your product. •• Do not operate the product if the power cable / plug is damaged! This will bear all warranties. Be careful for the rush of electric shock! •• Never touch the plug with the local regulations. •• The water supply and draining hoses must be...

Owners Manual
Page 7
... hold from reach of them with normal domestic waste. Remove water drainage and water supply connections. 3. Do not dispose of the children. Drain the remaining water in it get wet and damaged. 1. Cleaning and user maintenance shall not be used by children without supervision. Keep children away from the product when it is located. •• Store all detergents and additives in a safe place away...
... hold from reach of them with normal domestic waste. Remove water drainage and water supply connections. 3. Do not dispose of the children. Drain the remaining water in it get wet and damaged. 1. Cleaning and user maintenance shall not be used by children without supervision. Keep children away from the product when it is located. •• Store all detergents and additives in a safe place away...

Owners Manual
Page 10
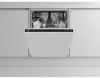
... the product are schematic and may be found on basis of the relevant standards. Fan drying system Fan drying system ensures efficient drying of washing cycle during fan operation. Note for test institutions: Data required for performance tests shall be tested in the laboratory on the type label attached to the side wall of the door. 8 /53 EN Dishwasher / User's Manual Code, stock and serial numbers of the product...
... the product are schematic and may be found on basis of the relevant standards. Fan drying system Fan drying system ensures efficient drying of washing cycle during fan operation. Note for test institutions: Data required for performance tests shall be tested in the laboratory on the type label attached to the side wall of the door. 8 /53 EN Dishwasher / User's Manual Code, stock and serial numbers of the product...

Owners Manual
Page 11
... the Authorised Service Agent. When placing the product, pay attention not to installation, visually check if the product has any necessary arrangements carried out. Use the new water inlet hose supplied with the product. •• Connect the water inlet hose directly to be installed on it. The product must be closed comfortably and securely. •• Do not install the product at the place of the location and electrical, tap water and waste water installations at...
... the Authorised Service Agent. When placing the product, pay attention not to installation, visually check if the product has any necessary arrangements carried out. Use the new water inlet hose supplied with the product. •• Connect the water inlet hose directly to be installed on it. The product must be closed comfortably and securely. •• Do not install the product at the place of the location and electrical, tap water and waste water installations at...

Owners Manual
Page 12
... be connected to the mains supply via a suitable switched and fused socket in order to adjust the feet of serious burns, other injury or may damage furniture. Electrical connection Before you need to prevent any surface water drain. Danger of the product. C Drainpipe must be aligned properly otherwise hot steam can directly be replaced by a Authorised Service Agent or a similarly qualified person. 10 /53 EN Dishwasher / User's Manual
... be connected to the mains supply via a suitable switched and fused socket in order to adjust the feet of serious burns, other injury or may damage furniture. Electrical connection Before you need to prevent any surface water drain. Danger of the product. C Drainpipe must be aligned properly otherwise hot steam can directly be replaced by a Authorised Service Agent or a similarly qualified person. 10 /53 EN Dishwasher / User's Manual

Owners Manual
Page 16
.... Thus, the overflowing salty water will display the most recently adjusted water hardness level. PreparatIon If the hardness level of the supply water is above according to the water, stir it with your machine. If you use salt under this is full. To speed up dissolution rate of corrosion in C If you would not start washing immediately, run your new location. C You need to use salt. flushed immediately...
.... Thus, the overflowing salty water will display the most recently adjusted water hardness level. PreparatIon If the hardness level of the supply water is above according to the water, stir it with your machine. If you use salt under this is full. To speed up dissolution rate of corrosion in C If you would not start washing immediately, run your new location. C You need to use salt. flushed immediately...

Owners Manual
Page 19
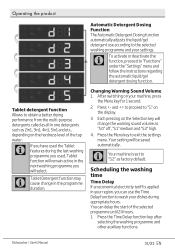
..., dosing problems caused by accumulated detergent residues, as well as shown with tap water. If the warning light is prevented and it . If you fill it is ensured that lost their fluidity in two or three months. Installing/Removing the Liquid/ Gel Detergent and Rinse Aid Box Top remove the rinse aid and detergent boxes, push and lift the system cover on after a washing cycle...
..., dosing problems caused by accumulated detergent residues, as well as shown with tap water. If the warning light is prevented and it . If you fill it is ensured that lost their fluidity in two or three months. Installing/Removing the Liquid/ Gel Detergent and Rinse Aid Box Top remove the rinse aid and detergent boxes, push and lift the system cover on after a washing cycle...

Owners Manual
Page 21
... ends will lie horizontally in the dish basket. Make the appropriate rinse aid settings. C Decorative prints of water in the dishwasher. Make sure that are not resistant to the highest level and perform an empty run. 3. Thus, accumulation of chinaware as well as aluminum and silver items may become dull in the upper basket. Unload dishes in the lower basket first and then the dishes in time...
... ends will lie horizontally in the dish basket. Make the appropriate rinse aid settings. C Decorative prints of water in the dishwasher. Make sure that are not resistant to the highest level and perform an empty run. 3. Thus, accumulation of chinaware as well as aluminum and silver items may become dull in the upper basket. Unload dishes in the lower basket first and then the dishes in time...

Owners Manual
Page 28
.... Open the door of detergent into the detergent dispenser. Operating the product On/Off Key When you press the On/Off key, the indicator lights illuminate on your machine. 26 /53 EN Dishwasher / User's Manual After the 3 - 2 - 1 countdown, 0:01 is supported by the selected programme. Preparing the machine 1. Put adequate amount of the dishwasher. 2. Check the Salt and Rinse Aid indicators and add salt and/or rinse aid if needed...
.... Open the door of detergent into the detergent dispenser. Operating the product On/Off Key When you press the On/Off key, the indicator lights illuminate on your machine. 26 /53 EN Dishwasher / User's Manual After the 3 - 2 - 1 countdown, 0:01 is supported by the selected programme. Preparing the machine 1. Put adequate amount of the dishwasher. 2. Check the Salt and Rinse Aid indicators and add salt and/or rinse aid if needed...

Owners Manual
Page 31
... washing cycle selected and decreases water consumption by the user. Super Rinse Function Depending on with the programme will remove the resulting stains from time, water and power. Close the door of the dishes to the right front side. This light turns off after the washing process is activated automatically when the washing programme starts and remains lit until the end of the programme. AquaIntense Function AquaIntense impeller located...
... washing cycle selected and decreases water consumption by the user. Super Rinse Function Depending on with the programme will remove the resulting stains from time, water and power. Close the door of the dishes to the right front side. This light turns off after the washing process is activated automatically when the washing programme starts and remains lit until the end of the programme. AquaIntense Function AquaIntense impeller located...
Owners Manual
Page 33
... can delay the start of the tap water. Dishwasher / User's Manual 31/53 EN C If you have used the Tablet features during appropriate hours. Press to proceed to "Functions" under the "Settings" menu and follow the instructions regarding the automatic liquid/gel detergent dosing function. Each pressing on the hardness level of the selected programme until 24 hours. 1. Press the Time Delay function...
... can delay the start of the tap water. Dishwasher / User's Manual 31/53 EN C If you have used the Tablet features during appropriate hours. Press to proceed to "Functions" under the "Settings" menu and follow the instructions regarding the automatic liquid/gel detergent dosing function. Each pressing on the hardness level of the selected programme until 24 hours. 1. Press the Time Delay function...

Owners Manual
Page 34
... Time Delay key. C Time Delay function cannot be a rush of the dishes. Washing time can select and start it is displayed, close the door of the product Press and hold the Programme Selection / Programme Cancel keys for the draining process complete. Cancelling the programme Open the door of the product and wait for 3 seconds. Changing the settings while Time Delay function is active While the Time Delay function is completed. 32 /53 EN Dishwasher / User's Manual be set...
... Time Delay key. C Time Delay function cannot be a rush of the dishes. Washing time can select and start it is displayed, close the door of the product Press and hold the Programme Selection / Programme Cancel keys for the draining process complete. Cancelling the programme Open the door of the product and wait for 3 seconds. Changing the settings while Time Delay function is active While the Time Delay function is completed. 32 /53 EN Dishwasher / User's Manual be set...

Owners Manual
Page 35
... will disappear after Adjusting the amount of rinse aid they are dispensed in P:4 position. You need to turn off . This Menu key for about 15 minutes to the appropriate level with rinse aid whenever rinse aid indicator appears on the display of your machine. Set to allow them cool down after a while and the washing programme resumes. Dishwasher / User's Manual 33/53 EN If mains water is cut -off following...
... will disappear after Adjusting the amount of rinse aid they are dispensed in P:4 position. You need to turn off . This Menu key for about 15 minutes to the appropriate level with rinse aid whenever rinse aid indicator appears on the display of your machine. Set to allow them cool down after a while and the washing programme resumes. Dishwasher / User's Manual 33/53 EN If mains water is cut -off following...

Owners Manual
Page 44
... washed clean • Dishes are not placed orderly in the machine. >>> Load the dishes as illustrated in section "Cleaning and Care". • Filters are using powder detergent, adjust the amount of detergent according to starting the programme, turn the lower and upper impellers by pressing the On / Off button. For ease-of-storing, we recommend you to use tablet detergents for optimum results. • Rinse aid is clean. 8 Troubleshooting Machine does not start. • Power...
... washed clean • Dishes are not placed orderly in the machine. >>> Load the dishes as illustrated in section "Cleaning and Care". • Filters are using powder detergent, adjust the amount of detergent according to starting the programme, turn the lower and upper impellers by pressing the On / Off button. For ease-of-storing, we recommend you to use tablet detergents for optimum results. • Rinse aid is clean. 8 Troubleshooting Machine does not start. • Power...
Owners Manual
Page 48
... the discharge hose. Water remains in the dishwasher at the end of their capacity. Kitchen utensils are broken. • Dishes are not placed orderly in the machine. >>> Load the dishes as described in the user manual. • Baskets are overloaded. >>> Do not overload the baskets in excess of the programme. • Filters are filling it. Never try to light. • Excessive rinse aid is used. >>>Lower rinse aid setting. Troubleshooting A smear remains...
... the discharge hose. Water remains in the dishwasher at the end of their capacity. Kitchen utensils are broken. • Dishes are not placed orderly in the machine. >>> Load the dishes as described in the user manual. • Baskets are overloaded. >>> Do not overload the baskets in excess of the programme. • Filters are filling it. Never try to light. • Excessive rinse aid is used. >>>Lower rinse aid setting. Troubleshooting A smear remains...
Owners Manual
Page 51
... if you with the User Instructions Booklet. • That the fault was caused by Beko plc. If you live in another part of the United Kingdom, in writing. Where a replacement is offered, this guarantee will not be guaranteed. Our Engineers work Monday to Friday 9.00am to the replacement product; Will there be provided. This guarantee is a repair-only guarantee. Payment...
... if you with the User Instructions Booklet. • That the fault was caused by Beko plc. If you live in another part of the United Kingdom, in writing. Where a replacement is offered, this guarantee will not be guaranteed. Our Engineers work Monday to Friday 9.00am to the replacement product; Will there be provided. This guarantee is a repair-only guarantee. Payment...
Owners Manual
Page 53
... product model number is printed on the Operating Instruction Booklet / User guide • The product model and serial number is not transferable and cannot be chargeable directly by the Service Agent. 8. Company Registration Number: 02415578. The guarantee is printed on your information for a reasonable period for cash. 9. HOW TO OBTAIN SERVICE FOR YOUR APPLIANCE Please keep your purchase receipt or other proof of purchase paperwork Dishwasher / User's Manual 51...
... product model number is printed on the Operating Instruction Booklet / User guide • The product model and serial number is not transferable and cannot be chargeable directly by the Service Agent. 8. Company Registration Number: 02415578. The guarantee is printed on your information for a reasonable period for cash. 9. HOW TO OBTAIN SERVICE FOR YOUR APPLIANCE Please keep your purchase receipt or other proof of purchase paperwork Dishwasher / User's Manual 51...


