User Manual
Page 3
... the packaging material collection points designated by the local authorities. Follow all other models. Do not dispose of the product are used: C Important information or useful hints about usage. Explanation of -the-art technology. Dear Customer, We hope that this user manual is also applicable for electric shock. Please read this entire user manual and all warnings and information in the...
... the packaging material collection points designated by the local authorities. Follow all other models. Do not dispose of the product are used: C Important information or useful hints about usage. Explanation of -the-art technology. Dear Customer, We hope that this user manual is also applicable for electric shock. Please read this entire user manual and all warnings and information in the...
User Manual
Page 4
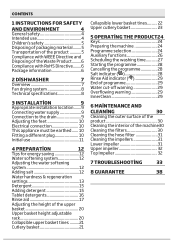
... the washing time............27 Starting the programme 28 Cancelling the programme 28 Salt indicator 28 Rinse Aid indicator 29 End of programme 29 Water cut-off warning 29 Overflowing warning 29 InnerClean 29 6 MAINTENANCE AND CLEANING 30 Cleaning the outer surface of the product 30 Cleaning the interior of the machine.30 Cleaning the filters 30 Cleaning the hose filter 31 Cleaning the impellers 31 Lower impeller 31 Upper impeller 32 Top Impeller 32 7 TROUBLESHOOTING 33...
... the washing time............27 Starting the programme 28 Cancelling the programme 28 Salt indicator 28 Rinse Aid indicator 29 End of programme 29 Water cut-off warning 29 Overflowing warning 29 InnerClean 29 6 MAINTENANCE AND CLEANING 30 Cleaning the outer surface of the product 30 Cleaning the interior of the machine.30 Cleaning the filters 30 Cleaning the hose filter 31 Cleaning the impellers 31 Lower impeller 31 Upper impeller 32 Top Impeller 32 7 TROUBLESHOOTING 33...
User Manual
Page 5
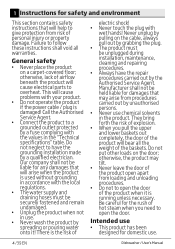
... during installation, maintenance, cleaning and repairing procedures. •• Always have the grounding installation made by a qualified electrician. Call the Authorised Service Agent. •• Connect the product to overheat. There is running unless necessary. Do not put other loads on the door; Be careful for domestic use •• This product has been designed for the rush of hot steam when you pull the upper and lower baskets...
... during installation, maintenance, cleaning and repairing procedures. •• Always have the grounding installation made by a qualified electrician. Call the Authorised Service Agent. •• Connect the product to overheat. There is running unless necessary. Do not put other loads on the door; Be careful for domestic use •• This product has been designed for the rush of hot steam when you pull the upper and lower baskets...
User Manual
Page 6
.... Cleaning and user maintenance shall not be used in household and similar applications such as: - Remove water drainage and water supply connections. 3. InstructIons for the children. Children shall not play with reduced physical,sensory or mental capabilities or lack of experience and knowledge if they have been given supervision or instruction concerning use . Do not dispose of the product are dangerous to close the door...
.... Cleaning and user maintenance shall not be used in household and similar applications such as: - Remove water drainage and water supply connections. 3. InstructIons for the children. Children shall not play with reduced physical,sensory or mental capabilities or lack of experience and knowledge if they have been given supervision or instruction concerning use . Do not dispose of the product are dangerous to close the door...
User Manual
Page 9
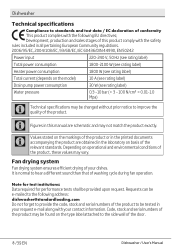
... the model) Drain pump power consumption Water pressure 220-240 V, 50 Hz (see rating label) 1800-2100 W (see rating label) 1800 W (see rating label) 10 A (see rating label) 30 W (see rating label) 0.3 -10 bar (= 3 - 100 N/cm² = 0.01-1.0 Mpa) C Technical specifications may not match the product exactly. C Figures in this product comply with your contact information. Fan drying system Fan drying system ensures efficient drying of washing cycle...
... the model) Drain pump power consumption Water pressure 220-240 V, 50 Hz (see rating label) 1800-2100 W (see rating label) 1800 W (see rating label) 10 A (see rating label) 30 W (see rating label) 0.3 -10 bar (= 3 - 100 N/cm² = 0.01-1.0 Mpa) C Technical specifications may not match the product exactly. C Figures in this product comply with your contact information. Fan drying system Fan drying system ensures efficient drying of washing cycle...
User Manual
Page 10
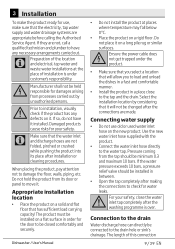
... directly be installed in order for the door to the drain hole or sink's drainage. When placing the product, pay attention not to the water tap. Dishwasher / User's Manual •• Do not install the product at the place of this connection 9/39 EN C Make sure that the water inlet and discharge hoses are made. If the water pressure exceeds 10 bars, a pressure relief valve should be changed...
... directly be installed in order for the door to the drain hole or sink's drainage. When placing the product, pay attention not to the water tap. Dishwasher / User's Manual •• Do not install the product at the place of this connection 9/39 EN C Make sure that the water inlet and discharge hoses are made. If the water pressure exceeds 10 bars, a pressure relief valve should be changed...
User Manual
Page 11
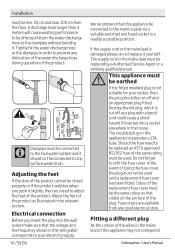
... fuse. Electrical connection Before you need to prevent any surface water drain. The moulded plug on the pin face of the same rating must be the same colour as a plug with a bared cord could cause a shock hazard if inserted into the wall socket make sure that visible on this appliance may not correspond Dishwasher / User's Manual In the event of the product. The supply cord or...
... fuse. Electrical connection Before you need to prevent any surface water drain. The moulded plug on the pin face of the same rating must be the same colour as a plug with a bared cord could cause a shock hazard if inserted into the wall socket make sure that visible on this appliance may not correspond Dishwasher / User's Manual In the event of the product. The supply cord or...
User Manual
Page 14
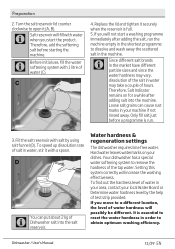
... to a different location, the level of test strip provided. Your dishwasher has a special water softening system to open it with water when you move to obtain optimum washing efficiency. It is essential to reset the water hardness in your dishes. Setting this system correctly will not start the product. Preparation 2. Hard water leaves watermarks on for a while after adding the salt, run . 3. If you start a washing programme immediately...
... to a different location, the level of test strip provided. Your dishwasher has a special water softening system to open it with water when you move to obtain optimum washing efficiency. It is essential to reset the water hardness in your dishes. Setting this system correctly will not start the product. Preparation 2. Hard water leaves watermarks on for a while after adding the salt, run . 3. If you start a washing programme immediately...
User Manual
Page 16
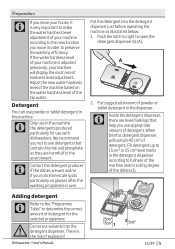
... recent hardness level adjustment. C Contact the detergent producer if the dishes are level markings that contain chlorine and phosphate as illustrated below. 1. Push the latch to right to preserve the washing efficiency. There is over. We recommend you use powder or tablet detergent in the dispenser. If the water hardness level of your machine is adjusted previously, your machine according to the new location you...
... recent hardness level adjustment. C Contact the detergent producer if the dishes are level markings that contain chlorine and phosphate as illustrated below. 1. Push the latch to right to preserve the washing efficiency. There is over. We recommend you use powder or tablet detergent in the dispenser. If the water hardness level of your machine is adjusted previously, your machine according to the new location you...
User Manual
Page 17
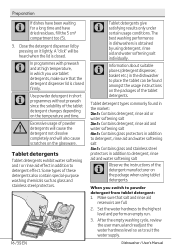
... since the solubility of the tablet detergents. A "click" will also cause scratches on the packages of the tablet detergent changes depending on it lightly. C Use poAwder detergent in dishwashers is closed . Tablet detergent types commonly found amongst the usage instructions on the glassware. After the empty washing cycle, review the user manual and readjust the water hardness level so as to powder detergent from tablet detergent: 1. Close the detergent dispenser lid by using tablet detergents.
... since the solubility of the tablet detergents. A "click" will also cause scratches on the packages of the tablet detergent changes depending on it lightly. C Use poAwder detergent in dishwashers is closed . Tablet detergent types commonly found amongst the usage instructions on the glassware. After the empty washing cycle, review the user manual and readjust the water hardness level so as to powder detergent from tablet detergent: 1. Close the detergent dispenser lid by using tablet detergents.
User Manual
Page 18
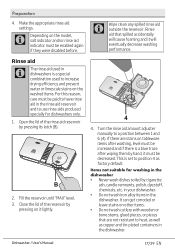
... by pressing its latch (B). B 2. Close the lid of the rinse aid reservoir by pressing on the washed items. For this reason, care must be decreased. Turn the rinse aid amount adjuster manually to heat, as well as factory default. Items not suitable for dishwashers only. 1. Dishwasher / User's Manual 17/39 EN Rinse aid C The rinse aid used in the dishwasher. Fill the reservoir until "MAX" level. 3. Make the appropriate rinse aid settings. in your dishwasher. ••...
... by pressing its latch (B). B 2. Close the lid of the rinse aid reservoir by pressing on the washed items. For this reason, care must be decreased. Turn the rinse aid amount adjuster manually to heat, as well as factory default. Items not suitable for dishwashers only. 1. Dishwasher / User's Manual 17/39 EN Rinse aid C The rinse aid used in the dishwasher. Fill the reservoir until "MAX" level. 3. Make the appropriate rinse aid settings. in your dishwasher. ••...
User Manual
Page 25
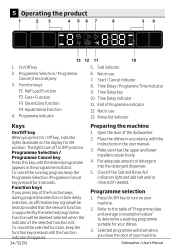
... the upper and lower impellers rotate freely. 4. To cancel the selected function, keep the Programme Selection /Programme Cancel key pressed for ON position. Put adequate amount of your machine. 2. Start / Cancel indicator 8. Place the dishes in accordance with the instructions in OFF position. Make sure that the relevant function is lit. Time Delay key 10. The lights turn on the display for 3 seconds. Dishwasher / User's Manual Time Delay indicator 11...
... the upper and lower impellers rotate freely. 4. To cancel the selected function, keep the Programme Selection /Programme Cancel key pressed for ON position. Put adequate amount of your machine. 2. Start / Cancel indicator 8. Place the dishes in accordance with the instructions in OFF position. Make sure that the relevant function is lit. Time Delay key 10. The lights turn on the display for 3 seconds. Dishwasher / User's Manual Time Delay indicator 11...
User Manual
Page 27
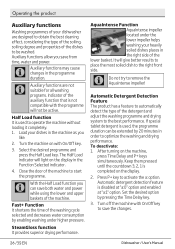
... of the detergent and adjust the washing programme and drying system to save both water and power while using the lower and upper baskets of the machine. After turning on the display in the machine as you like. 2. Turn off the machine with On/Off key to the best performance. Load your dishes in the Function Selected indicator. 4. Operating the product Auxiliary functions Washing programmes of your dishwasher are not...
... of the detergent and adjust the washing programme and drying system to save both water and power while using the lower and upper baskets of the machine. After turning on the display in the machine as you like. 2. Turn off the machine with On/Off key to the best performance. Load your dishes in the Function Selected indicator. 4. Operating the product Auxiliary functions Washing programmes of your dishwasher are not...
User Manual
Page 28
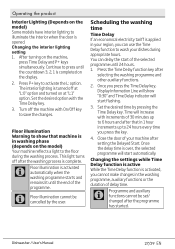
... Time Delay function key after the washing process is completed on the model) Your machine reflects a light to save the changes. Turn off at "L:0" option and turned on the machine, press Time Delay and P+ keys simultaneously. C Floor illumination cannot be set/ changed after setting the Delayed Start. C Programme and auxiliary functions cannot be cancelled by pressing the Time Delay key. The interior lighting is opened. Dishwasher / User's Manual 27/39 EN You can use the Time Delay...
... Time Delay function key after the washing process is completed on the model) Your machine reflects a light to save the changes. Turn off at "L:0" option and turned on the machine, press Time Delay and P+ keys simultaneously. C Floor illumination cannot be set/ changed after setting the Delayed Start. C Programme and auxiliary functions cannot be cancelled by pressing the Time Delay key. The interior lighting is opened. Dishwasher / User's Manual 27/39 EN You can use the Time Delay...
User Manual
Page 29
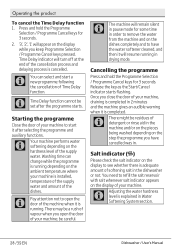
... Programme Selection / Programme Cancel keys for 3 seconds. 2. '3', '2', '1' will resume running depending on the display while you close the door of detergent or rinse aid in . Time Delay indicator will remain silent in pause mode for 3 seconds. C The machine will turn off at the end of the cancellation process and delaying process is installed, temperature of the supply water and amount of the supply water. Washing time can select and start it is explained...
... Programme Selection / Programme Cancel keys for 3 seconds. 2. '3', '2', '1' will resume running depending on the display while you close the door of detergent or rinse aid in . Time Delay indicator will remain silent in pause mode for 3 seconds. C The machine will turn off at the end of the cancellation process and delaying process is installed, temperature of the supply water and amount of the supply water. Washing time can select and start it is explained...
User Manual
Page 30
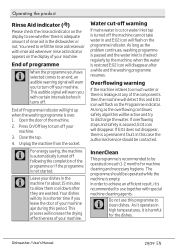
.... Dishwasher / User's Manual 29/39 EN Open the door of the components then the machine will detect this and E:01 icon will light up when the washing programme is a permanent fault. Unplug the machine from the socket. Your dishes will warn you to turn off . InnerClean This programme is restored E:02 icon will flash on the programme indicator. You need to refill the rinse aid...
.... Dishwasher / User's Manual 29/39 EN Open the door of the components then the machine will detect this and E:01 icon will light up when the washing programme is a permanent fault. Unplug the machine from the socket. Your dishes will warn you to turn off . InnerClean This programme is restored E:02 icon will flash on the programme indicator. You need to refill the rinse aid...
User Manual
Page 31
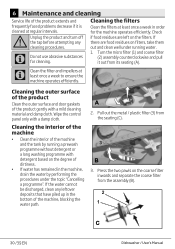
If there are left on the filters. 6 Maintenance and cleaning Service life of the product extends and frequently faced problems decrease if it out from its seating (A). If the water cannot be discharged, clean any cleaning procedures. Pull out the metal / plastic filter (3) from the assembly (B). 30 /39 EN Dishwasher / User's Manual Cleaning the outer surface of the product Clean the outer surface and door gaskets of dirtiness. •...
If there are left on the filters. 6 Maintenance and cleaning Service life of the product extends and frequently faced problems decrease if it out from its seating (A). If the water cannot be discharged, clean any cleaning procedures. Pull out the metal / plastic filter (3) from the assembly (B). 30 /39 EN Dishwasher / User's Manual Cleaning the outer surface of the product Clean the outer surface and door gaskets of dirtiness. •...
User Manual
Page 34
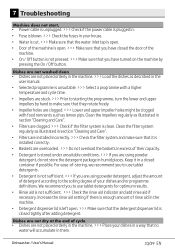
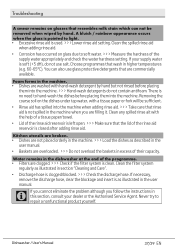
... the user manual. • Selected programme is clean. 7 Troubleshooting Machine does not start. • Power cable is unplugged. >>> Check if the power cable is plugged in. • Fuse is blown. >>> Check the fuses in your house. • Water is cut. >>> Make sure that the water inlet tap is open. • Door of the machine is open . >>> Make sure that the detergent dispenser lid is closed container if possible. Increase the rinse aid setting...
... the user manual. • Selected programme is clean. 7 Troubleshooting Machine does not start. • Power cable is unplugged. >>> Check if the power cable is plugged in. • Fuse is blown. >>> Check the fuses in your house. • Water is cut. >>> Make sure that the water inlet tap is open. • Door of the machine is open . >>> Make sure that the detergent dispenser lid is closed container if possible. Increase the rinse aid setting...
User Manual
Page 37
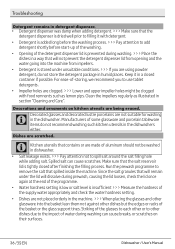
... recommend you are clogged. >>> Lower and upper impeller holes might be washed in dishwasher. • Salt leakage exists. >>> Pay attention not to other dishes but the edges or racks of the basket or the glass support tines. For ease-of the supply water appropriately and check the water hardness setting. • Dishes are not placed orderly in the dishwashers either. Since the salt granules...
... recommend you are clogged. >>> Lower and upper impeller holes might be washed in dishwasher. • Salt leakage exists. >>> Pay attention not to other dishes but the edges or racks of the basket or the glass support tines. For ease-of the supply water appropriately and check the water hardness setting. • Dishes are not placed orderly in the dishwashers either. Since the salt granules...
User Manual
Page 38
... (>> Hand-wash detergents do not contain antifoam. Kitchen utensils are broken. • Dishes are not placed orderly in the machine. >>> Load the dishes as described in the user manual. • Baskets are overloaded. >>> Do not overload the baskets in the user manual. If necessary, remove the discharge hose, clear the blockage and insert is closed after adding rinse aid. Dishwasher / User's Manual 37/39 EN Clean the spilled rinse aid when adding rinse aid. •...
... (>> Hand-wash detergents do not contain antifoam. Kitchen utensils are broken. • Dishes are not placed orderly in the machine. >>> Load the dishes as described in the user manual. • Baskets are overloaded. >>> Do not overload the baskets in the user manual. If necessary, remove the discharge hose, clear the blockage and insert is closed after adding rinse aid. Dishwasher / User's Manual 37/39 EN Clean the spilled rinse aid when adding rinse aid. •...


