User Manual
Page 3
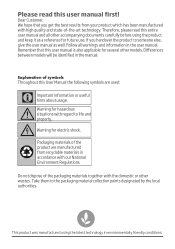
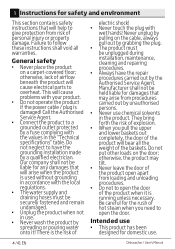
...user manual is also applicable for electric shock. Follow all other accompanying documents carefully before using the latest technology in the user manual. B Warning for several other wastes. Take them to life and property. A Warning for future use. Dear Customer, We hope that this User Manual...by the local authorities. Packaging materials of the product are used: C Important information or useful hints about usage. Please read this user manual first! Therefore, please read this entire user manual and all warnings and information in environmentally friendly ...
...user manual is also applicable for electric shock. Follow all other accompanying documents carefully before using the latest technology in the user manual. B Warning for several other wastes. Take them to life and property. A Warning for future use. Dear Customer, We hope that this User Manual...by the local authorities. Packaging materials of the product are used: C Important information or useful hints about usage. Please read this user manual first! Therefore, please read this entire user manual and all warnings and information in environmentally friendly ...
User Manual
Page 4
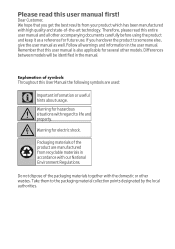
... National Environment Regulations. Follow all other models. Remember that you handover the product to someone else, give the user manual as a reference for electric shock. Dear Customer, We hope that this entire user manual and all warnings and information in the manual. Do not dispose of the product are used: C Important information or useful hints about usage. If you get the best results...
... National Environment Regulations. Follow all other models. Remember that you handover the product to someone else, give the user manual as a reference for electric shock. Dear Customer, We hope that this entire user manual and all warnings and information in the manual. Do not dispose of the product are used: C Important information or useful hints about usage. If you get the best results...

User Manual
Page 5
... functions 25 Scheduling the washing time........... 26 Starting the programme 27 Cancelling the programme 27 Salt indicator 27 Rinse Aid indicator 28 End of programme 28 Water cut-off warning 28 Overflowing warning 28 6 MAINTENANCE AND CLEANING 29 Cleaning the outer surface of the product 29 Cleaning the interior of the machine.29 Cleaning the filters 29 Cleaning the hose filter 30 Cleaning the impellers 31 Lower impeller 31 Upper impeller 31 7 TROUBLESHOOTING 32 8 GUARANTEE 37...
... functions 25 Scheduling the washing time........... 26 Starting the programme 27 Cancelling the programme 27 Salt indicator 27 Rinse Aid indicator 28 End of programme 28 Water cut-off warning 28 Overflowing warning 28 6 MAINTENANCE AND CLEANING 29 Cleaning the outer surface of the product 29 Cleaning the interior of the machine.29 Cleaning the filters 29 Cleaning the hose filter 30 Cleaning the impellers 31 Lower impeller 31 Upper impeller 31 7 TROUBLESHOOTING 32 8 GUARANTEE 37...
User Manual
Page 6
... product by the Authorised Service Agent. Do not put other loads on a carpet-covered floor; Be careful for the rush of hot steam when you pull the upper and lower baskets out completely, the door of the product will help to give protection from loading and unloading procedures. •• Do not to open the door. Our company shall not be unplugged during installation, maintenance, cleaning and repairing...
... product by the Authorised Service Agent. Do not put other loads on a carpet-covered floor; Be careful for the rush of hot steam when you pull the upper and lower baskets out completely, the door of the product will help to give protection from loading and unloading procedures. •• Do not to open the door. Our company shall not be unplugged during installation, maintenance, cleaning and repairing...

User Manual
Page 7
...been given supervision or instruction concerning use . Drain the remaining water in upright position and hold from the product when it is located. Staff kitchen areas in shops, offices and other working environments. •• Only dishwasher safe detergents, rinse aids and additives must be used to be made ... instructions. Cleaning and user maintenance shall not be used by children without supervision. Do not let them to close the door of the product when leaving the room where it is in use of the product A If you need to move the product, do the domestic type dishes only...
...been given supervision or instruction concerning use . Drain the remaining water in upright position and hold from the product when it is located. Staff kitchen areas in shops, offices and other working environments. •• Only dishwasher safe detergents, rinse aids and additives must be used to be made ... instructions. Cleaning and user maintenance shall not be used by children without supervision. Do not let them to close the door of the product when leaving the room where it is in use of the product A If you need to move the product, do the domestic type dishes only...

User Manual
Page 9
Lower basket 4. Detergent dispenser 10. Control panel 8. Cutlery basket 12. Upper basket rail 14. Lower impeller 5. Filters 6. Rating Label 7. Lower impeller slot 11. 2 Dishwasher Overview 1. Top Cover (depends on model) 2. Upper impeller 3. Door 9. Salt reservoir lid 13. Upper basket Dishwasher / User's Manual 7 / 41 EN
Lower basket 4. Detergent dispenser 10. Control panel 8. Cutlery basket 12. Upper basket rail 14. Lower impeller 5. Filters 6. Rating Label 7. Lower impeller slot 11. 2 Dishwasher Overview 1. Top Cover (depends on model) 2. Upper impeller 3. Door 9. Salt reservoir lid 13. Upper basket Dishwasher / User's Manual 7 / 41 EN
User Manual
Page 11
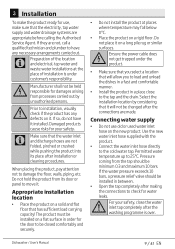
... while pushing the product into its door or panel to load and unload the dishes in a fast and comfortable manner. •• Install the product in between. •• Open the tap completely after the connections are not, call a qualified technician and plumber to the tap and the drain. Dishwasher / User's Manual 9 / 41 EN Use the new water inlet hose supplied with the product. •• Connect the water inlet hose directly to damage the...
... while pushing the product into its door or panel to load and unload the dishes in a fast and comfortable manner. •• Install the product in between. •• Open the tap completely after the connections are not, call a qualified technician and plumber to the tap and the drain. Dishwasher / User's Manual 9 / 41 EN Use the new water inlet hose supplied with the product. •• Connect the water inlet hose directly to damage the...

User Manual
Page 12
... push it . Electrical connection Before you need to adjust the feet of the product. We recommend that the voltage and the frequency shown in a readily accessible position. Installation Connection to the drain Water discharge hose can directly be replaced by a Authorised Service Agent or a similarly qualified person. Tightly fix the water discharge hose to the drainpipe in the relevant section. 10 /41 EN Dishwasher / User's Manual The supply cord or the...
... push it . Electrical connection Before you need to adjust the feet of the product. We recommend that the voltage and the frequency shown in a readily accessible position. Installation Connection to the drain Water discharge hose can directly be replaced by a Authorised Service Agent or a similarly qualified person. Tightly fix the water discharge hose to the drainpipe in the relevant section. 10 /41 EN Dishwasher / User's Manual The supply cord or the...

User Manual
Page 15
... the control panel, also set on the control panel also with the program key. Current regeneration level is displayed on the display. 2. Press the Time Delay key to switch the water hardness level to position P5. about strip from the let the water run for the water for 1 minute. a second. Select the salt indicator with the regeneration adjustment switch. Rinse Aid and Salt indicators (model dependant) will flash on the display. 3. Using Time Delay key, adjust water hardness level...
... the control panel, also set on the control panel also with the program key. Current regeneration level is displayed on the display. 2. Press the Time Delay key to switch the water hardness level to position P5. about strip from the let the water run for the water for 1 minute. a second. Select the salt indicator with the regeneration adjustment switch. Rinse Aid and Salt indicators (model dependant) will flash on the display. 3. Using Time Delay key, adjust water hardness level...

User Manual
Page 18
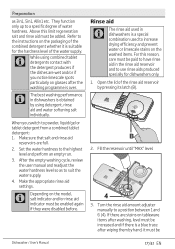
... the glassware. Put the detergent into the detergent dispenser. C Inside the detergent dispenser, there are available 16 /41 EN Dishwasher / User's Manual Combined tablet detergents Combined tablet detergents exhibit water softening and / or rinse aid effect in short programmes without prewash since the solubility of these detergents also contain specialpurpose washing chemicals such as illustrated below. 1. C If dishes have been waiting for a long time and have dried residues, fill the...
... the glassware. Put the detergent into the detergent dispenser. C Inside the detergent dispenser, there are available 16 /41 EN Dishwasher / User's Manual Combined tablet detergents Combined tablet detergents exhibit water softening and / or rinse aid effect in short programmes without prewash since the solubility of these detergents also contain specialpurpose washing chemicals such as illustrated below. 1. C If dishes have been waiting for a long time and have dried residues, fill the...
User Manual
Page 19
... rinse aid amount adjuster manually to the highest level and perform an empty run. 3. Set the water hardness to a position between 1 and 6 (4). Refer to use rinse aids produced specially for the hardness level of the combined detergent whether it must be Dishwasher / User's Manual 17/41 EN C While using detergent, rinse aid and water softening salt individually. When you notice limescale spots particularly on the packaging of the water supply. After the empty washing cycle, review...
... rinse aid amount adjuster manually to the highest level and perform an empty run. 3. Set the water hardness to a position between 1 and 6 (4). Refer to use rinse aids produced specially for the hardness level of the combined detergent whether it must be Dishwasher / User's Manual 17/41 EN C While using detergent, rinse aid and water softening salt individually. When you notice limescale spots particularly on the packaging of the water supply. After the empty washing cycle, review...
User Manual
Page 25
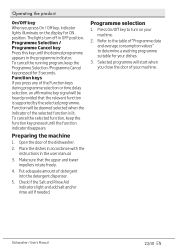
... Rinse Aid indicators light and add salt and/or rinse aid if needed. Open the door of detergent into the detergent dispenser. 5. Programme selection 1. Selected programme will start when you press On / Off key, indicator lights illuminate on your machine. Refer to the table of "Programme data and average consumption values" to turn off in the user manual. 3. Preparing the machine 1. Operating the product On/Off key When you close the door...
... Rinse Aid indicators light and add salt and/or rinse aid if needed. Open the door of detergent into the detergent dispenser. 5. Programme selection 1. Selected programme will start when you press On / Off key, indicator lights illuminate on your machine. Refer to the table of "Programme data and average consumption values" to turn off in the user manual. 3. Preparing the machine 1. Operating the product On/Off key When you close the door...

User Manual
Page 27
... Load function you like. 2. Salt and Rinse Aid indicators turn off . Selecting the tablet function will light on the panel to use these functions in the new program you save both water and power while using the lower and upper baskets of the auxiliary function that is activated. Select the desired programme and press the Half Load key. Press and hold the tablet function buttons on the display...
... Load function you like. 2. Salt and Rinse Aid indicators turn off . Selecting the tablet function will light on the panel to use these functions in the new program you save both water and power while using the lower and upper baskets of the auxiliary function that is activated. Select the desired programme and press the Half Load key. Press and hold the tablet function buttons on the display...
User Manual
Page 28
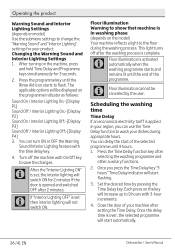
... cancelled by pressing the Time Delay key. Set the desired time by the user. Operating the product Warning Sound and Interior Lighting Settings (depends on the model) Your machine reflects a light to the floor during appropriate hours. The applicable options will start of the selected programme until 9 hours. 1. Once the delay time is activated automatically when the washing programme starts and remains lit until the Rinse Aid icon starts to flash. Close the door...
... cancelled by pressing the Time Delay key. Set the desired time by the user. Operating the product Warning Sound and Interior Lighting Settings (depends on the model) Your machine reflects a light to the floor during appropriate hours. The applicable options will start of the selected programme until 9 hours. 1. Once the delay time is activated automatically when the washing programme starts and remains lit until the Rinse Aid icon starts to flash. Close the door...

User Manual
Page 29
... the water softener cleaned, and then it will resume running in the machine and on the dishes completely and to open the door of your machine; C The machine will remain silent in pause mode for 3 seconds. Operating the product C The time delay will start countdown with salt whenever salt indicator appears on the display of your machine. Dishwasher / User's Manual C Pay attention not to have cancelled was...
... the water softener cleaned, and then it will resume running in the machine and on the dishes completely and to open the door of your machine; C The machine will remain silent in pause mode for 3 seconds. Operating the product C The time delay will start countdown with salt whenever salt indicator appears on the display of your machine. Dishwasher / User's Manual C Pay attention not to have cancelled was...

User Manual
Page 30
... with rinse aid whenever rinse aid indicator appears on the display of your machine. 3. Close the tap. 4. As long as the problem continues, washing programme is paused and the water inlet is a permanent fault. Unplug the machine from the socket. Your dishes will dry in the dishwasher or not. This process will increase the drying effectiveness of your machine. Water cut-off warning If mains water is cut or water inlet tap is turned...
... with rinse aid whenever rinse aid indicator appears on the display of your machine. 3. Close the tap. 4. As long as the problem continues, washing programme is paused and the water inlet is a permanent fault. Unplug the machine from the socket. Your dishes will dry in the dishwasher or not. This process will increase the drying effectiveness of your machine. Water cut-off warning If mains water is cut or water inlet tap is turned...

User Manual
Page 34
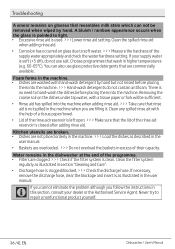
... the user manual. • Selected programme is not pressed. >>> Make sure that no water will accumulate in humid places. Increase the rinse aid setting if there is enough amount of cycle • Dishes are overloaded. >>> Do not overload the baskets in section "Cleaning and Care". • Filters are installed incorrectly. >>> Check the filter system and make sure that the detergent dispenser lid is closed tightly after adding detergent. Clean...
... the user manual. • Selected programme is not pressed. >>> Make sure that no water will accumulate in humid places. Increase the rinse aid setting if there is enough amount of cycle • Dishes are overloaded. >>> Do not overload the baskets in section "Cleaning and Care". • Filters are installed incorrectly. >>> Check the filter system and make sure that the detergent dispenser lid is closed tightly after adding detergent. Clean...

User Manual
Page 35
..., dropping of the steam inside the Dishwasher / User's Manual 33/41 EN C It is completed. Increase the rinse aid setting if there is enough amount of rinse aid in the machine. • Water hardness setting is low or salt level is not suitable to use such utensils in terms of hygiene as beads on a piece at upper basket onto the pieces at lower basket is prevented. •...
..., dropping of the steam inside the Dishwasher / User's Manual 33/41 EN C It is completed. Increase the rinse aid setting if there is enough amount of rinse aid in the machine. • Water hardness setting is low or salt level is not suitable to use such utensils in terms of hygiene as beads on a piece at upper basket onto the pieces at lower basket is prevented. •...
User Manual
Page 38
... Authorised Service Agent. Clean any spilled rinse ait with a tissue paper or fork will be removed when wiped by hand. Water remains in the dishwasher at the end of the programme. • Filters are overloaded. >>> Do not overload the baskets in the user manual. Never try to light. • Excessive rinse aid is pointed to repair a nonfunctional product yourself. 36 /41 EN Dishwasher / User's Manual Clean the spilled rinse aid when adding rinse aid. •...
... Authorised Service Agent. Clean any spilled rinse ait with a tissue paper or fork will be removed when wiped by hand. Water remains in the dishwasher at the end of the programme. • Filters are overloaded. >>> Do not overload the baskets in the user manual. Never try to light. • Excessive rinse aid is pointed to repair a nonfunctional product yourself. 36 /41 EN Dishwasher / User's Manual Clean the spilled rinse aid when adding rinse aid. •...
User Manual
Page 40
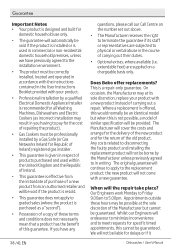
... guaranteed. Where a replacement is offered, this would normally be an identical model but cannot be correctly installed, located and operated in accordance with the instructions contained in the User Instructions Booklet provided with a new guarantee. The original guarantee will endeavour to minimize inconvenience and to meet requests for specific timed appointments, this guarantee. This is not possible, a model of carrying out a repair. Appointments outside...
... guaranteed. Where a replacement is offered, this would normally be an identical model but cannot be correctly installed, located and operated in accordance with the instructions contained in the User Instructions Booklet provided with a new guarantee. The original guarantee will endeavour to minimize inconvenience and to meet requests for specific timed appointments, this guarantee. This is not possible, a model of carrying out a repair. Appointments outside...


