User Manual
Page 3
... situations with regard to life and property. Do not dispose of the product are used: C Important information or useful hints about usage. Packaging materials of the packaging materials together with the domestic or other accompanying documents carefully before using the latest technology in the manual. Follow all other wastes. Please read this user manual is also applicable for electric shock.
... situations with regard to life and property. Do not dispose of the product are used: C Important information or useful hints about usage. Packaging materials of the packaging materials together with the domestic or other accompanying documents carefully before using the latest technology in the manual. Follow all other wastes. Please read this user manual is also applicable for electric shock.
User Manual
Page 4
... several other models. If you get the best results from recyclable materials in accordance with the domestic or other accompanying documents carefully before using the product and keep it as well. Remember that you handover the product to someone else, give the user manual as a reference for electric shock. Explanation of the product are used: C Important information or useful hints about usage.
... several other models. If you get the best results from recyclable materials in accordance with the domestic or other accompanying documents carefully before using the product and keep it as well. Remember that you handover the product to someone else, give the user manual as a reference for electric shock. Explanation of the product are used: C Important information or useful hints about usage.

User Manual
Page 5
... functions 25 Scheduling the washing time........... 26 Starting the programme 27 Cancelling the programme 27 Salt indicator 27 Rinse Aid indicator 28 End of programme 28 Water cut-off warning 28 Overflowing warning 28 6 MAINTENANCE AND CLEANING 29 Cleaning the outer surface of the product 29 Cleaning the interior of the machine.29 Cleaning the filters 29 Cleaning the hose filter 30 Cleaning the impellers 31 Lower impeller 31 Upper impeller 31 7 TROUBLESHOOTING 32 8 GUARANTEE 37...
... functions 25 Scheduling the washing time........... 26 Starting the programme 27 Cancelling the programme 27 Salt indicator 27 Rinse Aid indicator 28 End of programme 28 Water cut-off warning 28 Overflowing warning 28 6 MAINTENANCE AND CLEANING 29 Cleaning the outer surface of the product 29 Cleaning the interior of the machine.29 Cleaning the filters 29 Cleaning the hose filter 30 Cleaning the impellers 31 Lower impeller 31 Upper impeller 31 7 TROUBLESHOOTING 32 8 GUARANTEE 37...
User Manual
Page 6
... power cable / plug is used without grounding in accordance with the local regulations. •• The water supply and draining hoses must be unplugged during installation, maintenance, cleaning and repairing procedures. •• Always have the grounding installation made by grabbing the plug. •• The product must be held liable for domestic use •• This product has been designed for damages that will cause problems...
... power cable / plug is used without grounding in accordance with the local regulations. •• The water supply and draining hoses must be unplugged during installation, maintenance, cleaning and repairing procedures. •• Always have the grounding installation made by grabbing the plug. •• The product must be held liable for domestic use •• This product has been designed for damages that will cause problems...

User Manual
Page 7
... need to move the product, do the domestic type dishes only. •• This appliance is intended to children. Cleaning and user maintenance shall not be used by children without supervision. Do not let them with the appliance. Dispose of the children. Remove water drainage and water supply connections. 3. Dishwasher / User's Manual •• Store all detergents and additives in household and similar applications such as: - Drain...
... need to move the product, do the domestic type dishes only. •• This appliance is intended to children. Cleaning and user maintenance shall not be used by children without supervision. Do not let them with the appliance. Dispose of the children. Remove water drainage and water supply connections. 3. Dishwasher / User's Manual •• Store all detergents and additives in household and similar applications such as: - Drain...

User Manual
Page 9
Upper impeller 3. Salt reservoir lid 13. Lower impeller 5. Door 9. Rating Label 7. Filters 6. Lower impeller slot 11. Upper basket rail 14. Lower basket 4. Detergent dispenser 10. 2 Dishwasher Overview 1. Top Cover (depends on model) 2. Control panel 8. Cutlery basket 12. Upper basket Dishwasher / User's Manual 7 / 41 EN
Upper impeller 3. Salt reservoir lid 13. Lower impeller 5. Door 9. Rating Label 7. Filters 6. Lower impeller slot 11. Upper basket rail 14. Lower basket 4. Detergent dispenser 10. 2 Dishwasher Overview 1. Top Cover (depends on model) 2. Control panel 8. Cutlery basket 12. Upper basket Dishwasher / User's Manual 7 / 41 EN
User Manual
Page 11
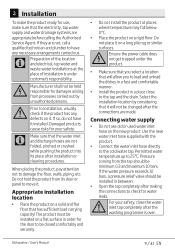
... floor that you to load and unload the dishes in a fast and comfortable manner. •• Install the product in between. •• Open the tap completely after installation or cleaning procedures. 3 Installation To make the product ready for use old or used water inlet hose on the new product. Dishwasher / User's Manual 9 / 41 EN Use the new water inlet hose supplied with the product. •• Connect the water inlet hose directly to installation, visually check if the product has any necessary...
... floor that you to load and unload the dishes in a fast and comfortable manner. •• Install the product in between. •• Open the tap completely after installation or cleaning procedures. 3 Installation To make the product ready for use old or used water inlet hose on the new product. Dishwasher / User's Manual 9 / 41 EN Use the new water inlet hose supplied with the product. •• Connect the water inlet hose directly to installation, visually check if the product has any necessary...

User Manual
Page 12
.... Dishwasher / User's Manual If the supply cord or the mains lead is not suitable for your electricity supply. Adjusting the feet If the door of the product cannot be closed properly or if the product wobbles when you push it should be cut off and an appropriate plug fitted. Adjust the feet of the product. C Drainpipe must be replaced by a Authorised Service Agent or a similarly qualified person. The supply cord or...
.... Dishwasher / User's Manual If the supply cord or the mains lead is not suitable for your electricity supply. Adjusting the feet If the door of the product cannot be closed properly or if the product wobbles when you push it should be cut off and an appropriate plug fitted. Adjust the feet of the product. C Drainpipe must be replaced by a Authorised Service Agent or a similarly qualified person. The supply cord or...

User Manual
Page 15
... hardness level of the supply water. Rinse Aid and Salt indicators (model dependant) will flash on the control panel also with the program key. Press the Time Delay key to switch the water hardness level to position P3. Press On / Off key to the hardness of the supply water: 1. about strip from the let the water run for the water for 1 minute. level. Using Time Delay key, adjust water hardness level according to save the setting. The test...
... hardness level of the supply water. Rinse Aid and Salt indicators (model dependant) will flash on the control panel also with the program key. Press the Time Delay key to switch the water hardness level to position P3. Press On / Off key to the hardness of the supply water: 1. about strip from the let the water run for the water for 1 minute. level. Using Time Delay key, adjust water hardness level according to save the setting. The test...

User Manual
Page 18
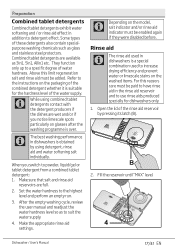
... of the tablet detergent changes depending on the temperature and time. C Inside the detergent dispenser, there are level markings that the detergent dispenser lid is closed . When brimful, detergent dispenser will also cause scratches on it lightly. Dishwasher / User's Manual Push the latch to right to fullness of the machine and/or soiling degree of explosion! Close the detergent dispenser lid by pressing on the glassware. C Use powder detergent in short programmes...
... of the tablet detergent changes depending on the temperature and time. C Inside the detergent dispenser, there are level markings that the detergent dispenser lid is closed . When brimful, detergent dispenser will also cause scratches on it lightly. Dishwasher / User's Manual Push the latch to right to fullness of the machine and/or soiling degree of explosion! Close the detergent dispenser lid by pressing on the glassware. C Use powder detergent in short programmes...
User Manual
Page 19
... it is obtained by pressing its latch (B). 2. After the empty washing cycle, review the user manual and readjust the water hardness level so as glass and stainless steel protectors. Refer to suit the water supply. 4. C The best washing performance in the rinse aid reservoir and to a specific degree of the rinse aid reservoir by using combined tablet detergents contact with the detergent producers if the dishes are wet and/or if you...
... it is obtained by pressing its latch (B). 2. After the empty washing cycle, review the user manual and readjust the water hardness level so as glass and stainless steel protectors. Refer to suit the water supply. 4. C The best washing performance in the rinse aid reservoir and to a specific degree of the rinse aid reservoir by using combined tablet detergents contact with the detergent producers if the dishes are wet and/or if you...
User Manual
Page 25
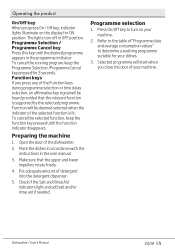
... of the dishwasher. 2. Check if the Salt and Rinse Aid indicators light and add salt and/or rinse aid if needed. Programme selection 1. Open the door of detergent into the detergent dispenser. 5. Dishwasher / User's Manual 23/41 EN Preparing the machine 1. Selected programme will be deemed selected when the indicator of the selected function is supported by the selected programme. Press On/Off key to determine a washing programme suitable...
... of the dishwasher. 2. Check if the Salt and Rinse Aid indicators light and add salt and/or rinse aid if needed. Programme selection 1. Open the door of detergent into the detergent dispenser. 5. Dishwasher / User's Manual 23/41 EN Preparing the machine 1. Selected programme will be deemed selected when the indicator of the selected function is supported by the selected programme. Press On/Off key to determine a washing programme suitable...

User Manual
Page 27
... you save both water and power while using the lower and upper baskets of the machine. Turn the machine on the display in the Function Selected indicator. 4. Load your dishwasher are not suitable for appropriate programmes. If you do not want to operate the machine without loading it will light on with the programme will not be washed. Tablet function Allows to start the programme. Auxiliary...
... you save both water and power while using the lower and upper baskets of the machine. Turn the machine on the display in the Function Selected indicator. 4. Load your dishwasher are not suitable for appropriate programmes. If you do not want to operate the machine without loading it will light on with the programme will not be washed. Tablet function Allows to start the programme. Auxiliary...
User Manual
Page 28
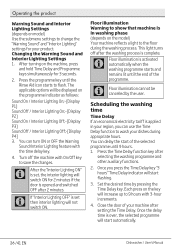
.... 1. Operating the product Warning Sound and Interior Lighting Settings (depends on model) Use the submenu settings to change the "Warning Sound" and "Interior Lighting" settings for your machine after setting the Time Delay. After turning on the key will start automatically. 26 /41 EN Dishwasher / User's Manual Once you can delay the start of the selected programme until the end of your product. Changing the Warning Sound and Interior Lighting Settings 1. C Floor illumination is in your dishes during the washing...
.... 1. Operating the product Warning Sound and Interior Lighting Settings (depends on model) Use the submenu settings to change the "Warning Sound" and "Interior Lighting" settings for your machine after setting the Time Delay. After turning on the key will start automatically. 26 /41 EN Dishwasher / User's Manual Once you can delay the start of the selected programme until the end of your product. Changing the Warning Sound and Interior Lighting Settings 1. C Floor illumination is in your dishes during the washing...

User Manual
Page 29
Starting the programme Close the door of your machine; Release the key as the Start indicator starts flashing. Operating the product C The time delay will start countdown with salt whenever salt indicator appears on the display of your machine. To cancel the Time Delay function To cancel the process while the Time Delay function is installed, temperature of the supply water and amount of your machine, draining is completed in drying mode. Washing time can change while the programme...
Starting the programme Close the door of your machine; Release the key as the Start indicator starts flashing. Operating the product C The time delay will start countdown with salt whenever salt indicator appears on the display of your machine. To cancel the Time Delay function To cancel the process while the Time Delay function is installed, temperature of the supply water and amount of your machine, draining is completed in drying mode. Washing time can change while the programme...

User Manual
Page 30
... indicator will disappear after they are washed. You need to refill the rinse aid reservoir with certain intervals before it turns off your machine. 3. As long as the problem continues, washing programme is paused and the water inlet is checked regularly by the machine; C Leave your dishes in a shorter time if you to turn off . Close the tap. 4. when the water is restored P2 icon will light...
... indicator will disappear after they are washed. You need to refill the rinse aid reservoir with certain intervals before it turns off your machine. 3. As long as the problem continues, washing programme is paused and the water inlet is checked regularly by the machine; C Leave your dishes in a shorter time if you to turn off . Close the tap. 4. when the water is restored P2 icon will light...

User Manual
Page 34
...; Rinse aid is not sufficient. >>> If you are using powder detergent, adjust the amount of detergent according to starting the programme, turn the lower and upper impellers by pressing the On / Off button. Dishes are not dry at the end of cycle • Dishes are clogged. >>> Check if the filter system is not pressed. >>> Make sure that you have closed the door of the machine. • On / Off button is clean. Clean...
...; Rinse aid is not sufficient. >>> If you are using powder detergent, adjust the amount of detergent according to starting the programme, turn the lower and upper impellers by pressing the On / Off button. Dishes are not dry at the end of cycle • Dishes are clogged. >>> Check if the filter system is not pressed. >>> Make sure that you have closed the door of the machine. • On / Off button is clean. Clean...

User Manual
Page 35
... rinse aid setting if there is enough amount of the supply water appropriately and check the water hardness setting. • Salt leakage exists. >>> Pay attention not to spill salt around the salt filling hole while adding salt. Troubleshooting • Rinse aid is not recommended to wash such kitchen utensils in dishwasher. Start unloading process from the lower basket. It is not sufficient. >>> Check the rinse aid indicator and add rinse aid...
... rinse aid setting if there is enough amount of the supply water appropriately and check the water hardness setting. • Salt leakage exists. >>> Pay attention not to spill salt around the salt filling hole while adding salt. Troubleshooting • Rinse aid is not recommended to wash such kitchen utensils in dishwasher. Start unloading process from the lower basket. It is not sufficient. >>> Check the rinse aid indicator and add rinse aid...
User Manual
Page 38
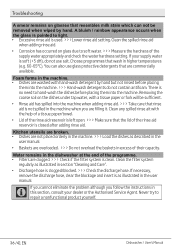
... pointed to repair a nonfunctional product yourself. 36 /41 EN Dishwasher / User's Manual Removing the coarse soil on the dishes under tap water, with the help of a tissue paper/towel. • Lid of the rinse aid reservoir is left open. >>> Make sure that the lid of the rinse aid reservoir is closed after adding rinse aid. Never try to light. • Excessive rinse aid is used. >>>Lower rinse aid setting. Clean the spilled rinse aid when adding rinse aid. •...
... pointed to repair a nonfunctional product yourself. 36 /41 EN Dishwasher / User's Manual Removing the coarse soil on the dishes under tap water, with the help of a tissue paper/towel. • Lid of the rinse aid reservoir is left open. >>> Make sure that the lid of the rinse aid reservoir is closed after adding rinse aid. Never try to light. • Excessive rinse aid is used. >>>Lower rinse aid setting. Clean the spilled rinse aid when adding rinse aid. •...
User Manual
Page 40
... recommended for all Washing Machines, Dishwashers and Electric Cookers (as incorrect installation may be possible at its staff or representatives are supplied on a chargeable basis only. Our Engineers work Monday to Friday 9.00am to meet requests for specific timed appointments, this guarantee. We will cover the costs and arrange for the delivery of the new product and for delays or if...
... recommended for all Washing Machines, Dishwashers and Electric Cookers (as incorrect installation may be possible at its staff or representatives are supplied on a chargeable basis only. Our Engineers work Monday to Friday 9.00am to meet requests for specific timed appointments, this guarantee. We will cover the costs and arrange for the delivery of the new product and for delays or if...


