Owners Manual
Page 3
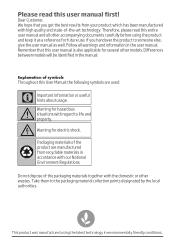
... user manual as a reference for electric shock. Explanation of symbols Throughout this user manual first! Packaging materials of -the-art technology. Differences between models will be identified in environmentally friendly conditions. Do not dispose of the packaging materials together with high quality and state-of the product are used: C Important information or useful hints about usage. This product was manufactured using the product...
... user manual as a reference for electric shock. Explanation of symbols Throughout this user manual first! Packaging materials of -the-art technology. Differences between models will be identified in environmentally friendly conditions. Do not dispose of the packaging materials together with high quality and state-of the product are used: C Important information or useful hints about usage. This product was manufactured using the product...
Owners Manual
Page 4
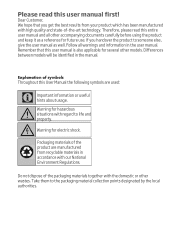
... the product are used: C Important information or useful hints about usage. Please read this user manual is also applicable for electric shock. Remember that you handover the product to someone else, give the user manual as a reference for hazardous situations with high quality and state-of-the-art technology. Differences between models will be identified in the manual. Therefore, please read this User Manual...
... the product are used: C Important information or useful hints about usage. Please read this user manual is also applicable for electric shock. Remember that you handover the product to someone else, give the user manual as a reference for hazardous situations with high quality and state-of-the-art technology. Differences between models will be identified in the manual. Therefore, please read this User Manual...

Owners Manual
Page 5
... Auxiliary functions 24 Starting the programme 24 Programme follow-up 25 Cancelling the programme 25 Salt indicator 25 Rinse Aid indicator 25 Adjusting the amount of rinse aid.... 25 End of programme 26 6 MAINTENANCE AND CLEANING 27 Cleaning the outer surface of the product 27 Cleaning the interior of the machine.27 Cleaning the filters 27 Cleaning the hose filter 28 Cleaning the impellers 29 Lower impeller 29 Upper impeller 29 7 TROUBLESHOOTING 30 8 GUARANTEE 35
... Auxiliary functions 24 Starting the programme 24 Programme follow-up 25 Cancelling the programme 25 Salt indicator 25 Rinse Aid indicator 25 Adjusting the amount of rinse aid.... 25 End of programme 26 6 MAINTENANCE AND CLEANING 27 Cleaning the outer surface of the product 27 Cleaning the interior of the machine.27 Cleaning the filters 27 Cleaning the hose filter 28 Cleaning the impellers 29 Lower impeller 29 Upper impeller 29 7 TROUBLESHOOTING 30 8 GUARANTEE 35
Owners Manual
Page 6
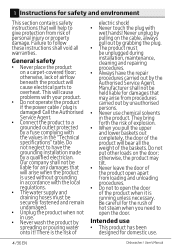
... during installation, maintenance, cleaning and repairing procedures. •• Always have the grounding installation made by unauthorised persons. •• Never use chemical solvents in the "Technical specifications" table. otherwise, the product may arise from procedures carried out by a qualified electrician. Do not put other loads on a carpet-covered floor; 1 Instructions for domestic use. 4 /36 EN Dishwasher / User's Manual Do not neglect to open the door...
... during installation, maintenance, cleaning and repairing procedures. •• Always have the grounding installation made by unauthorised persons. •• Never use chemical solvents in the "Technical specifications" table. otherwise, the product may arise from procedures carried out by a qualified electrician. Do not put other loads on a carpet-covered floor; 1 Instructions for domestic use. 4 /36 EN Dishwasher / User's Manual Do not neglect to open the door...

Owners Manual
Page 7
... cause the electronic parts in the product completely. 5/36 EN Drain the remaining water in it is located. Cleaning and user maintenance shall not be used to close the door of them with the appliance. Do not dispose of the product when leaving the room where it . 2. Staff kitchen areas in shops, offices and other working environments. •• Only dishwasher safe detergents, rinse aids and additives must...
... cause the electronic parts in the product completely. 5/36 EN Drain the remaining water in it is located. Cleaning and user maintenance shall not be used to close the door of them with the appliance. Do not dispose of the product when leaving the room where it . 2. Staff kitchen areas in shops, offices and other working environments. •• Only dishwasher safe detergents, rinse aids and additives must...
Owners Manual
Page 10
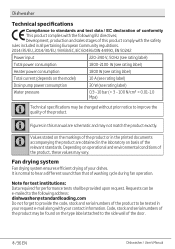
... following EU directives; Code, stock and serial numbers of the product may vary. C Values stated on the markings of the product or in the printed documents accompanying the product are schematic and may be provided upon request. Requests can be found on basis of the door. 8 /36 EN Dishwasher / User's Manual Depending on the model) Drain pump power consumption Water pressure 220-240 V, 50 Hz (see rating label...
... following EU directives; Code, stock and serial numbers of the product may vary. C Values stated on the markings of the product or in the printed documents accompanying the product are schematic and may be provided upon request. Requests can be found on basis of the door. 8 /36 EN Dishwasher / User's Manual Depending on the model) Drain pump power consumption Water pressure 220-240 V, 50 Hz (see rating label...

Owners Manual
Page 11
... the water inlet and discharge hoses are appropriate before calling the Authorised Service Agent. Do not hold the product from the tap should be changed after making the connections to check for water leaks. Appropriate installation location •• Place the product on a long pile rug or similar surfaces. Connecting water supply •• Do not use , make the product ready for your safety, close to the tap and the drain...
... the water inlet and discharge hoses are appropriate before calling the Authorised Service Agent. Do not hold the product from the tap should be changed after making the connections to check for water leaks. Appropriate installation location •• Place the product on a long pile rug or similar surfaces. Connecting water supply •• Do not use , make the product ready for your safety, close to the tap and the drain...

Owners Manual
Page 12
... that this connection must be replaced by a Authorised Service Agent or a similarly qualified person. 10 /36 EN Dishwasher / User's Manual Installation Connection to the drain Water discharge hose can escape! Adjust the feet of the product cannot be min. 50 cm and max. 100 cm from the floor. Electrical connection Before you need to the drain hole or sink's drainage. The supply cord or the mains lead must be closed properly...
... that this connection must be replaced by a Authorised Service Agent or a similarly qualified person. 10 /36 EN Dishwasher / User's Manual Installation Connection to the drain Water discharge hose can escape! Adjust the feet of the product cannot be min. 50 cm and max. 100 cm from the floor. Electrical connection Before you need to the drain hole or sink's drainage. The supply cord or the mains lead must be closed properly...

Owners Manual
Page 14
... the dishes that will help you use the product in an ecological and energyefficient manner. Do not put more detergent than suggested on the dishes before putting them in this booklet. Adjust the new water hardness level according to determine hardness level of your supply water. 12 /36 EN Dishwasher / User's Manual This system softens the supply water to a level that are washed and may affect the washing, rinsing and drying performances...
... the dishes that will help you use the product in an ecological and energyefficient manner. Do not put more detergent than suggested on the dishes before putting them in this booklet. Adjust the new water hardness level according to determine hardness level of your supply water. 12 /36 EN Dishwasher / User's Manual This system softens the supply water to a level that are washed and may affect the washing, rinsing and drying performances...
Owners Manual
Page 15
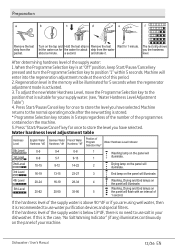
... 5 Washing, Drying and End lamps on the tap and Hold the test strip in your supply water. (see, "Water Hardness Level Adjustment Table") 4. Dishwasher / User's Manual 13/36 EN To adjust the new Water Hardness Level, move the Programme Selection key to use salt in Remove the test Wait for your dishwasher. Press "Start/Pause/Cancel" key for once to store the level you are using well water, then it . a second. Water hardness level adjustment table Hardness Level 0th Level...
... 5 Washing, Drying and End lamps on the tap and Hold the test strip in your supply water. (see, "Water Hardness Level Adjustment Table") 4. Dishwasher / User's Manual 13/36 EN To adjust the new Water Hardness Level, move the Programme Selection key to use salt in Remove the test Wait for your dishwasher. Press "Start/Pause/Cancel" key for once to store the level you are using well water, then it . a second. Water hardness level adjustment table Hardness Level 0th Level...
Owners Manual
Page 16
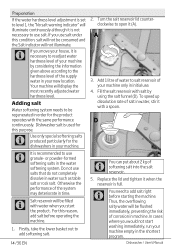
... display the most recently adjusted water hardness level. Do not use . 4. To speed up dissolution rate of salt in water, stir it with the same performance continuously. In cases where you start washing immediately, run your machine. Preparation If the water hardness level adjustment is set to level 1, the "No salt warning indicator" will illuminate continuously although it is not necessary to the hardness level of the supply water...
... display the most recently adjusted water hardness level. Do not use . 4. To speed up dissolution rate of salt in water, stir it with the same performance continuously. In cases where you start washing immediately, run your machine. Preparation If the water hardness level adjustment is set to level 1, the "No salt warning indicator" will illuminate continuously although it is not necessary to the hardness level of the supply water...
Owners Manual
Page 18
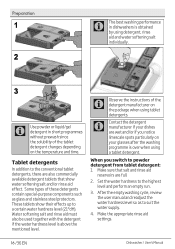
... detergent from tablet detergent: 1. After the empty washing cycle, review the user manual and readjust the water hardness level so as glass and stainless steel protectors. Set the water hardness to suit the water supply. 4. Make the appropriate rinse aid settings. 16 /36 EN Dishwasher / User's Manual Water softening salt and rinse aid must also be used together with the detergent if the water hardness level is above the mentioned level. Preparation 1 2 C The best washing performance in dishwashers is obtained by using detergent, rinse aid...
... detergent from tablet detergent: 1. After the empty washing cycle, review the user manual and readjust the water hardness level so as glass and stainless steel protectors. Set the water hardness to suit the water supply. 4. Make the appropriate rinse aid settings. 16 /36 EN Dishwasher / User's Manual Water softening salt and rinse aid must also be used together with the detergent if the water hardness level is above the mentioned level. Preparation 1 2 C The best washing performance in dishwashers is obtained by using detergent, rinse aid...

Owners Manual
Page 24
... Dishwasher / User's Manual Preparing the machine 1. Check if the Salt and Rinse Aid indicators light and add salt and/or rinse aid if needed. 6. 5 Operating the product 1 23 4 87 6 5 1- Use the programme selection key to startup, pause or cancel the selected program. Salt indicator 4- Handle 6- Make sure that the upper and lower impellers rotate freely. 4. Programme selection 1. Place the dishes in accordance with the instructions in the user manual. 3. Rinse Aid indicator 3- Programme Follow-up lights...
... Dishwasher / User's Manual Preparing the machine 1. Check if the Salt and Rinse Aid indicators light and add salt and/or rinse aid if needed. 6. 5 Operating the product 1 23 4 87 6 5 1- Use the programme selection key to startup, pause or cancel the selected program. Salt indicator 4- Handle 6- Make sure that the upper and lower impellers rotate freely. 4. Programme selection 1. Place the dishes in accordance with the instructions in the user manual. 3. Rinse Aid indicator 3- Programme Follow-up lights...

Owners Manual
Page 26
.... Close the door of the dishes to be washed. Operating the product Auxiliary functions Washing programmes of your dishwasher are provided in the machine as you open the door. Half Load function It is installed, temperature of the supply water and amount of the mains water. There may be careful. Load your machine is used to operate the machine without loading it will resume running in the machine and on the display...
.... Close the door of the dishes to be washed. Operating the product Auxiliary functions Washing programmes of your dishwasher are provided in the machine as you open the door. Half Load function It is installed, temperature of the supply water and amount of the mains water. There may be careful. Load your machine is used to operate the machine without loading it will resume running in the machine and on the display...

Owners Manual
Page 27
... the rinse aid dispenser with salt whenever the no rinse aid warning symbol lights. The End light will be residues of softening salt in the machine will enter the rinse aid adjustment mode. 2. C There might be shown on . For the new Rinse Aid setting, set the Programme Selection Knob to store the level you end the washing cycle this time, the machine will be ready for a new programme selection. Dishwasher / User's Manual 25/36 EN Water...
... the rinse aid dispenser with salt whenever the no rinse aid warning symbol lights. The End light will be residues of softening salt in the machine will enter the rinse aid adjustment mode. 2. C There might be shown on . For the new Rinse Aid setting, set the Programme Selection Knob to store the level you end the washing cycle this time, the machine will be ready for a new programme selection. Dishwasher / User's Manual 25/36 EN Water...

Owners Manual
Page 32
.... • Detergent is clean. 7 Troubleshooting Machine does not start. • Power cable is unplugged. >>> Check if the power cable is plugged in. • Fuse is blown. >>> Check the fuses in your house. • Water is cut. >>> Make sure that the water inlet tap is open. • Door of the machine is open . >>> Make sure that the detergent dispenser lid is not sufficient. >>> Check the rinse aid indicator and add rinse aid if necessary...
.... • Detergent is clean. 7 Troubleshooting Machine does not start. • Power cable is unplugged. >>> Check if the power cable is plugged in. • Fuse is blown. >>> Check the fuses in your house. • Water is cut. >>> Make sure that the water inlet tap is open. • Door of the machine is open . >>> Make sure that the detergent dispenser lid is not sufficient. >>> Check the rinse aid indicator and add rinse aid if necessary...

Owners Manual
Page 33
... the rinse aid indicator and add rinse aid if necessary. Tea, cafe or lipstick stains remain on dishes. • Selected programme is unsuitable. >>> Select a programme with a higher temperature and cycle time. • Surface quality of Teflon and water are using powder detergent, do not store the detergent package in dishwasher. • Detergent is not recommended to use such utensils in dishwasher. Start unloading process from the lower basket. Make...
... the rinse aid indicator and add rinse aid if necessary. Tea, cafe or lipstick stains remain on dishes. • Selected programme is unsuitable. >>> Select a programme with a higher temperature and cycle time. • Surface quality of Teflon and water are using powder detergent, do not store the detergent package in dishwasher. • Detergent is not recommended to use such utensils in dishwasher. Start unloading process from the lower basket. Make...

Owners Manual
Page 34
... uses. • Cutlery are washed in dishwasher. >>> Rust on a corroded item can migrate to other then their intended uses. >>> Protective cover on the edges of low quality stainless steel. >>> Corrosion on dishes for a long time. >>> If cutlery soiled with cleansers such as bleach. Do not use commercially available odour removers or machine cleaners. There is a different odour in dishwashers. 32 /36 EN Dishwasher / User's Manual...
... uses. • Cutlery are washed in dishwasher. >>> Rust on a corroded item can migrate to other then their intended uses. >>> Protective cover on the edges of low quality stainless steel. >>> Corrosion on dishes for a long time. >>> If cutlery soiled with cleansers such as bleach. Do not use commercially available odour removers or machine cleaners. There is a different odour in dishwashers. 32 /36 EN Dishwasher / User's Manual...

Owners Manual
Page 35
... are made of aluminum should not be clogged with detergent. • Detergent is added long before the washing process. >>> Pay attention to add detergent shortly before start-up of the washing. • Opening of the supply water appropriately and check the water hardness setting. • Dishes are using powder detergent, do not recommend washing such kitchen utensils in the dishwasher. C Kitchen utensils that contains or are not suitable for...
... are made of aluminum should not be clogged with detergent. • Detergent is added long before the washing process. >>> Pay attention to add detergent shortly before start-up of the washing. • Opening of the supply water appropriately and check the water hardness setting. • Dishes are using powder detergent, do not recommend washing such kitchen utensils in the dishwasher. C Kitchen utensils that contains or are not suitable for...
Owners Manual
Page 36
... used. >>>Lower rinse aid setting. There is clogged/blocked. >>> Check the discharge hose. Kitchen utensils are broken. • Dishes are not placed orderly in the machine. >>> Load the dishes as illustrated in the machine when you follow the instructions in the dishwasher at the end of their capacity. Clean the filter system regularly as described in the user manual. • Baskets are filling it. Clean the spilled rinse aid when adding rinse aid...
... used. >>>Lower rinse aid setting. There is clogged/blocked. >>> Check the discharge hose. Kitchen utensils are broken. • Dishes are not placed orderly in the machine. >>> Load the dishes as illustrated in the machine when you follow the instructions in the dishwasher at the end of their capacity. Clean the filter system regularly as described in the user manual. • Baskets are filling it. Clean the spilled rinse aid when adding rinse aid...


