

Owners Manual
Page 3
... several other wastes. Please take some time to read these instructions first before using your appliance Thank you know how to safely operate the controls and functions. Take them to use. Please read this user manual, and store in environmentally friendly conditions. Carefully follow all unpacking and installation instructions to ensure the appliance is correctly connected and fitted prior to the packaging...
... several other wastes. Please take some time to read these instructions first before using your appliance Thank you know how to safely operate the controls and functions. Take them to use. Please read this user manual, and store in environmentally friendly conditions. Carefully follow all unpacking and installation instructions to ensure the appliance is correctly connected and fitted prior to the packaging...

Owners Manual
Page 4
...user manual may also be listed. B Warning for several other wastes. Take them to use. Please read this user manual before using your appliance, to ensure you know how to safely operate the controls and functions. Please take some time to read these instructions first before using your product model and serial number on the last page of symbols Throughout this user manual...and information online at www.beko.co.uk Explanation of this User Manual the following symbols are manufactured from recyclable materials in a safe location close to the appliance for hazardous...
...user manual may also be listed. B Warning for several other wastes. Take them to use. Please read this user manual before using your appliance, to ensure you know how to safely operate the controls and functions. Please take some time to read these instructions first before using your product model and serial number on the last page of symbols Throughout this user manual...and information online at www.beko.co.uk Explanation of this User Manual the following symbols are manufactured from recyclable materials in a safe location close to the appliance for hazardous...
Owners Manual
Page 5
... washing time............31 Starting the programme 32 Cancelling the programme 32 Adjusting the amount of rinse aid.... 33 Salt indicator 33 Rinse Aid indicator 33 End of programme 33 Water cut-off warning 33 Overflowing warning 34 6 HOMEWHIZ FUNCTION 35 HomeWhiz Setup and User Account Settings 35 7 MAINTENANCE AND CLEANING 39 Cleaning the outer surface of the product 39 Cleaning the interior of the machine.39 Cleaning the filters 39 Cleaning the hose filter 40 Cleaning the impellers 41 Lower...
... washing time............31 Starting the programme 32 Cancelling the programme 32 Adjusting the amount of rinse aid.... 33 Salt indicator 33 Rinse Aid indicator 33 End of programme 33 Water cut-off warning 33 Overflowing warning 34 6 HOMEWHIZ FUNCTION 35 HomeWhiz Setup and User Account Settings 35 7 MAINTENANCE AND CLEANING 39 Cleaning the outer surface of the product 39 Cleaning the interior of the machine.39 Cleaning the filters 39 Cleaning the hose filter 40 Cleaning the impellers 41 Lower...

Owners Manual
Page 6
... unplugged during installation, maintenance, cleaning and repairing procedures. •• Always have the grounding installation made by unauthorised persons. •• Never use . •• Never wash the product by a fuse complying with your product. •• Do not operate the product if the power cable / plug is running unless necessary. Do not put other loads on a carpet-covered floor; Be careful for the rush of hot steam...
... unplugged during installation, maintenance, cleaning and repairing procedures. •• Always have the grounding installation made by unauthorised persons. •• Never use . •• Never wash the product by a fuse complying with your product. •• Do not operate the product if the power cable / plug is running unless necessary. Do not put other loads on a carpet-covered floor; Be careful for the rush of hot steam...

Owners Manual
Page 7
... used by children without supervision. Dishwasher / User's Manual 5/53 EN Do not dispose of the appliance in the product completely. Children's safety •• Electrical products are manufactured from 8 years and above and persons with recycled waste instructions. Dispose of the product A If you need to children. Transportation of them with the appliance. Remove water drainage and water supply connections. 3. Instructions for the children. Unplug the product...
... used by children without supervision. Dishwasher / User's Manual 5/53 EN Do not dispose of the appliance in the product completely. Children's safety •• Electrical products are manufactured from 8 years and above and persons with recycled waste instructions. Dispose of the product A If you need to children. Transportation of them with the appliance. Remove water drainage and water supply connections. 3. Instructions for the children. Unplug the product...

Owners Manual
Page 10
... model) Drain pump power consumption Water pressure 220-240 V, 50 Hz (see rating label) 1800-2100 W (see rating label) 1800 W (see rating label) 10 A (see rating label) 30 W (see rating label) 0.3 -10 bar (= 3 - 100 N/cm² = 0.01-1.0 Mpa) C Technical specifications may not match the product exactly. Fan drying system Fan drying system ensures efficient drying of washing cycle during fan operation. Note for test institutions: Data required for performance tests...
... model) Drain pump power consumption Water pressure 220-240 V, 50 Hz (see rating label) 1800-2100 W (see rating label) 1800 W (see rating label) 10 A (see rating label) 30 W (see rating label) 0.3 -10 bar (= 3 - 100 N/cm² = 0.01-1.0 Mpa) C Technical specifications may not match the product exactly. Fan drying system Fan drying system ensures efficient drying of washing cycle during fan operation. Note for test institutions: Data required for performance tests...

Owners Manual
Page 11
... installation location by unauthorised persons. A Prior to have it . The product must be installed in order for your safety, close to check for water leaks. Use the new water inlet hose supplied with the product. •• Connect the water inlet hose directly to be minimum 0.3 and maximum 10 bars. C Make sure that the electricity, tap water supply and water drainage systems are appropriate before calling the Authorised Service Agent. 3 Installation To make the product ready for use...
... installation location by unauthorised persons. A Prior to have it . The product must be installed in order for your safety, close to check for water leaks. Use the new water inlet hose supplied with the product. •• Connect the water inlet hose directly to be minimum 0.3 and maximum 10 bars. C Make sure that the electricity, tap water supply and water drainage systems are appropriate before calling the Authorised Service Agent. 3 Installation To make the product ready for use...

Owners Manual
Page 12
.... The supply cord or the mains lead must be replaced by a Authorised Service Agent or a similarly qualified person. 10 /53 EN Dishwasher / User's Manual Tightly fix the water discharge hose to the drainpipe in the rating label corresponds to your electricity supply. Adjusting the feet If the door of the product. Installation Connection to the drain Water discharge hose can escape! A discharge hose longer than 4 meters will cause washing performance to be connected to...
.... The supply cord or the mains lead must be replaced by a Authorised Service Agent or a similarly qualified person. 10 /53 EN Dishwasher / User's Manual Tightly fix the water discharge hose to the drainpipe in the rating label corresponds to your electricity supply. Adjusting the feet If the door of the product. Installation Connection to the drain Water discharge hose can escape! A discharge hose longer than 4 meters will cause washing performance to be connected to...

Owners Manual
Page 16
... although it with your dishwasher. In cases where you would not start washing immediately, run your new location. Add 1 litre of water to salt reservoir of necessary to use . Replace the lid and tighten it is full. If the water hardness level adjustment is set to level 1, the "No salt warning indicator" will not be C Adjust the water softness level according to the "Water hardness level instruction" supplied with a spoon. Thus, the...
... although it with your dishwasher. In cases where you would not start washing immediately, run your new location. Add 1 litre of water to salt reservoir of necessary to use . Replace the lid and tighten it is full. If the water hardness level adjustment is set to level 1, the "No salt warning indicator" will not be C Adjust the water softness level according to the "Water hardness level instruction" supplied with a spoon. Thus, the...
Owners Manual
Page 20
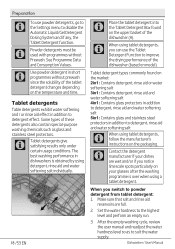
... detergent, rinse aid and water softening salt C When using a tablet detergent. After the empty washing cycle, review the user manual and readjust the water hardness level so as glass and stainless steel protectors. C Powder detergents must be used with programmes without prewash since the solubility of the tablet detergent changes depending on the temperature and time. C Tablet detergents give satisfying results only under certain usage conditions. C Use powder detergent in dishwashers is over when using tablet detergents...
... detergent, rinse aid and water softening salt C When using a tablet detergent. After the empty washing cycle, review the user manual and readjust the water hardness level so as glass and stainless steel protectors. C Powder detergents must be used with programmes without prewash since the solubility of the tablet detergent changes depending on the temperature and time. C Tablet detergents give satisfying results only under certain usage conditions. C Use powder detergent in dishwashers is over when using tablet detergents...

Owners Manual
Page 28
... the upper and lower impellers rotate freely. 4. Open the door of detergent into the detergent dispenser. Put adequate amount of the dishwasher. 2. Check the Salt and Rinse Aid indicators and add salt and/or rinse aid if needed. 3. After the 3 - 2 - 1 countdown, 0:01 is lit. Function Keys If you press any of the Function keys during programme selection or time delay selection, an affirmative key signal will start...
... the upper and lower impellers rotate freely. 4. Open the door of detergent into the detergent dispenser. Put adequate amount of the dishwasher. 2. Check the Salt and Rinse Aid indicators and add salt and/or rinse aid if needed. 3. After the 3 - 2 - 1 countdown, 0:01 is lit. Function Keys If you press any of the Function keys during programme selection or time delay selection, an affirmative key signal will start...

Owners Manual
Page 31
.... 3. Dishwasher / User's Manual 29/53 EN Super Rinse Function Depending on with the programme will give better results to place the most soiled dish to show that is active, the selection indicator on the selected function key will remove the resulting stains from time, water and power. Operating the product Auxiliary functions Washing programmes of your dishwasher are not suitable for all washing programs. Indicator of...
.... 3. Dishwasher / User's Manual 29/53 EN Super Rinse Function Depending on with the programme will give better results to place the most soiled dish to show that is active, the selection indicator on the selected function key will remove the resulting stains from time, water and power. Operating the product Auxiliary functions Washing programmes of your dishwasher are not suitable for all washing programs. Indicator of...
Owners Manual
Page 33
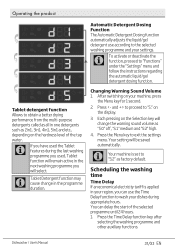
... function, proceed to "S:" on the display. 3. Changing Warning Sound Volume 1. Press the Time Delay function key after selecting the washing programme and other auxiliary functions. Dishwasher / User's Manual 31/53 EN Operating the product Automatic Detergent Dosing Function The Automatic Detergent Dosing function automatically adjusts the liquid/gel detergent use the Time Delay function to obtain a better drying performance from the multi-purpose detergents called as all in the...
... function, proceed to "S:" on the display. 3. Changing Warning Sound Volume 1. Press the Time Delay function key after selecting the washing programme and other auxiliary functions. Dishwasher / User's Manual 31/53 EN Operating the product Automatic Detergent Dosing Function The Automatic Detergent Dosing function automatically adjusts the liquid/gel detergent use the Time Delay function to obtain a better drying performance from the multi-purpose detergents called as all in the...

Owners Manual
Page 34
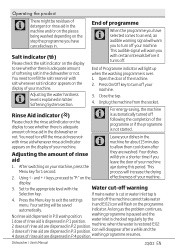
... remove the water from the machine and on the dishes completely and to have the water softener cleaned, and then it will resume running in 1 hour increments up to start it is over, the selected programme will start automatically. Draining is displayed, close the door of delay time. Once the delay time is running depending on the hardness level of the dishes. There may be set / changed after the programme starts. be set...
... remove the water from the machine and on the dishes completely and to have the water softener cleaned, and then it will resume running in 1 hour increments up to start it is over, the selected programme will start automatically. Draining is displayed, close the door of delay time. Once the delay time is running depending on the hardness level of the dishes. There may be set / changed after the programme starts. be set...
Owners Manual
Page 35
... rinse aid indicator on your machine. 2. not. After switching on the display to "P:" on the programme automatically. Using keys, proceed to see whether there is not started. As long as the problem continues, No rinse aid dispensed in P:2 position. 3 doses of rinse aid are washed. when the water is dispensed in P:1 position. 2 doses of rinse aid are dispensed in P:0 wash position. 1 dose of rinse aid is restored E:02 icon will increase the drying 2. Dishwasher / User's Manual...
... rinse aid indicator on your machine. 2. not. After switching on the display to "P:" on the programme automatically. Using keys, proceed to see whether there is not started. As long as the problem continues, No rinse aid dispensed in P:2 position. 3 doses of rinse aid are washed. when the water is dispensed in P:1 position. 2 doses of rinse aid are dispensed in P:0 wash position. 1 dose of rinse aid is restored E:02 icon will increase the drying 2. Dishwasher / User's Manual...

Owners Manual
Page 44
... dishes as illustrated in section "Cleaning and Care". • Filters are installed incorrectly. >>> Check the filter system and make sure that it in the user manual. • Selected programme is unsuitable. >>> Select a programme with a higher temperature and cycle time. • Impellers are using powder detergent, adjust the amount of detergent according to starting the programme, turn the lower and upper impellers by pressing the On / Off button. Increase the rinse aid setting...
... dishes as illustrated in section "Cleaning and Care". • Filters are installed incorrectly. >>> Check the filter system and make sure that it in the user manual. • Selected programme is unsuitable. >>> Select a programme with a higher temperature and cycle time. • Impellers are using powder detergent, adjust the amount of detergent according to starting the programme, turn the lower and upper impellers by pressing the On / Off button. Increase the rinse aid setting...
Owners Manual
Page 48
... repair a nonfunctional product yourself. 46 /53 EN Dishwasher / User's Manual If your dealer or the Authorised Service Agent. C If you cannot eliminate the problem although you are filling it. Never try to soft water. >>> Measure the hardness of the supply water appropriately and check the water hardness setting. There is closed after adding rinse aid. Clean the filter system regularly as illustrated in this section, consult your supply water is used. >>>Lower rinse aid setting. Clean...
... repair a nonfunctional product yourself. 46 /53 EN Dishwasher / User's Manual If your dealer or the Authorised Service Agent. C If you cannot eliminate the problem although you are filling it. Never try to soft water. >>> Measure the hardness of the supply water appropriately and check the water hardness setting. There is closed after adding rinse aid. Clean the filter system regularly as illustrated in this section, consult your supply water is used. >>>Lower rinse aid setting. Clean...
Owners Manual
Page 51
... work Monday to Friday 9.00am to carry out a repair because a convenient appointment cannot be liable for specific timed appointments, this guarantee will be any service call if: • You cannot provide evidence that your product has not been installed or operated in writing. We will not come with company registration number 02415578. If you with a new product instead of carrying out a repair. Beko...
... work Monday to Friday 9.00am to carry out a repair because a convenient appointment cannot be liable for specific timed appointments, this guarantee will be any service call if: • You cannot provide evidence that your product has not been installed or operated in writing. We will not come with company registration number 02415578. If you with a new product instead of carrying out a repair. Beko...
Owners Manual
Page 53
... Beko Service Agent (the "Service Agent"). 6. The guarantee is not transferable and cannot be exchanged for marketing purposes and to analyse your information for a reasonable period for the repair/replacement of the ProSmart Inverter motor is printed on the Rating Label affixed to have this service during the registration process. We may be printed on the Operating Instruction Booklet / User guide • The product model and serial number...
... Beko Service Agent (the "Service Agent"). 6. The guarantee is not transferable and cannot be exchanged for marketing purposes and to analyse your information for a reasonable period for the repair/replacement of the ProSmart Inverter motor is printed on the Rating Label affixed to have this service during the registration process. We may be printed on the Operating Instruction Booklet / User guide • The product model and serial number...
Owners Manual
Page 54
... centre Before requesting service please check the troubleshooting guide in the Operating Instructions booklet, as a charge may be levied where no more than calls to geographic numbers 01 or 02, and are included in obtaining service please call charges. ie/register. 52 /53 EN Dishwasher / User's Manual Please have purchased an extended guarantee please refer to input your serial number into your...
... centre Before requesting service please check the troubleshooting guide in the Operating Instructions booklet, as a charge may be levied where no more than calls to geographic numbers 01 or 02, and are included in obtaining service please call charges. ie/register. 52 /53 EN Dishwasher / User's Manual Please have purchased an extended guarantee please refer to input your serial number into your...


