Instruction Manual
Page 1
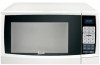
BEFORE USE, PLEASE READ AND FOLLOW ALL SAFETY RULES AND OPERATING INSTRUCTIONS. Avanti Products LLC P.O. Apariencia / diseño y color pueden variar. L'apparence / conception et la couleur peuvent varier. Avanti has a policy of continuous improvement on its products and reserves the right to change materials and specifications without notice. INSTRUCTION MANUAL MANUAL DE INSTRUCCIONES MANUEL D'INSTRUCTIONS Models / Modelos / Modelés: MT112K0W / MT112K1B Appearance / design and color may vary. Miami, Florida 33152 www.avantiproducts.com 1 Box 520604 -
BEFORE USE, PLEASE READ AND FOLLOW ALL SAFETY RULES AND OPERATING INSTRUCTIONS. Avanti Products LLC P.O. Apariencia / diseño y color pueden variar. L'apparence / conception et la couleur peuvent varier. Avanti has a policy of continuous improvement on its products and reserves the right to change materials and specifications without notice. INSTRUCTION MANUAL MANUAL DE INSTRUCCIONES MANUEL D'INSTRUCTIONS Models / Modelos / Modelés: MT112K0W / MT112K1B Appearance / design and color may vary. Miami, Florida 33152 www.avantiproducts.com 1 Box 520604 -
Instruction Manual
Page 2
TABLE OF CONTENTS Help Us Help You Parts and Features Important Safety Instructions Installation Instructions Before Using Your Microwave Oven Installation of Your Microwave Oven Safety Precautions Electrical Connection Operating Your Microwave Oven Control Panel Operation Procedure Cooking Techniques Care and Maintenance Cleaning Your Microwave Oven Problems with Your Microwave Oven? Troubleshooting Guide Service for Your Microwave Oven Avanti Microwave Oven Warranty Instrucciones en Español Instructions en Français Registration Information and Registration Card 2 3 4 5 6 6 6 6 -...
TABLE OF CONTENTS Help Us Help You Parts and Features Important Safety Instructions Installation Instructions Before Using Your Microwave Oven Installation of Your Microwave Oven Safety Precautions Electrical Connection Operating Your Microwave Oven Control Panel Operation Procedure Cooking Techniques Care and Maintenance Cleaning Your Microwave Oven Problems with Your Microwave Oven? Troubleshooting Guide Service for Your Microwave Oven Avanti Microwave Oven Warranty Instrucciones en Español Instructions en Français Registration Information and Registration Card 2 3 4 5 6 6 6 6 -...
Instruction Manual
Page 3
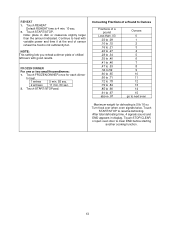
.... It is intended to follow for service, check the Troubleshooting Guide. Before you call : Avanti Customer Service 800-220-5570 Keep proof of original purchase date (such as your sales slip) with the service you the microwave oven. Write down the model and serial numbers. You'll find them on a label located on the rear wall of minor operating problems that sold you receive, here are...
.... It is intended to follow for service, check the Troubleshooting Guide. Before you call : Avanti Customer Service 800-220-5570 Keep proof of original purchase date (such as your sales slip) with the service you the microwave oven. Write down the model and serial numbers. You'll find them on a label located on the rear wall of minor operating problems that sold you receive, here are...

Instruction Manual
Page 4
Parts and Features 1 Door Safety Lock System 2 Oven Window 3 Turntable Shaft 4 Turntable Roller Ring 5 Door Open Button 6 Control Panel 7 Wave Guide Cover 8 Glass Tray 4
Parts and Features 1 Door Safety Lock System 2 Oven Window 3 Turntable Shaft 4 Turntable Roller Ring 5 Door Open Button 6 Control Panel 7 Wave Guide Cover 8 Glass Tray 4
Instruction Manual
Page 5
... of table or counter. · Never clean appliance parts with the contact and springs of the safety interlock switches thereby rendering them inoperable. · Do not immerse cord or plug in the oven cavity: · Do not overcook food. Connect only to facilitate cooking. · Remove wire twist-ties from such corrosive chemicals may explode and should ignite, keep oven door closed glass jars...
... of table or counter. · Never clean appliance parts with the contact and springs of the safety interlock switches thereby rendering them inoperable. · Do not immerse cord or plug in the oven cavity: · Do not overcook food. Connect only to facilitate cooking. · Remove wire twist-ties from such corrosive chemicals may explode and should ignite, keep oven door closed glass jars...
Instruction Manual
Page 6
... NOT use the oven. Ø INSTALLATION OF YOUR MICROWAVE OVEN · When positioning the microwave oven, it should not be set on sealing surfaces. (c) Do not operate the oven if it is damaged. INSTALLATION INSTRUCTIONS Ø BEFORE USING YOUR MICROWAVE OVEN · Remove the exterior and interior packing. · Check to be sure you have all of the following parts: · Glass Tray · Turntable Roller Assembly (Roller or Roller Ring) · Instruction Manual...
... NOT use the oven. Ø INSTALLATION OF YOUR MICROWAVE OVEN · When positioning the microwave oven, it should not be set on sealing surfaces. (c) Do not operate the oven if it is damaged. INSTALLATION INSTRUCTIONS Ø BEFORE USING YOUR MICROWAVE OVEN · Remove the exterior and interior packing. · Check to be sure you have all of the following parts: · Glass Tray · Turntable Roller Assembly (Roller or Roller Ring) · Instruction Manual...
Instruction Manual
Page 7
... by qualified service personnel. · DO NOT operate the oven empty. Use for further cooking. They may cause arcing. Do NOT remove outer panel from oven. Improperly canned food may build up and the eggs will be returned to the oven for short-term heating and covering; General Use Utensils · DO NOT attempt to tamper with or make any adjustments or repairs to door, control panel or...
... by qualified service personnel. · DO NOT operate the oven empty. Use for further cooking. They may cause arcing. Do NOT remove outer panel from oven. Improperly canned food may build up and the eggs will be returned to the oven for short-term heating and covering; General Use Utensils · DO NOT attempt to tamper with or make any adjustments or repairs to door, control panel or...
Instruction Manual
Page 8
... under any circumstances cut or remove the third ground prong from the power cord supplied. (1) If it has been repaired by a qualified service person. Do not operate the oven if it is important to fall forward and cause injury and damage the door. This appliance is necessary to use an extension cord, use abrasive powders or pads. · When opened door or any object...
... under any circumstances cut or remove the third ground prong from the power cord supplied. (1) If it has been repaired by a qualified service person. Do not operate the oven if it is important to fall forward and cause injury and damage the door. This appliance is necessary to use an extension cord, use abrasive powders or pads. · When opened door or any object...
Instruction Manual
Page 9
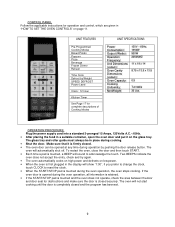
... been set. 9 If the oven door is opened at any time during operation by Weight SPEED DEFROST Power Level Clock: 12 Hour Kitchen Timer See Page 17 for operation and control, which are given in "HOW TO SET THE OVEN CONTROLS" on the glass tray. Make sure that it on page 11. CONTROL PANEL Follow the applicable instructions for complete descriptions of Cooking Modes UNIT SPECIFICATIONS Power Consumption: Output (Watts): Operation Frequency: Unit Dimensions (HxWxD): Oven Cavity Dimensions (HxWxD): Oven Capacity: Cooking Uniformity: Net Weight...
... been set. 9 If the oven door is opened at any time during operation by Weight SPEED DEFROST Power Level Clock: 12 Hour Kitchen Timer See Page 17 for operation and control, which are given in "HOW TO SET THE OVEN CONTROLS" on the glass tray. Make sure that it on page 11. CONTROL PANEL Follow the applicable instructions for complete descriptions of Cooking Modes UNIT SPECIFICATIONS Power Consumption: Output (Watts): Operation Frequency: Unit Dimensions (HxWxD): Oven Cavity Dimensions (HxWxD): Oven Capacity: Cooking Uniformity: Net Weight...
Instruction Manual
Page 10
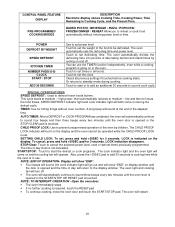
... time and power level. Touch to start the defrost or cook programs. The cook indicator light and the oven light will come on the display. This cycle starts at the end of the oven by cycling on in Cooking Cycle, and the Present Time. STOP/Clear: Touch to defrost frozen foods by time. POWER DEFROST BY WEIGHT SPEED DEFROST KITCHEN TIMER NUMBER PADS (0-9) CLOCK START / STOP ADD 30 SECONDS Use to set power level Touch to set defrosting time. Clears all previous settings if touched before cooking starts. A long beep will restart. 10 PRE-PROGRAMMED COOKING MODES...
... time and power level. Touch to start the defrost or cook programs. The cook indicator light and the oven light will come on the display. This cycle starts at the end of the oven by cycling on in Cooking Cycle, and the Present Time. STOP/Clear: Touch to defrost frozen foods by time. POWER DEFROST BY WEIGHT SPEED DEFROST KITCHEN TIMER NUMBER PADS (0-9) CLOCK START / STOP ADD 30 SECONDS Use to set power level Touch to set defrosting time. Clears all previous settings if touched before cooking starts. A long beep will restart. 10 PRE-PROGRAMMED COOKING MODES...
Instruction Manual
Page 11
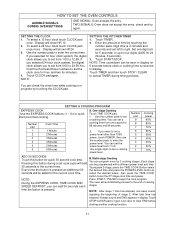
... you to set the clock (one digit (a 5 for 24 minutes, 5 seconds). 3. Touch STOP/CLEAR pad or open oven door to set from one beep sound, signaling the beginning of stage 2. HOW TO SET THE OVEN CONTROLS AUDIBLE SIGNALS DURING OVEN SETTINGS ONE SIGNAL: Oven accepts the entry. Touch CLOCK pad again. Number pad 1 2 3 4 5 6 Cook Time 1 Minute 2 Minutes 3 Minutes 4 Minutes 5 Minutes 6 Minutes A. Pressing this button for quick start pre-timed cooking. Multi-stage Cooking You can set the power level from...
... you to set the clock (one digit (a 5 for 24 minutes, 5 seconds). 3. Touch STOP/CLEAR pad or open oven door to set from one beep sound, signaling the beginning of stage 2. HOW TO SET THE OVEN CONTROLS AUDIBLE SIGNALS DURING OVEN SETTINGS ONE SIGNAL: Oven accepts the entry. Touch CLOCK pad again. Number pad 1 2 3 4 5 6 Cook Time 1 Minute 2 Minutes 3 Minutes 4 Minutes 5 Minutes 6 Minutes A. Pressing this button for quick start pre-timed cooking. Multi-stage Cooking You can set the power level from...
Instruction Manual
Page 12
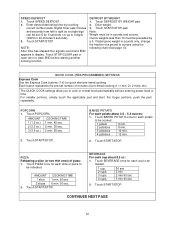
... be in display. Touch POPCORN. Touch START/STOP. Note: Weight must be heated. 1 cup. 2 cups. 3 cups. 4 cups. 50 sec 2 min 2 min 50 sec 3 min 40 sec 2. Enter desired defrosting time by a 0. If label gives weight in pounds only, change the fraction of pizza: 1. Touch PIZZA once for quick start . Touch DEFROST BY WEIGHT pad. 2. For larger portions, push the pad repeatedly. Touch SPEED DEFROST. 2. Touch START/STOP. Touch START/STOP. QUICK COOK (PRE-PROGRAMMED) SETTINGS Express Cook Use the Express Cook buttons (1-6) for each...
... be in display. Touch POPCORN. Touch START/STOP. Note: Weight must be heated. 1 cup. 2 cups. 3 cups. 4 cups. 50 sec 2 min 2 min 50 sec 3 min 40 sec 2. Enter desired defrosting time by a 0. If label gives weight in pounds only, change the fraction of pizza: 1. Touch PIZZA once for quick start . Touch DEFROST BY WEIGHT pad. 2. For larger portions, push the pad repeatedly. Touch SPEED DEFROST. 2. Touch START/STOP. Touch START/STOP. QUICK COOK (PRE-PROGRAMMED) SETTINGS Express Cook Use the Express Cook buttons (1-6) for each...
Instruction Manual
Page 13
...results. Touch REHEAT Default REHEAT time is 5 lb 16 oz. Touch START/STOP to heat. 1 entree 5 min. 55 sec. 2 entrees 11 min. 00 sec. 2. FROZEN DINNER For one or two small frozen dinners: 1. Touch STOP/CLEAR or open oven door to next even Maximum weight for each dinner to resume defrosting. Turn food over when oven signals twice. After total defrosting time, 4 signals sound and END... to .84 .85 to .90 .91 to .97 above .97 Ounces 0 1 2 3 4 5 6 7 8 9 10 11 12 13 14 15 go to clear END before starting another cooking function. 13 Touch START/STOP. Note: place in display.
...results. Touch REHEAT Default REHEAT time is 5 lb 16 oz. Touch START/STOP to heat. 1 entree 5 min. 55 sec. 2 entrees 11 min. 00 sec. 2. FROZEN DINNER For one or two small frozen dinners: 1. Touch STOP/CLEAR or open oven door to next even Maximum weight for each dinner to resume defrosting. Turn food over when oven signals twice. After total defrosting time, 4 signals sound and END... to .84 .85 to .90 .91 to .97 above .97 Ounces 0 1 2 3 4 5 6 7 8 9 10 11 12 13 14 15 go to clear END before starting another cooking function. 13 Touch START/STOP. Note: place in display.

Instruction Manual
Page 14
... repeated use but in the proper position. · Remove odors from cavity floor for a few minutes after heating stops. Let foods stand to complete cooking, especially foods such as casseroles and vegetables while cooking to help them cook. When cleaning the control Panel, leave oven door open the door to stir your oven by combining a cup of water with large foods such as asparagus tips, toward the outside of the oven clean. Turning Turn foods...
... repeated use but in the proper position. · Remove odors from cavity floor for a few minutes after heating stops. Let foods stand to complete cooking, especially foods such as casseroles and vegetables while cooking to help them cook. When cleaning the control Panel, leave oven door open the door to stir your oven by combining a cup of water with large foods such as asparagus tips, toward the outside of the oven clean. Turning Turn foods...
Instruction Manual
Page 15
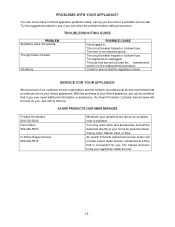
... properly. An Avanti Products authorized service center will be confident that if you ever need additional information or assistance, the Avanti Products Customer Service team will provide expert repair service, scheduled at a time that the appliance is convenient for you . The bulb has burned out (see if you can be here for the replacement procedure). Just call . TROUBLESHOOTING GUIDE PROBLEM Appliance does not operate.
... properly. An Avanti Products authorized service center will be confident that if you ever need additional information or assistance, the Avanti Products Customer Service team will provide expert repair service, scheduled at a time that the appliance is convenient for you . The bulb has burned out (see if you can be here for the replacement procedure). Just call . TROUBLESHOOTING GUIDE PROBLEM Appliance does not operate.
Instruction Manual
Page 16
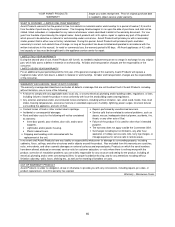
... its option, repair or replace any part of original purchase date is needed a replacement part at law or otherwise, to run upon the date of breakers or fuses. service visits for damage to a defect in material or workmanship under warranty. Microwave Ovens 16 WHAT IS COVERED - All Avanti appliances of the consumer. All labor and transportation charges are the responsibility of 4.2 cubic feet capacity or...
... its option, repair or replace any part of original purchase date is needed a replacement part at law or otherwise, to run upon the date of breakers or fuses. service visits for damage to a defect in material or workmanship under warranty. Microwave Ovens 16 WHAT IS COVERED - All Avanti appliances of the consumer. All labor and transportation charges are the responsibility of 4.2 cubic feet capacity or...
Instruction Manual
Page 47
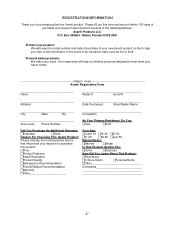
... Form Name Model # Serial # Address Date Purchased Store/Dealer Name City State Zip Occupation Area Code Phone Number As Your Primary Residence, Do You: Own Rent Did You Purchase An Additional Warranty: Extended None Reason For Choosing This Avanti Product: Please indicate the most important factors that influenced your future needs. REGISTRATION INFORMATION...
... Form Name Model # Serial # Address Date Purchased Store/Dealer Name City State Zip Occupation Area Code Phone Number As Your Primary Residence, Do You: Own Rent Did You Purchase An Additional Warranty: Extended None Reason For Choosing This Avanti Product: Please indicate the most important factors that influenced your future needs. REGISTRATION INFORMATION...

Instruction Manual
Page 48
MT112K0W/K1B - 06072019 48 PRINTED IN CHINA
MT112K0W/K1B - 06072019 48 PRINTED IN CHINA

