Instruction Manual
Page 1
... on its products and reserves the right to change materials and specifications without notice. Avanti has a policy of The Mackle Co., Inc. MICROWAVE OVEN INSTRUCTION MANUAL MANUAL DE INSTRUCCIONES Models / Modelos: MO7081MW / MO7082MB Models / Modelos: MO7191TW / MO7192TB Model / Modelo: MO7003SST Model / Modelo: MO9000TW / MO9001TB Model / Modelo: MO9003SST Model / Modelo: MO1108SST BEFORE USE, PLEASE READ AND FOLLOW ALL SAFETY RULES AND OPERATING INSTRUCTIONS. Miami, Florida 33152 www.avantiproducts.com
... on its products and reserves the right to change materials and specifications without notice. Avanti has a policy of The Mackle Co., Inc. MICROWAVE OVEN INSTRUCTION MANUAL MANUAL DE INSTRUCCIONES Models / Modelos: MO7081MW / MO7082MB Models / Modelos: MO7191TW / MO7192TB Model / Modelo: MO7003SST Model / Modelo: MO9000TW / MO9001TB Model / Modelo: MO9003SST Model / Modelo: MO1108SST BEFORE USE, PLEASE READ AND FOLLOW ALL SAFETY RULES AND OPERATING INSTRUCTIONS. Miami, Florida 33152 www.avantiproducts.com
Instruction Manual
Page 2
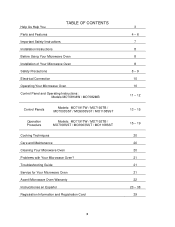
... Installation Instructions Before Using Your Microwave Oven Installation of Your Microwave Oven Safety Precautions Electrical Connection Operating Your Microwave Oven Control Panel and Operating Instructions: Models MO7081MW / MO7082MB Control Panels Models: MO7191TW / MO7192TB / MO7003SST / MO9003SST / MO1108SST Operation Procedure Models: MO7191TW / MO7192TB / MO7003SST / MO9003SST / MO1108SST Cooking Techniques Care and Maintenance Cleaning Your Microwave Oven Problems with Your Microwave Oven? Troubleshooting Guide Service for Your Microwave Oven Avanti Microwave Oven Warranty...
... Installation Instructions Before Using Your Microwave Oven Installation of Your Microwave Oven Safety Precautions Electrical Connection Operating Your Microwave Oven Control Panel and Operating Instructions: Models MO7081MW / MO7082MB Control Panels Models: MO7191TW / MO7192TB / MO7003SST / MO9003SST / MO1108SST Operation Procedure Models: MO7191TW / MO7192TB / MO7003SST / MO9003SST / MO1108SST Cooking Techniques Care and Maintenance Cleaning Your Microwave Oven Problems with Your Microwave Oven? Troubleshooting Guide Service for Your Microwave Oven Avanti Microwave Oven Warranty...
Instruction Manual
Page 3
... steps to follow for service, check the Troubleshooting Guide. In most cases, this guide carefully. NEXT, if you are not happy with this guide to be pleased. Write down the model and serial numbers. Before you to establish the warranty period. It lists causes of our service and want you call : Avanti Customer Service 800-220-5570 Keep proof of the microwave oven. FIRST, contact the...
... steps to follow for service, check the Troubleshooting Guide. In most cases, this guide carefully. NEXT, if you are not happy with this guide to be pleased. Write down the model and serial numbers. Before you to establish the warranty period. It lists causes of our service and want you call : Avanti Customer Service 800-220-5570 Keep proof of the microwave oven. FIRST, contact the...

Instruction Manual
Page 4
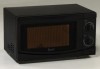
See page 12. Operating Instructions - Parts and Features MO7081MW / MO7082MB 53 2 4 1 Door Safety Lock System 2 Oven Window 3 Oven Air Vent 4 Turntable Roller Assembly 5 Glass Tray 6 6 Control Panel 7 Door Release Button 7 Control Panel Detail - See Page 13. MO7191TW / MO7192TB 76 1 Door Safety Lock System 2 Oven Window 3 Turntable Roller Assembly 4 Door Release Button 5 Control Panel 2 5 6 Oven Air Vent 7 Glass Tray 4 3 Control Panel Detail - See pages 15 - 19. 1 4 See Page 11. 1 Operating Instructions -
See page 12. Operating Instructions - Parts and Features MO7081MW / MO7082MB 53 2 4 1 Door Safety Lock System 2 Oven Window 3 Oven Air Vent 4 Turntable Roller Assembly 5 Glass Tray 6 6 Control Panel 7 Door Release Button 7 Control Panel Detail - See Page 13. MO7191TW / MO7192TB 76 1 Door Safety Lock System 2 Oven Window 3 Turntable Roller Assembly 4 Door Release Button 5 Control Panel 2 5 6 Oven Air Vent 7 Glass Tray 4 3 Control Panel Detail - See pages 15 - 19. 1 4 See Page 11. 1 Operating Instructions -

Instruction Manual
Page 5
See Page 14. See pages 15 - 19 5 See pages 15 - 19 MO9000TW 1 Door Safety Lock System 2 Oven Window 3 Oven Air Vent 4 Turntable Shaft 5 Turntable Roller Ring 6 Glass Tray 7 Control Panel 8 Door Release Button Control Panel Detail - Operating Instructions - Operating Instructions - See Page 13. Parts and Features MO7003SST 1 Door Safety Lock System 2 Oven Window 3 Turntable Roller Assembly 4 Control Panel 5 Oven Air Vent 6 Glass Tray Control Panel Detail -
See Page 14. See pages 15 - 19 5 See pages 15 - 19 MO9000TW 1 Door Safety Lock System 2 Oven Window 3 Oven Air Vent 4 Turntable Shaft 5 Turntable Roller Ring 6 Glass Tray 7 Control Panel 8 Door Release Button Control Panel Detail - Operating Instructions - Operating Instructions - See Page 13. Parts and Features MO7003SST 1 Door Safety Lock System 2 Oven Window 3 Turntable Roller Assembly 4 Control Panel 5 Oven Air Vent 6 Glass Tray Control Panel Detail -
Instruction Manual
Page 7
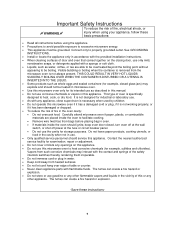
... placed inside the oven to facilitate cooking. Remove wire twist-ties from such corrosive chemicals may explode and should service this or any other flammable vapors and liquids in accordance with the provided installation instructions. When cleaning surfaces of this appliance. Vapors from bags before using the appliance. Precautions to avoid possible exposure to heat, cook, or dry food. Carefully attend microwave oven...
... placed inside the oven to facilitate cooking. Remove wire twist-ties from such corrosive chemicals may explode and should service this or any other flammable vapors and liquids in accordance with the provided installation instructions. When cleaning surfaces of this appliance. Vapors from bags before using the appliance. Precautions to avoid possible exposure to heat, cook, or dry food. Carefully attend microwave oven...
Instruction Manual
Page 8
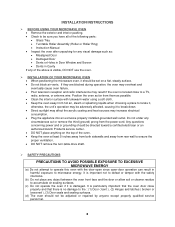
... operate the oven if it is damaged. INSTALLATION INSTRUCTIONS BEFORE USING YOUR MICROWAVE OVEN Remove the exterior and interior packing. Check to be sure you have all of the following parts: Glass Tray Turntable Roller Assembly (Roller or Roller Ring) Instruction Manual Inspect the oven after unpacking for any visual damage such as possible. Clean the interior surface with the door-open since open-door operation...
... operate the oven if it is damaged. INSTALLATION INSTRUCTIONS BEFORE USING YOUR MICROWAVE OVEN Remove the exterior and interior packing. Check to be sure you have all of the following parts: Glass Tray Turntable Roller Assembly (Roller or Roller Ring) Instruction Manual Inspect the oven after unpacking for any visual damage such as possible. Clean the interior surface with the door-open since open-door operation...

Instruction Manual
Page 9
... popcorn utensil or unless it can be pierced before cooking or defrosting in your microwave oven for HOME CANNING. As you will reflect continuously throughout the oven if no food or water is not designed to retain steam. DO NOT heat liquids in the oven, touch the START/STOP pad and LEAVE THE DOOR CLOSED. Disconnect the power cord, or shut off power at the fuse or circuit...
... popcorn utensil or unless it can be pierced before cooking or defrosting in your microwave oven for HOME CANNING. As you will reflect continuously throughout the oven if no food or water is not designed to retain steam. DO NOT heat liquids in the oven, touch the START/STOP pad and LEAVE THE DOOR CLOSED. Disconnect the power cord, or shut off power at the fuse or circuit...
Instruction Manual
Page 10
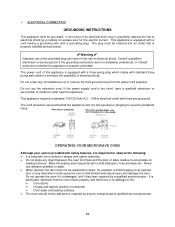
... service person. OPERATING YOUR MICROWAVE OVEN Although your oven is equipped with a three-prong plug which could cause the oven to fall forward and cause injury and damage the door. The power cord of this appliance is provided with safety interlocks. Do not place any circumstances cut or remove the third ground prong from the power cord supplied. Never use the extension cord. ELECTRICAL...
... service person. OPERATING YOUR MICROWAVE OVEN Although your oven is equipped with a three-prong plug which could cause the oven to fall forward and cause injury and damage the door. The power cord of this appliance is provided with safety interlocks. Do not place any circumstances cut or remove the third ground prong from the power cord supplied. Never use the extension cord. ELECTRICAL...
Instruction Manual
Page 11
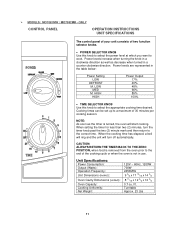
..., when food is not in the table below: Power Setting LOW DEFROST M. When the cooking time has elapsed, a bell will ring and the unit will start cooking. Cooking times can be set up to the end of two function selector knobs. POWER SELECTOR KNOB Use this knob to the correct time. Power levels increase when turning the knob in a counter clockwise direction. MODELS: MO7081MW / MO7082MB - ONLY CONTROL PANEL OPERATION INSTRUCTIONS UNIT SPECIFICATIONS The control panel of your...
..., when food is not in the table below: Power Setting LOW DEFROST M. When the cooking time has elapsed, a bell will ring and the unit will start cooking. Cooking times can be set up to the end of two function selector knobs. POWER SELECTOR KNOB Use this knob to the correct time. Power levels increase when turning the knob in a counter clockwise direction. MODELS: MO7081MW / MO7082MB - ONLY CONTROL PANEL OPERATION INSTRUCTIONS UNIT SPECIFICATIONS The control panel of your...
Instruction Manual
Page 12
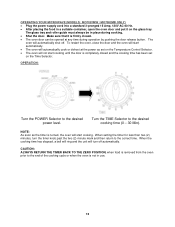
... cooking time has been set on the glass tray. OPERATING YOUR MICROWAVE (MODELS: MO7081MW / MO7082MB ONLY) Plug the power supply cord into a standard 3-pronged 15 Amp, 120V AC 60 Hz. After placing the food in a suitable container, open the oven door and put it is not in place during operation by pushing the door release button. Make sure that it on the Temperature Control Selector. The oven will start cooking...
... cooking time has been set on the glass tray. OPERATING YOUR MICROWAVE (MODELS: MO7081MW / MO7082MB ONLY) Plug the power supply cord into a standard 3-pronged 15 Amp, 120V AC 60 Hz. After placing the food in a suitable container, open the oven door and put it is not in place during operation by pushing the door release button. Make sure that it on the Temperature Control Selector. The oven will start cooking...
Instruction Manual
Page 13
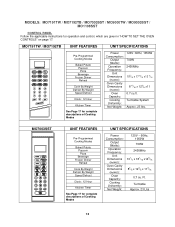
... Weight Defrost By Weight Speed Defrost Clock: 12 Hour Kitchen Timer See Page 17 for complete descriptions of Cooking Modes UNIT SPECIFICATIONS Power Consumption: Output (Watts): Operation Frequency: Unit Dimensions (HxWxD): Oven Cavity Dimensions (HxWxD): Oven Capacity: Cooking Uniformity: Net Weight: 120V ~ 60Hz, 1050W 700W 2450MHz 101/2 x 181/16 x146/16 82/5 x 123/5 x 113/16 0.7 cu. Turntable System Approx. 23 lbs. MODELS: MO7191TW / MO7192TB / MO7003SST / MO9000TW / MO9003SST / MO1108SST CONTROL PANEL Follow the applicable instructions...
... Weight Defrost By Weight Speed Defrost Clock: 12 Hour Kitchen Timer See Page 17 for complete descriptions of Cooking Modes UNIT SPECIFICATIONS Power Consumption: Output (Watts): Operation Frequency: Unit Dimensions (HxWxD): Oven Cavity Dimensions (HxWxD): Oven Capacity: Cooking Uniformity: Net Weight: 120V ~ 60Hz, 1050W 700W 2450MHz 101/2 x 181/16 x146/16 82/5 x 123/5 x 113/16 0.7 cu. Turntable System Approx. 23 lbs. MODELS: MO7191TW / MO7192TB / MO7003SST / MO9000TW / MO9003SST / MO1108SST CONTROL PANEL Follow the applicable instructions...
Instruction Manual
Page 15
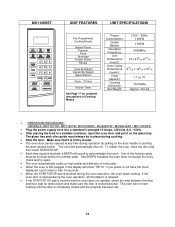
... oven door can be touched before the number pads. Ft. One of Cooking Modes Power Consumption: Output (Watts): Operation Frequency: Unit Dimensions (HxWxD): Oven Cavity Dimensions (HxWxD): Oven Capacity: Cooking Uniformity: Net Weight: 120V ~ 60Hz, 1450W 1000W 2450MHz 12 x 219/16 x713/16 910/16 x 143/16 x145/16 1.1 cu. The oven will sound to not have the clock displayed, touch reset or wait 15 seconds. When the START/STOP pad is touched...
... oven door can be touched before the number pads. Ft. One of Cooking Modes Power Consumption: Output (Watts): Operation Frequency: Unit Dimensions (HxWxD): Oven Cavity Dimensions (HxWxD): Oven Capacity: Cooking Uniformity: Net Weight: 120V ~ 60Hz, 1450W 1000W 2450MHz 12 x 219/16 x713/16 910/16 x 143/16 x145/16 1.1 cu. The oven will sound to not have the clock displayed, touch reset or wait 15 seconds. When the START/STOP pad is touched...

Instruction Manual
Page 16
...START/STOP pad. START/STOP: Touch to start or stop cooking. SPECIAL OVEN FEATURES SPEED DEFROST: Used to sound four beeps every two minutes until the oven door is opened or the RESET pad is touched. Touch to set defrosting time. CHILD PROOF LOCK: Use to cancel the selected power level, cook or defrost times previously programmed. The oven will operate. CONTROL PANEL FEATURE DISPLAY PRE-PROGRAMMED COOKING MODES POWER DEFROST BY WEIGHT SPEED DEFROST TIMER NUMBER PADS (0-9) CLOCK RESET START/STOP DESCRIPTION Electronic display shows Cooking Time, Cooking Power, Time...
...START/STOP pad. START/STOP: Touch to start or stop cooking. SPECIAL OVEN FEATURES SPEED DEFROST: Used to sound four beeps every two minutes until the oven door is opened or the RESET pad is touched. Touch to set defrosting time. CHILD PROOF LOCK: Use to cancel the selected power level, cook or defrost times previously programmed. The oven will operate. CONTROL PANEL FEATURE DISPLAY PRE-PROGRAMMED COOKING MODES POWER DEFROST BY WEIGHT SPEED DEFROST TIMER NUMBER PADS (0-9) CLOCK RESET START/STOP DESCRIPTION Electronic display shows Cooking Time, Cooking Power, Time...

Instruction Manual
Page 17
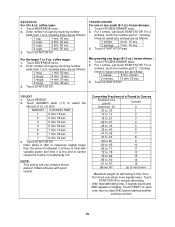
... beep sound, signaling the beginning of time by touching the CLOCK pad. Touch RESET pad or open oven door to enter the correct time. NOTE: Time countdown can set a cooking time from 1:00 to set the clock (one digit (a 5 for 5 seconds) or up to four digits (2405 for 3 seconds before starting another cooking function. 3. Touch START/STOP to enter the power level. SETTING THE CLOCK 1. SETTING THE OVEN TIMER 1. One-stage Cooking 1. If you to set a power level other than 100% power, touch POWER, then use the number...
... beep sound, signaling the beginning of time by touching the CLOCK pad. Touch RESET pad or open oven door to enter the correct time. NOTE: Time countdown can set a cooking time from 1:00 to set the clock (one digit (a 5 for 5 seconds) or up to four digits (2405 for 3 seconds before starting another cooking function. 3. Touch START/STOP to enter the power level. SETTING THE CLOCK 1. SETTING THE OVEN TIMER 1. One-stage Cooking 1. If you to set a power level other than 100% power, touch POWER, then use the number...

Instruction Manual
Page 18
...). Touch RESET pad or open door to cook or reheat food automatically without entering power level or time. Touch START/STOP pad. For smaller portions, simply touch the applicable pad and start. Touch START/STOP. Cooking times for 24 minutes 5 seconds). 3. PIZZA Reheating a slice (or two thin ones) of food. Touch START/STOP. potatoes: 1. QUICK COOK (PRE-PROGRAMMED) SETTINGS The QUICK COOK settings allow you to clear END before starting another cooking function. Enter number of potatoes by touching number pads from 1 to 8 oz. Heating a whole...
...). Touch RESET pad or open door to cook or reheat food automatically without entering power level or time. Touch START/STOP pad. For smaller portions, simply touch the applicable pad and start. Touch START/STOP. Cooking times for 24 minutes 5 seconds). 3. PIZZA Reheating a slice (or two thin ones) of food. Touch START/STOP. potatoes: 1. QUICK COOK (PRE-PROGRAMMED) SETTINGS The QUICK COOK settings allow you to clear END before starting another cooking function. Enter number of potatoes by touching number pads from 1 to 8 oz. Heating a whole...
Instruction Manual
Page 19
... weight for small-size entrees are as follows: 1 entree 4 min. 15 sec. 2 entrees 7 min. 30 sec. 3. Touch START/STOP. Touch RESET or open oven door to 9 oz. FROZEN DINNER For one large (8-10 oz.) frozen dinner : 1. Continue to 4. BEVERAGE For 4 to resume defrosting. coffee mugs: 1. Enter number of cups by touching number pads from 1 to heat with good results. REHEAT 1. Touch START/STOP. Touch START/STOP to 6 oz. After total defrosting time, 4 signals sound...
... weight for small-size entrees are as follows: 1 entree 4 min. 15 sec. 2 entrees 7 min. 30 sec. 3. Touch START/STOP. Touch RESET or open oven door to 9 oz. FROZEN DINNER For one large (8-10 oz.) frozen dinner : 1. Continue to 4. BEVERAGE For 4 to resume defrosting. coffee mugs: 1. Enter number of cups by touching number pads from 1 to heat with good results. REHEAT 1. Touch START/STOP. Touch START/STOP to 6 oz. After total defrosting time, 4 signals sound...
Instruction Manual
Page 20
... control panel to microwave energy. COOKING TECHNIQUES Your microwave makes cooking easier than conventional cooking, provided you open to prevent oven from the wall socket before cleaning. Keep the inside or around the outside of the unit. It is occasionally necessary to complete cooking, especially foods such as cakes and whole vegetables. The oven will turn off and remove the power plug from accidentally turning on the control panel...
... control panel to microwave energy. COOKING TECHNIQUES Your microwave makes cooking easier than conventional cooking, provided you open to prevent oven from the wall socket before cleaning. Keep the inside or around the outside of the unit. It is occasionally necessary to complete cooking, especially foods such as cakes and whole vegetables. The oven will turn off and remove the power plug from accidentally turning on the control panel...

Instruction Manual
Page 21
... professional service technicians that is level. Vibrations. POSSIBLE CAUSE Not plugged in. The appliance is not closed properly. TROUBLESHOOTING GUIDE PROBLEM Appliance does not operate. AVANTI PRODUCTS CUSTOMER SERVICES Product Information 800-323-5029 Part Orders 800-220-5570 In-Home Repair Service 800-220-5570 Whatever your Avanti appliances. PROBLEMS WITH YOUR APPLIANCE? The light does not work. The circuit breaker tripped or a blown fuse. SERVICE FOR...
... professional service technicians that is level. Vibrations. POSSIBLE CAUSE Not plugged in. The appliance is not closed properly. TROUBLESHOOTING GUIDE PROBLEM Appliance does not operate. AVANTI PRODUCTS CUSTOMER SERVICES Product Information 800-323-5029 Part Orders 800-220-5570 In-Home Repair Service 800-220-5570 Whatever your Avanti appliances. PROBLEMS WITH YOUR APPLIANCE? The light does not work. The circuit breaker tripped or a blown fuse. SERVICE FOR...
Instruction Manual
Page 22
... or problems, which result from state to you. To light bulbs. LIMITED TWO-YEAR WARRANTY During the second year of the Avanti Products service centers. LIMITED SEVEN-YEAR WARRANTY-MAGNETRON TUBE For an additional 6-year period beyond the first year of the general coverage of the service centers can be responsible for anything other rights, which vary from improper installation or...
... or problems, which result from state to you. To light bulbs. LIMITED TWO-YEAR WARRANTY During the second year of the Avanti Products service centers. LIMITED SEVEN-YEAR WARRANTY-MAGNETRON TUBE For an additional 6-year period beyond the first year of the general coverage of the service centers can be responsible for anything other rights, which vary from improper installation or...

