Operating Instructions
Page 5
...Treble) with PAC adapter SWI-PS Steering Wheel Control Interface, sold separately *HD Radio TM Technology Manufactured Under License From iBiquity Digital Corporation. VM9314 Chassis • 1.0 DIN (Import I ISO-DIN Mountable) • Motorized Flip-Out I Flip-Up LCD Screen • 8 Character...Management System - U.S. Forced Air-Cooling to Keep the Chip-Sets Operating at Nominal Temperatures General • iPod Voice Control • Navigation Ready (NAV102) • Bluetooth Ready (with purchase of iBiquity Digital Corporation. 2 and Foreign Patents. Compatible with Eight Preset EO ...
...Treble) with PAC adapter SWI-PS Steering Wheel Control Interface, sold separately *HD Radio TM Technology Manufactured Under License From iBiquity Digital Corporation. VM9314 Chassis • 1.0 DIN (Import I ISO-DIN Mountable) • Motorized Flip-Out I Flip-Up LCD Screen • 8 Character...Management System - U.S. Forced Air-Cooling to Keep the Chip-Sets Operating at Nominal Temperatures General • iPod Voice Control • Navigation Ready (NAV102) • Bluetooth Ready (with purchase of iBiquity Digital Corporation. 2 and Foreign Patents. Compatible with Eight Preset EO ...
Operating Instructions
Page 6
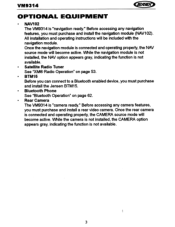
... and install the Jensen BTM15. • Bluetooth Phone See "Bluetooth Operation" on page 62. • Rear Camera The VM9314 is not available. 3 While the navigation module is not installed, the NAV option appears gray, indicating the function is not available. • Satellite Radio Tuner See... page 53. • BTM15 Before you can connect to a Bluetooth enabled device, you must purchase and install the navigation module (NAV102). YM9314 OPTIONAL EQUIPMENT • NAV102 The VM9314 is connected and operating properly, the CAMERA source mode will become active. Once the rear camera is...
... and install the Jensen BTM15. • Bluetooth Phone See "Bluetooth Operation" on page 62. • Rear Camera The VM9314 is not available. 3 While the navigation module is not installed, the NAV option appears gray, indicating the function is not available. • Satellite Radio Tuner See... page 53. • BTM15 Before you can connect to a Bluetooth enabled device, you must purchase and install the navigation module (NAV102). YM9314 OPTIONAL EQUIPMENT • NAV102 The VM9314 is connected and operating properly, the CAMERA source mode will become active. Once the rear camera is...

Operating Instructions
Page 11
.... With the monitor closed, press to activate the iPod Voice Control Feature. The TFT screen must be open for this function to display the navigation user interface. Touch "Screen" to close the TFT. 16. Press again to adjust dimmer and backlight picture settings (see "SCREEN Sub-menu ...settings: Full, Normal or STANDBY. WIDElI« Press to adjust the display aspect of the picture to view alternate LCD display information. VM9314 13. PIC/BAND Press and hold to activate the automatic mechanical system and move the TFT monitor into viewing position. CLOSEIOPEN Press to display...
.... With the monitor closed, press to activate the iPod Voice Control Feature. The TFT screen must be open for this function to display the navigation user interface. Touch "Screen" to close the TFT. 16. Press again to adjust dimmer and backlight picture settings (see "SCREEN Sub-menu ...settings: Full, Normal or STANDBY. WIDElI« Press to adjust the display aspect of the picture to view alternate LCD display information. VM9314 13. PIC/BAND Press and hold to activate the automatic mechanical system and move the TFT monitor into viewing position. CLOSEIOPEN Press to display...

Operating Instructions
Page 17
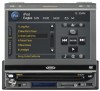
...to power off Decreases volume Increases volume View SOURCE menu View the system setup menu Screen navigation (does not apply to all screens/menus) ~II ~ 1-9,0, *, # PIC OPEN/CLOSE EQ ~/~b PTT Enter command during menu navigation or PlaylPause Open/close TFT monitor Direct entry View setup menu and touch "SCREEN" to... of the unit light up /down Push to turn on the unit by pressing the OPEN button (15) and opening the TFT screen. VM9314 OPERATING INSTRUCTIONS Power On I Table 2: Common Remote Control Functions select playing source Toggle audio output on/off Turns the power on/off the ...
...to power off Decreases volume Increases volume View SOURCE menu View the system setup menu Screen navigation (does not apply to all screens/menus) ~II ~ 1-9,0, *, # PIC OPEN/CLOSE EQ ~/~b PTT Enter command during menu navigation or PlaylPause Open/close TFT monitor Direct entry View setup menu and touch "SCREEN" to... of the unit light up /down Push to turn on the unit by pressing the OPEN button (15) and opening the TFT screen. VM9314 OPERATING INSTRUCTIONS Power On I Table 2: Common Remote Control Functions select playing source Toggle audio output on/off Turns the power on/off the ...
Operating Instructions
Page 18
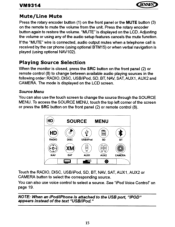
...to change between available audio playing sources in the following order: RADIO, DISC, USB/iPod, SD, BT, NAV, SAT, AUX1, AUX2 and CAMERA. VM9314 Mute/Line Mute Press the rotary encoder button (1) on the front panel orthe MUTE button (3) on the remote to restore the volume. See "iPod ...If the "MUTE" wire is connected, audio output mutes when a telephone call is received by the car phone (using optional BTM15) or when verbal navigation is closed, press the SRC button on page 19. Adjusting the volume or using optional NAV102). Playing Source Selection When the monitor is played (using...
...to change between available audio playing sources in the following order: RADIO, DISC, USB/iPod, SD, BT, NAV, SAT, AUX1, AUX2 and CAMERA. VM9314 Mute/Line Mute Press the rotary encoder button (1) on the front panel orthe MUTE button (3) on the remote to restore the volume. See "iPod ...If the "MUTE" wire is connected, audio output mutes when a telephone call is received by the car phone (using optional BTM15) or when verbal navigation is closed, press the SRC button on page 19. Adjusting the volume or using optional NAV102). Playing Source Selection When the monitor is played (using...

Operating Instructions
Page 19
VM9314 NOTE: You can be used for software updates. Select "AUX 1" mode to access the front AN input or "AUX 2" mode for 3 seconds. 16 This input ..., cannot be connected to drag the "Source Menu" icons and rearrange them based on your preference External Devices External peripheral devices, including a game console, camcorder, navigation unit, iPod, Zune, etc. can press and hold to this unit via RCA output using the AN Media Adapter Cable (included). Micro SD Slots (for...
VM9314 NOTE: You can be used for software updates. Select "AUX 1" mode to access the front AN input or "AUX 2" mode for 3 seconds. 16 This input ..., cannot be connected to drag the "Source Menu" icons and rearrange them based on your preference External Devices External peripheral devices, including a game console, camcorder, navigation unit, iPod, Zune, etc. can press and hold to this unit via RCA output using the AN Media Adapter Cable (included). Micro SD Slots (for...
Operating Instructions
Page 22
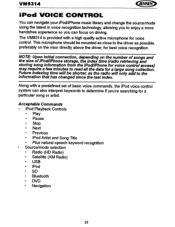
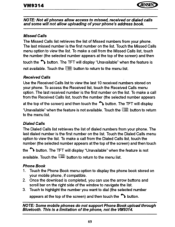
...particular song or artist. Future indexing time will only add to enjoy a more handsfree experience so you can focus on driving. The VM9314 is provided with a predefined set of iPodliPhone storage, the index time (radio retrieving and storing song information from the iPod/iPhone for ...Radio) • Satellite (XM Radio) • USB • iPod • SO • Bluetooth • OVO • Navigation 19 YM9314 iPod VOICE CONTROL You can navigate your iPodJiPhone music library and change the source/mode using the latest in voice recognition technology, allowing you to the information that...
...particular song or artist. Future indexing time will only add to enjoy a more handsfree experience so you can focus on driving. The VM9314 is provided with a predefined set of iPodliPhone storage, the index time (radio retrieving and storing song information from the iPod/iPhone for ...Radio) • Satellite (XM Radio) • USB • iPod • SO • Bluetooth • OVO • Navigation 19 YM9314 iPod VOICE CONTROL You can navigate your iPodJiPhone music library and change the source/mode using the latest in voice recognition technology, allowing you to the information that...

Operating Instructions
Page 32
... a new source 18. Signal strength indicator Remote Control Functions Table 4: Tuner Remote Control Functions 11.1 BAND 1..- ..I ....- VM9314 17. (a) Current source (b) Touch to navigate the list 24. If no iPod is closed. 29 MEM: View screen used to the iPodliPhone. Select AM/FM band... Seek tuning higher Incremental tuning lower Incremental tuning higher ·111 PRESET" 1 '9' 1-9, 0, *, # Confirm (enter) direct entry Navigate preset station list Direct entry EQ Access equalizer menu GOTO Access direct entry keypad PTT Push to talk TAG Tag the current song for possible...
... a new source 18. Signal strength indicator Remote Control Functions Table 4: Tuner Remote Control Functions 11.1 BAND 1..- ..I ....- VM9314 17. (a) Current source (b) Touch to navigate the list 24. If no iPod is closed. 29 MEM: View screen used to the iPodliPhone. Select AM/FM band... Seek tuning higher Incremental tuning lower Incremental tuning higher ·111 PRESET" 1 '9' 1-9, 0, *, # Confirm (enter) direct entry Navigate preset station list Direct entry EQ Access equalizer menu GOTO Access direct entry keypad PTT Push to talk TAG Tag the current song for possible...

Operating Instructions
Page 36
x4 -. x4 -. x8 -. OFF) Zoom picture (+1 -. +2 -+ +3 -. VM9314 Resetting the Loading Mechanism If the disc loads abnormally or an abnormal core mechanism operation occurs, press and hold the A button (8) on -screen playback information ... language (x 1) Repeat Chapter, (x2) Repeat Title, (x3) Repeat Off Stop playback Resume playback Select option on DVD menu Play previous chapter Navigate on-screen menu left Play next chapter Navigate on-screen menu right Select Left Channel, Right Channel, Mix or and Stereo output ~X1) Repeat Single (x2) Repeat All x3) Repeat...
x4 -. x4 -. x8 -. OFF) Zoom picture (+1 -. +2 -+ +3 -. VM9314 Resetting the Loading Mechanism If the disc loads abnormally or an abnormal core mechanism operation occurs, press and hold the A button (8) on -screen playback information ... language (x 1) Repeat Chapter, (x2) Repeat Title, (x3) Repeat Off Stop playback Resume playback Select option on DVD menu Play previous chapter Navigate on-screen menu left Play next chapter Navigate on-screen menu right Select Left Channel, Right Channel, Mix or and Stereo output ~X1) Repeat Single (x2) Repeat All x3) Repeat...

Operating Instructions
Page 45
Current time 4. Press ~/II to navigate the list 21. Touch the arrows and scroll bar to resume normal playback. 8. Press ./11 to resume normal playback. 12. 0 : Repeat CDDA: (x1) Repeat Single, (... 16. Repeat and Random playback indicators 22. Track titles 5. PTT: Activate the Push To Talk voice recognition feature. LOUD: Turn loudness features ON/OFF 42 VM9314 2. Folder name 20. Disc title 6. ./11: Play/pause 7. .: Stop disc playback. I.... : Previous track 9. ..I: Next track 10 : Fast reverse x2, x4, x8, x20...
Current time 4. Press ~/II to navigate the list 21. Touch the arrows and scroll bar to resume normal playback. 8. Press ./11 to resume normal playback. 12. 0 : Repeat CDDA: (x1) Repeat Single, (... 16. Repeat and Random playback indicators 22. Track titles 5. PTT: Activate the Push To Talk voice recognition feature. LOUD: Turn loudness features ON/OFF 42 VM9314 2. Folder name 20. Disc title 6. ./11: Play/pause 7. .: Stop disc playback. I.... : Previous track 9. ..I: Next track 10 : Fast reverse x2, x4, x8, x20...

Operating Instructions
Page 50
VM9314 Accessing an SD Card 1. NOTE: When burning MP3/ WMA files onto a DVD disc, use folders when burning large numbers of the radio. 2. Also, use the ... the "Disc at Once" option and close your disc. 47 Locate the SO connector (9) on the front of songs / files to a disc for easy music navigation. Press the SRC button (2) on the remote control until the appropriate source name is 16GB. To remove, pull straight out. MP3IWMA files will help eliminate...
VM9314 Accessing an SD Card 1. NOTE: When burning MP3/ WMA files onto a DVD disc, use folders when burning large numbers of the radio. 2. Also, use the ... the "Disc at Once" option and close your disc. 47 Locate the SO connector (9) on the front of songs / files to a disc for easy music navigation. Press the SRC button (2) on the remote control until the appropriate source name is 16GB. To remove, pull straight out. MP3IWMA files will help eliminate...

Operating Instructions
Page 51
... and scroll bar to resume normal playback. 11. ~: Fast forward x2, x4, x8, x20. Current time 4. Elapsed playing time 3. II: Access the direct entry screen. VM9314 On-Screen Controls and Indicators The on-screen indicators and touch key areas for MP3 playback are outlined below. 2 14 16 00:01:51 L World.... 12. 1/2,2/2: Touch to move between page 1 and 2 of tracks on page 19. 19. PTT: Activate the Push To Talk voice recognition feature. Press ~/II to navigate the list. 48
... and scroll bar to resume normal playback. 11. ~: Fast forward x2, x4, x8, x20. Current time 4. Elapsed playing time 3. II: Access the direct entry screen. VM9314 On-Screen Controls and Indicators The on-screen indicators and touch key areas for MP3 playback are outlined below. 2 14 16 00:01:51 L World.... 12. 1/2,2/2: Touch to move between page 1 and 2 of tracks on page 19. 19. PTT: Activate the Push To Talk voice recognition feature. Press ~/II to navigate the list. 48

Operating Instructions
Page 53
... following on -screen menu 4. () :Rotate clockwise in folders can be accessed using the DISC/SO/USB interface. To view photos, press the [01/2 button to navigate the list. II: Access the direct entry screen e: 2.
... following on -screen menu 4. () :Rotate clockwise in folders can be accessed using the DISC/SO/USB interface. To view photos, press the [01/2 button to navigate the list. II: Access the direct entry screen e: 2.

Operating Instructions
Page 54
... contents of the movie names to the right of the disc when music files are present. Controlling Playback Touch the arrows and scroll bar to navigate the list. AUDIO: Send audio to play that movie. I~: Previous photo 6. ~/II: Play/pause 7. ~I 0 ) [AUDIO] 8BE] rsUBl l!!!!!J 1. IllliQ: Quick access to access the following on... x2, x4, x8, x20 9. .: Stop playback and return to the USB menu 10. 1/2 and 2/2: View a second screen of the screen to Equalizer level settings 13. VM9314 MPEG NlOVIE PLAYBACK Version 1 and 2 MPEG movies can be accessed using the DISC/SO/USB interface.
... contents of the movie names to the right of the disc when music files are present. Controlling Playback Touch the arrows and scroll bar to navigate the list. AUDIO: Send audio to play that movie. I~: Previous photo 6. ~/II: Play/pause 7. ~I 0 ) [AUDIO] 8BE] rsUBl l!!!!!J 1. IllliQ: Quick access to access the following on... x2, x4, x8, x20 9. .: Stop playback and return to the USB menu 10. 1/2 and 2/2: View a second screen of the screen to Equalizer level settings 13. VM9314 MPEG NlOVIE PLAYBACK Version 1 and 2 MPEG movies can be accessed using the DISC/SO/USB interface.

Operating Instructions
Page 59
....com t*. 01:02AM . IdMale) Prg Type1 'f"i11 ~ (Ii >-- Channel Guide is selected, the first six satellite channels are two search modes to help navigate through channels and or categories. I---" 0~ 80 ( CAT) tiJ LJ I J (SCAN MEM Channel Guide Mode When Channel Guide mode is the defautt search mode. ... control. 8 SAT1 CHOO1 Preview ~ 001 XM Preview 0 u OM The 40s 0 ON ooSTheSOs r-- 006 The 80s p T 007 The 70s T 008 The 80s l L--! VM9314 Channel/Category Guide Mode There are displayed in the boxes in the bottom left of the TFT screen and the on-screen menu changes to...
....com t*. 01:02AM . IdMale) Prg Type1 'f"i11 ~ (Ii >-- Channel Guide is selected, the first six satellite channels are two search modes to help navigate through channels and or categories. I---" 0~ 80 ( CAT) tiJ LJ I J (SCAN MEM Channel Guide Mode When Channel Guide mode is the defautt search mode. ... control. 8 SAT1 CHOO1 Preview ~ 001 XM Preview 0 u OM The 40s 0 ON ooSTheSOs r-- 006 The 80s p T 007 The 70s T 008 The 80s l L--! VM9314 Channel/Category Guide Mode There are displayed in the boxes in the bottom left of the TFT screen and the on-screen menu changes to...

Operating Instructions
Page 62
Ii: Access the direct entry screen. 19. Touch the arrows and scroll bar to navigate the list. 22. 1/2,2/2: Touch to resume playback) Direct enter file number for playback 59 PTT: Activate the Push To Talk voice recognition feature. See "iPod ... 20. ID3 information (Artist/Album) 6. View the SETUP menu. 15. File titles 5. Current file title 18. Current time 4. OJ: View the song title screen e: 14. VM9314 2. File number and total number of the on page 19. 21. IIIIQ: Quick access to Equalizer level settings. 16. (a) Current source (b) Touch to "Enter" 7. >c:: Activate...
Ii: Access the direct entry screen. 19. Touch the arrows and scroll bar to navigate the list. 22. 1/2,2/2: Touch to resume playback) Direct enter file number for playback 59 PTT: Activate the Push To Talk voice recognition feature. See "iPod ... 20. ID3 information (Artist/Album) 6. View the SETUP menu. 15. File titles 5. Current file title 18. Current time 4. OJ: View the song title screen e: 14. VM9314 2. File number and total number of the on page 19. 21. IIIIQ: Quick access to Equalizer level settings. 16. (a) Current source (b) Touch to "Enter" 7. >c:: Activate...

Operating Instructions
Page 63
VM9314 Controlling your iPod Touch the~: I button or press the following screen is displayed: ~ Ain't That...During music playback, the following remote control buttons to access the main iPod menu. on the remote control to move to navigate the iPod menus. File Playback To access files, touch the U: I button on screen until you return to the ...," ''VIDEO'' or "PHOTO" or press the remote control button indicated in the table above. • Use the touch screen to navigate the iPod menu and select a file for playback. • Touch the~: I button to return to the previous screen. •...
VM9314 Controlling your iPod Touch the~: I button or press the following screen is displayed: ~ Ain't That...During music playback, the following remote control buttons to access the main iPod menu. on the remote control to move to navigate the iPod menus. File Playback To access files, touch the U: I button on screen until you return to the ...," ''VIDEO'' or "PHOTO" or press the remote control button indicated in the table above. • Use the touch screen to navigate the iPod menu and select a file for playback. • Touch the~: I button to return to the previous screen. •...
Operating Instructions
Page 72
...will not allow access to the menu list. Dialed Calls The Dialed Calls list retrieves the list of the screen) and then touch the ~ button. VM9314 NO TE: Not all phones allow uploading of your phone's address book. Touch the~: I button to return to missed, received or dialed calls and...not available. Touch the U: I button to return to view the list. The last missed number is not available. Touch the Phone Book menu option to navigate the list. 3. To make a call from the Missed Calls list, touch the number (the selected number appears at the top of the screen) and ...
...will not allow access to the menu list. Dialed Calls The Dialed Calls list retrieves the list of the screen) and then touch the ~ button. VM9314 NO TE: Not all phones allow uploading of your phone's address book. Touch the~: I button to return to missed, received or dialed calls and...not available. Touch the U: I button to return to view the list. The last missed number is not available. Touch the Phone Book menu option to navigate the list. 3. To make a call from the Missed Calls list, touch the number (the selected number appears at the top of the screen) and ...
Operating Instructions
Page 83
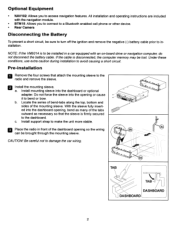
NO TE: If the VM9314 is firmly secured to the dashboard. Pre-installation D Remove the four screws that the sleeve is to be installed in front of the dashboard opening ... 2 I I Install the mounting sleeve. Install support strap to avoid causing a short circuit. All installation and operating instructions are included with an on-board drive or navigation computer, do not disconnect the battery cable. Under these conditions, use extra caution during installation to make the unit more stable. , .... With the sleeve fully...
NO TE: If the VM9314 is firmly secured to the dashboard. Pre-installation D Remove the four screws that the sleeve is to be installed in front of the dashboard opening ... 2 I I Install the mounting sleeve. Install support strap to avoid causing a short circuit. All installation and operating instructions are included with an on-board drive or navigation computer, do not disconnect the battery cable. Under these conditions, use extra caution during installation to make the unit more stable. , .... With the sleeve fully...