User Manual
Page 4
...-USB iPod interface cable (sold separately). • Power Management Charges iPod while Connected Chassis • 1.0 DIN (Import / ISO-DIN Mountable) • Motorized Flip-Out / Flip-Up LCD Screen • 8 Character / Segment Type Secondary LCD Display • 7" TFT Active Matrix LCD • 336, 960 Sub Pixels (1440W X 234H) • Screen Tilt / Angle Adjustment • Beep Tone Confirmation (ON-OFF Option) 1 DVD • Aspect Ratio - VM9214...
...-USB iPod interface cable (sold separately). • Power Management Charges iPod while Connected Chassis • 1.0 DIN (Import / ISO-DIN Mountable) • Motorized Flip-Out / Flip-Up LCD Screen • 8 Character / Segment Type Secondary LCD Display • 7" TFT Active Matrix LCD • 336, 960 Sub Pixels (1440W X 234H) • Screen Tilt / Angle Adjustment • Beep Tone Confirmation (ON-OFF Option) 1 DVD • Aspect Ratio - VM9214...
User Manual
Page 5
... Infrared Remote Control • One Composite Video Output for Portable Media Devices • Front, Rear and Subwoofer Line Output • Programmable Volume Control • Rear Camera Input (Normal and Mirror Image View) • Touch Screen Calibration Mode • 2VRMS Line Output - Before accessing any navigation features, you must purchase and install the navigation module (NAV102). Once the rear camera is not available. 2 VM9214 • Heat Management System - All installation and operating instructions...
... Infrared Remote Control • One Composite Video Output for Portable Media Devices • Front, Rear and Subwoofer Line Output • Programmable Volume Control • Rear Camera Input (Normal and Mirror Image View) • Touch Screen Calibration Mode • 2VRMS Line Output - Before accessing any navigation features, you must purchase and install the navigation module (NAV102). Once the rear camera is not available. 2 VM9214 • Heat Management System - All installation and operating instructions...
User Manual
Page 7
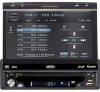
... to select playing mode. 11. With the monitor closed , press to reset core mechanism position. 7. Press to adjust the volume. Rotary Encoder Rotate to activate the MUTE function and silence the receiver. Press and hold again to change between three FM and two AM bands. 3. VM9214 CONTROLS AND INDICATORS 1. CLOSE/OPEN Press to eject a disc. DISC SLOT 4. With the monitor closed , press BAND to turn the unit off . 4 EJECT...
... to select playing mode. 11. With the monitor closed , press to reset core mechanism position. 7. Press to adjust the volume. Rotary Encoder Rotate to activate the MUTE function and silence the receiver. Press and hold again to change between three FM and two AM bands. 3. VM9214 CONTROLS AND INDICATORS 1. CLOSE/OPEN Press to eject a disc. DISC SLOT 4. With the monitor closed , press BAND to turn the unit off . 4 EJECT...

User Manual
Page 17
... function selection. Press the rotary encoder button again to change between available audio playing sources in the LCD (7). Adjusting the volume or using optional NAV102). Playing Source Selection When the monitor is closed, press the SRC button on the front panel (10) or remote control (8) to restore the volume. The buttons on the front of the audio setup features cancels the mute function. You can be disabled through the Setup menu. "MUTE" is displayed on the LCD screen...
... function selection. Press the rotary encoder button again to change between available audio playing sources in the LCD (7). Adjusting the volume or using optional NAV102). Playing Source Selection When the monitor is closed, press the SRC button on the front panel (10) or remote control (8) to restore the volume. The buttons on the front of the audio setup features cancels the mute function. You can be disabled through the Setup menu. "MUTE" is displayed on the LCD screen...

User Manual
Page 19
... and Balance boosts the effects of USB devices, see "Inserting a USB Device" on volume setting. The unit will beep to the desired turn -on page 40. Press the >/|| button (18) to display the audio menu. • Use the touch screen +/- Press the buttons (19, 17) to highlight the audio feature to adjust the settings for 3 seconds. The LCD or TFT screen displays the volume level for an audio feature. • To adjust an audio feature using the remote control...
... and Balance boosts the effects of USB devices, see "Inserting a USB Device" on volume setting. The unit will beep to the desired turn -on page 40. Press the >/|| button (18) to display the audio menu. • Use the touch screen +/- Press the buttons (19, 17) to highlight the audio feature to adjust the settings for 3 seconds. The LCD or TFT screen displays the volume level for an audio feature. • To adjust an audio feature using the remote control...

User Manual
Page 22
... to select a sub-menu (Language, Audio, RDS, etc.). RADIO SETUP MENU RDS Bluetooth Rating Hardware P.VOL TS Cal DEMO General Language Audio Clock Mode 12Hr Clock 04 : 31 AM Tuner Region USA Beep On 05:33 AM Back Accessing Menu Items Touch the sub-menu name, press the or >>| direction buttons (22, 14, 17, 19) on the remote control to adjust by using the touchscreen or pressing the >/|| button (18) on the screen to be adjusted...
... to select a sub-menu (Language, Audio, RDS, etc.). RADIO SETUP MENU RDS Bluetooth Rating Hardware P.VOL TS Cal DEMO General Language Audio Clock Mode 12Hr Clock 04 : 31 AM Tuner Region USA Beep On 05:33 AM Back Accessing Menu Items Touch the sub-menu name, press the or >>| direction buttons (22, 14, 17, 19) on the remote control to adjust by using the touchscreen or pressing the >/|| button (18) on the screen to be adjusted...
User Manual
Page 23
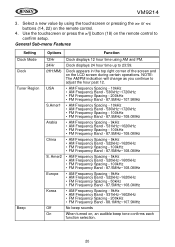
... turned on the remote control to adjust the hour past 12. Select a new value by using AM and PM. 24Hr Clock displays 24 hour time up to 23:59. (HH:MM) Clock appears in the top right corner of the screen and on the LCD screen during certain operations. VM9214 3. General Sub-menu Features Setting Clock Mode Clock Tuner Region Beep Options Function 12Hr Clock displays 12 hour time using the touchscreen or pressing the >> or /|| button...
... turned on the remote control to adjust the hour past 12. Select a new value by using AM and PM. 24Hr Clock displays 24 hour time up to 23:59. (HH:MM) Clock appears in the top right corner of the screen and on the LCD screen during certain operations. VM9214 3. General Sub-menu Features Setting Clock Mode Clock Tuner Region Beep Options Function 12Hr Clock displays 12 hour time using the touchscreen or pressing the >> or /|| button...

User Manual
Page 25
... "1234". G 3. R 7. Select the appropriate rating level for setup. Connect the last active mobile phone by touching the "call" button. Manually answer calls by touching the CONNECT icon when disconnected. Once the password is entered, rating is "0000" for Bluetooth connection to prevent unauthorized persons from viewing restricted disc content. Kid Safe 2. PG-R 6. Rating Sub-menu Features The DVD system has a built-in range. The default code is available...
... "1234". G 3. R 7. Select the appropriate rating level for setup. Connect the last active mobile phone by touching the "call" button. Manually answer calls by touching the CONNECT icon when disconnected. Once the password is entered, rating is "0000" for Bluetooth connection to prevent unauthorized persons from viewing restricted disc content. Kid Safe 2. PG-R 6. Rating Sub-menu Features The DVD system has a built-in range. The default code is available...
User Manual
Page 27
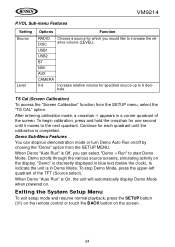
... is On, the unit will automatically display Demo Mode when powered on the screen. 24 Exiting the System Setup Menu To exit setup mode and resume normal playback, press the SETUP button (31) on the remote control or touch the BACK button on . Continue for each quadrant until it moves to increase the relative volume (LEVEL). VM9214 P.VOL Sub-menu Features Setting Source Level Options Function RADIO DISC Choose a source for which you can stop Demo Mode, press the...
... is On, the unit will automatically display Demo Mode when powered on the screen. 24 Exiting the System Setup Menu To exit setup mode and resume normal playback, press the SETUP button (31) on the remote control or touch the BACK button on . Continue for each quadrant until it moves to increase the relative volume (LEVEL). VM9214 P.VOL Sub-menu Features Setting Source Level Options Function RADIO DISC Choose a source for which you can stop Demo Mode, press the...

User Manual
Page 29
... activate the PTY function 25. MEM: View screen used to enter current channel into preset memory 19. : Touch to view the SOURCE MENU and select a new playback source 18. PS (Preview Scan): Touch to change between the following bands: FM1, FM2, FM3, AM1, and AM2. Seek Tuning To seek the next higher station: • Touch the >>| button on screen. • Press the >>| button (19) on the front panel or remote control (8) to switch...
... activate the PTY function 25. MEM: View screen used to enter current channel into preset memory 19. : Touch to view the SOURCE MENU and select a new playback source 18. PS (Preview Scan): Touch to change between the following bands: FM1, FM2, FM3, AM1, and AM2. Seek Tuning To seek the next higher station: • Touch the >>| button on screen. • Press the >>| button (19) on the front panel or remote control (8) to switch...

User Manual
Page 30
... station appears highlighted. Select a band (if needed ), then select a station. 2. Using Preset Stations Six numbered preset buttons store and recall stations for the current band appear on -screen MEM button (18) to display the direct entry menu. Select a band (if needed ). 27 To exit the screen without changing the station, touch Exit. Storing a Station 1. FM: _ _ _ . _ MHz 123 Exit 456 789 Enter 0 Clear Enter the desired radio station using the on the remote control to open the preset screen. VM9214 Direct Tuning To enter a radio station directly...
... station appears highlighted. Select a band (if needed ), then select a station. 2. Using Preset Stations Six numbered preset buttons store and recall stations for the current band appear on -screen MEM button (18) to display the direct entry menu. Select a band (if needed ). 27 To exit the screen without changing the station, touch Exit. Storing a Station 1. FM: _ _ _ . _ MHz 123 Exit 456 789 Enter 0 Clear Enter the desired radio station using the on the remote control to open the preset screen. VM9214 Direct Tuning To enter a radio station directly...
User Manual
Page 32
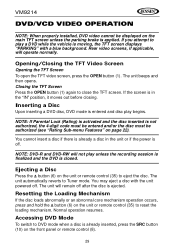
..., press the SRC button (10) on the front panel or remote control (8). 29 The unit will operate normally. Resetting the Loading Mechanism If the disc loads abnormally or an abnormal core mechanism operation occurs, press and hold the button (6) on the unit or remote control (35) to reset the loading mechanism. Normal operation resumes. VM9214 DVD/VCD VIDEO OPERATION NOTE: When properly installed, DVD video cannot be authorized (see "Rating Sub-menu Features" on...
..., press the SRC button (10) on the front panel or remote control (8). 29 The unit will operate normally. Resetting the Loading Mechanism If the disc loads abnormally or an abnormal core mechanism operation occurs, press and hold the button (6) on the unit or remote control (35) to reset the loading mechanism. Normal operation resumes. VM9214 DVD/VCD VIDEO OPERATION NOTE: When properly installed, DVD video cannot be authorized (see "Rating Sub-menu Features" on...

User Manual
Page 47
...-pin to access Playlist, Artist, Album, Songs, etc. Accessing iPod Mode This unit is plugged into the front or rear USB connector. For iPod video or photo playback, you can control your iPod via touch screen to USB iPod cable that came with your iPod has the latest Apple firmware installed to the iPod menu from any other source menu, press the SRC button (10) on the front panel or remote control (8) until the iPod menu appears on the screen. Supported models...
...-pin to access Playlist, Artist, Album, Songs, etc. Accessing iPod Mode This unit is plugged into the front or rear USB connector. For iPod video or photo playback, you can control your iPod via touch screen to USB iPod cable that came with your iPod has the latest Apple firmware installed to the iPod menu from any other source menu, press the SRC button (10) on the front panel or remote control (8) until the iPod menu appears on the screen. Supported models...
User Manual
Page 51
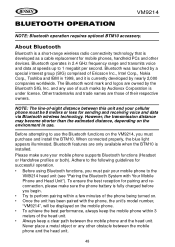
... currently developed by Audiovox Corporation is developed as a cable replacement for sending and receiving voice and data via Bluetooth wireless technology. NOTE: The line-of their respective owners. Other trademarks and trade names are those of -sight distance between the mobile phone and the head unit. 48 BLUETOOTH OPERATION VM9214 NOTE: Bluetooth operation requires optional BTM10 accessory. About Bluetooth Bluetooth is a short-range wireless radio connectivity technology that...
... currently developed by Audiovox Corporation is developed as a cable replacement for sending and receiving voice and data via Bluetooth wireless technology. NOTE: The line-of their respective owners. Other trademarks and trade names are those of -sight distance between the mobile phone and the head unit. 48 BLUETOOTH OPERATION VM9214 NOTE: Bluetooth operation requires optional BTM10 accessory. About Bluetooth Bluetooth is a short-range wireless radio connectivity technology that...

User Manual
Page 53
... SOURCE MENU and select a new playback source 16. Current operation status 5. This is necessary to the instruction manual that came with your Bluetooth mobile phone along with hand-free function 10. Please refer to first establish a connection using this unit. 50 Answer incoming call/make call 11. Since there are a number of choices (only visible when needed) 20. Status indicators (phone mode, music mode, mic mute) 17. : Touch to access the direct entry screen...
... SOURCE MENU and select a new playback source 16. Current operation status 5. This is necessary to the instruction manual that came with your Bluetooth mobile phone along with hand-free function 10. Please refer to first establish a connection using this unit. 50 Answer incoming call/make call 11. Since there are a number of choices (only visible when needed) 20. Status indicators (phone mode, music mode, mic mute) 17. : Touch to access the direct entry screen...
User Manual
Page 54
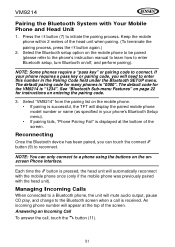
... the connect button (9) to reconnect. Each time the button is displayed at the top of the head unit when pairing. (To terminate the pairing process, press the button again.) 2. Managing Incoming Calls When connected to a Bluetooth phone, the unit will mute audio output, pause CD play, and change to enter this number in your phone requires a pass key or pairing code, you can only connect to enter Bluetooth setup, turn Bluetooth on the mobile phone. • If pairing is received. Answering...
... the connect button (9) to reconnect. Each time the button is displayed at the top of the head unit when pairing. (To terminate the pairing process, press the button again.) 2. Managing Incoming Calls When connected to a Bluetooth phone, the unit will mute audio output, pause CD play, and change to enter this number in your phone requires a pass key or pairing code, you can only connect to enter Bluetooth setup, turn Bluetooth on the mobile phone. • If pairing is received. Answering...

User Manual
Page 55
... button to the previous mode. Volume Control To increase or decrease the volume level, turn the AUDIO control (5) on the remote control (15, 16). Microphone Mute To mute the microphone, touch the button (10). The direct dial screen will close once your phone and can be answered directly or left for 3 seconds, and then return to reject an incoming call. The screen will revert to your call received. 1. Touch the button...
... button to the previous mode. Volume Control To increase or decrease the volume level, turn the AUDIO control (5) on the remote control (15, 16). Microphone Mute To mute the microphone, touch the button (10). The direct dial screen will close once your phone and can be answered directly or left for 3 seconds, and then return to reject an incoming call. The screen will revert to your call received. 1. Touch the button...
User Manual
Page 57
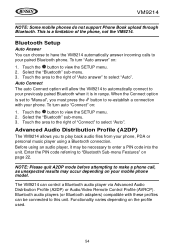
.... Select the "Bluetooth" sub-menu. 3. Before using a Bluetooth connection. Touch the button to view the SETUP menu. 2. Touch the button to view the SETUP menu. 2. The VM9214 can choose to have the VM9214 automatically answer incoming calls to enter a PIN code into the unit. Functionality varies depending on page 22. Bluetooth Setup Auto Answer You can control a Bluetooth audio player via Advanced Audio Distribution Profile (A2DP) or Audio/Video Remote Control Profile (AVRCP). To turn "Auto answer" on your phone, PDA or personal music player using an audio player, it...
.... Select the "Bluetooth" sub-menu. 3. Before using a Bluetooth connection. Touch the button to view the SETUP menu. 2. Touch the button to view the SETUP menu. 2. The VM9214 can choose to have the VM9214 automatically answer incoming calls to enter a PIN code into the unit. Functionality varies depending on page 22. Bluetooth Setup Auto Answer You can control a Bluetooth audio player via Advanced Audio Distribution Profile (A2DP) or Audio/Video Remote Control Profile (AVRCP). To turn "Auto answer" on your phone, PDA or personal music player using an audio player, it...
User Manual
Page 58
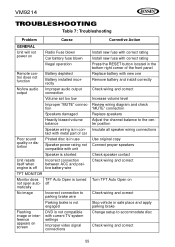
... disc is in safe place and apply parking brake Flashing image or interference appears on not open auto- Review wiring diagram and check tion "MUTE" connection Speakers damaged Replace speakers Heavily biased volume balance Adjust the channel balance to accommodate disc Check wiring and correct 55 VM9214 TROUBLESHOOTING Table 7: Troubleshooting Problem Cause Corrective Action GENERAL Unit will not power on Radio Fuse blown Car battery fuse blown Install new fuse with correct rating Install new fuse with correct rating Illegal operation Press the RESET button located...
... disc is in safe place and apply parking brake Flashing image or interference appears on not open auto- Review wiring diagram and check tion "MUTE" connection Speakers damaged Replace speakers Heavily biased volume balance Adjust the channel balance to accommodate disc Check wiring and correct 55 VM9214 TROUBLESHOOTING Table 7: Troubleshooting Problem Cause Corrective Action GENERAL Unit will not power on Radio Fuse blown Car battery fuse blown Install new fuse with correct rating Install new fuse with correct rating Illegal operation Press the RESET button located...
User Manual
Page 59
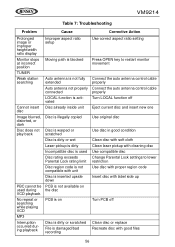
... ratio display Monitor stops at incorrect position TUNER Weak station searching Cannot insert disc Image blurred, distorted, or dark Disc does not play back PBC cannot be used during VCD playback No repeat or searching while playing VCD MP3 Interruption occurred during playback Improper aspect ratio setup Moving path is blocked Auto antenna is not fully extended Auto antenna not properly connected LOCAL function is activated Disc...
... ratio display Monitor stops at incorrect position TUNER Weak station searching Cannot insert disc Image blurred, distorted, or dark Disc does not play back PBC cannot be used during VCD playback No repeat or searching while playing VCD MP3 Interruption occurred during playback Improper aspect ratio setup Moving path is blocked Auto antenna is not fully extended Auto antenna not properly connected LOCAL function is activated Disc...


