Owners Manual
Page 5
TABLE OF CONTENTS Safety Precautions ...1-2 ...3 Repeat Playback ...19 DVD Programmable Memory ...20 DVD Programmable Memory ...20 Important Safety Instructions Table of Contents ...4 Disc Formats ...5 Accessories ...6 Remote Control ...6 Control Reference Guide ...7-9 Mounting Instructions ...10-11 Connections ...12-13 Connecting the TV Antenna ...12 Connecting the Unit to a TV or other Video Equipment ...12 Connecting ...
TABLE OF CONTENTS Safety Precautions ...1-2 ...3 Repeat Playback ...19 DVD Programmable Memory ...20 DVD Programmable Memory ...20 Important Safety Instructions Table of Contents ...4 Disc Formats ...5 Accessories ...6 Remote Control ...6 Control Reference Guide ...7-9 Mounting Instructions ...10-11 Connections ...12-13 Connecting the TV Antenna ...12 Connecting the Unit to a TV or other Video Equipment ...12 Connecting ...

Owners Manual
Page 7
...4 #M 5 x 69 mm screws ...x 4 #M 5 x 40 mm screws ...x 4 Warranty Card ...x 1 Registration Card ...x 1 REMOTE CONTROL Using the Remote Control • This remote control is magnetic and can leak and severely damage the remote control. • WARNING: Do not dispose of explosion if battery is about 16 feet (5 meters). In this case, try attaching...Do not mix old and new batteries. Notes: • Do not place the remote control near magnetic devices or magnetic cards. • If the remote control is not going to be degraded, causing unreliable operation. • The recommended effective...
...4 #M 5 x 69 mm screws ...x 4 #M 5 x 40 mm screws ...x 4 Warranty Card ...x 1 Registration Card ...x 1 REMOTE CONTROL Using the Remote Control • This remote control is magnetic and can leak and severely damage the remote control. • WARNING: Do not dispose of explosion if battery is about 16 feet (5 meters). In this case, try attaching...Do not mix old and new batteries. Notes: • Do not place the remote control near magnetic devices or magnetic cards. • If the remote control is not going to be degraded, causing unreliable operation. • The recommended effective...

Owners Manual
Page 8
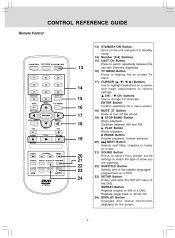
... to enter the main menu of the DVD you are watching. 6) VOLUME (+/-) Buttons Adjusts the volume. 7) / TUNING Buttons : Fast reverse playback. : Fast forward playback. CONTROL REFERENCE GUIDE Remote Control PICTURE 1 2 1 4 7 2 5 8 0 EXIT TV MENU 3 6 9 LAST CH 3 4 RETURN DVD MENU MUTE 5 6 STOP BAND 7 8 9 10 11 12 SOUND FORMAT MTS FUNCTION Button Use to select DVD...
... to enter the main menu of the DVD you are watching. 6) VOLUME (+/-) Buttons Adjusts the volume. 7) / TUNING Buttons : Fast reverse playback. : Fast forward playback. CONTROL REFERENCE GUIDE Remote Control PICTURE 1 2 1 4 7 2 5 8 0 EXIT TV MENU 3 6 9 LAST CH 3 4 RETURN DVD MENU MUTE 5 6 STOP BAND 7 8 9 10 11 12 SOUND FORMAT MTS FUNCTION Button Use to select DVD...
Owners Manual
Page 9
... Button Press to select from preset sound settings to match the type of show you are watching. 22) SUBTITLE Button Selects one of a DVD. CONTROL REFERENCE GUIDE Remote Control PICTURE 13 1 4 7 2 5 8 0 EXIT TV MENU 3 6 14 9 LAST CH 15 16 13) STANDBY/ON Button Turns on the unit and puts it in standby mode...
... Button Press to select from preset sound settings to match the type of show you are watching. 22) SUBTITLE Button Selects one of a DVD. CONTROL REFERENCE GUIDE Remote Control PICTURE 13 1 4 7 2 5 8 0 EXIT TV MENU 3 6 14 9 LAST CH 15 16 13) STANDBY/ON Button Turns on the unit and puts it in standby mode...

Owners Manual
Page 10
POWER ON Indicators DVD : DVD indicator TV : TV indicator RADIO : RADIO indicator Remote Sensor Receives the remote control unit signals. POWER Button Turns the unit on the disc tray, label side up. Switches between AM and FM. CH Buttons Use to search for a ... certain settings. 9) 10) 11) 12) 13) 14) 15) SET CLOCK Button Use to select DVD, TV or RADIO mode. Buttons Adjusts the volume levels. Screen -9- CONTROL REFERENCE GUIDE Unit 1 2 3 45 678 9 10 11 12 13 14 15 1) 2) 3) 4) 5) 6) 7) 8) Disc Tray Opens or closes the tray by pressing OPEN/ CLOSE button. OPEN/CLOSE...
POWER ON Indicators DVD : DVD indicator TV : TV indicator RADIO : RADIO indicator Remote Sensor Receives the remote control unit signals. POWER Button Turns the unit on the disc tray, label side up. Switches between AM and FM. CH Buttons Use to search for a ... certain settings. 9) 10) 11) 12) 13) 14) 15) SET CLOCK Button Use to select DVD, TV or RADIO mode. Buttons Adjusts the volume levels. Screen -9- CONTROL REFERENCE GUIDE Unit 1 2 3 45 678 9 10 11 12 13 14 15 1) 2) 3) 4) 5) 6) 7) 8) Disc Tray Opens or closes the tray by pressing OPEN/ CLOSE button. OPEN/CLOSE...

Owners Manual
Page 15
... the front panel display and the TV program will begin on the screen. • Press the DVD/TV/RADIO button (the FUNCTION button on the remote control) to TV mode and the TV indicator lights up . Soundtracks encoded in Dolby Digital can reproduce from Dolby Laboratories. 'Dolby' and the double-D symbol ...display and the DVD logo (start-up picture) will appear on the screen. • Press the DVD/TV/RADIO button (the FUNCTION button on the remote control) to RADIO mode and the radio indicator lights up . UNIT OPERATION Turning the Unit On While the power cord is connected and the unit is...
... the front panel display and the TV program will begin on the screen. • Press the DVD/TV/RADIO button (the FUNCTION button on the remote control) to TV mode and the TV indicator lights up . Soundtracks encoded in Dolby Digital can reproduce from Dolby Laboratories. 'Dolby' and the double-D symbol ...display and the DVD logo (start-up picture) will appear on the screen. • Press the DVD/TV/RADIO button (the FUNCTION button on the remote control) to RADIO mode and the radio indicator lights up . UNIT OPERATION Turning the Unit On While the power cord is connected and the unit is...

Owners Manual
Page 17
...fast scan changes in the following sequence: 2. Press the DVD/TV/RADIO button (the FUNCTION button on the remote) to load the disc. The disc tray opens. 3. It takes a short while for your unit to...• Four speeds are produced in the unit. Pausing Playback (Still Mode) Press the PAUSE button on the remote control when a disc is playing. • The disc begins fast scan at normal Notes: • The DVD...skip to step 3. For an audio CD, use the number buttons (remote control only) to go directly to interrupt playback. Fast Forward/Fast Reverse 1. Press the TUNING or TUNING button...
...fast scan changes in the following sequence: 2. Press the DVD/TV/RADIO button (the FUNCTION button on the remote) to load the disc. The disc tray opens. 3. It takes a short while for your unit to...• Four speeds are produced in the unit. Pausing Playback (Still Mode) Press the PAUSE button on the remote control when a disc is playing. • The disc begins fast scan at normal Notes: • The DVD...skip to step 3. For an audio CD, use the number buttons (remote control only) to go directly to interrupt playback. Fast Forward/Fast Reverse 1. Press the TUNING or TUNING button...

Owners Manual
Page 19
... only one angle is played back, " " is displayed. Press the or button on the remote to select the option (Title, Chapter or Time) then press the corresponding number button(s) for...Press the GOTO button to confirm. The unit will start playback about 3 seconds later. Press the or button on the remote to this process. • Some scenes may not be located as precisely as you can locate a specific track by...the audio currently selected is playing, press the DISPLAY button on the remote control repeatedly to confirm. Press the ENTER button to display information on disc.
... only one angle is played back, " " is displayed. Press the or button on the remote to select the option (Title, Chapter or Time) then press the corresponding number button(s) for...Press the GOTO button to confirm. The unit will start playback about 3 seconds later. Press the or button on the remote to this process. • Some scenes may not be located as precisely as you can locate a specific track by...the audio currently selected is playing, press the DISPLAY button on the remote control repeatedly to confirm. Press the ENTER button to display information on disc.

Owners Manual
Page 20
...is cancelled when you can mark the desired scene. 1. The current title is playing, press the REPEAT DISC button on the remote control until the " indicator displays on the remote to select Single/All/Off. Single: Repeat the current track. All: Repeat the entire CD. To Resume Normal Playback 3.... the disc is playing, use the or button on the screen. While the disc is playing, press the REPEAT DISC button on the remote control until the " indicator displays on the Repeating a Single Track You can play the favorite bookmark. Press the ENTER button to play the same...
...is cancelled when you can mark the desired scene. 1. The current title is playing, press the REPEAT DISC button on the remote control until the " indicator displays on the remote to select Single/All/Off. Single: Repeat the current track. All: Repeat the entire CD. To Resume Normal Playback 3.... the disc is playing, use the or button on the screen. While the disc is playing, press the REPEAT DISC button on the remote control until the " indicator displays on the Repeating a Single Track You can play the favorite bookmark. Press the ENTER button to play the same...

Owners Manual
Page 21
... button to resume slide show. • You can press the STOP button to quit playback. • You can use the number buttons on the remote control to jump immediately to select the title you want , then press the ENTER button on the screen. Notes: • Some discs may not permit ...the button to display a folder list. Press the STOP button to select "Clear All", then press the ENTER button. Press the MEMORY button on the remote control. 4. Press the PLAY button to program the new title and chapter. Use the or button to select the chapter you want , then press the ...
... button to resume slide show. • You can press the STOP button to quit playback. • You can use the number buttons on the remote control to jump immediately to select the title you want , then press the ENTER button on the screen. Notes: • Some discs may not permit ...the button to display a folder list. Press the STOP button to select "Clear All", then press the ENTER button. Press the MEMORY button on the remote control. 4. Press the PLAY button to program the new title and chapter. Use the or button to select the chapter you want , then press the ...
Owners Manual
Page 22
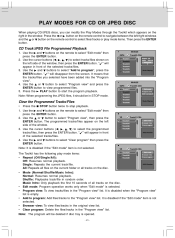
... Playback 1. All: Repeats all files on the current folder or all tracks on the left /right windows and the or button on the remote control to select tracks/files shown on the disc. Browser view: To view files/tracks in the window. " " will be in the "...21 - The programmed tracks/files appear on the disc. • Mode (Normal/Shuffle/Music Intro): Normal: Resumes normal playback. Press the or button on the remote control to navigate between the left side of the selected tracks/files. 4. Use the cursor buttons ( , , , ) to select files/tracks or play mode ...
... Playback 1. All: Repeats all files on the current folder or all tracks on the left /right windows and the or button on the remote control to select tracks/files shown on the disc. Browser view: To view files/tracks in the window. " " will be in the "...21 - The programmed tracks/files appear on the disc. • Mode (Normal/Shuffle/Music Intro): Normal: Resumes normal playback. Press the or button on the remote control to navigate between the left side of the selected tracks/files. 4. Use the cursor buttons ( , , , ) to select files/tracks or play mode ...

Owners Manual
Page 26
...: Select from preset sound settings (Standard, Music, Movie, Personal) to make adjustment. Repeat steps 2 to 4 to the normal screen, press the EXIT button on the remote control. NOTE: You can also access these setting by pressing the PICTURE button. Bass: Adjust the bass range. NOTE: You can also access these setting by... to select the options (Sound Mode / Bass / Treble / Balance / Audio Language). 4. Use the or button to the normal screen, press the EXIT button on the remote control.
...: Select from preset sound settings (Standard, Music, Movie, Personal) to make adjustment. Repeat steps 2 to 4 to the normal screen, press the EXIT button on the remote control. NOTE: You can also access these setting by pressing the PICTURE button. Bass: Adjust the bass range. NOTE: You can also access these setting by... to select the options (Sound Mode / Bass / Treble / Balance / Audio Language). 4. Use the or button to the normal screen, press the EXIT button on the remote control.

Owners Manual
Page 27
...temperature of TV menu showing on page 15, please set both settings. Repeat steps 2 to 4 to the normal screen, press the EXIT button on the remote control. Time Zone / Day Saving Time / Clock 1. Set the local Time Zone, eg. Press the TV MENU button to return to select TIMER SETTING.... the options (OSD Duration / Time Zone / Day Saving Time). 4. Repeat steps 2 to 4 to the normal screen, press the EXIT button on the remote control. To exit the TV SETUP MENU and return to adjust other options. 6. The clock will change . 3. Restore Setting: If you reset the TV to ...
...temperature of TV menu showing on page 15, please set both settings. Repeat steps 2 to 4 to the normal screen, press the EXIT button on the remote control. Time Zone / Day Saving Time / Clock 1. Set the local Time Zone, eg. Press the TV MENU button to return to select TIMER SETTING.... the options (OSD Duration / Time Zone / Day Saving Time). 4. Repeat steps 2 to 4 to the normal screen, press the EXIT button on the remote control. To exit the TV SETUP MENU and return to adjust other options. 6. The clock will change . 3. Restore Setting: If you reset the TV to ...

Owners Manual
Page 28
... or letter. Automatically search all channels for the next 4. Channel Skip: You may edit one label for CATV. The screen will be shown on the remote control. TV SETUP TV Channel Setting 1. Use the or button to receive cable signal. Antenna : Auto Scan : Select "CATV" to select TV CHANNEL SETTING. 3. Antenna Auto...
... or letter. Automatically search all channels for the next 4. Channel Skip: You may edit one label for CATV. The screen will be shown on the remote control. TV SETUP TV Channel Setting 1. Use the or button to receive cable signal. Antenna : Auto Scan : Select "CATV" to select TV CHANNEL SETTING. 3. Antenna Auto...


