User Manual
Page 4
Turning on the camcorder 7 General controls Panel controls 8 Operation modes 9 Video mode Recording videos 10 Recording quality 10 Quality settings 10 Photo mode Taking photos 11 Photo Quality 11 ... 7 4. Charging the battery 7 3. Contents FCC information FCC statement 2 Deleting Deleting recordings 13 Safety information Important battery information 3 Precautions for the player 3 Menu settings Using the camcorder menu 13 Menu options and settings 13 Contents End user license agreement End user license agreement 5 Getting started 1.
Turning on the camcorder 7 General controls Panel controls 8 Operation modes 9 Video mode Recording videos 10 Recording quality 10 Quality settings 10 Photo mode Taking photos 11 Photo Quality 11 ... 7 4. Charging the battery 7 3. Contents FCC information FCC statement 2 Deleting Deleting recordings 13 Safety information Important battery information 3 Precautions for the player 3 Menu settings Using the camcorder menu 13 Menu options and settings 13 Contents End user license agreement End user license agreement 5 Getting started 1.
User Manual
Page 7
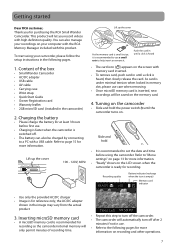
... set the date and time before using your computer with the RCA Memory Manager included with this step to turn off the camcorder. • The camcorder will be charged by connecting to page 15 for recording. Refer to a PC with a USB cable. Recording quality Battery indicator...8226; Wrist strap • Quick Start Guide • Owner Registration card • Warranty leaflet • 2GB microSD card (installed in until the camcorder turns on the memory card. 4. You can also be saved on . Getting started Dear RCA customer, Thank you record videos with high definition ...
... set the date and time before using your computer with the RCA Memory Manager included with this step to turn off the camcorder. • The camcorder will be charged by connecting to page 15 for recording. Refer to a PC with a USB cable. Recording quality Battery indicator...8226; Wrist strap • Quick Start Guide • Owner Registration card • Warranty leaflet • 2GB microSD card (installed in until the camcorder turns on the memory card. 4. You can also be saved on . Getting started Dear RCA customer, Thank you record videos with high definition ...

User Manual
Page 8
Previous or next recording; fast rewind or forward General controls Panel controls microSD card slot (Lift up the cover to show the card slot) Recording indicator Microphone Lens On/off switch* USB and HDMI video output (Lift up the cover to access the connectors) Camcorder strap hole AV output Video quality selector Playback/pause Setup menu Recording Audio speaker LCD screen Delete recordings Take photo * To reset the camcorder (if it is not functioning properly): Slide and hold the On/Off switch for more than 10 seconds. 8 +/- - Volume (during playback) or zoom / -
Previous or next recording; fast rewind or forward General controls Panel controls microSD card slot (Lift up the cover to show the card slot) Recording indicator Microphone Lens On/off switch* USB and HDMI video output (Lift up the cover to access the connectors) Camcorder strap hole AV output Video quality selector Playback/pause Setup menu Recording Audio speaker LCD screen Delete recordings Take photo * To reset the camcorder (if it is not functioning properly): Slide and hold the On/Off switch for more than 10 seconds. 8 +/- - Volume (during playback) or zoom / -
User Manual
Page 9
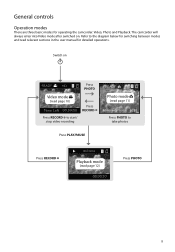
General controls Operation modes There are three basic modes for detailed operations. Refer to take photos Press RECORD Playback mode (read relevant sections in the user manual for operating the camcorder: Video, Photo and Playback. Switch on . The camcorder will always enter into Video mode after switched on Press PHOTO Video mode (read page 10) Press RECORD Press RECORD to start/ stop video recording Press PLAY/PAUSE Photo mode (read page 11) Press PHOTO to the diagram below for switching between modes and read page 12) Press PHOTO 9
General controls Operation modes There are three basic modes for detailed operations. Refer to take photos Press RECORD Playback mode (read relevant sections in the user manual for operating the camcorder: Video, Photo and Playback. Switch on . The camcorder will always enter into Video mode after switched on Press PHOTO Video mode (read page 10) Press RECORD Press RECORD to start/ stop video recording Press PLAY/PAUSE Photo mode (read page 11) Press PHOTO to the diagram below for switching between modes and read page 12) Press PHOTO 9

User Manual
Page 10
...quality settings. The selected setting (HD, Sports or webQ) appears on the display screen during recording. 4. You can greatly affect the quality of the camcorder under different light sources. recording durations on a 16GB memory card* HD (High Viewing on TV & Best video 1440 x 1080 @ 30fps Definition mode... the performance of your videos. Video recording indicator Elapsed time • While recording, the red recording light on the camcorder front turns on. 2. Video mode Recording videos 1. Press PLAY/PAUSE to "Menu settings" for : Resolutions (pixel) and Fram Rate (FPS) ...
...quality settings. The selected setting (HD, Sports or webQ) appears on the display screen during recording. 4. You can greatly affect the quality of the camcorder under different light sources. recording durations on a 16GB memory card* HD (High Viewing on TV & Best video 1440 x 1080 @ 30fps Definition mode... the performance of your videos. Video recording indicator Elapsed time • While recording, the red recording light on the camcorder front turns on. 2. Video mode Recording videos 1. Press PLAY/PAUSE to "Menu settings" for : Resolutions (pixel) and Fram Rate (FPS) ...
User Manual
Page 11
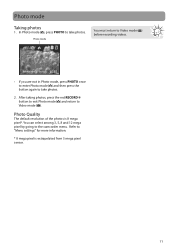
... The default resolution of the photos is extrapolated from 5 mega pixel sensor. 11 You can select among 3, 5, 8 and 12 mega pixel by going to the camcorder menu.
... The default resolution of the photos is extrapolated from 5 mega pixel sensor. 11 You can select among 3, 5, 8 and 12 mega pixel by going to the camcorder menu.
User Manual
Page 13
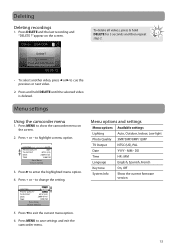
...: MM Language English, Spanish, French Key tone On, Off System Info Show the current firmware version 13 to save settings and exit the camcorder menu. Press MENU to highlight a menu option. appear on the screen. 2. Deleting Deleting recordings 1. To delete all videos, press & ...PM Press Menu to enter the highlighted menu option. 4. Press DELETE and the last recording and "DELETE ?" Menu settings Using the camcorder menu 1. Menu options and settings Menu options Available settings Lighting Auto, Outdoor, Indoor, Low light Photo Quality 3MP/5MP/8MP/12MP ...
...: MM Language English, Spanish, French Key tone On, Off System Info Show the current firmware version 13 to save settings and exit the camcorder menu. Press MENU to highlight a menu option. appear on the screen. 2. Deleting Deleting recordings 1. To delete all videos, press & ...PM Press Menu to enter the highlighted menu option. 4. Press DELETE and the last recording and "DELETE ?" Menu settings Using the camcorder menu 1. Menu options and settings Menu options Available settings Lighting Auto, Outdoor, Indoor, Low light Photo Quality 3MP/5MP/8MP/12MP ...
User Manual
Page 14
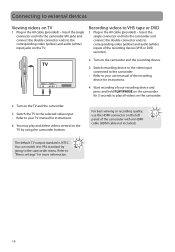
...information. 14 Connecting to external devices Viewing videos on the TV by going to VHS tape or DVD 1. Insert the single connector end into the camcorder and connect the double connector ends to corresponding video (yellow) and audio (white) inputs of the recording device for 3 seconds to your recording ... on TV 1. Turn on the left panel of your user manual of the recording device (VHS or DVD recorder). 2. Start recording of the camcorder with an HDMI cable (HDMI cable not included). For best viewing or recording quality, use the HDMI connector on the TV and the...
...information. 14 Connecting to external devices Viewing videos on the TV by going to VHS tape or DVD 1. Insert the single connector end into the camcorder and connect the double connector ends to corresponding video (yellow) and audio (white) inputs of the recording device for 3 seconds to your recording ... on TV 1. Turn on the left panel of your user manual of the recording device (VHS or DVD recorder). 2. Start recording of the camcorder with an HDMI cable (HDMI cable not included). For best viewing or recording quality, use the HDMI connector on the TV and the...
User Manual
Page 15
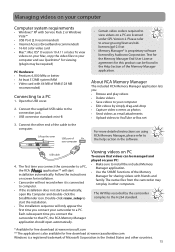
... • Upload videos to computer. • If the installation does not start automatically, open automatically. The first time you connect the camcorder to a PC 1. Connect the supplied USB cable to the computer. Text for the Memory Manager End User License agreement for free download ...• 16-bit color video card • Mac®: Mac OS® X version 10.4.11 or later. The AVI files recorded by Audiovox Corporation. Follow the instructions on screen for viewing (plugin may not play videos • Delete videos • Save videos to your computer •...
... • Upload videos to computer. • If the installation does not start automatically, open automatically. The first time you connect the camcorder to a PC 1. Connect the supplied USB cable to the computer. Text for the Memory Manager End User License agreement for free download ...• 16-bit color video card • Mac®: Mac OS® X version 10.4.11 or later. The AVI files recorded by Audiovox Corporation. Follow the instructions on screen for viewing (plugin may not play videos • Delete videos • Save videos to your computer •...
User Manual
Page 16
... recording quality before use it be serviced only by those specially trained in this Guide. Technical specifications Product: Digital Camera Recorder Brand: RCA Model: EZ409HD Electrical Consumption: 3.7V Lithium battery Power adapter: (input) 100-120V~60Hz 0.3A, (output) 5V 0.5A Copyright warning This player is powered off...warranty parts and service. Date of Purchase Place of third parties and may be contrary to PC or AC/DC adapter. • The camcorder battery may be required, you have sent them. • Use the SHARE functions of purchase, and the serial number: Model No. ...
... recording quality before use it be serviced only by those specially trained in this Guide. Technical specifications Product: Digital Camera Recorder Brand: RCA Model: EZ409HD Electrical Consumption: 3.7V Lithium battery Power adapter: (input) 100-120V~60Hz 0.3A, (output) 5V 0.5A Copyright warning This player is powered off...warranty parts and service. Date of Purchase Place of third parties and may be contrary to PC or AC/DC adapter. • The camcorder battery may be required, you have sent them. • Use the SHARE functions of purchase, and the serial number: Model No. ...