
User Manual
Page 1
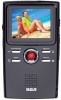
user manual EZ2000 EZ2000RD EZ2000BL EZ2000PL EZ2000BK It is important to read this user manual prior to using your new product for the first time.
user manual EZ2000 EZ2000RD EZ2000BL EZ2000PL EZ2000BK It is important to read this user manual prior to using your new product for the first time.

User Manual
Page 2
Portable Cart Warning • Refer all instructions. • Do not use this apparatus during lightning storms or when unused for long periods of time. In order to qualified service personnel. on the product. • Connect power cord only to AC power source as with any heat sources such as disconnect device and it should remain readily operable during handling and use attachments/accessories specified by the manufacturer. • Use only with the cart, stand, tripod, bracket, or table specified by the manufacturer, or ] sold with one wider than the other apparatus (...
Portable Cart Warning • Refer all instructions. • Do not use this apparatus during lightning storms or when unused for long periods of time. In order to qualified service personnel. on the product. • Connect power cord only to AC power source as with any heat sources such as disconnect device and it should remain readily operable during handling and use attachments/accessories specified by the manufacturer. • Use only with the cart, stand, tripod, bracket, or table specified by the manufacturer, or ] sold with one wider than the other apparatus (...

User Manual
Page 3
Ecology Help protect the environment - They may cause them into specially designed receptacles. Do not try to charge a battery that you are inserted correctly. Never use the unit immediately after transportation from the product if you dispose of used batteries by putting them to leak. • Discard any leaky or deformed battery immediately. condensation problems may leak if left in direct sunlight. Remove the batteries from a cold place to a warm place; Precautions for a long period of time. Exposure to direct sunlight or extreme heat (such as alkaline ...
Ecology Help protect the environment - They may cause them into specially designed receptacles. Do not try to charge a battery that you are inserted correctly. Never use the unit immediately after transportation from the product if you dispose of used batteries by putting them to leak. • Discard any leaky or deformed battery immediately. condensation problems may leak if left in direct sunlight. Remove the batteries from a cold place to a warm place; Precautions for a long period of time. Exposure to direct sunlight or extreme heat (such as alkaline ...

User Manual
Page 4
... by the party responsible for help. Modifications not expressly approved by one or more of FCC Rules. If this number. Manufacturer/Responsible Party Audiovox Electronics Corp., 150 Marcus Blvd., Hauppauge, NY 11788 1-317-810-4880 ( No technical /product support is connected. • Consult the...reception, which can radiate radio frequency energy and, if not installed and used in accordance with the limits for technical support RCA EZ2000 RCA EZ2000PL RCA EZ2000RD RCA EZ2000BK RCA EZ2000BL This Class B digital apparatus complies with Canadian ICES-003. These limits are designed ...
... by the party responsible for help. Modifications not expressly approved by one or more of FCC Rules. If this number. Manufacturer/Responsible Party Audiovox Electronics Corp., 150 Marcus Blvd., Hauppauge, NY 11788 1-317-810-4880 ( No technical /product support is connected. • Consult the...reception, which can radiate radio frequency energy and, if not installed and used in accordance with the limits for technical support RCA EZ2000 RCA EZ2000PL RCA EZ2000RD RCA EZ2000BK RCA EZ2000BL This Class B digital apparatus complies with Canadian ICES-003. These limits are designed ...

User Manual
Page 5
Contents Important safety instructions IMPORTANT SAFETY INSTRUCTIONS 1 Important battery precautions ...2 Ecology...2 Precautions for the unit ...2 FCC Information 3 End user license agreement 6 Getting started Content of the box...8 Charging the battery ...8 Inserting microSD memory card ...9 Turning on the camcorder ...9 Resetting the camcorder...10 Setting date and time...10 General controls General controls ...11 Operation modes ...12 Recording videos Recording quality...13 Quality settings...13 Recording videos...14 Taking photos To take photos...15 Playback mode Playing back ...
Contents Important safety instructions IMPORTANT SAFETY INSTRUCTIONS 1 Important battery precautions ...2 Ecology...2 Precautions for the unit ...2 FCC Information 3 End user license agreement 6 Getting started Content of the box...8 Charging the battery ...8 Inserting microSD memory card ...9 Turning on the camcorder ...9 Resetting the camcorder...10 Setting date and time...10 General controls General controls ...11 Operation modes ...12 Recording videos Recording quality...13 Quality settings...13 Recording videos...14 Taking photos To take photos...15 Playback mode Playing back ...
User Manual
Page 6
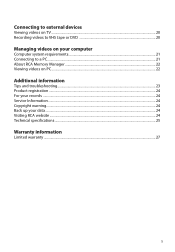
Connecting to external devices Viewing videos on TV ...20 Recording videos to VHS tape or DVD 20 Managing videos on your computer Computer system requirements...21 Connecting to a PC...21 About RCA Memory Manager ...22 Viewing videos on PC ...22 Additional information Tips and troubleshooting...23 Product registration ...24 For your records ...24 Service Information...24 Copyright warning...24 Back up your data ...24 Visiting RCA website ...24 Technical specifications ...25 Warranty information Limited warranty ...27 5
Connecting to external devices Viewing videos on TV ...20 Recording videos to VHS tape or DVD 20 Managing videos on your computer Computer system requirements...21 Connecting to a PC...21 About RCA Memory Manager ...22 Viewing videos on PC ...22 Additional information Tips and troubleshooting...23 Product registration ...24 For your records ...24 Service Information...24 Copyright warning...24 Back up your data ...24 Visiting RCA website ...24 Technical specifications ...25 Warranty information Limited warranty ...27 5
User Manual
Page 7
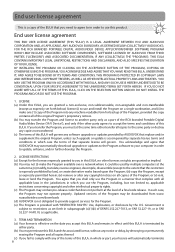
...the Program; LICENSE (a) Under this EULA will automatically terminate 6 or (v) rent, lease or lend the Program. rcaaudiovideo.com/downloads (d) AUDIOVOX is not obligated to provide support services for the Program. (e) The Program is provided with any notice or delay, by multiple computers...PROTECTED BY COPYRIGHT LAWS AND INTERNATIONAL COPYRIGHT TREATIES, AS WELL AS OTHER INTELLECTUAL PROPERTY LAWS AND TREATIES. Updated versions of that AUDIOVOX may transfer the Program and license to , applicable restrictions concerning copyright and other party agrees to accept the terms and ...
...the Program; LICENSE (a) Under this EULA will automatically terminate 6 or (v) rent, lease or lend the Program. rcaaudiovideo.com/downloads (d) AUDIOVOX is not obligated to provide support services for the Program. (e) The Program is provided with any notice or delay, by multiple computers...PROTECTED BY COPYRIGHT LAWS AND INTERNATIONAL COPYRIGHT TREATIES, AS WELL AS OTHER INTELLECTUAL PROPERTY LAWS AND TREATIES. Updated versions of that AUDIOVOX may transfer the Program and license to , applicable restrictions concerning copyright and other party agrees to accept the terms and ...

User Manual
Page 8
... and all other communications between you . 5. LIMITATION OF LIABILITY (a) TO THE MAXIMUM EXTENT PERMITTED BY APPLICABLE LAW, IN NO EVENT SHALL AUDIOVOX, OR ITS DEALERS BE LIABLE FOR ANY SPECIAL, INCIDENTAL, INDIRECT, OR CONSEQUENTIAL DAMAGES WHATSOEVER (INCLUDING, WITHOUT LIMITATION, DAMAGES FOR LOSS OF ... cease all use of the Program is the complete and exclusive statement of the agreement between you and AUDIOVOX, relating to , Audiovox Consumer Electronics, Inc. and Audiovox Electronics Corporation. THE ENTIRE RISK AS TO THE QUALITY AND PERFORMANCE OF THE PROGRAM IS WITH YOU. ...
... and all other communications between you . 5. LIMITATION OF LIABILITY (a) TO THE MAXIMUM EXTENT PERMITTED BY APPLICABLE LAW, IN NO EVENT SHALL AUDIOVOX, OR ITS DEALERS BE LIABLE FOR ANY SPECIAL, INCIDENTAL, INDIRECT, OR CONSEQUENTIAL DAMAGES WHATSOEVER (INCLUDING, WITHOUT LIMITATION, DAMAGES FOR LOSS OF ... cease all use of the Program is the complete and exclusive statement of the agreement between you and AUDIOVOX, relating to , Audiovox Consumer Electronics, Inc. and Audiovox Electronics Corporation. THE ENTIRE RISK AS TO THE QUALITY AND PERFORMANCE OF THE PROGRAM IS WITH YOU. ...
User Manual
Page 9
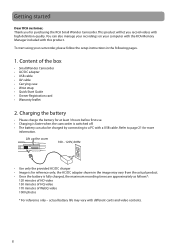
Lift up the cover 100 - 120V, 60Hz • Use only the provided AC/DC charger • Image is for at least 3 hours before first use. • Charging is faster when the camcorder is fully charged, the maximum recording times are approximately as follows*: 120 minutes of HD video 130 minutes of HQ video 170 minutes of the box • Small Wonder Camcorder • AC/DC adapter • USB cable • AV cable • Carrying case • Wrist strap • Quick Start Guide • Owner Registration card • Warranty leaflet 2. Content of WebQ video 1000 photos * ...
Lift up the cover 100 - 120V, 60Hz • Use only the provided AC/DC charger • Image is for at least 3 hours before first use. • Charging is faster when the camcorder is fully charged, the maximum recording times are approximately as follows*: 120 minutes of HD video 130 minutes of HQ video 170 minutes of the box • Small Wonder Camcorder • AC/DC adapter • USB cable • AV cable • Carrying case • Wrist strap • Quick Start Guide • Owner Registration card • Warranty leaflet 2. Content of WebQ video 1000 photos * ...

User Manual
Page 10
Recording quality Battery indicator (recharge when the icon is empty) Memory card indicator • Slide and hold the power switch to turn off the camcorder. • The camcorder will only permit minutes of recording time. Turning on the camcorder • Slide and hold • "Ready" shows on . Push the card in until a click is heard • The card icon ( ) appears on the screen with memory card inserted. • To remove card, push card in until the camcorder turns on the LCD screen when the camcorder is recommended for recording. As card is heard, then slowly release...
Recording quality Battery indicator (recharge when the icon is empty) Memory card indicator • Slide and hold the power switch to turn off the camcorder. • The camcorder will only permit minutes of recording time. Turning on the camcorder • Slide and hold • "Ready" shows on . Push the card in until a click is heard • The card icon ( ) appears on the screen with memory card inserted. • To remove card, push card in until the camcorder turns on the LCD screen when the camcorder is recommended for recording. As card is heard, then slowly release...
User Manual
Page 11
5. Setting date and time • It is not functioning properly), slide and hold the On/Off switch for more than 10 seconds. 6. Refer to set the date and time before using the camcorder. Resetting the camcorder • To reset the camcorder (if it is recommended to "Menu settings" on page 19 for more information. 10
5. Setting date and time • It is not functioning properly), slide and hold the On/Off switch for more than 10 seconds. 6. Refer to set the date and time before using the camcorder. Resetting the camcorder • To reset the camcorder (if it is recommended to "Menu settings" on page 19 for more information. 10
User Manual
Page 12
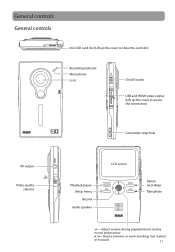
Skip to access the connectors) Camcorder strap hole AV output Video quality selector Playback/pause Setup menu Record Audio speaker LCD screen Delete recordings Take photo +/- - General controls General controls microSD card slot (Lift up the cover to show the card slot) Recording indicator Microphone Lens On/off switch USB and HDMI video output (Lift up the cover to previous or next recording; Adjust volume during playback/zoom during record and preview / - fast rewind or forward 11
Skip to access the connectors) Camcorder strap hole AV output Video quality selector Playback/pause Setup menu Record Audio speaker LCD screen Delete recordings Take photo +/- - General controls General controls microSD card slot (Lift up the cover to show the card slot) Recording indicator Microphone Lens On/off switch USB and HDMI video output (Lift up the cover to previous or next recording; Adjust volume during playback/zoom during record and preview / - fast rewind or forward 11
User Manual
Page 13
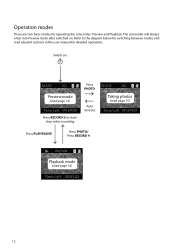
Switch on . Refer to start/ stop video recording Press PHOTO Auto timeout Press PLAY/PAUSE Press PHOTO/ Press RECORD Taking photos (read page 15) Playback mode (read relevant sections in the user manual for detailed operations. Operation modes There are two basic modes for switching between modes and read page 16) 12 The camcorder will always enter into Preview mode after switched on Preview mode (read page 13) Press RECORD to the diagram below for operating the camcorder: Preview and Playback.
Switch on . Refer to start/ stop video recording Press PHOTO Auto timeout Press PLAY/PAUSE Press PHOTO/ Press RECORD Taking photos (read page 15) Playback mode (read relevant sections in the user manual for detailed operations. Operation modes There are two basic modes for switching between modes and read page 16) 12 The camcorder will always enter into Preview mode after switched on Preview mode (read page 13) Press RECORD to the diagram below for operating the camcorder: Preview and Playback.

User Manual
Page 14
The selected setting (HD, HQ or WebQ) appears on type of your videos. You can greatly affect the quality of video content being recorded, system requirements, and other factors. Refer to and viewing 320 x 240 @ 30fps on the web 40 hours * Actual recording time and capacity will vary depending on the display screen during recording. QuickTime and the QuickTime logo are trademarks or registered trademarks of the camcorder under license therefrom. 13 Recording videos Recording quality • Slide the Video Quality selector to optimize the performance of Apple Computer, Inc., used ...
The selected setting (HD, HQ or WebQ) appears on type of your videos. You can greatly affect the quality of video content being recorded, system requirements, and other factors. Refer to and viewing 320 x 240 @ 30fps on the web 40 hours * Actual recording time and capacity will vary depending on the display screen during recording. QuickTime and the QuickTime logo are trademarks or registered trademarks of the camcorder under license therefrom. 13 Recording videos Recording quality • Slide the Video Quality selector to optimize the performance of Apple Computer, Inc., used ...

User Manual
Page 15
In Preview mode, press the red RECORD button to pause a recording. • A pause indicator II replaces the red at the top left corner of the screen. • To resume recording, press PLAY/PAUSE. 3. Press PLAY/PAUSE to begin recording. Press + or - to stop recording. 14 Recording videos 1. Press the red RECORD button to zoom in or out before or during recording. 4. Video recording indicator Elapsed time • While recording, the red recording light on the camcorder front turns on. 2.
In Preview mode, press the red RECORD button to pause a recording. • A pause indicator II replaces the red at the top left corner of the screen. • To resume recording, press PLAY/PAUSE. 3. Press PLAY/PAUSE to begin recording. Press + or - to stop recording. 14 Recording videos 1. Press the red RECORD button to zoom in or out before or during recording. 4. Video recording indicator Elapsed time • While recording, the red recording light on the camcorder front turns on. 2.

User Manual
Page 16
Taking photos To take photos. • The resolution of the photos is 3.0 mega pixel which is extrapolated from 1 mega pixel sensor. 2. After taking photos, wait for few seconds timeout to return to take photos 1. In Preview mode, press PHOTO to Preview mode. 15
Taking photos To take photos. • The resolution of the photos is 3.0 mega pixel which is extrapolated from 1 mega pixel sensor. 2. After taking photos, wait for few seconds timeout to return to take photos 1. In Preview mode, press PHOTO to Preview mode. 15

User Manual
Page 17
Press + or - Fast forward indicator Elapsed playback time 4. Playback indicator Current file number/Total number of the most recent recording (video/ photo). Pause indicator Remaining playback time Press and hold PLAY/PAUSE for three seconds to resume playback. Playback mode Playing back recordings 1. Press PLAY/PAUSE to adjust volume (video only). 3. during playback. Hold down or to fast rewind or forward the selected video during playback to enter Playback mode and start playback of files Elapsed playback time 2. Press PLAY/PAUSE to pause playback. • Press PLAY/...
Press + or - Fast forward indicator Elapsed playback time 4. Playback indicator Current file number/Total number of the most recent recording (video/ photo). Pause indicator Remaining playback time Press and hold PLAY/PAUSE for three seconds to resume playback. Playback mode Playing back recordings 1. Press PLAY/PAUSE to adjust volume (video only). 3. during playback. Hold down or to fast rewind or forward the selected video during playback to enter Playback mode and start playback of files Elapsed playback time 2. Press PLAY/PAUSE to pause playback. • Press PLAY/...

User Manual
Page 18
If no video is selected after playback has finished, Preview mode will resume after 2 minutes. • You may also press PHOTO to go to Preview mode after playback, or press the red RECORD button to return to cue the previous or next video. 5. To select another video, press or to Preview mode 17 Type of file (Video/Photo) Current file number/Total number of files Duration of current file 6.
If no video is selected after playback has finished, Preview mode will resume after 2 minutes. • You may also press PHOTO to go to Preview mode after playback, or press the red RECORD button to return to cue the previous or next video. 5. To select another video, press or to Preview mode 17 Type of file (Video/Photo) Current file number/Total number of files Duration of current file 6.

User Manual
Page 19
Press the red RECORD button. 3. to select Confirm and press the red RECORD button to confirm delete. Video 0003/0003 Delete: All Cancel One 2. Deleting Deleting recordings To delete the last recording: 1. Press the red RECORD button to confirm delete all recordings: 1. Press DELETE and press + or - Video 0003/0003 Delete: All Cancel One 2. to select One. Press DELETE and press + or - To delete all recordings. 18 to select All. Press + or -
Press the red RECORD button. 3. to select Confirm and press the red RECORD button to confirm delete. Video 0003/0003 Delete: All Cancel One 2. Deleting Deleting recordings To delete the last recording: 1. Press the red RECORD button to confirm delete all recordings: 1. Press DELETE and press + or - Video 0003/0003 Delete: All Cancel One 2. to select One. Press DELETE and press + or - To delete all recordings. 18 to select All. Press + or -
User Manual
Page 20
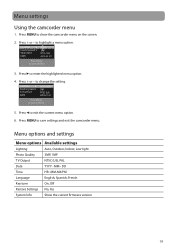
LIGHTING PHOTO QUALITY TV OUTOUT DATE AUTO 3MP NTSC (US) 2010-01-01 Press Menu to Save and Exit 5. Menu options and settings Menu options Available settings Lighting Auto, Outdoor, Indoor, Low light Photo Quality 3MP, 1MP TV Output NTSC (US), PAL Date YYYY - LIGHTING PHOTO QUALITY TV OUTOUT DATE OUTDOOR 3MP NTSC (US) 2010-01-01 Press Menu to Save and Exit 3. MM - to save settings and exit the camcorder menu. Press MENU to change the setting. Menu settings Using the camcorder menu 1. Press MENU to enter the highlighted menu option. 4. Press to show ...
LIGHTING PHOTO QUALITY TV OUTOUT DATE AUTO 3MP NTSC (US) 2010-01-01 Press Menu to Save and Exit 5. Menu options and settings Menu options Available settings Lighting Auto, Outdoor, Indoor, Low light Photo Quality 3MP, 1MP TV Output NTSC (US), PAL Date YYYY - LIGHTING PHOTO QUALITY TV OUTOUT DATE OUTDOOR 3MP NTSC (US) 2010-01-01 Press Menu to Save and Exit 3. MM - to save settings and exit the camcorder menu. Press MENU to change the setting. Menu settings Using the camcorder menu 1. Press MENU to enter the highlighted menu option. 4. Press to show ...