Operation Manual
Page 1
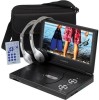
Operation Manual PORTABLE DVD PLAYER Model: D1998PK READ THESE INSTRUCTIONS THOROUGHLY PRIOR TO CONNECTING AND OPERATING YOUR DVD PLAYER. THE ILLUSTRATIONS AND GRAPHICS IN THE MANUAL ARE FOR REFERENCE ONLY AND SUBJECT TO CHANGE WITHOUT NOTICE. PLEASE RETAIN THIS MANUAL IN CASE YOU NEED IT FOR FUTURE REFERENCE.
Operation Manual PORTABLE DVD PLAYER Model: D1998PK READ THESE INSTRUCTIONS THOROUGHLY PRIOR TO CONNECTING AND OPERATING YOUR DVD PLAYER. THE ILLUSTRATIONS AND GRAPHICS IN THE MANUAL ARE FOR REFERENCE ONLY AND SUBJECT TO CHANGE WITHOUT NOTICE. PLEASE RETAIN THIS MANUAL IN CASE YOU NEED IT FOR FUTURE REFERENCE.
Operation Manual
Page 2
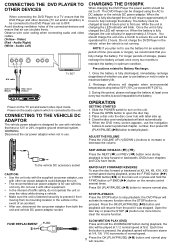
... is fully charged the LED will play , the LCD panel or video monitor must be installed so that is protected by Macrovision Corporation, and is intended for vehicle information, system control, rear or side observation or navigation. To obtain the best performance from your DVD Player please refer to the following battery care instructions: CHARGING THE D1998PK When charging the DVD Player the power switch should charge the unit...
... is fully charged the LED will play , the LCD panel or video monitor must be installed so that is protected by Macrovision Corporation, and is intended for vehicle information, system control, rear or side observation or navigation. To obtain the best performance from your DVD Player please refer to the following battery care instructions: CHARGING THE D1998PK When charging the DVD Player the power switch should charge the unit...

Operation Manual
Page 3
... turned on or in hotels, offices, home or vehicle. Disassembly Do not attempt to play . These regional codes must match in order for use . Cautions and Warnings 1. Contact qualified service personnel if your system is designed for the disc to disassemble the cabinet or replace the battery. Use a cloth lightly dampened with the instructions and illustrations provided in accordance with water for selecting the D1998PK portable DVD Player...
... turned on or in hotels, offices, home or vehicle. Disassembly Do not attempt to play . These regional codes must match in order for use . Cautions and Warnings 1. Contact qualified service personnel if your system is designed for the disc to disassemble the cabinet or replace the battery. Use a cloth lightly dampened with the instructions and illustrations provided in accordance with water for selecting the D1998PK portable DVD Player...
Operation Manual
Page 4
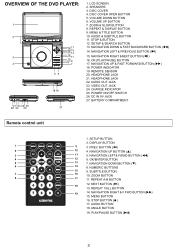
... DOWN BUTTON (q) 6 14 8. REPEAT A-B BUTTON 12. MENU & TITLE BUTTON 10. POWER INDICATOR 19. DC IN 9V JACK 27. REPEAT 1/ALL BUTTON 19 14. STOP BUTTON ( DISC COVER 4. AUDIO & SUBTITLE BUTTON 11. STOP & BUTTON 12. SETUP & SEARCH BUTTON 13. NAVIGATION RIGHT &NEXT BUTTON (:) 16. NAVIGATION UP & FAST FORWARD BUTTON (uu) 18. POWER ON/OFF SWITCH 26. NAVIGATION UP BUTTON (p) 3 11 5. OK/ENTER BUTTON 5 13 7. ZOOM BUTTON 8 17 11. VOLUME UP BUTTON 7. BATTERY COMPARTMENT Remote control unit 1. BUTTON (9) 2 10 4. MENU BUTTON 16. OVERVIEW OF THE DVD PLAYER...
... DOWN BUTTON (q) 6 14 8. REPEAT A-B BUTTON 12. MENU & TITLE BUTTON 10. POWER INDICATOR 19. DC IN 9V JACK 27. REPEAT 1/ALL BUTTON 19 14. STOP BUTTON ( DISC COVER 4. AUDIO & SUBTITLE BUTTON 11. STOP & BUTTON 12. SETUP & SEARCH BUTTON 13. NAVIGATION RIGHT &NEXT BUTTON (:) 16. NAVIGATION UP & FAST FORWARD BUTTON (uu) 18. POWER ON/OFF SWITCH 26. NAVIGATION UP BUTTON (p) 3 11 5. OK/ENTER BUTTON 5 13 7. ZOOM BUTTON 8 17 11. VOLUME UP BUTTON 7. BATTERY COMPARTMENT Remote control unit 1. BUTTON (9) 2 10 4. MENU BUTTON 16. OVERVIEW OF THE DVD PLAYER...

Operation Manual
Page 5
Adjust the headrest strap until the bag is firmly secured. 3. Secure the lower portion of the carry bag to the vehicle seat back using the headrest strap. Unfold the carry bag, and place the DVD Player on the bag beneath the elastic straps. Ensure that the unit's corners are secured by the elastic straps. 2. VEHICLE INSTALLATION: INSTALLING THE DVD PLAYER ON A SEAT BACK IN A CAR 1. Secure the upper portion of the carry bag to headrest support bars using the seat back strap. Adjust the seat back strap until the bag is firmly secured. 4
Adjust the headrest strap until the bag is firmly secured. 3. Secure the lower portion of the carry bag to the vehicle seat back using the headrest strap. Unfold the carry bag, and place the DVD Player on the bag beneath the elastic straps. Ensure that the unit's corners are secured by the elastic straps. 2. VEHICLE INSTALLATION: INSTALLING THE DVD PLAYER ON A SEAT BACK IN A CAR 1. Secure the upper portion of the carry bag to headrest support bars using the seat back strap. Adjust the seat back strap until the bag is firmly secured. 4
Operation Manual
Page 6
.... Do not charge the DVD Player in order to first use with vehicles that have tracks. When the DVD menu screen appears, use , disconnect the car power adaptor from both the unit and vehicle DC power adaptor socket. ADJUST THE VOLUME Press the VOLUME UP (+)/DOWN (-) buttons to fully recharge the battery. Press the OK (PLAY/PAUSE) (uII) button and playback will remain on the TV set and select video input mode. Avoid...
.... Do not charge the DVD Player in order to first use with vehicles that have tracks. When the DVD menu screen appears, use , disconnect the car power adaptor from both the unit and vehicle DC power adaptor socket. ADJUST THE VOLUME Press the VOLUME UP (+)/DOWN (-) buttons to fully recharge the battery. Press the OK (PLAY/PAUSE) (uII) button and playback will remain on the TV set and select video input mode. Avoid...
Operation Manual
Page 7
...) button to normal play is loaded into the DVD Player. Use the navigation buttons to select the desired folder and then press OK (PLAY/PAUSE) (uII) button to be ended (B). PLAY MODES During playback, press the STOP ( Press and hold AUDIO&DISPLAY button on the main unit. A preview of the selection between two specific points(A-B repeat) 1. REPEAT Press REPEAT 1/all tracks (for DVD disc), or repeat play of the picture will start playback. Repeat play a track or all button during playback until...
...) button to normal play is loaded into the DVD Player. Use the navigation buttons to select the desired folder and then press OK (PLAY/PAUSE) (uII) button to be ended (B). PLAY MODES During playback, press the STOP ( Press and hold AUDIO&DISPLAY button on the main unit. A preview of the selection between two specific points(A-B repeat) 1. REPEAT Press REPEAT 1/all tracks (for DVD disc), or repeat play of the picture will start playback. Repeat play a track or all button during playback until...
Operation Manual
Page 8
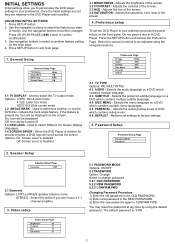
...disabled Preference Page TV Type Audio Subtitle Disc Menu Parental Default NTSC ENG OFF ENG 4.1 TV TYPE Options: PAL/MULTI/NTSC 4.2 AUDIO - Use the navigation buttons to select the feature you want to exit main page. 3.1 BRIGHTNESS - Adjusts the hue of the screen. 3.2 CONTRAST - Selects the audio language on a DVD which contains multiple language. 4.3 SUBTITLE - Press SETUP button to modify. Selects the preferred subtitle language on a DVD which contains multiple subtitle language. 4.4 DISC MENU - Restores all settings to perform changes. Video setup 5.1 PASSWORD MODE...
...disabled Preference Page TV Type Audio Subtitle Disc Menu Parental Default NTSC ENG OFF ENG 4.1 TV TYPE Options: PAL/MULTI/NTSC 4.2 AUDIO - Use the navigation buttons to select the feature you want to exit main page. 3.1 BRIGHTNESS - Adjusts the hue of the screen. 3.2 CONTRAST - Selects the audio language on a DVD which contains multiple language. 4.3 SUBTITLE - Press SETUP button to modify. Selects the preferred subtitle language on a DVD which contains multiple subtitle language. 4.4 DISC MENU - Restores all settings to perform changes. Video setup 5.1 PASSWORD MODE...
Operation Manual
Page 9
... use a disc that will damage the disc. Check the volume setting. Do not try to avoid volume levels that headphones are disabled. Check that the battery is properly installed and AC Adapter is set to hearing. Check that the Audio/Videos cables are plugged into Headphone jack 1 or Headphone jack 2. When the headphones are securely connected. Remote control won't work. Remove any obstacles between the remote control and remote control sensor on the disc tray...
... use a disc that will damage the disc. Check the volume setting. Do not try to avoid volume levels that headphones are disabled. Check that the battery is properly installed and AC Adapter is set to hearing. Check that the Audio/Videos cables are plugged into Headphone jack 1 or Headphone jack 2. When the headphones are securely connected. Remote control won't work. Remove any obstacles between the remote control and remote control sensor on the disc tray...
Operation Manual
Page 10
... Company, has suffered or been damaged through alteration, improper installation, mishandling, misuse, neglect, accident, or by removal or defacement of the factory serial number/bar code label(s). U.S.A.: AUDIOVOX ELECTRONICS CORPORATION, 150 MARCUS BLVD. This Warranty is authorized to assume for parts and repair labor. ® 12 MONTH LIMITED WARRANTY Applies to Audiovox Video Products AUDIOVOX ELECTRONICS CORP. (the Company) warrants to the original retail...
... Company, has suffered or been damaged through alteration, improper installation, mishandling, misuse, neglect, accident, or by removal or defacement of the factory serial number/bar code label(s). U.S.A.: AUDIOVOX ELECTRONICS CORPORATION, 150 MARCUS BLVD. This Warranty is authorized to assume for parts and repair labor. ® 12 MONTH LIMITED WARRANTY Applies to Audiovox Video Products AUDIOVOX ELECTRONICS CORP. (the Company) warrants to the original retail...


