
User Guide
Page 3
Specifications 30 P. Contents A. Contents 6 D. SETUP 9 H. Basic Operation 17 I. DISPLAY 18 K. Connecting to a TV or another monitor 30 O. Controls, Indicators, and Connectors 7 F. PLAYING AUDIO CDS 24 L. Cautions and Warnings 4 C. Powering and installation 6 E. PLAYING MP3 DISCS 26 M. Rechargeable Battery Installation and Use 31 Q. Playing JPG file 28 N. Troubleshooting 33 Introduction 4 B. Loading and Playing a Disc 8 G. MENU 18 J.
Specifications 30 P. Contents A. Contents 6 D. SETUP 9 H. Basic Operation 17 I. DISPLAY 18 K. Connecting to a TV or another monitor 30 O. Controls, Indicators, and Connectors 7 F. PLAYING AUDIO CDS 24 L. Cautions and Warnings 4 C. Powering and installation 6 E. PLAYING MP3 DISCS 26 M. Rechargeable Battery Installation and Use 31 Q. Playing JPG file 28 N. Troubleshooting 33 Introduction 4 B. Loading and Playing a Disc 8 G. MENU 18 J.

User Guide
Page 5
...sure the system is hazardous to disassemble the cabinet. Do not expose the disc to Laser Radiation. Do not touch the surface of the battery properly. Remove the disc from the unit and store it in temperatures higher than 104 degrees Fahrenheit or 40 degrees Celcius. 4.Disassemble Do... not attempt to replace the battery incorrectly. In order to the disc contents the software producers designed, some playback features may not be intentionally fixed by its case after ...
...sure the system is hazardous to disassemble the cabinet. Do not expose the disc to Laser Radiation. Do not touch the surface of the battery properly. Remove the disc from the unit and store it in temperatures higher than 104 degrees Fahrenheit or 40 degrees Celcius. 4.Disassemble Do... not attempt to replace the battery incorrectly. In order to the disc contents the software producers designed, some playback features may not be intentionally fixed by its case after ...
User Guide
Page 6
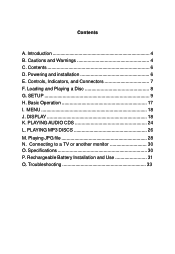
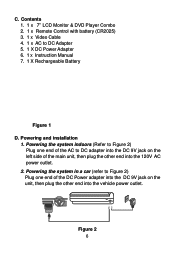
Figure 2 6 Contents 1. 1 x 7'' LCD Monitor & DVD Player Combo 2. 1 x Remote Control with battery (CR2025) 3. 1 x Video Cable 4. 1 x AC to Figure 2) Plug one end of the AC to DC adapter into the DC 9V jack on the left side of ... plug the other end into the 120V AC power outlet. 2. C. Powering the system in a car (refer to DC Adapter 5. 1 X DC Power Adapter 6. 1 x Instruction Manual 7. 1 X Rechargeable Battery Figure 1 D.
Figure 2 6 Contents 1. 1 x 7'' LCD Monitor & DVD Player Combo 2. 1 x Remote Control with battery (CR2025) 3. 1 x Video Cable 4. 1 x AC to Figure 2) Plug one end of the AC to DC adapter into the DC 9V jack on the left side of ... plug the other end into the 120V AC power outlet. 2. C. Powering the system in a car (refer to DC Adapter 5. 1 X DC Power Adapter 6. 1 x Instruction Manual 7. 1 X Rechargeable Battery Figure 1 D.

User Guide
Page 32
...: 5~40°C (41~104°F) Storage temperature: -20~60°C (4~140°F) Operating humidity: 10~75% Dimensions (W x H x D):7.87 X 5.92 X1.87inches 200 x 150.5 x 47.5mm Battery Type: Li-ion 32
...: 5~40°C (41~104°F) Storage temperature: -20~60°C (4~140°F) Operating humidity: 10~75% Dimensions (W x H x D):7.87 X 5.92 X1.87inches 200 x 150.5 x 47.5mm Battery Type: Li-ion 32
User Guide
Page 33
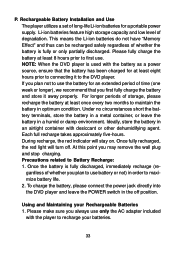
... an airtight container with the player to connecting it away properly. Please make sure you first fully charge the battery and store it to use the battery for an extended period of whether you may remove the wall plug and stop charging. If you plan not to the DVD player. Ideally, store... the battery in a humid or damp environment. To charge the battery, please connect the power jack directly into the DVD player and leave the POWER switch in order to use . Each full...
... an airtight container with the player to connecting it away properly. Please make sure you first fully charge the battery and store it to use the battery for an extended period of whether you may remove the wall plug and stop charging. If you plan not to the DVD player. Ideally, store... the battery in a humid or damp environment. To charge the battery, please connect the power jack directly into the DVD player and leave the POWER switch in order to use . Each full...

User Guide
Page 34
...to the player. Align the guide pins on the battery with the holes on the left side of the unit. Installing the DVD Player Battery Removing the Battery Pack: 1. Removing the DVD Player Battery Installing the Battery Pack: 1. Pull the battery from the player and store it locks into position...." mode and that the AC power supply has been disconnected. 2. Close the player cover. 3. Please remove the battery from the unit. The lock position is not to the battery. Figure 6. First, make sure the player is in "Stop" mode and the AC power supply has been disconnected...
...to the player. Align the guide pins on the battery with the holes on the left side of the unit. Installing the DVD Player Battery Removing the Battery Pack: 1. Removing the DVD Player Battery Installing the Battery Pack: 1. Pull the battery from the player and store it locks into position...." mode and that the AC power supply has been disconnected. 2. Close the player cover. 3. Please remove the battery from the unit. The lock position is not to the battery. Figure 6. First, make sure the player is in "Stop" mode and the AC power supply has been disconnected...
User Guide
Page 36
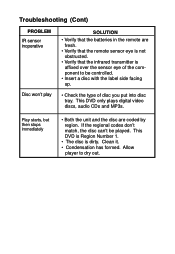
... the component to dry out. Clean it. • Condensation has formed. Troubleshooting (Cont) PROBLEM IR sensor inoperative Disc won't play SOLUTION • Verify that the batteries in the remote are coded by region. This DVD only plays digital video discs, audio CDs and MP3s.
... the component to dry out. Clean it. • Condensation has formed. Troubleshooting (Cont) PROBLEM IR sensor inoperative Disc won't play SOLUTION • Verify that the batteries in the remote are coded by region. This DVD only plays digital video discs, audio CDs and MP3s.

