
User Guide
Page 1
D1712 PORTABLE 7" LCD MONITOR AND DVD PLAYER
D1712 PORTABLE 7" LCD MONITOR AND DVD PLAYER
User Guide
Page 4
... of any kind into the unit through openings; The main features include a 7" Wide Screen (16:9 Aspect Ratio) Liquid Crystal Display (LCD) monitor and a DVD player. B. Do not place anything heavy on an unstable cart, stand, tripod, bracket or table to using. Keep the unit away from a cold to provide... years of the art electronics and is compact so that the D1712 is constructed to a warm location, wait for about one hour before operating the unit, or remove the disc and leave the unit turned on or...
... of any kind into the unit through openings; The main features include a 7" Wide Screen (16:9 Aspect Ratio) Liquid Crystal Display (LCD) monitor and a DVD player. B. Do not place anything heavy on an unstable cart, stand, tripod, bracket or table to using. Keep the unit away from a cold to provide... years of the art electronics and is compact so that the D1712 is constructed to a warm location, wait for about one hour before operating the unit, or remove the disc and leave the unit turned on or...
User Guide
Page 6
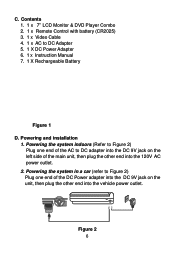
... a car (refer to Figure 2) Plug one end of the AC to DC Adapter 5. 1 X DC Power Adapter 6. 1 x Instruction Manual 7. 1 X Rechargeable Battery Figure 1 D. Figure 2 6 Contents 1. 1 x 7'' LCD Monitor & DVD Player Combo 2. 1 x Remote Control with battery (CR2025) 3. 1 x Video Cable 4. 1 x AC to DC adapter into the DC 9V jack on the left side of the DC...
... a car (refer to Figure 2) Plug one end of the AC to DC Adapter 5. 1 X DC Power Adapter 6. 1 x Instruction Manual 7. 1 X Rechargeable Battery Figure 1 D. Figure 2 6 Contents 1. 1 x 7'' LCD Monitor & DVD Player Combo 2. 1 x Remote Control with battery (CR2025) 3. 1 x Video Cable 4. 1 x AC to DC adapter into the DC 9V jack on the left side of the DC...
User Guide
Page 8
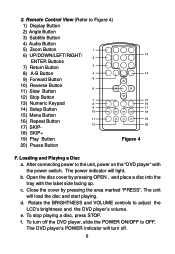
..." with the label side facing up. b. The unit will turn off . 8 The DVD player's POWER indicator will load the disc and start playing. 2. After connecting power to Figure 4) 1) Display Button 2) Angle Button 3) Subtitle Button 4) Audio Button 5) Zoom Button ...light. Close the cover by pressing OPEN , and place a disc into the tray with the power switch. f. d. To turn off the DVD player, slide the POWER ON/OFF to adjust the LCD's brightness and the DVD player's volume. e. Open the disc cover by pressing the area marked "PRESS". Loading and Playing a Disc a.
..." with the label side facing up. b. The unit will turn off . 8 The DVD player's POWER indicator will load the disc and start playing. 2. After connecting power to Figure 4) 1) Display Button 2) Angle Button 3) Subtitle Button 4) Audio Button 5) Zoom Button ...light. Close the cover by pressing OPEN , and place a disc into the tray with the power switch. f. d. To turn off the DVD player, slide the POWER ON/OFF to adjust the LCD's brightness and the DVD player's volume. e. Open the disc cover by pressing the area marked "PRESS". Loading and Playing a Disc a.
User Guide
Page 11
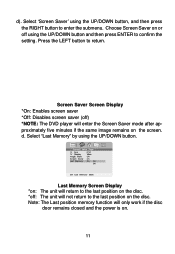
... the setting. Select "Last Memory" by using the UP/DOWN button and then press ENTER to the last position on the disc. *off ) *NOTE: The DVD player will only work if the disc door remains closed and the power is on the screen. Choose Screen Saver on or off using the...
... the setting. Select "Last Memory" by using the UP/DOWN button and then press ENTER to the last position on the disc. *off ) *NOTE: The DVD player will only work if the disc door remains closed and the power is on the screen. Choose Screen Saver on or off using the...

User Guide
Page 19
The contents of the menu vary from disc to display the Remaining Time of the title. Some DVDs only allow you play a DVD, a root menu of the disc will appear on the screen of Chapters (4), and the Playing elapsed Time for the title (5). During playback press the '... Number of your TV or Monitor. Title Remaining Time Screen Display 19 DISPLAY (Display contents vary from disc to select disc playback options using the DVD root menu. The heading will disappear automatically after 3 seconds if no buttons are pressed. When you to disc. Press 'DISPLAY' again to disc.) 1. The...
The contents of the menu vary from disc to display the Remaining Time of the title. Some DVDs only allow you play a DVD, a root menu of the disc will appear on the screen of Chapters (4), and the Playing elapsed Time for the title (5). During playback press the '... Number of your TV or Monitor. Title Remaining Time Screen Display 19 DISPLAY (Display contents vary from disc to select disc playback options using the DVD root menu. The heading will disappear automatically after 3 seconds if no buttons are pressed. When you to disc. Press 'DISPLAY' again to disc.) 1. The...

User Guide
Page 21
SUBTITLE During disc playback press 'SUBTITLE' to this function through the DVD menu. 21 Subtitle Screen Display * Some DVDs only allow access to select the subtitle language you desire*, with the current Subtitle Language Number (1) and the total Number of Subtitle Languages (2) displayed. If ...
SUBTITLE During disc playback press 'SUBTITLE' to this function through the DVD menu. 21 Subtitle Screen Display * Some DVDs only allow access to select the subtitle language you desire*, with the current Subtitle Language Number (1) and the total Number of Subtitle Languages (2) displayed. If ...

User Guide
Page 22
... language you desire*, with the current Audio Channel Number (1) and the total number of Audio Channels (2) displayed. Press AUDIO again to this function through the DVD menu. 5. Audio Language Screen Display * Some DVDs only allow access to select another audio language. ZOOM Screen Display 22
... language you desire*, with the current Audio Channel Number (1) and the total number of Audio Channels (2) displayed. Press AUDIO again to this function through the DVD menu. 5. Audio Language Screen Display * Some DVDs only allow access to select another audio language. ZOOM Screen Display 22

User Guide
Page 27
... FOLDER (repeat playback of the highlighted song. 27 Press the or button to select and begin playback of a specific folder) Insert an MP3 CD, the DVD player will initialize the disc and the directory (folder) will be shown on the left side of audio quality while taking up much less disc...
... FOLDER (repeat playback of the highlighted song. 27 Press the or button to select and begin playback of a specific folder) Insert an MP3 CD, the DVD player will initialize the disc and the directory (folder) will be shown on the left side of audio quality while taking up much less disc...

User Guide
Page 31
Connect the audio/video cable's yellow plug into the unit's DVD AUDIO OUT jack, and connect the other yellow plug to enjoy high quality stereo sound and picture on your TV or Monitor (white = left channel, ...red = right channel). 2. Connect one end of the audio/video cable's black (1/8" stereo plug) plug into the DVD VIDEO OUT jack on the back of the unit, and the other end to the AUDIO INPUT jacks on your TV or Monitor. Figure 5 31...
Connect the audio/video cable's yellow plug into the unit's DVD AUDIO OUT jack, and connect the other yellow plug to enjoy high quality stereo sound and picture on your TV or Monitor (white = left channel, ...red = right channel). 2. Connect one end of the audio/video cable's black (1/8" stereo plug) plug into the DVD VIDEO OUT jack on the back of the unit, and the other end to the AUDIO INPUT jacks on your TV or Monitor. Figure 5 31...

User Guide
Page 32
... format: Horizontal 720 pixel, vertical 480 pixel (NTSC) Frequency response: DVD (PCM 96 kHz/24 bits ): 20 Hz to 44 Hz DVD (PCM 48 kHz): 20 Hz to 22 kHz CD: 20 Hz to 20 kHz Video output: 1.0 Vp-p/75 Ohm, unbalanced Video S/N: Better than 35 dB ...
... format: Horizontal 720 pixel, vertical 480 pixel (NTSC) Frequency response: DVD (PCM 96 kHz/24 bits ): 20 Hz to 44 Hz DVD (PCM 48 kHz): 20 Hz to 22 kHz CD: 20 Hz to 20 kHz Video output: 1.0 Vp-p/75 Ohm, unbalanced Video S/N: Better than 35 dB ...
User Guide
Page 33
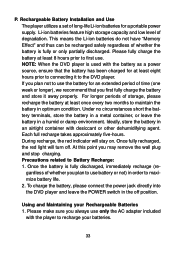
... power source, ensure that you may remove the wall plug and stop charging. To charge the battery, please connect the power jack directly into the DVD player and leave the POWER switch in an airtight container with the player to maximize battery life. 2. P. Ideally, store the battery in the off... a set of time (one week or longer), we recommend that the battery has been charged for a portable power supply. NOTE: When the DVD player is fully discharged, immediately recharge (regardless of whether you always use the battery for an extended period of long-life Li-ion batteries for...
... power source, ensure that you may remove the wall plug and stop charging. To charge the battery, please connect the power jack directly into the DVD player and leave the POWER switch in an airtight container with the player to maximize battery life. 2. P. Ideally, store the battery in the off... a set of time (one week or longer), we recommend that the battery has been charged for a portable power supply. NOTE: When the DVD player is fully discharged, immediately recharge (regardless of whether you always use the battery for an extended period of long-life Li-ion batteries for...

User Guide
Page 34
... battery from the player and store it locks into position. Then push the battery towards the rear of battery. 3. Installing the DVD Player Battery Removing the Battery Pack: 1. Removing the DVD Player Battery Align the guide pins on the battery with the holes on the left side of the player until it...
... battery from the player and store it locks into position. Then push the battery towards the rear of battery. 3. Installing the DVD Player Battery Removing the Battery Pack: 1. Removing the DVD Player Battery Align the guide pins on the battery with the holes on the left side of the player until it...
User Guide
Page 35
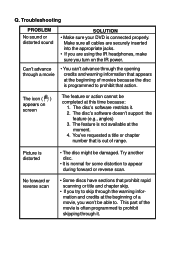
... • Some discs have sections that is not available at this time because: 1. Troubleshooting PROBLEM No sound or distorted sound SOLUTION • Make sure your DVD is normal for some distortion to skip through the opening credits and warning information that action. The disc's software doesn't support the feature (e.g., angles) 3. Try...
... • Some discs have sections that is not available at this time because: 1. Troubleshooting PROBLEM No sound or distorted sound SOLUTION • Make sure your DVD is normal for some distortion to skip through the opening credits and warning information that action. The disc's software doesn't support the feature (e.g., angles) 3. Try...
User Guide
Page 36
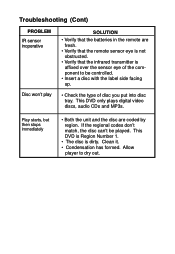
... plays digital video discs, audio CDs and MP3s. Clean it. • Condensation has formed. This DVD is Region Number 1. • The disc is dirty. Play starts, but then stops immediately • Both the unit and the disc are fresh. • Verify ...
... plays digital video discs, audio CDs and MP3s. Clean it. • Condensation has formed. This DVD is Region Number 1. • The disc is dirty. Play starts, but then stops immediately • Both the unit and the disc are fresh. • Verify ...


