Owners Manual
Page 1
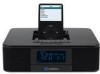
DOCKING DIGITAL MUSIC SYSTEM FOR iPod® ESTACIÓN DE SISTEMA DE MÚSICA DIGITAL PARA iPod® CONNEXION DU SYSTEME MUSICAL DIGITAL POUR iPod® OWNER'S MANUAL MANUAL DEL USUARIO/GUIDE DU PROPRIETAIRE CE710CR (iPod® Not Included/iPod® No Incluido/iPod® non inclus) PLEASE READ THIS OPERATING MANUAL COMPLETELY BEFORE OPERATING THIS UNIT AND RETAIN THE BOOKLET FOR FUTURE REFERENCE CE710CR IB 09/01/2009 VER 18.0 fold size: 148.5 x 210mm ( 15 pcs 297 x 210mm - 60PP) printing color: Black (black on white / BK+BK)
DOCKING DIGITAL MUSIC SYSTEM FOR iPod® ESTACIÓN DE SISTEMA DE MÚSICA DIGITAL PARA iPod® CONNEXION DU SYSTEME MUSICAL DIGITAL POUR iPod® OWNER'S MANUAL MANUAL DEL USUARIO/GUIDE DU PROPRIETAIRE CE710CR (iPod® Not Included/iPod® No Incluido/iPod® non inclus) PLEASE READ THIS OPERATING MANUAL COMPLETELY BEFORE OPERATING THIS UNIT AND RETAIN THE BOOKLET FOR FUTURE REFERENCE CE710CR IB 09/01/2009 VER 18.0 fold size: 148.5 x 210mm ( 15 pcs 297 x 210mm - 60PP) printing color: Black (black on white / BK+BK)
Owners Manual
Page 8
... conditions: (1) this device may not cause harmful interference, and (2) this equipment does cause harmful interference to radio or television reception, which can radiate radio frequency energy and, if not installed and used in Contractible Aux Cord with 3.5mm Aux Plug •... Wake to operate the equipment. PRODUCT FEATURES CE710CR is docked. 4 CAUTION: Changes or modifications not expressly approved by one or more of the following features: • iPod®, iPod® Mini, iPod 1st to 3rd Generation Nano, iPod® Classic and iPod® touch Player / Recharger • Audio...
... conditions: (1) this device may not cause harmful interference, and (2) this equipment does cause harmful interference to radio or television reception, which can radiate radio frequency energy and, if not installed and used in Contractible Aux Cord with 3.5mm Aux Plug •... Wake to operate the equipment. PRODUCT FEATURES CE710CR is docked. 4 CAUTION: Changes or modifications not expressly approved by one or more of the following features: • iPod®, iPod® Mini, iPod 1st to 3rd Generation Nano, iPod® Classic and iPod® touch Player / Recharger • Audio...

Owners Manual
Page 10
...cord 19. Battery Compartment - iPod® Dock 2. iPod ® Skip/Search. MEM/iPod Button - save settings; ...Pair of the sleep timer 10. Cord Retracting Wheel - AC power cable and plug 20. To turn the unit on or off 9. Select the preset radio...; Tune the radio channel frequency up or down ; MODE Button -...output 23. For resetting the unit 6 iPod® PLAY/PAUSE 12. Switch the ...Save the radio preset stations; Select the time duration of Speakers 16. Select FM Radio, iPod® ...
...cord 19. Battery Compartment - iPod® Dock 2. iPod ® Skip/Search. MEM/iPod Button - save settings; ...Pair of the sleep timer 10. Cord Retracting Wheel - AC power cable and plug 20. To turn the unit on or off 9. Select the preset radio...; Tune the radio channel frequency up or down ; MODE Button -...output 23. For resetting the unit 6 iPod® PLAY/PAUSE 12. Switch the ...Save the radio preset stations; Select the time duration of Speakers 16. Select FM Radio, iPod® ...
Owners Manual
Page 12
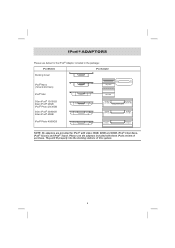
... properly into the docking stations of purchase. iPod® ADAPTORS Please see below for the iPod® Adaptor included in the package: iPod Models iPod Adaptor Docking Cover iPod® Nano (1st and 2nd Gen) iPod® Mini 3Gen iPod® 10/15GB 4Gen iPod® 20GB iPod® Photo 20/30GB 3Gen iPod® 30/40GB 4Gen iPod® 40GB iPod® Photo...
... properly into the docking stations of purchase. iPod® ADAPTORS Please see below for the iPod® Adaptor included in the package: iPod Models iPod Adaptor Docking Cover iPod® Nano (1st and 2nd Gen) iPod® Mini 3Gen iPod® 10/15GB 4Gen iPod® 20GB iPod® Photo 20/30GB 3Gen iPod® 30/40GB 4Gen iPod® 40GB iPod® Photo...
Owners Manual
Page 14
... the connector on iPod or docking system. 2. The iPod® will not be inserted into the docking area. button on the display. To remove the iPod® from the docking connector. NOTE:The recharge function still operates in your desired volume level. Select your desired EQ and play mode in Radio, iPod and AUX mode. 7. iPod DOCKING This model includes...
... the connector on iPod or docking system. 2. The iPod® will not be inserted into the docking area. button on the display. To remove the iPod® from the docking connector. NOTE:The recharge function still operates in your desired volume level. Select your desired EQ and play mode in Radio, iPod and AUX mode. 7. iPod DOCKING This model includes...
Owners Manual
Page 15
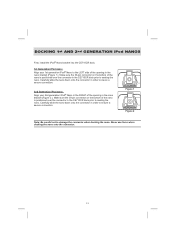
... 2nd GENERATION iPod NANOS First, install the iPod® Nano bracket into the CE710CR dock. 1st Generation iPod nano: Align your 2nd generation iPod® Nano in the RIGHT of the opening in the nano bracket (Figure 2 ). Carefully slide the nano down onto the connector in the CE710CR dock prior to seating the ... the nano bracket (Figure 1 ). Carefully slide the nano down onto the connector in order to insure a secure connection. 2nd Generation iPod nano: Align your 1st generation iPod® Nano to the LEFT side of the opening in the CE710CR dock prior to seating the nano.
... 2nd GENERATION iPod NANOS First, install the iPod® Nano bracket into the CE710CR dock. 1st Generation iPod nano: Align your 2nd generation iPod® Nano in the RIGHT of the opening in the nano bracket (Figure 2 ). Carefully slide the nano down onto the connector in the CE710CR dock prior to seating the ... the nano bracket (Figure 1 ). Carefully slide the nano down onto the connector in order to insure a secure connection. 2nd Generation iPod nano: Align your 1st generation iPod® Nano to the LEFT side of the opening in the CE710CR dock prior to seating the nano.

Owners Manual
Page 16
... input connector on a television is set to "ON" 4. S-VIDEO - Video Out (For 5th Generation iPods with video. 3. Securely dock the iPod® with video, iPod 3Gen nano, iPod classic and iPod touch ONLY) 1. iPod: Make sure the TV Out section is usually color coded yellow to match the color on the unit speaker.... 4. The slideshow will only playback on the AV cable. 3. For the initial docking of the iPod(3Gen) nano,iPod clasic and iPod touch, you may wait for the finishing of iPod authentication process then the video signal output to your TV screen on this unit to your...
... input connector on a television is set to "ON" 4. S-VIDEO - Video Out (For 5th Generation iPods with video. 3. Securely dock the iPod® with video, iPod 3Gen nano, iPod classic and iPod touch ONLY) 1. iPod: Make sure the TV Out section is usually color coded yellow to match the color on the unit speaker.... 4. The slideshow will only playback on the AV cable. 3. For the initial docking of the iPod(3Gen) nano,iPod clasic and iPod touch, you may wait for the finishing of iPod authentication process then the video signal output to your TV screen on this unit to your...
Owners Manual
Page 18
... • After the first alarm minute, it can be redirected to iPod® ( iPod) • Your docked iPod will automatically switch on when the alarm time is set the unit to Radio ( RAD) • The radio will sound immediately for choosing are: 15, 30, 45 or 60 ...docked, the alarm source will show the indicator "SNOOZE". • The alarm will be delayed for 60 minutes and then automatically shut off. • To stop the radio alarm sound immediately, press the ALARM On/Off button once. Snooze Function • When the alarm sounds, it will flash. 4. The alarm clock...
... • After the first alarm minute, it can be redirected to iPod® ( iPod) • Your docked iPod will automatically switch on when the alarm time is set the unit to Radio ( RAD) • The radio will sound immediately for choosing are: 15, 30, 45 or 60 ...docked, the alarm source will show the indicator "SNOOZE". • The alarm will be delayed for 60 minutes and then automatically shut off. • To stop the radio alarm sound immediately, press the ALARM On/Off button once. Snooze Function • When the alarm sounds, it will flash. 4. The alarm clock...
Owners Manual
Page 20
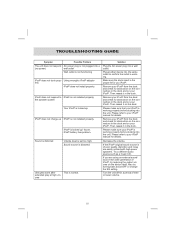
... lower volume. 16 Remove your iPod® from the dock and check for obstruction on the device itself. Then reseat it in the dock and on your iPod®. Please make sure your iPod® is working . Remove your iPod® from the dock and check for a period of iPod®, try turning bass boost...such as a music CD. ume Solution Plug the AC power plug into the same outlet to your iPod® from the dock and check for obstruction on the connectors in the dock and on your iPod® manual for you are easily noticed with high-power speakers. Then reseat it on your...
... lower volume. 16 Remove your iPod® from the dock and check for obstruction on the device itself. Then reseat it in the dock and on your iPod®. Please make sure your iPod® is working . Remove your iPod® from the dock and check for a period of iPod®, try turning bass boost...such as a music CD. ume Solution Plug the AC power plug into the same outlet to your iPod® from the dock and check for obstruction on the connectors in the dock and on your iPod® manual for you are easily noticed with high-power speakers. Then reseat it on your...