
Owners Manual
Page 5
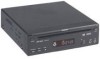
X 4 6. 5 AUDIOVOX 4. Contents 1. 1 Main Unit 2. 1 Remote control with one Battery 3. 1 12VDC Power Harness 4. 2 Brackets with 4 Screws 5. 1 Remote IR Receiver 6. 1 AV cable (RCA to RCA) 7. 1 Owner's Manual (not shown) 1. AVD400A DVDPLAYER DOLBY 3. 5. 2. C.
X 4 6. 5 AUDIOVOX 4. Contents 1. 1 Main Unit 2. 1 Remote control with one Battery 3. 1 12VDC Power Harness 4. 2 Brackets with 4 Screws 5. 1 Remote IR Receiver 6. 1 AV cable (RCA to RCA) 7. 1 Owner's Manual (not shown) 1. AVD400A DVDPLAYER DOLBY 3. 5. 2. C.

Owners Manual
Page 7
Buttons 7) NUMERIC KEYPAD 8) 10+ Button 9) TITLE Button 10) AUDIO Button 11) REPEAT Button 12) SUBTITLE Button 13) DISPLAY Button 14) EJECT Button 15) SETUP Button 16) PAUSE Button 17) STOP Button 18) NEXT Button 19) PREVIOUS Button 20) SCAN FORWARD Button 21) SCAN REVERSE Button 22) MUTE Button 23) GOTO Button 24) ZOOM Button 25) A-B REPEAT Button 26) ANGLE Button 27) SLOW Button Figure 2 7 E. Remote Control View (Refer to Figure 2) 1) MODE Button 2) POWER Button 3) MENU Button 4) UP/DOWN/ LEFT/RIGHT Button 5) ENTER/PLAY Button 6) VOLUME +/-
Buttons 7) NUMERIC KEYPAD 8) 10+ Button 9) TITLE Button 10) AUDIO Button 11) REPEAT Button 12) SUBTITLE Button 13) DISPLAY Button 14) EJECT Button 15) SETUP Button 16) PAUSE Button 17) STOP Button 18) NEXT Button 19) PREVIOUS Button 20) SCAN FORWARD Button 21) SCAN REVERSE Button 22) MUTE Button 23) GOTO Button 24) ZOOM Button 25) A-B REPEAT Button 26) ANGLE Button 27) SLOW Button Figure 2 7 E. Remote Control View (Refer to Figure 2) 1) MODE Button 2) POWER Button 3) MENU Button 4) UP/DOWN/ LEFT/RIGHT Button 5) ENTER/PLAY Button 6) VOLUME +/-

Owners Manual
Page 8
...cable into the A/V input jack on the back of the DVD player. 8 Place the IR receiver anywhere in the vehicle to the vehicle ground. Powering your DVD Player ( Refer to Figure 3) Connect the black wire (-) to allow remote control from any location. 3. Plug the other end into the IR...Accessory) 12VDC source. F. Connect the red wire (+) to Figure 3) a. Connections AVD400A DVDPLAYER DOLBY Front Rear Yellow Video Input (to Red. 4. Match the color-coded plugs to the appropriate jacks on the front of the DVD Player A/V OUTPUT jacks: Yellow (video) to Yellow, White (left audio) to White,...
...cable into the A/V input jack on the back of the DVD player. 8 Place the IR receiver anywhere in the vehicle to the vehicle ground. Powering your DVD Player ( Refer to Figure 3) Connect the black wire (-) to allow remote control from any location. 3. Plug the other end into the IR...Accessory) 12VDC source. F. Connect the red wire (+) to Figure 3) a. Connections AVD400A DVDPLAYER DOLBY Front Rear Yellow Video Input (to Red. 4. Match the color-coded plugs to the appropriate jacks on the front of the DVD Player A/V OUTPUT jacks: Yellow (video) to Yellow, White (left audio) to White,...


