User Guide
Page 1
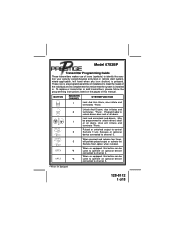
... replace a transmitter or add transmitters, please follow the programming instructions listed on the pages of this button can be programmed to unlock driver's door or all doors. When pressed and release two times, 3 will initiate and terminate *Panic. Lock and arm/unlock and disarm. Pulsed or switched output to control 3 Remote Trunk Release or optional device connected to unlock drivers door and or all doors. Model 07S3BP Transmitter Programming Guide These transmitters makes use...
... replace a transmitter or add transmitters, please follow the programming instructions listed on the pages of this button can be programmed to unlock driver's door or all doors. When pressed and release two times, 3 will initiate and terminate *Panic. Lock and arm/unlock and disarm. Pulsed or switched output to control 3 Remote Trunk Release or optional device connected to unlock drivers door and or all doors. Model 07S3BP Transmitter Programming Guide These transmitters makes use...
User Guide
Page 2
... dash mounted LED are used and you require access to a 5th channel, you wish to the on position. 2) Press and release the valet push button switch three times. i.e... NOTE: Because the system may sound. PROGRAMMING TRANSMITTERS: NOTE: It is important to remember that during the programming mode, each transmitter you would program a combination of , you would program unlock and trunk buttons pressed simultaneously into the receiver to control...
... dash mounted LED are used and you require access to a 5th channel, you wish to the on position. 2) Press and release the valet push button switch three times. i.e... NOTE: Because the system may sound. PROGRAMMING TRANSMITTERS: NOTE: It is important to remember that during the programming mode, each transmitter you would program a combination of , you would program unlock and trunk buttons pressed simultaneously into the receiver to control...
User Guide
Page 3
... valet push button switch one time. (Siren emits 6 short chirps indicating channel 6 has been entered) 14. Within 10 Seconds, Press and hold the unlock button, (or any unused button(s)), of the first transmitter you wish to control Channel 6 output, (Driver Priority 1) until a long chirp is heard from the siren. The siren will chirp 4 times and the dash mounted LED will Flash 5 times, indicating that the unit is...
... valet push button switch one time. (Siren emits 6 short chirps indicating channel 6 has been entered) 14. Within 10 Seconds, Press and hold the unlock button, (or any unused button(s)), of the first transmitter you wish to control Channel 6 output, (Driver Priority 1) until a long chirp is heard from the siren. The siren will chirp 4 times and the dash mounted LED will Flash 5 times, indicating that the unit is...
User Guide
Page 4
... outputs. Turn the ignition switch to four transmitters. Enter the transmitter program mode: 1. Simply programming any unused button(s)) of the first transmitter you wish to control Channel 7 output, (Driver Priority 2) until a single chirp is heard from the siren. (Repeat this for each transmitter you wish to operate the Channel 7 output, Driver Priority 2) NOTE: Channels 6 and 7 can be certain all transmitter slots in the receiver are occupied with transmitters you wish to continue to use...
... outputs. Turn the ignition switch to four transmitters. Enter the transmitter program mode: 1. Simply programming any unused button(s)) of the first transmitter you wish to control Channel 7 output, (Driver Priority 2) until a single chirp is heard from the siren. (Repeat this for each transmitter you wish to operate the Channel 7 output, Driver Priority 2) NOTE: Channels 6 and 7 can be certain all transmitter slots in the receiver are occupied with transmitters you wish to continue to use...
User Guide
Page 5
... codes will remain stored. 2. SEE ASSOCIATED DIAGRAMS ON FOLLOWING PAGE 5 128-8112 5 of that the rubber membrane is heard, then repeat 3 additional times. Using any unused button or combination of the case, then insert the circuit board, and return to indicate battery condition. Enter the transmitter program mode. To replace the battery: 1) Remove the 2 small # 0 Phillips head screw from the rear of the case. 2) Remove...
... codes will remain stored. 2. SEE ASSOCIATED DIAGRAMS ON FOLLOWING PAGE 5 128-8112 5 of that the rubber membrane is heard, then repeat 3 additional times. Using any unused button or combination of the case, then insert the circuit board, and return to indicate battery condition. Enter the transmitter program mode. To replace the battery: 1) Remove the 2 small # 0 Phillips head screw from the rear of the case. 2) Remove...
User Guide
Page 6
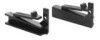
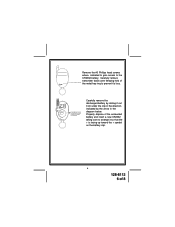
Properly dispose of the exhausted battery and insert a new CR2032 taking care to the CR2032 battery. Remove the #0 Phillips head screws where indicated to gain access to arrange it so that the + is facing up toward the + symbol on the battery clip. 6 128-8112 6 of 8 Carefully remove the discharged battery by the arrow in the direction indicated by sliding it 's loss. Carefully remove transmitter back cover keeping hold of the metal key ring to prevent it out from under the clip in the diagram below.
Properly dispose of the exhausted battery and insert a new CR2032 taking care to the CR2032 battery. Remove the #0 Phillips head screws where indicated to gain access to arrange it so that the + is facing up toward the + symbol on the battery clip. 6 128-8112 6 of 8 Carefully remove the discharged battery by the arrow in the direction indicated by sliding it 's loss. Carefully remove transmitter back cover keeping hold of the metal key ring to prevent it out from under the clip in the diagram below.
User Guide
Page 7
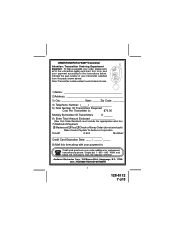
... your payment according to : Credit card purchasers can order additional or replacement transmitters by phone. Indicate the pad number of the information legibly and mail this form along with your payment to the instructions below. ORDER FORM FOR 07S3BP Transmitter Attention: Transmitter Ordering Department Important: To help us expedite your order, please print all of your transmitter selected from the operator interface.
... your payment according to : Credit card purchasers can order additional or replacement transmitters by phone. Indicate the pad number of the information legibly and mail this form along with your payment to the instructions below. ORDER FORM FOR 07S3BP Transmitter Attention: Transmitter Ordering Department Important: To help us expedite your order, please print all of your transmitter selected from the operator interface.
User Guide
Page 8
© 2007 Audiovox Electronics Corp., 150 Marcus Blvd., Hauppauge, NY, 11788 128-8112 8 128-8112 8 of 8
© 2007 Audiovox Electronics Corp., 150 Marcus Blvd., Hauppauge, NY, 11788 128-8112 8 128-8112 8 of 8


