
Product Manual
Page 1
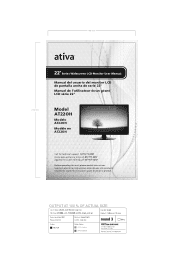
... les instructions avant d'utiliser ce produit. Lea atentamente las instrucciones antes de usar este producto. 140 mm 216 mm 22"Series Widescreen LCD Monitor User Manual Manual del usuario del monitor LCD de pantalla ancha de serie 22" Manuel de l'utilisateur écran géant LCD série 22" Model AT22OH Modelo AT22OH Modèle no AT22OH Call for technical support 1-877...
... les instructions avant d'utiliser ce produit. Lea atentamente las instrucciones antes de usar este producto. 140 mm 216 mm 22"Series Widescreen LCD Monitor User Manual Manual del usuario del monitor LCD de pantalla ancha de serie 22" Manuel de l'utilisateur écran géant LCD série 22" Model AT22OH Modelo AT22OH Modèle no AT22OH Call for technical support 1-877...
Product Manual
Page 2
... that interference will not occur in a particular installation. This monitor generates, uses, and can radiate radio frequency energy. Note: If necessary, shielded interface cables and AC power cord must use a grounded power supply cord and the provided shielded video interface cable with the limits for purchasing this high-resolution multi-scan color monitor. Please read this guide thoroughly before installation. These limits are encouraged to correct interference by...
... that interference will not occur in a particular installation. This monitor generates, uses, and can radiate radio frequency energy. Note: If necessary, shielded interface cables and AC power cord must use a grounded power supply cord and the provided shielded video interface cable with the limits for purchasing this high-resolution multi-scan color monitor. Please read this guide thoroughly before installation. These limits are encouraged to correct interference by...
Product Manual
Page 3
English Contents Safety Precautions 1 First Setup 2 Quick Installation 2 Front View of the Product 3 Rear View of the Product 3 Using On Screen Display (OSD) Functions 4 Supporting Timing Modes 7 Technical Information 8 Care and Maintenance 9 Troubleshooting 9 Warranty Information 10
English Contents Safety Precautions 1 First Setup 2 Quick Installation 2 Front View of the Product 3 Rear View of the Product 3 Using On Screen Display (OSD) Functions 4 Supporting Timing Modes 7 Technical Information 8 Care and Maintenance 9 Troubleshooting 9 Warranty Information 10
Product Manual
Page 4
... wet and consult your service technician. Always unplug the monitor before installation and keep this guide handy. Apply non-ammonia based cleaner onto the cloth, not directly onto the glass screen. Keep the monitor away from magnetic objects, motors, TV sets, and transformer. Do not place heavy objects on the cable or power cord. For PLUG CABLE EQUIPMENT, the socket-outlet...
... wet and consult your service technician. Always unplug the monitor before installation and keep this guide handy. Apply non-ammonia based cleaner onto the cloth, not directly onto the glass screen. Keep the monitor away from magnetic objects, motors, TV sets, and transformer. Do not place heavy objects on the cable or power cord. For PLUG CABLE EQUIPMENT, the socket-outlet...
Product Manual
Page 5
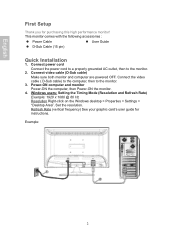
... Cable (15 pin) Quick Installation 1. Refresh Rate (vertical frequency) See your graphic card's user guide for purchasing this high performance monitor! Example: 2 Set the resolution. Connect video cable (D-Sub cable) Make sure both monitor and computer are powered OFF. Windows users: Setting the Timing Mode (Resolution and Refresh Rate) Example: 1920 x 1080 @ 60 Hz Resolution Right-click on the Windows desktop > Properties > Settings > "Desktop Area". Power-ON computer and monitor Power-ON the computer, then Power-ON the monitor. 4. Connect power cord Connect the power cord...
... Cable (15 pin) Quick Installation 1. Refresh Rate (vertical frequency) See your graphic card's user guide for purchasing this high performance monitor! Example: 2 Set the resolution. Connect video cable (D-Sub cable) Make sure both monitor and computer are powered OFF. Windows users: Setting the Timing Mode (Resolution and Refresh Rate) Example: 1920 x 1080 @ 60 Hz Resolution Right-click on the Windows desktop > Properties > Settings > "Desktop Area". Power-ON computer and monitor Power-ON the computer, then Power-ON the monitor. 4. Connect power cord Connect the power cord...
Product Manual
Page 6
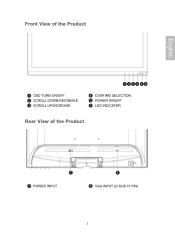
Front View of the Product English 1 OSD TURN ON/OFF 2 SCROLL DOWN/DECREASE 3 SCROLL UP/INCREASE 1 2 34 56 4 CONFIRM SELECTION 5 POWER ON/OFF 6 LED INDICATER Rear View of the Product 7 7 POWER INPUT 8 8 VGA INPUT (D-SUB 15 PIN) 3
Front View of the Product English 1 OSD TURN ON/OFF 2 SCROLL DOWN/DECREASE 3 SCROLL UP/INCREASE 1 2 34 56 4 CONFIRM SELECTION 5 POWER ON/OFF 6 LED INDICATER Rear View of the Product 7 7 POWER INPUT 8 8 VGA INPUT (D-SUB 15 PIN) 3
Product Manual
Page 7
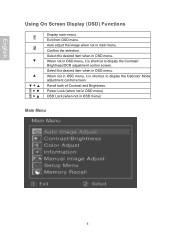
... the desired item when in main menu. Recall both of Contrast and Brightness. Select the desired item when in OSD menu) Main Menu 4 English Using On Screen Display (OSD) Functions 1 2 ▼ ▲ ▼ + ▲ 1 +▼ 1 +▲ Display main menu. When not in OSD menu, it is shortcut to display the Opticolor Mode adjustment control screen. When not in OSD menu, it is shortcut to display the Contrast/ Brightness/DCR adjustment control screen. Power Lock (when not in OSD menu) OSD Lock (when not in OSD menu.
... the desired item when in main menu. Recall both of Contrast and Brightness. Select the desired item when in OSD menu) Main Menu 4 English Using On Screen Display (OSD) Functions 1 2 ▼ ▲ ▼ + ▲ 1 +▼ 1 +▲ Display main menu. When not in OSD menu, it is shortcut to display the Opticolor Mode adjustment control screen. When not in OSD menu, it is shortcut to display the Contrast/ Brightness/DCR adjustment control screen. Power Lock (when not in OSD menu) OSD Lock (when not in OSD menu.

Product Manual
Page 8
... about changing the resolution and refresh rate. Note: See your graphic card user guide for red (R), green (G), blue (B). 1. Press ▼ or ▲ to adjust to adjust selected color. Contrast : To adjust the foreground white level of the video. ▲ : increase brightness, ▼ : decrease brightness. DCR : To turn On or Off the DCR function. Information : To display the information, regarding the current input signal coming from the graphic card in your preference. 5 H./V. V. Manual Image Adjust : To manually adjust the Horizontal Size, H./ V. Position...
... about changing the resolution and refresh rate. Note: See your graphic card user guide for red (R), green (G), blue (B). 1. Press ▼ or ▲ to adjust to adjust selected color. Contrast : To adjust the foreground white level of the video. ▲ : increase brightness, ▼ : decrease brightness. DCR : To turn On or Off the DCR function. Information : To display the information, regarding the current input signal coming from the graphic card in your preference. 5 H./V. V. Manual Image Adjust : To manually adjust the Horizontal Size, H./ V. Position...
Product Manual
Page 9
... the contents displayed. Setup Menu : To set up , ▼ : move OSD down. V. Press button 2 to select between horizontal and vertical OSD Position adjustment. User is active. ? Cinema optimized for general windows environment and monitor default setting. Contrast and Brightness adjustment disabled when ECO is for movie and video environment. Memory Recall : To recall factory settings for the full screen. English Sharpness : To adjust the clarity of time. Aspect Ratio : Restore the resolution (Non-16:9) for Video controls. Game optimized for text...
... the contents displayed. Setup Menu : To set up , ▼ : move OSD down. V. Press button 2 to select between horizontal and vertical OSD Position adjustment. User is active. ? Cinema optimized for general windows environment and monitor default setting. Contrast and Brightness adjustment disabled when ECO is for movie and video environment. Memory Recall : To recall factory settings for the full screen. English Sharpness : To adjust the clarity of time. Aspect Ratio : Restore the resolution (Non-16:9) for Video controls. Game optimized for text...
Product Manual
Page 10
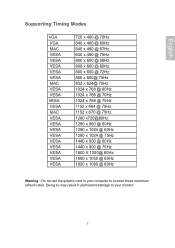
English Supporting Timing Modes VGA VGA MAC VESA VESA VESA VESA VESA MAC VESA VESA VESA VESA MAC VESA VESA VESA VESA VESA VESA VESA VESA VESA 720 x 400 @ 70Hz 640 x 480 @ 60Hz 640 x 480 @ 67Hz 640 x 480 @ 75Hz 800 x 600 @ 56Hz 800 x 600 @ 60Hz 800 x 600 @ 72Hz 800 x 600@ 75Hz 832 x ... @ 60Hz 1280 x 1024 @ 60Hz 1280 x 1024 @ 75Hz 1440 x 900 @ 60Hz 1440 x 900 @ 75Hz 1600 X 1200@ 60Hz 1680 x 1050 @ 60Hz 1920 x 1080 @ 60Hz Warning : Do not set the graphic card in permanent damage to your computer to exceed these maximum refresh rates. Doing so may result in your monitor. 7
English Supporting Timing Modes VGA VGA MAC VESA VESA VESA VESA VESA MAC VESA VESA VESA VESA MAC VESA VESA VESA VESA VESA VESA VESA VESA VESA 720 x 400 @ 70Hz 640 x 480 @ 60Hz 640 x 480 @ 67Hz 640 x 480 @ 75Hz 800 x 600 @ 56Hz 800 x 600 @ 60Hz 800 x 600 @ 72Hz 800 x 600@ 75Hz 832 x ... @ 60Hz 1280 x 1024 @ 60Hz 1280 x 1024 @ 75Hz 1440 x 900 @ 60Hz 1440 x 900 @ 75Hz 1600 X 1200@ 60Hz 1680 x 1050 @ 60Hz 1920 x 1080 @ 60Hz Warning : Do not set the graphic card in permanent damage to your computer to exceed these maximum refresh rates. Doing so may result in your monitor. 7
Product Manual
Page 12
... the screen Make sure the computer is turned on top of your monitor. Make certain your monitor is supplying proper voltage. Make sure all signal cables are missing, check the video cable to repair your monitor cabinet. Safety Tips If smoke, abnormal noise, or odor appears to fix it . Adjust brightness. If not, tightly secure it . Place your monitor away from your monitor, remove the power cord immediately...
... the screen Make sure the computer is turned on top of your monitor. Make certain your monitor is supplying proper voltage. Make sure all signal cables are missing, check the video cable to repair your monitor cabinet. Safety Tips If smoke, abnormal noise, or odor appears to fix it . Adjust brightness. If not, tightly secure it . Place your monitor away from your monitor, remove the power cord immediately...

Product Manual
Page 13
...cleaning or other circumstances not directly attributable to validate warranty. Swinton Avenue Trading, Inc. (SAT) warrants its option, will replace with a comparable product, free of charge, any product which fails under normal use...English ...card. THIS WARRANTY APPLIES ONLY TO THE U.S. For service, please call 1-877-777-HELP (1-877-777-4357) 10 SAT, at 1-800-721-6592. SAT'S SOLE OBLIGATION AND THE USER'S EXCLUSIVE REMEDY UNDER THIS WARRANTY SHALL BE LIMITED TO THE REPAIR OR REPLACEMENT AT SAT'S SOLE DISCRETION AND COST, OF PRODUCT OR COMPONENTS. THIS WARRANTY GIVES YOU SPECIFIC...
...cleaning or other circumstances not directly attributable to validate warranty. Swinton Avenue Trading, Inc. (SAT) warrants its option, will replace with a comparable product, free of charge, any product which fails under normal use...English ...card. THIS WARRANTY APPLIES ONLY TO THE U.S. For service, please call 1-877-777-HELP (1-877-777-4357) 10 SAT, at 1-800-721-6592. SAT'S SOLE OBLIGATION AND THE USER'S EXCLUSIVE REMEDY UNDER THIS WARRANTY SHALL BE LIMITED TO THE REPAIR OR REPLACEMENT AT SAT'S SOLE DISCRETION AND COST, OF PRODUCT OR COMPONENTS. THIS WARRANTY GIVES YOU SPECIFIC...


