
User Guide
Page 1
Motherboard Z9PA-D8 Series
Motherboard Z9PA-D8 Series
User Guide
Page 3
Contents Notices...vii Safety information viii About this guide x Z9PA-D8 series specifications summary xii Chapter 1: Product introduction 1.1 Welcome 1-3 1.2 Package contents 1-3 1.3 Serial number label 1-4 1.4 Special features 1-4 1.4.1 Product highlights 1-4 1.4.2 Innovative ASUS features 1-6 Chapter 2: Hardware information 2.1 Before you proceed 2-3 2.2 Motherboard overview 2-4 2.2.1 Placement direction 2-4 2.2.2 Screw holes 2-4 2.2.3 Motherboard layout 2-5 2.2.4 Layout contents 2-7 2.3 Central Processing Unit (CPU 2-8 2.3.1 Installing the CPU 2-8 2.4 System memory...
Contents Notices...vii Safety information viii About this guide x Z9PA-D8 series specifications summary xii Chapter 1: Product introduction 1.1 Welcome 1-3 1.2 Package contents 1-3 1.3 Serial number label 1-4 1.4 Special features 1-4 1.4.1 Product highlights 1-4 1.4.2 Innovative ASUS features 1-6 Chapter 2: Hardware information 2.1 Before you proceed 2-3 2.2 Motherboard overview 2-4 2.2.1 Placement direction 2-4 2.2.2 Screw holes 2-4 2.2.3 Motherboard layout 2-5 2.2.4 Layout contents 2-7 2.3 Central Processing Unit (CPU 2-8 2.3.1 Installing the CPU 2-8 2.4 System memory...
User Guide
Page 8
... damaged. If you are not sure about the voltage of the electrical outlet you add a device. • Before connecting or removing signal cables from the motherboard, ensure that all power cables are using the product, make sure all the manuals that came with the product, contact a qualified service technician or your... the system, ensure that the power cables for the devices are unplugged before using an adapter or extension cord. Operation safety • Before installing the motherboard and adding devices on a stable surface. • If you detect any area where it by yourself.
... damaged. If you are not sure about the voltage of the electrical outlet you add a device. • Before connecting or removing signal cables from the motherboard, ensure that all power cables are using the product, make sure all the manuals that came with the product, contact a qualified service technician or your... the system, ensure that the power cables for the devices are unplugged before using an adapter or extension cord. Operation safety • Before installing the motherboard and adding devices on a stable surface. • If you detect any area where it by yourself.
User Guide
Page 9
... in municipal waste. This product has been designed to a major failure. DO NOT throw the motherboard in municipal waste. For the latest product warranty details please visit http://support.asus.com. You are entitled to all ASUS products, consistent with guarantees that the battery should not be excluded under the Australian Consumer Law...
... in municipal waste. This product has been designed to a major failure. DO NOT throw the motherboard in municipal waste. For the latest product warranty details please visit http://support.asus.com. You are entitled to all ASUS products, consistent with guarantees that the battery should not be excluded under the Australian Consumer Law...

User Guide
Page 10
...products. How this guide This user guide contains the information you need when installing and configuring the motherboard. ASUS websites The ASUS website provides updated information on the motherboard. • Chapter 3: Powering up This chapter describes the power up , creating, and configuring RAID...system components. • Appendix: Reference information This appendix includes additional information that may refer to when configuring the motherboard. Optional documentation Your product package may include optional documentation, such as warranty flyers, that you may have to ...
...products. How this guide This user guide contains the information you need when installing and configuring the motherboard. ASUS websites The ASUS website provides updated information on the motherboard. • Chapter 3: Powering up This chapter describes the power up , creating, and configuring RAID...system components. • Appendix: Reference information This appendix includes additional information that may refer to when configuring the motherboard. Optional documentation Your product package may include optional documentation, such as warranty flyers, that you may have to ...

User Guide
Page 15
This chapter describes the motherboard introPdruoc1dtuiocnt features and the new technologies it supports.
This chapter describes the motherboard introPdruoc1dtuiocnt features and the new technologies it supports.
User Guide
Page 17
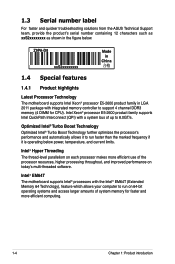
... over IP solution ASUS Z9PA-D8 1-3 Standard Gift Box Pack 1 1 2 4 1 1 1 1 pc per carton Standard Bulk Pack 1 1 1 1 10 pcs per carton If any of new features and latest technologies, making it , check the items in the long line of ASUS quality motherboards! The motherboard delivers a host ...of the above items is damaged or missing, contact your motherboard package for buying an ASUS® Z9PA-D8 Series motherboard! 1.1 Welcome!
... over IP solution ASUS Z9PA-D8 1-3 Standard Gift Box Pack 1 1 2 4 1 1 1 1 pc per carton Standard Bulk Pack 1 1 1 1 10 pcs per carton If any of new features and latest technologies, making it , check the items in the long line of ASUS quality motherboards! The motherboard delivers a host ...of the above items is damaged or missing, contact your motherboard package for buying an ASUS® Z9PA-D8 Series motherboard! 1.1 Welcome!
User Guide
Page 18
1.3 Serial number label For faster and quicker troubleshooting solutions from the ASUS Technical Support team, provide the product's serial number containing 12 characters such as xxS2xxxxxxxx as shown in LGA 2011 package ... 1: Product introduction Intel® Hyper Threading The thread-level parallelism on today's multi-threaded software. Z9PA-D8 xxS2xxxxxxxx Made in China 合格 1.4 Special features 1.4.1 Product highlights Latest Processor Technology The motherboard supports Intel Xeon® processor E5-2600 product family in the figure below power, temperature, and ...
1.3 Serial number label For faster and quicker troubleshooting solutions from the ASUS Technical Support team, provide the product's serial number containing 12 characters such as xxS2xxxxxxxx as shown in LGA 2011 package ... 1: Product introduction Intel® Hyper Threading The thread-level parallelism on today's multi-threaded software. Z9PA-D8 xxS2xxxxxxxx Made in China 合格 1.4 Special features 1.4.1 Product highlights Latest Processor Technology The motherboard supports Intel Xeon® processor E5-2600 product family in the figure below power, temperature, and ...
User Guide
Page 19
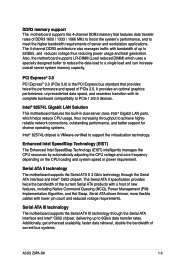
... with its complete backward compatibility to 52GB/s, and reduces voltage thus reducing power usage and heat generation. Also, the motherboard supports LR-DIMM (Load reduced DIMM) which helps reduce CPU usage, thus increasing throughput to achieve highlyreliable network connections,...The motherboard supports the 4-channel DDR3 memory that provides twice the performance and speed of PCIe 2.0. It provides an optimal graphics performance, unprecedented data speed, and seamless transition with bandwidth of up to meet the higher bandwidth requirements of current bus systems. ASUS Z9PA-D8 ...
... with its complete backward compatibility to 52GB/s, and reduces voltage thus reducing power usage and heat generation. Also, the motherboard supports LR-DIMM (Load reduced DIMM) which helps reduce CPU usage, thus increasing throughput to achieve highlyreliable network connections,...The motherboard supports the 4-channel DDR3 memory that provides twice the performance and speed of PCIe 2.0. It provides an optimal graphics performance, unprecedented data speed, and seamless transition with bandwidth of up to meet the higher bandwidth requirements of current bus systems. ASUS Z9PA-D8 ...
User Guide
Page 20
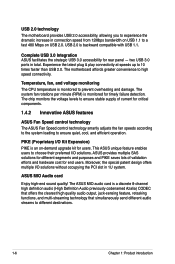
... in total. ASUS MIO Audio card Enjoy high-end sound quality! Temperature, fan, and voltage monitoring The CPU temperature is monitored to high speed connectivity. PIKE (Proprietary I /O solutions without occupying the PCI slot in 1U system. The motherboard affords greater convenience...the voltage levels to ensure stable supply of validation efforts and hardware cost for critical components. 1.4.2 Innovative ASUS features ASUS Fan Speed control technology The ASUS Fan Speed control technology smartly adjusts the fan speeds according to the system loading to 10 times faster...
... in total. ASUS MIO Audio card Enjoy high-end sound quality! Temperature, fan, and voltage monitoring The CPU temperature is monitored to high speed connectivity. PIKE (Proprietary I /O solutions without occupying the PCI slot in 1U system. The motherboard affords greater convenience...the voltage levels to ensure stable supply of validation efforts and hardware cost for critical components. 1.4.2 Innovative ASUS features ASUS Fan Speed control technology The ASUS Fan Speed control technology smartly adjusts the fan speeds according to the system loading to 10 times faster...

User Guide
Page 21
This chapter lists the hardware setup procedures that you have to perform when installing system components. Chapter 2: 2 Hardware information It includes description of the jumpers and connectors on the motherboard.
This chapter lists the hardware setup procedures that you have to perform when installing system components. Chapter 2: 2 Hardware information It includes description of the jumpers and connectors on the motherboard.
User Guide
Page 22
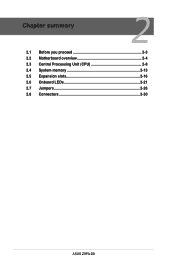
Chapter summary 2 2.1 Before you proceed 2-3 2.2 Motherboard overview 2-4 2.3 Central Processing Unit (CPU 2-8 2.4 System memory 2-13 2.5 Expansion slots 2-16 2.6 Onboard LEDs 2-21 2.7 Jumpers 2-26 2.8 Connectors 2-30 ASUS Z9PA-D8
Chapter summary 2 2.1 Before you proceed 2-3 2.2 Motherboard overview 2-4 2.3 Central Processing Unit (CPU 2-8 2.4 System memory 2-13 2.5 Expansion slots 2-16 2.6 Onboard LEDs 2-21 2.7 Jumpers 2-26 2.8 Connectors 2-30 ASUS Z9PA-D8
User Guide
Page 23
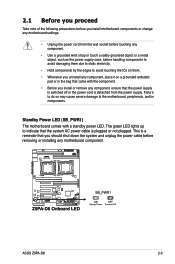
... component. • Use a grounded wrist strap or touch a safely grounded object or a metal object, such as the power supply case, before removing or installing any motherboard component. The green LED lights up to indicate that came with a standby power LED. 2.1 Before you proceed Take note of the following precautions before you... system and unplug the power cable before handling components to avoid damaging them due to static electricity. • Hold components by the edges to the motherboard, peripherals, and/or components. This is plugged or not plugged. ASUS Z9PA-D8 2-3
... component. • Use a grounded wrist strap or touch a safely grounded object or a metal object, such as the power supply case, before removing or installing any motherboard component. The green LED lights up to indicate that came with a standby power LED. 2.1 Before you proceed Take note of the following precautions before you... system and unplug the power cable before handling components to avoid damaging them due to static electricity. • Hold components by the edges to the motherboard, peripherals, and/or components. This is plugged or not plugged. ASUS Z9PA-D8 2-3
User Guide
Page 24
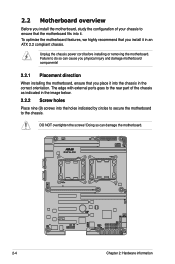
...DO NOT overtighten the screws! Doing so can cause you physical injury and damage motherboard components! 2.2.1 Placement direction When installing the motherboard, ensure that the motherboard fits into it. 2.2 Motherboard overview Before you install the motherboard, study the configuration of the chassis as indicated in the image below. 2.2.2 ...Screw holes Place nine (9) screws into the holes indicated by circles to secure the motherboard to the chassis. The edge with external ports goes to the rear part of your chassis to ensure that you place it...
...DO NOT overtighten the screws! Doing so can cause you physical injury and damage motherboard components! 2.2.1 Placement direction When installing the motherboard, ensure that the motherboard fits into it. 2.2 Motherboard overview Before you install the motherboard, study the configuration of the chassis as indicated in the image below. 2.2.2 ...Screw holes Place nine (9) screws into the holes indicated by circles to secure the motherboard to the chassis. The edge with external ports goes to the rear part of your chassis to ensure that you place it...
User Guide
Page 25
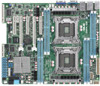
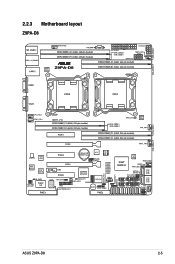
2.2.3 Motherboard layout Z9PA-D8 ASUS Z9PA-D8 2-5
2.2.3 Motherboard layout Z9PA-D8 ASUS Z9PA-D8 2-5
User Guide
Page 28
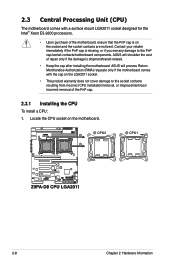
...mount LGA2011 socket designed for the Intel® Xeon E5-2600 processors. • Upon purchase of the motherboard, ensure that the PnP cap is on the motherboard. 2-8 Chapter 2: Hardware information ASUS will shoulder the cost of repair only if the damage is shipment/transit-related. • Keep the ...cap after installing the motherboard. Contact your retailer immediately if the PnP cap is missing, or if you...
...mount LGA2011 socket designed for the Intel® Xeon E5-2600 processors. • Upon purchase of the motherboard, ensure that the PnP cap is on the motherboard. 2-8 Chapter 2: Hardware information ASUS will shoulder the cost of repair only if the damage is shipment/transit-related. • Keep the ...cap after installing the motherboard. Contact your retailer immediately if the PnP cap is missing, or if you...
User Guide
Page 32
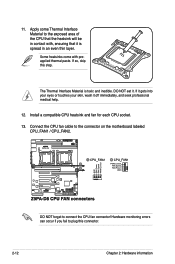
... it is toxic and inedible. The Thermal Interface Material is spread in contact with preapplied thermal paste. DO NOT forget to the connector on the motherboard labeled CPU_FAN1 / CPU_FAN2. 11. If it gets into your eyes or touches your skin, wash it . Install a compatible CPU heatsink and fan for each CPU...
... it is toxic and inedible. The Thermal Interface Material is spread in contact with preapplied thermal paste. DO NOT forget to the connector on the motherboard labeled CPU_FAN1 / CPU_FAN2. 11. If it gets into your eyes or touches your skin, wash it . Install a compatible CPU heatsink and fan for each CPU...
User Guide
Page 33
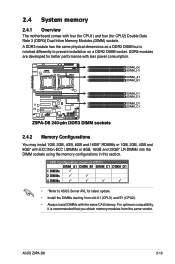
... AVL for CPU2) Double Data Rate 3 (DDR3) Dual Inline Memory Modules (DIMM) sockets. 2.4 System memory 2.4.1 Overview The motherboard comes with the same CAS latency. ASUS Z9PA-D8 2-13 A DDR3 module has the same physical dimensions as a DDR2 DIMM but is recommended that you obtain memory modules from slot A1 (CPU1) and E1 (...
... AVL for CPU2) Double Data Rate 3 (DDR3) Dual Inline Memory Modules (DIMM) sockets. 2.4 System memory 2.4.1 Overview The motherboard comes with the same CAS latency. ASUS Z9PA-D8 2-13 A DDR3 module has the same physical dimensions as a DDR2 DIMM but is recommended that you obtain memory modules from slot A1 (CPU1) and E1 (...
User Guide
Page 35
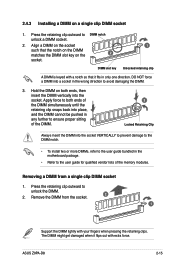
... 1 Support the DIMM lightly with your fingers when pressing the retaining clips. DIMM slot key 1 Unlocked retaining clip A DIMM is keyed with extra force. ASUS Z9PA-D8 2-15 Hold the DIMM on the 2 socket. Press the retaining clip outward to DIMM notch unlock a DIMM socket. 2. Apply force to both ends, ...VERTICALLY to prevent damage to the DIMM notch. • To install two or more DIMMs, refer to the user guide bundled in the motherboard package. • Refer to the user guide for qualified vendor lists of the memory modules. The DIMM might get damaged when it fits...
... 1 Support the DIMM lightly with your fingers when pressing the retaining clips. DIMM slot key 1 Unlocked retaining clip A DIMM is keyed with extra force. ASUS Z9PA-D8 2-15 Hold the DIMM on the 2 socket. Press the retaining clip outward to DIMM notch unlock a DIMM socket. 2. Apply force to both ends, ...VERTICALLY to prevent damage to the DIMM notch. • To install two or more DIMMs, refer to the user guide bundled in the motherboard package. • Refer to the user guide for qualified vendor lists of the memory modules. The DIMM might get damaged when it fits...

User Guide
Page 36
... it and make the necessary hardware settings for later use . Before installing the expansion card, read the documentation that you physical injury and damage motherboard components. 2.5.1 Installing an expansion card To install an expansion card: 1. Keep the screw for the card. 2. Turn on the next page....until the card is already installed in a chassis). 3. See Chapter 4 for the expansion card. Remove the system unit cover (if your motherboard is completely seated on BIOS setup. 2. Secure the card to do not need IRQ assignments. Remove the bracket opposite the slot that came...
... it and make the necessary hardware settings for later use . Before installing the expansion card, read the documentation that you physical injury and damage motherboard components. 2.5.1 Installing an expansion card To install an expansion card: 1. Keep the screw for the card. 2. Turn on the next page....until the card is already installed in a chassis). 3. See Chapter 4 for the expansion card. Remove the system unit cover (if your motherboard is completely seated on BIOS setup. 2. Secure the card to do not need IRQ assignments. Remove the bracket opposite the slot that came...

