
User Guide
Page 3
... About this guide iv Package contents vi Z97-E/USB 3.1 specifications summary vi Chapter 1: Product introduction 1.1 Before you proceed 1-1 1.2 Motherboard overview 1-2 1.3 Central Processing Unit (CPU 1-4 1.4 System memory 1-8 1.5 Expansion slots 1-11 1.6 Headers 1-13 1.7 Connectors 1-14 1.8 Onboard LEDs 1-24 1.9 Software support 1-25 Chapter 2: BIOS information 2.1 Managing and updating your BIOS 2-1 2.2 BIOS setup program 2-6 2.3 My Favorites 2-15 2.4 Main menu...
... About this guide iv Package contents vi Z97-E/USB 3.1 specifications summary vi Chapter 1: Product introduction 1.1 Before you proceed 1-1 1.2 Motherboard overview 1-2 1.3 Central Processing Unit (CPU 1-4 1.4 System memory 1-8 1.5 Expansion slots 1-11 1.6 Headers 1-13 1.7 Connectors 1-14 1.8 Onboard LEDs 1-24 1.9 Software support 1-25 Chapter 2: BIOS information 2.1 Managing and updating your BIOS 2-1 2.2 BIOS setup program 2-6 2.3 My Favorites 2-15 2.4 Main menu...

User Guide
Page 4
...guide is broken, do not try to moisture. • Place the product on the motherboard. • Chapter 2: BIOS information This chapter discusses changing system settings through the BIOS Setup menus. If you are not sure about the voltage of the switches, jumpers, and connectors on a stable ... Before using the product, ensure all power cables from the motherboard, ensure that all the manuals that the power cables for the BIOS parameters are unplugged. • Seek professional assistance before you need when installing and configuring the motherboard. How this guide This user ...
...guide is broken, do not try to moisture. • Place the product on the motherboard. • Chapter 2: BIOS information This chapter discusses changing system settings through the BIOS Setup menus. If you are not sure about the voltage of the switches, jumpers, and connectors on a stable ... Before using the product, ensure all power cables from the motherboard, ensure that all the manuals that the power cables for the BIOS parameters are unplugged. • Seek professional assistance before you need when installing and configuring the motherboard. How this guide This user ...

User Guide
Page 7
...bandwidth with fast response time M.2 & SATA Express onboard - LED-lit audio shielding - ASUS Stainless Steel Back I/O - 3x more durable corrosion-resistant coating UEFI BIOS - Dedicated audio PCB layers: Separate layers for left and right channels to 10Gb/s data-...ports at rear panel (teal blue) High Performance ASUS 5X PROTECTION - Featuring Fan Auto Tuning function and multiple thermistors selection for headphone and speakers - Z97-E/USB 3.1 specifications summary Storage LAN Audio USB ASUS Exclusive Features Intel® Z97 Express Chipset with RAID 0, 1, 5, 10 ...
...bandwidth with fast response time M.2 & SATA Express onboard - LED-lit audio shielding - ASUS Stainless Steel Back I/O - 3x more durable corrosion-resistant coating UEFI BIOS - Dedicated audio PCB layers: Separate layers for left and right channels to 10Gb/s data-...ports at rear panel (teal blue) High Performance ASUS 5X PROTECTION - Featuring Fan Auto Tuning function and multiple thermistors selection for headphone and speakers - Z97-E/USB 3.1 specifications summary Storage LAN Audio USB ASUS Exclusive Features Intel® Z97 Express Chipset with RAID 0, 1, 5, 10 ...

User Guide
Page 8
Z97-E/USB 3.1 specifications summary ASUS Exclusive Features ASUS Quiet Thermal Solution ASUS Exclusive Overclocking Features ASUS EPU - ASUS USB 3.1 Boost - ASUS AI Suite 3 - vCore: Adjustable CPU Core voltage at 0.001V increment - vDRAM Bus:...Compatible with the most fun gaming platform under Windows® system ASUS Exclusive Features - ASUS GPU Boost - Friendly graphics user interface - ASUS O.C. ASUS CrashFree BIOS 3 - ASUS EZ Flash 2 Q-Design - ASUS Q-Slot Quiet Thermal Design - ASUS Fan Xpert 3 - ASUS Stylish Fanless Design: PCH Heat-sink & MOS Heatsink solution ...
Z97-E/USB 3.1 specifications summary ASUS Exclusive Features ASUS Quiet Thermal Solution ASUS Exclusive Overclocking Features ASUS EPU - ASUS USB 3.1 Boost - ASUS AI Suite 3 - vCore: Adjustable CPU Core voltage at 0.001V increment - vDRAM Bus:...Compatible with the most fun gaming platform under Windows® system ASUS Exclusive Features - ASUS GPU Boost - Friendly graphics user interface - ASUS O.C. ASUS CrashFree BIOS 3 - ASUS EZ Flash 2 Q-Design - ASUS Q-Slot Quiet Thermal Design - ASUS Fan Xpert 3 - ASUS Stylish Fanless Design: PCH Heat-sink & MOS Heatsink solution ...

User Guide
Page 9
Z97-E/USB 3.1 specifications summary Rear Panel I/O ports Internal I/O Connectors BIOS 1 x PS/2 keyboard/mouse port 1 x HDMI port 1 x DVI port 1 x VGA port 1 x Intel LAN (RJ45) port 2 x USB 3.1/3.0/2.0 ports (teal blue) 2 x USB 3.0/2.0 ports (blue) 2 x USB 2.0/1.1 ports 7.1-channel Audio I/O ports(6-jacks) 1 x USB 3.0/2.0 connectors support additional 2 USB ports (19-pin) 3 x USB 2.0/1/1 connectors support additional 6 USB.... 64 Mb Flash ROM, UEFI AMI BIOS, PnP, DMI2.7, WfM2.0, SM BIOS 2.8, ACPI 5.0, Multi-language BIOS, ASUS EZ Flash 2, CrashFree BIOS 3, F6 Qfan Control, F11 EZ Tuning...
Z97-E/USB 3.1 specifications summary Rear Panel I/O ports Internal I/O Connectors BIOS 1 x PS/2 keyboard/mouse port 1 x HDMI port 1 x DVI port 1 x VGA port 1 x Intel LAN (RJ45) port 2 x USB 3.1/3.0/2.0 ports (teal blue) 2 x USB 3.0/2.0 ports (blue) 2 x USB 2.0/1.1 ports 7.1-channel Audio I/O ports(6-jacks) 1 x USB 3.0/2.0 connectors support additional 2 USB ports (19-pin) 3 x USB 2.0/1/1 connectors support additional 6 USB.... 64 Mb Flash ROM, UEFI AMI BIOS, PnP, DMI2.7, WfM2.0, SM BIOS 2.8, ACPI 5.0, Multi-language BIOS, ASUS EZ Flash 2, CrashFree BIOS 3, F6 Qfan Control, F11 EZ Tuning...

User Guide
Page 19
...operate at the vendor-marked or at a higher frequency, refer to the physical characteristics of the same version or date code (D/C) from a memory module. ASUS Z97-E/USB 3.1 1-9 com/kb/929605/en-us. • This motherboard does not support DIMMs made up of 512 Mb (64 MB) chips or less. ...the latest QVL. Under the default state, some memory modules for overclocking may install varying memory sizes in the BIOS for the hyper DIMM support. • Visit the ASUS website for the dual-channel configuration. • You may operate at a lower frequency than 2133MHz and their ...
...operate at the vendor-marked or at a higher frequency, refer to the physical characteristics of the same version or date code (D/C) from a memory module. ASUS Z97-E/USB 3.1 1-9 com/kb/929605/en-us. • This motherboard does not support DIMMs made up of 512 Mb (64 MB) chips or less. ...the latest QVL. Under the default state, some memory modules for overclocking may install varying memory sizes in the BIOS for the hyper DIMM support. • Visit the ASUS website for the dual-channel configuration. • You may operate at a lower frequency than 2133MHz and their ...

User Guide
Page 21
... components. 1.5.1 Installing an expansion card To install an expansion card: 1. Keep the screw for the card. 2. Assign an IRQ to install expansion cards. ASUS Z97-E/USB 3.1 1-11 Unplug the power cord before adding or removing expansion cards. Before installing the expansion card, read the documentation that the cards do so may...Align the card connector with it by adjusting the software settings. 1. Install the software drivers for information on the system and change the necessary BIOS settings, if any. Turn on BIOS setup. 2. Failure to do not need to the card. 3.
... components. 1.5.1 Installing an expansion card To install an expansion card: 1. Keep the screw for the card. 2. Assign an IRQ to install expansion cards. ASUS Z97-E/USB 3.1 1-11 Unplug the power cord before adding or removing expansion cards. Before installing the expansion card, read the documentation that the cards do so may...Align the card connector with it by adjusting the software settings. 1. Install the software drivers for information on the system and change the necessary BIOS settings, if any. Turn on BIOS setup. 2. Failure to do not need to the card. 3.
User Guide
Page 23
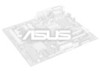
...powers the RAM data in CMOS. Use a metal object such as system passwords. Shut down the key during the boot process and enter BIOS setup to re- After clearing the CMOS, reinstall the battery. • You do not help, remove the onboard battery and short ...the RTC when the system hangs due to short the two pins. 3. ASUS Z97-E/USB 3.1 1-13 Z97-E/USB 3.1 CLRTC +3V_BAT GND PIN 1 Z97-E/USB 3.1 Clear RTC RAM To erase the RTC RAM: 1. Hold down and reboot the system, then the BIOS automatically resets parameter settings to overclocking, use the CPU Parameter Recall (C.P.R.) feature....
...powers the RAM data in CMOS. Use a metal object such as system passwords. Shut down the key during the boot process and enter BIOS setup to re- After clearing the CMOS, reinstall the battery. • You do not help, remove the onboard battery and short ...the RTC when the system hangs due to short the two pins. 3. ASUS Z97-E/USB 3.1 1-13 Z97-E/USB 3.1 CLRTC +3V_BAT GND PIN 1 Z97-E/USB 3.1 Clear RTC RAM To erase the RTC RAM: 1. Hold down and reboot the system, then the BIOS automatically resets parameter settings to overclocking, use the CPU Parameter Recall (C.P.R.) feature....

User Guide
Page 25
... that you connect USB 3.0 devices to USB 3.0 ports for USB 3.1 devices. 7. These two 4-pin Universal Serial Bus (USB) ports are for faster and better performance from RGB Signal to three displays under Windows® OS environment, two displays under BIOS, and one display..., or other audio sources. 8. These 9-pin Universal Serial Bus (USB) ports are controlled by the xHCI controller. Some legacy USB devices must update their firmware for USB 2.0/1.1 devices. 4. 7.1-channel audio ports. ASUS Z97-E/USB 3.1 1-15 USB 3.0 ports 3 and 4. HDMI port: 300 MHz 6. Rear Speaker...
... that you connect USB 3.0 devices to USB 3.0 ports for USB 3.1 devices. 7. These two 4-pin Universal Serial Bus (USB) ports are for faster and better performance from RGB Signal to three displays under Windows® OS environment, two displays under BIOS, and one display..., or other audio sources. 8. These 9-pin Universal Serial Bus (USB) ports are controlled by the xHCI controller. Some legacy USB devices must update their firmware for USB 2.0/1.1 devices. 4. 7.1-channel audio ports. ASUS Z97-E/USB 3.1 1-15 USB 3.0 ports 3 and 4. HDMI port: 300 MHz 6. Rear Speaker...
User Guide
Page 27
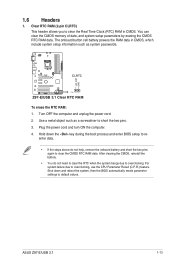
... FAN IN CHA FAN PWM CHA FAN PWM CHA FAN IN CHA FAN PWR GND Z97-E/USB 3.1 Fan connectors Do not forget to connect the fan cables to Advanced Mode > Monitor > Chassis Fan 1/2/3 Q-Fan Control items in BIOS. • The chassis fan connectors support DC and PWM modes. Do not place jumper caps... installed and automatically switches the control modes. To set these fans to DC or PWM, go to Advanced Mode > Monitor > CPU Q-Fan Control item in BIOS. To configure the CPU fan's control mode, go to the fan connectors. These are not jumpers! ASUS Z97-E/USB 3.1 1-17
... FAN IN CHA FAN PWM CHA FAN PWM CHA FAN IN CHA FAN PWR GND Z97-E/USB 3.1 Fan connectors Do not forget to connect the fan cables to Advanced Mode > Monitor > Chassis Fan 1/2/3 Q-Fan Control items in BIOS. • The chassis fan connectors support DC and PWM modes. Do not place jumper caps... installed and automatically switches the control modes. To set these fans to DC or PWM, go to Advanced Mode > Monitor > CPU Q-Fan Control item in BIOS. To configure the CPU fan's control mode, go to the fan connectors. These are not jumpers! ASUS Z97-E/USB 3.1 1-17
User Guide
Page 29
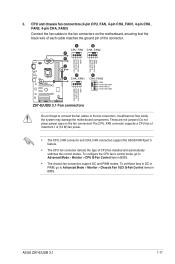
... an AC'97 front panel audio module to this connector, set the item to [HD]. 5. AGND NC SENSE1_RETUR SENSE2_RETUR AGND NC NC NC Z97-E/USB 3.1 AAFP PIN 1 PIN 1 MIC2 MICPWR Line out_R NC Line out_L PORT1 L PORT1 R PORT2 R SENSE_SEND PORT2 L HD-audio-compliant Legacy...to connect a high-definition front panel audio module to this connector, set the Front Panel Type item in the BIOS setup to avail of the system chassis. +5V SPDIFOUT GND Z97-E/USB 3.1 PIN 1 SPDIF_OUT Z97-E/USB 3.1 Digital audio connector The S/PDIF module is for details. 6. ASUS Z97-E/USB 3.1 1-19
... an AC'97 front panel audio module to this connector, set the item to [HD]. 5. AGND NC SENSE1_RETUR SENSE2_RETUR AGND NC NC NC Z97-E/USB 3.1 AAFP PIN 1 PIN 1 MIC2 MICPWR Line out_R NC Line out_L PORT1 L PORT1 R PORT2 R SENSE_SEND PORT2 L HD-audio-compliant Legacy...to connect a high-definition front panel audio module to this connector, set the Front Panel Type item in the BIOS setup to avail of the system chassis. +5V SPDIFOUT GND Z97-E/USB 3.1 PIN 1 SPDIF_OUT Z97-E/USB 3.1 Digital audio connector The S/PDIF module is for details. 6. ASUS Z97-E/USB 3.1 1-19

User Guide
Page 31
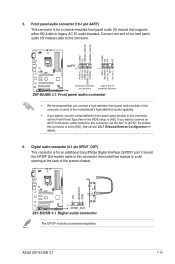
.../2280 storage devices. • M.2 Socket 3 shares bandwidth with the Intel® Rapid Storage Technology through the onboard Intel® Z97 chipset. ASUS Z97-E/USB 3.1 1-21 The M.2 (NGFF) SSD module is purchased separately 10. SATA6G_1 SATA6G_3 GND RSATA_TXP1 RSATA_TXN1 GND RSATA_RXN1 RSATA_RXP1 GND GND RSATA_TXP3... RSATA_RXN2 GND RSATA_TXN2 RSATA_TXP2 GND GND RSATA_RXP4 RSATA_RXN4 GND RSATA_TXN4 RSATA_TXP4 GND Z97-E/USB 3.1 Intel® SATA 6 Gb/s connectors • These connectors are set the SATA Mode item in the BIOS to the manual bundled in the motherboard support DVD. 9. If you...
.../2280 storage devices. • M.2 Socket 3 shares bandwidth with the Intel® Rapid Storage Technology through the onboard Intel® Z97 chipset. ASUS Z97-E/USB 3.1 1-21 The M.2 (NGFF) SSD module is purchased separately 10. SATA6G_1 SATA6G_3 GND RSATA_TXP1 RSATA_TXN1 GND RSATA_RXN1 RSATA_RXP1 GND GND RSATA_TXP3... RSATA_RXN2 GND RSATA_TXN2 RSATA_TXP2 GND GND RSATA_RXP4 RSATA_RXN4 GND RSATA_TXN4 RSATA_TXP4 GND Z97-E/USB 3.1 Intel® SATA 6 Gb/s connectors • These connectors are set the SATA Mode item in the BIOS to the manual bundled in the motherboard support DVD. 9. If you...

User Guide
Page 32
...GND GND RSATA_TXP6 RSATA_TXN6 GND RSATA_RXN6 RSATA_RXP6 GND Floating Device_Reset GND Detection SATAEXPRESS Z97-E/USB 3.1 Intel® SATA 6 Gb/s connectors • These connectors are set , refer to the manual bundled in the BIOS to [RAID]. If you use both connectors, the system automatically detects ... SATAEXPRESS connector can create a RAID 0, 1, 5, and 10 configuration with the Intel® Rapid Storage Technology through the onboard Intel® Z97 chipset. If you installed Serial ATA hard disk drives, you can support one SATA Express device or two SATA devices. 1-22 Chapter 1: ...
...GND GND RSATA_TXP6 RSATA_TXN6 GND RSATA_RXN6 RSATA_RXP6 GND Floating Device_Reset GND Detection SATAEXPRESS Z97-E/USB 3.1 Intel® SATA 6 Gb/s connectors • These connectors are set , refer to the manual bundled in the BIOS to [RAID]. If you use both connectors, the system automatically detects ... SATAEXPRESS connector can create a RAID 0, 1, 5, and 10 configuration with the Intel® Rapid Storage Technology through the onboard Intel® Z97 chipset. If you installed Serial ATA hard disk drives, you can support one SATA Express device or two SATA devices. 1-22 Chapter 1: ...

User Guide
Page 37
... AI Suite 3 main menu bar. ASUS Z97-E/USB 3.1 2-1 With this utlity, you to automatically update your motherboard's softwares, drivers and the BIOS version easily. Click to automatically update your BIOS Save a copy of the original motherboard BIOS file to a USB flash disk in case you need to restore the BIOS in the future. BIOS information 2 2.1 Managing and updating your...
... AI Suite 3 main menu bar. ASUS Z97-E/USB 3.1 2-1 With this utlity, you to automatically update your motherboard's softwares, drivers and the BIOS version easily. Click to automatically update your BIOS Save a copy of the original motherboard BIOS file to a USB flash disk in case you need to restore the BIOS in the future. BIOS information 2 2.1 Managing and updating your...

User Guide
Page 38
... process is done. • This function supports USB flash disks formatted using FAT32/16 on a single partition only. • DO NOT shut down or reset the system while updating the BIOS to enable it. 3. 2.1.2 ASUS EZ Flash 2 The ASUS EZ Flash 2 feature allows you start using this... utility, download the latest BIOS file from the ASUS website at www.asus.com. To update the BIOS using EZ Flash 2: 1. Insert the USB flash disk that contains the ...
... process is done. • This function supports USB flash disks formatted using FAT32/16 on a single partition only. • DO NOT shut down or reset the system while updating the BIOS to enable it. 3. 2.1.2 ASUS EZ Flash 2 The ASUS EZ Flash 2 feature allows you start using this... utility, download the latest BIOS file from the ASUS website at www.asus.com. To update the BIOS using EZ Flash 2: 1. Insert the USB flash disk that contains the ...
User Guide
Page 39
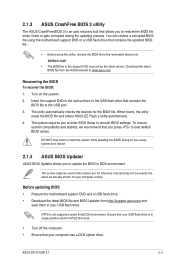
...; Before using this section are for the BIOS file. Recovering the BIOS To recover the BIOS: 1. When found, the utility reads the BIOS file and enters ASUS EZ Flash 2 utility automatically. 4. The system requires you to update the BIOS in your computer screen. NTFS is not supported under FreeDOS environment. ASUS Z97-E/USB 3.1 2-3 DO NOT shut down or reset...
...; Before using this section are for the BIOS file. Recovering the BIOS To recover the BIOS: 1. When found, the utility reads the BIOS file and enters ASUS EZ Flash 2 utility automatically. 4. The system requires you to update the BIOS in your computer screen. NTFS is not supported under FreeDOS environment. ASUS Z97-E/USB 3.1 2-3 DO NOT shut down or reset...

User Guide
Page 40
... device ESC to FreeDOS (http://www.freedos.org)! Welcome to boot using defaults P2: ST3808110AS (76319MB) aigo miniking (250MB) UEFI: (FAT) ASUS DRW-2014L1T(4458MB) P1: ASUS DRW-2014L1T(4458MB) UEFI: (FAT) aigo miniking (250MB) Enter Setup 4. D:/> bupdater /pc /g 2. If no key is detected. C:/> d: D:/> ...the DVD/CD. Booting the system in DOS environment To boot the system in DOS: 1. Insert the USB flash drive with the latest BIOS file and BIOS Updater to Drive D (USB flash drive). When the select boot device screen appears, insert the Support DVD into the optical drive then...
... device ESC to FreeDOS (http://www.freedos.org)! Welcome to boot using defaults P2: ST3808110AS (76319MB) aigo miniking (250MB) UEFI: (FAT) ASUS DRW-2014L1T(4458MB) P1: ASUS DRW-2014L1T(4458MB) UEFI: (FAT) aigo miniking (250MB) Enter Setup 4. D:/> bupdater /pc /g 2. If no key is detected. C:/> d: D:/> ...the DVD/CD. Booting the system in DOS environment To boot the system in DOS: 1. Insert the USB flash drive with the latest BIOS file and BIOS Updater to Drive D (USB flash drive). When the select boot device screen appears, insert the Support DVD into the optical drive then...
User Guide
Page 41
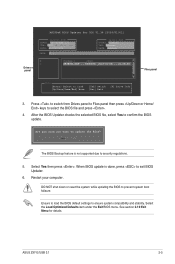
... and press . 4. Select the Load Optimized Defaults item under the Exit BIOS menu. Select Yes then press . Restart your computer. ASUS Z97-E/USB 3.1 2-5 Yes No The BIOS Backup feature is done, press to exit BIOS Updater. 6. Ensure to load the BIOS default settings to security regulations. 5. See section 2.10 Exit Menu for DOS V1.30 [2014/01...
... and press . 4. Select the Load Optimized Defaults item under the Exit BIOS menu. Select Yes then press . Restart your computer. ASUS Z97-E/USB 3.1 2-5 Yes No The BIOS Backup feature is done, press to exit BIOS Updater. 6. Ensure to load the BIOS default settings to security regulations. 5. See section 2.10 Exit Menu for DOS V1.30 [2014/01...

User Guide
Page 42
... parameters. Press the reset button on how to your screen. • Visit the ASUS website at startup: Press or during the Power-On Self Test (POST). Do this motherboard. • Ensure that a USB mouse is connected to your motherboard if you always shut down the system properly from... reset the motherboard to download the latest BIOS file for reference purposes only, and may not exactly match what you see on . Entering BIOS Setup at startup To enter BIOS Setup at www.asus.com to the default value. 2.2 BIOS setup program Use the BIOS Setup program to change between the two modes...
... parameters. Press the reset button on how to your screen. • Visit the ASUS website at startup: Press or during the Power-On Self Test (POST). Do this motherboard. • Ensure that a USB mouse is connected to your motherboard if you always shut down the system properly from... reset the motherboard to download the latest BIOS file for reference purposes only, and may not exactly match what you see on . Entering BIOS Setup at startup To enter BIOS Setup at www.asus.com to the default value. 2.2 BIOS setup program Use the BIOS Setup program to change between the two modes...
User Guide
Page 43
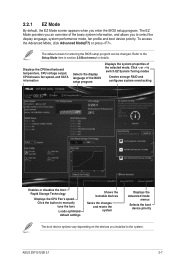
...system Displays the Advanced mode menus Selects the boot device priority The boot device options vary depending on the devices you enter the BIOS setup program. ASUS Z97-E/USB 3.1 2-7 The default screen for details. Click the button to the Setup Mode item in section 2.8 Boot menu for entering the... BIOS setup program can be changed. The EZ Mode provides you to switch EZ System Tuning modes Creates storage RAID and configures system ...
...system Displays the Advanced mode menus Selects the boot device priority The boot device options vary depending on the devices you enter the BIOS setup program. ASUS Z97-E/USB 3.1 2-7 The default screen for details. Click the button to the Setup Mode item in section 2.8 Boot menu for entering the... BIOS setup program can be changed. The EZ Mode provides you to switch EZ System Tuning modes Creates storage RAID and configures system ...


