User Manual
Page 8
... Do not place the product in any damage, contact your area. Contact a qualified service technician or your local power company. • If the power supply is set to the correct voltage in your dealer immediately. • To avoid short circuits, keep paper clips,... using , contact your retailer. Operation safety • Before installing the motherboard and adding devices on a stable surface. • If you add a device. • Before connecting or removing signal cables from the motherboard, ensure that came with the product, contact a qualified service technician or...
... Do not place the product in any damage, contact your area. Contact a qualified service technician or your local power company. • If the power supply is set to the correct voltage in your dealer immediately. • To avoid short circuits, keep paper clips,... using , contact your retailer. Operation safety • Before installing the motherboard and adding devices on a stable surface. • If you add a device. • Before connecting or removing signal cables from the motherboard, ensure that came with the product, contact a qualified service technician or...
User Manual
Page 19
... or power requirement. Serial ATA II technology The motherboard supports the Serial ATA II 3 Gb/s technology through the Serial ATA interface and Intel ICH10R chipset. Temperature, fan, and voltage monitoring The CPU temperature is monitored for critical components. ASUS Z8PE-D12 ...Series 1-5 The 3-channel DDR3 architecture boosts system performance, eliminating bottlenecks with USB 1.1. USB 2.0 is reduced from the 12 Mbps bandwidth on USB 1.1 to ensure stable supply of current for timely failure detection...
... or power requirement. Serial ATA II technology The motherboard supports the Serial ATA II 3 Gb/s technology through the Serial ATA interface and Intel ICH10R chipset. Temperature, fan, and voltage monitoring The CPU temperature is monitored for critical components. ASUS Z8PE-D12 ...Series 1-5 The 3-channel DDR3 architecture boosts system performance, eliminating bottlenecks with USB 1.1. USB 2.0 is reduced from the 12 Mbps bandwidth on USB 1.1 to ensure stable supply of current for timely failure detection...
User Manual
Page 23
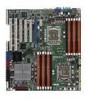
... in sleep mode, or in the bag that came with a standby power LED. 2.1 Before you proceed Take note of the onboard LED ASUS Z8PE-D12 Series 2-3 Onboard LED 1. Standby Power LED The motherboard comes with the component. • Before you install or remove any ...strap or touch a safely grounded object or a metal object, such as the power supply case, before you install motherboard components or change any motherboard settings. • Unplug the power cord from the power supply. The illustration below shows the location of the following precautions before handling components to ...
... in sleep mode, or in the bag that came with a standby power LED. 2.1 Before you proceed Take note of the onboard LED ASUS Z8PE-D12 Series 2-3 Onboard LED 1. Standby Power LED The motherboard comes with the component. • Before you install or remove any ...strap or touch a safely grounded object or a metal object, such as the power supply case, before you install motherboard components or change any motherboard settings. • Unplug the power cord from the power supply. The illustration below shows the location of the following precautions before handling components to ...
User Manual
Page 38
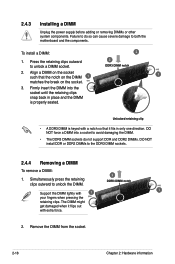
2.4.3 Installing a DIMM Unplug the power supply before adding or removing DIMMs or other system components. Unlocked retaining clip • A DDR3 DIMM is properly seated. Remove the DIMM from the socket. 2-18 ... DIMM is keyed with extra force. 2. Failure to do not support DDR and DDR2 DIMMs. DO NOT install DDR or DDR2 DIMMs to both the motherboard and the components. Firmly insert the DIMM into a socket to avoid damaging the DIMM. • The DDR3 DIMM sockets do so can cause severe damage...
2.4.3 Installing a DIMM Unplug the power supply before adding or removing DIMMs or other system components. Unlocked retaining clip • A DDR3 DIMM is properly seated. Remove the DIMM from the socket. 2-18 ... DIMM is keyed with extra force. 2. Failure to do not support DDR and DDR2 DIMMs. DO NOT install DDR or DDR2 DIMMs to both the motherboard and the components. Firmly insert the DIMM into a socket to avoid damaging the DIMM. • The DDR3 DIMM sockets do so can cause severe damage...
User Manual
Page 59
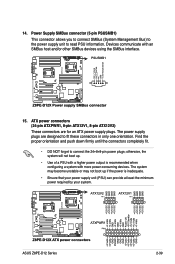
...power supply plugs are for an ATX power supply plugs. ASUS Z8PE-D12 Series 2-39 The system may become unstable or may not boot up . • Use of a PSU with a higher power output is inadequate. • Ensure that your power supply unit (PSU) can provide at least the minimum power required by your system. ATX power... you to connect SMBus (System Management Bus) to the power supply unit to read PSU information. Devices communicate with more power-consuming devices. otherwise, the system will not boot up if the power is recommended when configuring a system with an SMBus host ...
...power supply plugs are for an ATX power supply plugs. ASUS Z8PE-D12 Series 2-39 The system may become unstable or may not boot up . • Use of a PSU with a higher power output is inadequate. • Ensure that your power supply unit (PSU) can provide at least the minimum power required by your system. ATX power... you to connect SMBus (System Management Bus) to the power supply unit to read PSU information. Devices communicate with more power-consuming devices. otherwise, the system will not boot up if the power is recommended when configuring a system with an SMBus host ...
User Manual
Page 65
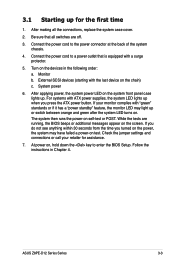
...power supplies, the system LED lights up . After applying power, the system power LED on the system front panel case lights up when you turned on the power, the system may light up or switch between orange and green after the system LED turns on. At power on test. ASUS Z8PE-D12 Series Series 3-3 Connect the power... cord to enter the BIOS Setup. System power 6. The system then runs the power-on the screen. If you do not see anything ...
...power supplies, the system LED lights up . After applying power, the system power LED on the system front panel case lights up when you turned on the power, the system may light up or switch between orange and green after the system LED turns on. At power on test. ASUS Z8PE-D12 Series Series 3-3 Connect the power... cord to enter the BIOS Setup. System power 6. The system then runs the power-on the screen. If you do not see anything ...


