
User Guide
Page 3
... About this guide iv Package contents vi Z170-P D3 specifications summary vi Chapter 1: Product introduction 1.1 Before you proceed 1-1 1.2 Motherboard overview 1-1 1.3 Central Processing Unit (CPU 1-3 1.4 System memory 1-7 1.5 Expansion slots 1-10 1.6 Headers 1-12 1.7 Connectors 1-13 1.8 Onboard LED 1-23 1.9 Software support 1-24 Chapter 2: BIOS information 2.1 Managing and updating your BIOS 2-1 2.2 BIOS setup program 2-6 2.3 My Favorites 2-15 2.4 Main menu...
... About this guide iv Package contents vi Z170-P D3 specifications summary vi Chapter 1: Product introduction 1.1 Before you proceed 1-1 1.2 Motherboard overview 1-1 1.3 Central Processing Unit (CPU 1-3 1.4 System memory 1-7 1.5 Expansion slots 1-10 1.6 Headers 1-12 1.7 Connectors 1-13 1.8 Onboard LED 1-23 1.9 Software support 1-24 Chapter 2: BIOS information 2.1 Managing and updating your BIOS 2-1 2.2 BIOS setup program 2-6 2.3 My Favorites 2-15 2.4 Main menu...
User Guide
Page 4
...detect any area where it may be exposed to moisture. • Place the product on the motherboard. • Chapter 2: BIOS information This chapter discusses changing system settings through the BIOS Setup menus. About this guide is set to the correct voltage in any damage, contact your local power company. • ... outlet before relocating the system. • When adding or removing devices to or from the system, ensure that the power cables for the BIOS parameters are also provided. If you are not sure about the voltage of the motherboard and the new technology it by yourself.
...detect any area where it may be exposed to moisture. • Place the product on the motherboard. • Chapter 2: BIOS information This chapter discusses changing system settings through the BIOS Setup menus. About this guide is set to the correct voltage in any damage, contact your local power company. • ... outlet before relocating the system. • When adding or removing devices to or from the system, ensure that the power cables for the BIOS parameters are also provided. If you are not sure about the voltage of the motherboard and the new technology it by yourself.
User Guide
Page 7
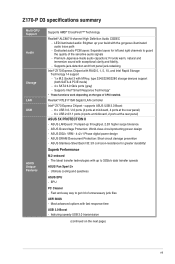
...and right channels to 32Gb/s data transfer speeds ASUS Fan Xpert 2+ - ASUS DIGI+ VRM - 4+2+1 Phase digital power design - featuring speedy USB 3.0 transmission (continued on the type of unnecessary junk files UEFI BIOS - EPU PC Cleaner - supports ASUS USB 3.0 Boost - 8 x USB 3.0 ...Rapid Storage Technology 14 support - 1 x M.2 Socket 3 with exceptional clarity and fidelity. - Z170-P D3 specifications summary Multi-GPU Support Audio Storage LAN USB ASUS Unique Features Supports AMD® CrossFireX™ Technology Realtek® ALC887 8-channel High Definition Audio CODEC...
...and right channels to 32Gb/s data transfer speeds ASUS Fan Xpert 2+ - ASUS DIGI+ VRM - 4+2+1 Phase digital power design - featuring speedy USB 3.0 transmission (continued on the type of unnecessary junk files UEFI BIOS - EPU PC Cleaner - supports ASUS USB 3.0 Boost - 8 x USB 3.0 ...Rapid Storage Technology 14 support - 1 x M.2 Socket 3 with exceptional clarity and fidelity. - Z170-P D3 specifications summary Multi-GPU Support Audio Storage LAN USB ASUS Unique Features Supports AMD® CrossFireX™ Technology Realtek® ALC887 8-channel High Definition Audio CODEC...

User Guide
Page 8
Z170-P D3 specifications summary ASUS Unique Features ASUS Quiet Thermal Solution ASUS Exclusive Overclocking Features Gaming Scenario Audio Features - ASUS Disk Unlocker featuring 3TB+ HDD support - Featuring friendly graphics user interface - ASUS EZ Flash 3 - vCCIO: Adjustable Analog and Digital I/O voltage at... System Agent voltage at 0.1MHz increment Overclocking Protection - ASUS CrashFree BIOS 3 - BCLK/PCIE frequency tuning from your PC to 170MHz at 0.005V increment - Tuner - ASUS Fan Xpert 2+ - ASUS O.C. ASUS AI Charger - vCore: Adjustable CPU Core voltage at ...
Z170-P D3 specifications summary ASUS Unique Features ASUS Quiet Thermal Solution ASUS Exclusive Overclocking Features Gaming Scenario Audio Features - ASUS Disk Unlocker featuring 3TB+ HDD support - Featuring friendly graphics user interface - ASUS EZ Flash 3 - vCCIO: Adjustable Analog and Digital I/O voltage at... System Agent voltage at 0.1MHz increment Overclocking Protection - ASUS CrashFree BIOS 3 - BCLK/PCIE frequency tuning from your PC to 170MHz at 0.005V increment - Tuner - ASUS Fan Xpert 2+ - ASUS O.C. ASUS AI Charger - vCore: Adjustable CPU Core voltage at ...
User Guide
Page 9
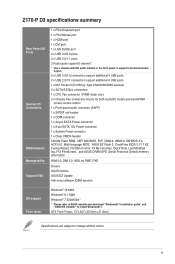
ix ATX Form Factor, 12"x 8.6" (30.5cm x 21.8cm) Specifications are subject to install Windows® 7. Z170-P D3 specifications summary Rear Panel I/O Ports Internal I/O Connectors BIOS features Manageability Support DVD 1 x PS/2 Keyboard port 1 x PS/2 Mouse port 1 x HDMI port 1 x DVI port 1 x LAN (RJ45) port 4 ... connector 1 x System Panel connector 1 x Clear CMOS header 128 Mb Flash ROM, UEFI AMI BIOS, PnP, DMI3.0, WfM2.0, SM BIOS 3.0, ACPI 5.0, Multi-language BIOS, ASUS EZ Flash 3, CrashFree BIOS 3, F11 EZ Tuning Wizard, F6 Qfan Control, F3 My Favorites, Quick Note, Last Modified log...
ix ATX Form Factor, 12"x 8.6" (30.5cm x 21.8cm) Specifications are subject to install Windows® 7. Z170-P D3 specifications summary Rear Panel I/O Ports Internal I/O Connectors BIOS features Manageability Support DVD 1 x PS/2 Keyboard port 1 x PS/2 Mouse port 1 x HDMI port 1 x DVI port 1 x LAN (RJ45) port 4 ... connector 1 x System Panel connector 1 x Clear CMOS header 128 Mb Flash ROM, UEFI AMI BIOS, PnP, DMI3.0, WfM2.0, SM BIOS 3.0, ACPI 5.0, Multi-language BIOS, ASUS EZ Flash 3, CrashFree BIOS 3, F11 EZ Tuning Wizard, F6 Qfan Control, F3 My Favorites, Quick Note, Last Modified log...
User Guide
Page 12
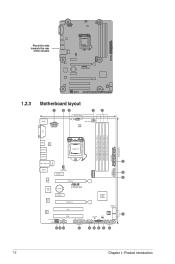
Place this side towards the rear of the chassis Z170-P D3 1.2.3 Motherboard layout 1 23 21.8cm(9.6in) 2 4 KBMS EATX12V CPU_FAN DIGI +VRM CHA_FAN1 DVI DDR3 DIMM_A1 (64bit, 240-pin module) DDR3 ... USB3_56 LGA1151 USB3_78 1 LAN_USB_910 LANGuard M.2(SOCKET3) USB3_12 AUDIO CHA_FAN2 5 PCIEX1_1 6 Realtek 8111GR PCIEX16_1 ASM 1083 BATTERY Z170-P D3 Super I/O PCIEX1_2 PCIEX16_2 Intel® Z170 ALC 887 SPDIF_OUT AAFP PCI1 SATA6G_3 SATA6G_4 PCI2 16MB BIOS 7 SB_PWR CLRTC COM USB1112 USB1314 USB3_34 PANEL SATA6G_6 SATA6G_5 14 13 12 11 5 10 9 8 7 1-2 Chapter...
Place this side towards the rear of the chassis Z170-P D3 1.2.3 Motherboard layout 1 23 21.8cm(9.6in) 2 4 KBMS EATX12V CPU_FAN DIGI +VRM CHA_FAN1 DVI DDR3 DIMM_A1 (64bit, 240-pin module) DDR3 ... USB3_56 LGA1151 USB3_78 1 LAN_USB_910 LANGuard M.2(SOCKET3) USB3_12 AUDIO CHA_FAN2 5 PCIEX1_1 6 Realtek 8111GR PCIEX16_1 ASM 1083 BATTERY Z170-P D3 Super I/O PCIEX1_2 PCIEX16_2 Intel® Z170 ALC 887 SPDIF_OUT AAFP PCI1 SATA6G_3 SATA6G_4 PCI2 16MB BIOS 7 SB_PWR CLRTC COM USB1112 USB1314 USB3_34 PANEL SATA6G_6 SATA6G_5 14 13 12 11 5 10 9 8 7 1-2 Chapter...

User Guide
Page 20
...slot that the cards do so may need to do not need IRQ assignments. Secure the card to the card. 3. When using PCI cards on BIOS setup. 2. See Chapter 2 for later use . Assign an IRQ to the chassis with it by adjusting the software settings. 1. Before installing the...card, read the documentation that they support. Remove the system unit cover (if your motherboard is completely seated on the system and change the necessary BIOS settings, if any. Keep the screw for information on shared slots, ensure that the drivers support "Share IRQ" or that you removed earlier....
...slot that the cards do so may need to do not need IRQ assignments. Secure the card to the card. 3. When using PCI cards on BIOS setup. 2. See Chapter 2 for later use . Assign an IRQ to the chassis with it by adjusting the software settings. 1. Before installing the...card, read the documentation that they support. Remove the system unit cover (if your motherboard is completely seated on the system and change the necessary BIOS settings, if any. Keep the screw for information on shared slots, ensure that the drivers support "Share IRQ" or that you removed earlier....
User Guide
Page 22
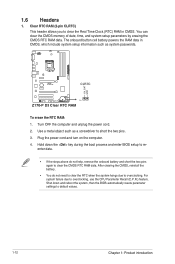
Plug the power cord and turn on the computer. 4. Hold down and reboot the system, then the BIOS automatically resets parameter settings to default values. 1-12 Chapter 1: Product introduction enter data. • If the steps above do not need to clear the RTC ... down the key during the boot process and enter BIOS setup to overclocking. Clear RTC RAM (2-pin CLRTC) This header allows you to clear the CMOS RTC RAM data. Turn OFF the computer and unplug the power cord. 2. Z170-P D3 CLRTC +3V_BAT GND PIN 1 Z170-P D3 Clear RTC RAM To erase the RTC RAM: 1. After...
Plug the power cord and turn on the computer. 4. Hold down and reboot the system, then the BIOS automatically resets parameter settings to default values. 1-12 Chapter 1: Product introduction enter data. • If the steps above do not need to clear the RTC ... down the key during the boot process and enter BIOS setup to overclocking. Clear RTC RAM (2-pin CLRTC) This header allows you to clear the CMOS RTC RAM data. Turn OFF the computer and unplug the power cord. 2. Z170-P D3 CLRTC +3V_BAT GND PIN 1 Z170-P D3 Clear RTC RAM To erase the RTC RAM: 1. After...
User Guide
Page 28
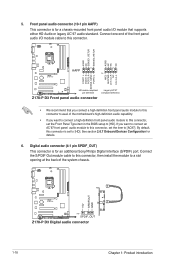
... to connect an AC'97 front panel audio module to this connector, set the item to avail of the system chassis. +5V SPDIFOUT GND Z170-P D3 PIN 1 SPDIF_OUT Z170-P D3 Digital audio connector 1-18 Chapter 1: Product introduction If you connect a high-definition front panel audio module to this connector is for details. 6. Connect one... panel audio I /O module that you want to connect a high-definition front panel audio module to this connector, set the Front Panel Type item in the BIOS setup to [HD]. By default, this connector to [AC97].
... to connect an AC'97 front panel audio module to this connector, set the item to avail of the system chassis. +5V SPDIFOUT GND Z170-P D3 PIN 1 SPDIF_OUT Z170-P D3 Digital audio connector 1-18 Chapter 1: Product introduction If you connect a high-definition front panel audio module to this connector is for details. 6. Connect one... panel audio I /O module that you want to connect a high-definition front panel audio module to this connector, set the Front Panel Type item in the BIOS setup to [HD]. By default, this connector to [AC97].

User Guide
Page 31
... to [AHCI]. ASUS Z170-P D3 1-21 Z170-P D3 SATA6G_3 GND RSATA_TXP1 RSATA_TXN1 GND RSATA_RXN1 RSATA_RXP1 GND SATA6G_4 GND RSATA_TXP2 RSATA_TXN2 GND RSATA_RXN2 RSATA_RXP2 GND SATA6G_6 SATA6G_5 GND RSATA_TXP3 RSATA_TXN3 GND RSATA_RXN3 RSATA_RXP3 GND GND RSATA_TXP4 RSATA_TXN4 GND RSATA_RXN4 RSATA_RXP4 GND Z170-P D3 Intel® SATA... 6.0Gb/s connectors When using hot-plug and NCQ, set the SATA Mode Selection item in the BIOS to Serial ATA 6.0 Gb/s hard disk drives via Serial...
... to [AHCI]. ASUS Z170-P D3 1-21 Z170-P D3 SATA6G_3 GND RSATA_TXP1 RSATA_TXN1 GND RSATA_RXN1 RSATA_RXP1 GND SATA6G_4 GND RSATA_TXP2 RSATA_TXN2 GND RSATA_RXN2 RSATA_RXP2 GND SATA6G_6 SATA6G_5 GND RSATA_TXP3 RSATA_TXN3 GND RSATA_RXN3 RSATA_RXP3 GND GND RSATA_TXP4 RSATA_TXN4 GND RSATA_RXN4 RSATA_RXP4 GND Z170-P D3 Intel® SATA... 6.0Gb/s connectors When using hot-plug and NCQ, set the SATA Mode Selection item in the BIOS to Serial ATA 6.0 Gb/s hard disk drives via Serial...
User Guide
Page 35
...'s softwares, drivers and the BIOS version easily. Click to automatically update your BIOS • Save a copy of the original motherboard BIOS file to a USB flash disk in case you need to restore the BIOS in the future. Copy the original motherboard BIOS using the ASUS Update utility. • The... The screen captures are from file Click to select a boot logo Click to update the BIOS EZ Update requires an Internet connection either through a network or an ISP (Internet Service Provider). ASUS Z170-P D3 2-1 To launch EZ Update, click EZ Update on the AI Suite 3 main menu bar...
...'s softwares, drivers and the BIOS version easily. Click to automatically update your BIOS • Save a copy of the original motherboard BIOS file to a USB flash disk in case you need to restore the BIOS in the future. Copy the original motherboard BIOS using the ASUS Update utility. • The... The screen captures are from file Click to select a boot logo Click to update the BIOS EZ Update requires an Internet connection either through a network or an ISP (Internet Service Provider). ASUS Z170-P D3 2-1 To launch EZ Update, click EZ Update on the AI Suite 3 main menu bar...
User Guide
Page 36
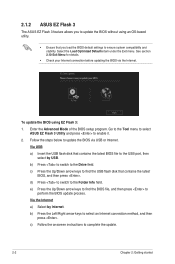
...flash disk that contains the latest BIOS, and then press . 2.1.2 ASUS EZ Flash 3 The ASUS EZ Flash 3 feature allows you to update the BIOS without using EZ Flash 3: 1. See section 2.10 Exit Menu for details. • Check your Internet connection before updating the BIOS via USB or Internet. Enter ... Press to switch to select an Internet connection method, and then press . Go to the Tool menu to select ASUS EZ Flash 3 Utility and press to perform the BIOS update process. Follow the steps below to ensure system compatibility and stability. c) Press the Up/Down arrow keys to...
...flash disk that contains the latest BIOS, and then press . 2.1.2 ASUS EZ Flash 3 The ASUS EZ Flash 3 feature allows you to update the BIOS without using EZ Flash 3: 1. See section 2.10 Exit Menu for details. • Check your Internet connection before updating the BIOS via USB or Internet. Enter ... Press to switch to select an Internet connection method, and then press . Go to the Tool menu to select ASUS EZ Flash 3 Utility and press to perform the BIOS update process. Follow the steps below to ensure system compatibility and stability. c) Press the Up/Down arrow keys to...

User Guide
Page 37
... in the support DVD may not be the latest version. When found, the utility reads the BIOS file and enters ASUS EZ Flash 3 utility automatically. 4. Before updating BIOS • Prepare the motherboard support DVD and a USB flash drive. ASUS Z170-P D3 2-3 Insert the support DVD to the optical drive or the USB flash drive that you...
... in the support DVD may not be the latest version. When found, the utility reads the BIOS file and enters ASUS EZ Flash 3 utility automatically. 4. Before updating BIOS • Prepare the motherboard support DVD and a USB flash drive. ASUS Z170-P D3 2-3 Insert the support DVD to the optical drive or the USB flash drive that you...
User Guide
Page 38
... in single partition and in your USB flash drive. boot: 5. Ensure that your computer has a DVD optical drive. • Download the latest BIOS file and BIOS Updater from http://support.asus.com and save them in FAT32/16 format. • Turn off the computer. • Ensure that your USB flash drive is pressed...
... in single partition and in your USB flash drive. boot: 5. Ensure that your computer has a DVD optical drive. • Download the latest BIOS file and BIOS Updater from http://support.asus.com and save them in FAT32/16 format. • Turn off the computer. • Ensure that your USB flash drive is pressed...
User Guide
Page 39
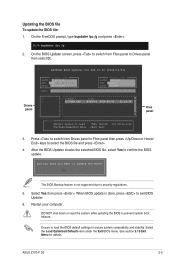
...Home/End] Move [Tab] Switch [Esc] Exit [V] Drive Info Files panel 3. Yes No The BIOS Backup feature is done, press to select the BIOS file and press . 4. ASUS Z170-P D3 2-5 On the BIOS Updater screen, press to switch from Drives panel to Files panel then press keys to exit... BIOS Updater. 6. Restart your computer. Ensure to load the BIOS default settings to prevent system boot ...
...Home/End] Move [Tab] Switch [Esc] Exit [V] Drive Info Files panel 3. Yes No The BIOS Backup feature is done, press to select the BIOS file and press . 4. ASUS Z170-P D3 2-5 On the BIOS Updater screen, press to switch from Drives panel to Files panel then press keys to exit... BIOS Updater. 6. Restart your computer. Ensure to load the BIOS default settings to prevent system boot ...
User Guide
Page 40
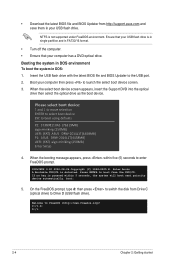
...2.10 Exit Menu for information on your data or system. Entering BIOS Setup at startup To enter BIOS Setup at www.asus.com to download the latest BIOS file for this option only if you want to use the mouse to control the BIOS setup program. • If the system becomes unstable after changing ...used under the Exit menu or press hotkey F5. Press the reset button on . Press to update the BIOS or configure its routines. Press the power button to your screen. • Visit the ASUS website at startup: Press or during the Power-On Self Test (POST). Select the Load Optimized Defaults ...
...2.10 Exit Menu for information on your data or system. Entering BIOS Setup at startup To enter BIOS Setup at www.asus.com to download the latest BIOS file for this option only if you want to use the mouse to control the BIOS setup program. • If the system becomes unstable after changing ...used under the Exit menu or press hotkey F5. Press the reset button on . Press to update the BIOS or configure its routines. Press the power button to your screen. • Visit the ASUS website at startup: Press or during the Power-On Self Test (POST). Select the Load Optimized Defaults ...
User Guide
Page 41
... SATA information Displays the system properties of the BIOS setup program switch EZ System Tuning modes Creates storage RAID and configures system overclocking Enables or disables the Intel Rapid Storage Technology Displays the CPU Fan's speed. ASUS Z170-P D3 2-7 Refer to the Setup Mode item in ...section 2.8 Boot menu for entering the BIOS setup program can be changed. The default screen for details. Click to Selects the ...
... SATA information Displays the system properties of the BIOS setup program switch EZ System Tuning modes Creates storage RAID and configures system overclocking Enables or disables the Intel Rapid Storage Technology Displays the CPU Fan's speed. ASUS Z170-P D3 2-7 Refer to the Setup Mode item in ...section 2.8 Boot menu for entering the BIOS setup program can be changed. The default screen for details. Click to Selects the ...
User Guide
Page 42
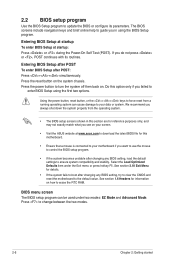
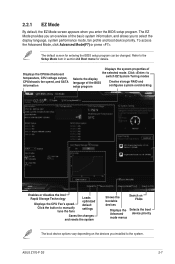
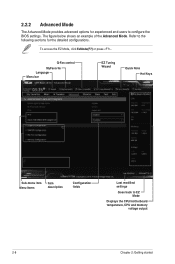
... Sub-menu item Menu items Item description Configuration fields Last modified settings Goes back to the following sections for experienced end-users to configure the BIOS settings. Refer to EZ Mode Displays the CPU/motherboard temperature, CPU and memory voltage output 2-8 Chapter 2: Getting started 2.2.2 Advanced Mode The Advanced Mode provides advanced...
... Sub-menu item Menu items Item description Configuration fields Last modified settings Goes back to the following sections for experienced end-users to configure the BIOS settings. Refer to EZ Mode Displays the CPU/motherboard temperature, CPU and memory voltage output 2-8 Chapter 2: Getting started 2.2.2 Advanced Mode The Advanced Mode provides advanced...
User Guide
Page 43
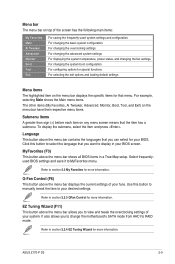
...that the item has a submenu. Click this button to manually tweak the fans to section 2.3 My Favorites for more information. Select frequentlyused BIOS settings and save it to section 2.2.3 QFan Control for that you to change the motherboard's SATA mode from AHCI to section 2.2.4 EZ ... the menu bar displays the current settings of your BIOS. Refer to RAID mode. MyFavorites (F3) This button above the menu bar allows you can select for your fans. Use this button to select the language that menu. ASUS Z170-P D3 2-9 For example, selecting Main shows the Main menu...
...that the item has a submenu. Click this button to manually tweak the fans to section 2.3 My Favorites for more information. Select frequentlyused BIOS settings and save it to section 2.2.3 QFan Control for that you to change the motherboard's SATA mode from AHCI to section 2.2.4 EZ ... the menu bar displays the current settings of your BIOS. Refer to RAID mode. MyFavorites (F3) This button above the menu bar allows you can select for your fans. Use this button to select the language that menu. ASUS Z170-P D3 2-9 For example, selecting Main shows the Main menu...
User Guide
Page 44
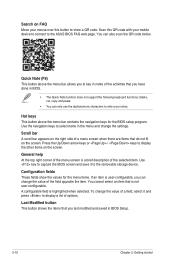
...only use the alphanumeric characters to enter your mobile device to connect to the ASUS BIOS FAQ web page. Scroll bar A scroll bar appears on the right side of... These fields show a QR code. Hot keys This button above the menu bar allows you have done in BIOS. • The Quick Note function does not support the following keyboard functions: delete, cut, copy and paste...select it to display a list of the menu screen is not user-configurable. Use key to capture the BIOS screen and save it and press to the removable storage device. A configurable field is user-configurable, you...
...only use the alphanumeric characters to enter your mobile device to connect to the ASUS BIOS FAQ web page. Scroll bar A scroll bar appears on the right side of... These fields show a QR code. Hot keys This button above the menu bar allows you have done in BIOS. • The Quick Note function does not support the following keyboard functions: delete, cut, copy and paste...select it to display a list of the menu screen is not user-configurable. Use key to capture the BIOS screen and save it and press to the removable storage device. A configurable field is user-configurable, you...


