

User Guide
Page 3
...guide...vi X99-PRO specifications summary viii Package contents...xiv Installation tools and components xv Chapter 1: Product Introduction 1.1 Special features 1-1 1.1.1 Product highlights 1-1 1.1.2 Other special features 1-2 1.2 Motherboard overview 1-3 1.2.1 Before you proceed 1-3 1.2.2 Motherboard layout 1-4...2.1.7 Front I/O Connector 2-9 2.1.8 Expansion Card installation 2-10 2.1.9 Wi-Fi antenna installation 2-12 2.2 BIOS update utility 2-13 2.3 Motherboard rear and audio connections 2-14 2.3.1 Rear I/O connection 2-14 2.3.2 Audio I/O connections 2-16 2.4 ...
...guide...vi X99-PRO specifications summary viii Package contents...xiv Installation tools and components xv Chapter 1: Product Introduction 1.1 Special features 1-1 1.1.1 Product highlights 1-1 1.1.2 Other special features 1-2 1.2 Motherboard overview 1-3 1.2.1 Before you proceed 1-3 1.2.2 Motherboard layout 1-4...2.1.7 Front I/O Connector 2-9 2.1.8 Expansion Card installation 2-10 2.1.9 Wi-Fi antenna installation 2-12 2.2 BIOS update utility 2-13 2.3 Motherboard rear and audio connections 2-14 2.3.1 Rear I/O connection 2-14 2.3.2 Audio I/O connections 2-16 2.4 ...

User Guide
Page 6
...introduction This chapter describes the features of the standard package. It includes description of the switches, jumpers, and connectors on ASUS hardware and software products. 2. Where to find more information Refer to perform when installing system components. 3. Chapter 2: ... the motherboard. Chapter 3: BIOS setup This chapter tells how to change system settings through the BIOS Setup menus. ASUS website The ASUS website (www.asus.com) provides updated information on the motherboard. 2. Detailed descriptions of the BIOS parameters are not part of the motherboard and the...
...introduction This chapter describes the features of the standard package. It includes description of the switches, jumpers, and connectors on ASUS hardware and software products. 2. Where to find more information Refer to perform when installing system components. 3. Chapter 2: ... the motherboard. Chapter 3: BIOS setup This chapter tells how to change system settings through the BIOS Setup menus. ASUS website The ASUS website (www.asus.com) provides updated information on the motherboard. 2. Detailed descriptions of the BIOS parameters are not part of the motherboard and the...
User Guide
Page 33
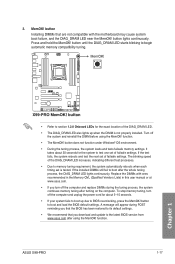
... with ones recommended in the Memory QVL (Qualified Vendors Lists) in this user manual or at www.asus.com. • If you download and update to BIOS overclocking, press the MemOK! ASUS X99-PRO 1-17 Chapter 1 If the installed DIMMs still fail to section 1.2.8 Onboard LEDs for the system to.... • If your system fails to boot and load the BIOS default settings. button Installing DIMMs that you turn off the system and reinstall the DIMM before using the MemOK! Replace the DIMMs with the motherboard may cause system boot failure, and the DIAG_DRAM LED near the MemOK...
... with ones recommended in the Memory QVL (Qualified Vendors Lists) in this user manual or at www.asus.com. • If you download and update to BIOS overclocking, press the MemOK! ASUS X99-PRO 1-17 Chapter 1 If the installed DIMMs still fail to section 1.2.8 Onboard LEDs for the system to.... • If your system fails to boot and load the BIOS default settings. button Installing DIMMs that you turn off the system and reinstall the DIMM before using the MemOK! Replace the DIMMs with the motherboard may cause system boot failure, and the DIAG_DRAM LED near the MemOK...
User Guide
Page 45
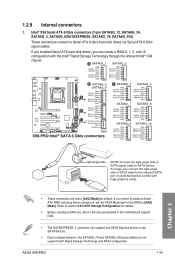
...]. Refer to section 3.6.3 PCH Storage Configuration for details. • Before creating a RAID set, refer to the manual bundled in the BIOS to chipset behavior, the SATA6G_78 and SATA6G_910 ports (black) do not support Intel® Rapid Storage Technology and RAID configuration. If you ...connectors, set to Serial ATA 6 Gb/s hard disk drives via Serial ATA 6 Gb/s signal cables. ASUS X99-PRO 1-29 Chapter 1 • These connectors are set the SATA Mode item in the motherboard support DVD. • The SATAEXPRESS_1 connector can create a RAID 0, 1, 5, and 10 configuration with ...
...]. Refer to section 3.6.3 PCH Storage Configuration for details. • Before creating a RAID set, refer to the manual bundled in the BIOS to chipset behavior, the SATA6G_78 and SATA6G_910 ports (black) do not support Intel® Rapid Storage Technology and RAID configuration. If you ...connectors, set to Serial ATA 6 Gb/s hard disk drives via Serial ATA 6 Gb/s signal cables. ASUS X99-PRO 1-29 Chapter 1 • These connectors are set the SATA Mode item in the motherboard support DVD. • The SATAEXPRESS_1 connector can create a RAID 0, 1, 5, and 10 configuration with ...
User Guide
Page 49
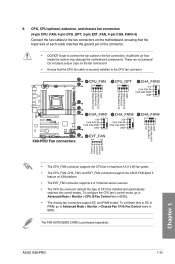
..., and chassis fan connectors (4-pin CPU_FAN; 4-pin CPU_OPT; 5-pin EXT_FAN, 4-pin CHA_FAN1-4) Connect the fan cables to the fan connectors on the motherboard, ensuring that the CPU fan cable is purchased separately. To configure the CPU fan's control mode, go to Advanced Mode > Monitor > CPU Q-Fan... set these fans to DC or PWM, go to Advanced Mode > Monitor > Chassis Fan 1/4 Q-Fan Control items in BIOS. • The chassis fan connectors support DC and PWM modes. ASUS X99-PRO 1-33 These are not jumpers! Chapter 1 • The CPU_FAN connector supports the CPU fan of maximum 1A (12 ...
..., and chassis fan connectors (4-pin CPU_FAN; 4-pin CPU_OPT; 5-pin EXT_FAN, 4-pin CHA_FAN1-4) Connect the fan cables to the fan connectors on the motherboard, ensuring that the CPU fan cable is purchased separately. To configure the CPU fan's control mode, go to Advanced Mode > Monitor > CPU Q-Fan... set these fans to DC or PWM, go to Advanced Mode > Monitor > Chassis Fan 1/4 Q-Fan Control items in BIOS. • The chassis fan connectors support DC and PWM modes. ASUS X99-PRO 1-33 These are not jumpers! Chapter 1 • The CPU_FAN connector supports the CPU fan of maximum 1A (12 ...
User Guide
Page 55
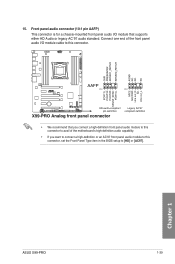
Chapter 1 ASUS X99-PRO 1-39 15. Front panel audio connector (10-1 pin AAFP) This connector is for a chassis-mounted front panel audio I /O module cable to this connector, set the Front Panel Type item in the BIOS setup to this connector. • We recommend that supports either HD Audio or legacy ...AC`97 audio standard. Connect one end of the front panel audio I /O module that you connect a high-definition front panel audio module to this connector to avail of the motherboard's high...
Chapter 1 ASUS X99-PRO 1-39 15. Front panel audio connector (10-1 pin AAFP) This connector is for a chassis-mounted front panel audio I /O module cable to this connector, set the Front Panel Type item in the BIOS setup to this connector. • We recommend that supports either HD Audio or legacy ...AC`97 audio standard. Connect one end of the front panel audio I /O module that you connect a high-definition front panel audio module to this connector to avail of the motherboard's high...

User Guide
Page 70
Keyboard/Mouse combo port 2. 2.3 Motherboard rear and audio connections 2.3.1 Rear I /O ports** *, ** and ***: Refer to the tables on the next page for Bluetooth/Wi-Fi module LEDs, LAN port LEDs, and audio port definitions. 2-14 Chapter 2: Basic installation USB 2.0 ports 78 (bottom port supports USB BIOS Flashback) 5. Audio I /O connection Chapter 2 Rear panel connectors 1. USB...
Keyboard/Mouse combo port 2. 2.3 Motherboard rear and audio connections 2.3.1 Rear I /O ports** *, ** and ***: Refer to the tables on the next page for Bluetooth/Wi-Fi module LEDs, LAN port LEDs, and audio port definitions. 2-14 Chapter 2: Basic installation USB 2.0 ports 78 (bottom port supports USB BIOS Flashback) 5. Audio I /O connection Chapter 2 Rear panel connectors 1. USB...

User Guide
Page 77
... settings such as your operating system. Chapter 3 ASUS X99-PRO 3-1 When downloading or updating the BIOS file, rename it as X99P.CAP for system startup in the motherboard CMOS. Inappropriate BIOS settings may result to enable a more flexible and convenient mouse input. Chapter 3: BIOS setup BIOS setup 3.1 Knowing BIOS 3 The new ASUS UEFI BIOS is a Unified Extensible Interface that complies with...
... settings such as your operating system. Chapter 3 ASUS X99-PRO 3-1 When downloading or updating the BIOS file, rename it as X99P.CAP for system startup in the motherboard CMOS. Inappropriate BIOS settings may result to enable a more flexible and convenient mouse input. Chapter 3: BIOS setup BIOS setup 3.1 Knowing BIOS 3 The new ASUS UEFI BIOS is a Unified Extensible Interface that complies with...

User Guide
Page 78
...Ensure that a USB mouse is connected to your motherboard if you want to use the mouse to control the BIOS setup program. • If the system becomes unstable after changing any BIOS setting, try to clear the CMOS and reset the motherboard to erase the RTC RAM via the Clear CMOS... button. • The BIOS setup program does not support the Bluetooth devices. Chapter 3 3-2 Chapter 3: BIOS setup Do this section are for reference purposes...
...Ensure that a USB mouse is connected to your motherboard if you want to use the mouse to control the BIOS setup program. • If the system becomes unstable after changing any BIOS setting, try to clear the CMOS and reset the motherboard to erase the RTC RAM via the Clear CMOS... button. • The BIOS setup program does not support the Bluetooth devices. Chapter 3 3-2 Chapter 3: BIOS setup Do this section are for reference purposes...
User Guide
Page 79
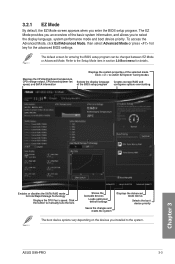
...when you to select the display language, system performance mode and boot device priority. ASUS X99-PRO 3-3 The EZ Mode provides you an overview of the basic system information, and allows you enter the BIOS setup program. Click the button to manually tune the fans Shows the bootable devices Loads... Exit/Advanced Mode, then select Advanced Mode or press hot key for entering the BIOS setup program can be changed between EZ Mode or Advanced Mode. Refer to the system. Displays the CPU/motherboard temperature, CPU voltage output, CPU/chassis/power fan speed, and SATA information Displays ...
...when you to select the display language, system performance mode and boot device priority. ASUS X99-PRO 3-3 The EZ Mode provides you an overview of the basic system information, and allows you enter the BIOS setup program. Click the button to manually tune the fans Shows the bootable devices Loads... Exit/Advanced Mode, then select Advanced Mode or press hot key for entering the BIOS setup program can be changed between EZ Mode or Advanced Mode. Refer to the system. Displays the CPU/motherboard temperature, CPU voltage output, CPU/chassis/power fan speed, and SATA information Displays ...

User Guide
Page 80
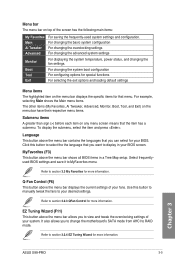
... of the Advanced Mode. To switch from EZ Mode to EZ Mode Displays the CPU/motherboard temperature, CPU and memory voltage output 3-4 Chapter 3: BIOS setup Refer to the following sections for experienced end-users to configure the BIOS settings. Q-Fan control MyFavorite Language Menu bar EZ Tuning Wizard Quick Note Hot Keys Chapter...
... of the Advanced Mode. To switch from EZ Mode to EZ Mode Displays the CPU/motherboard temperature, CPU and memory voltage output 3-4 Chapter 3: BIOS setup Refer to the following sections for experienced end-users to configure the BIOS settings. Q-Fan control MyFavorite Language Menu bar EZ Tuning Wizard Quick Note Hot Keys Chapter...
User Guide
Page 81
...Advanced For saving the frequently-used system settings and configuration. It also allows you can select for that the item has a submenu. Chapter 3 ASUS X99-PRO 3-5 For example, selecting Main shows the Main menu items. The other items (My Favorites, Ai Tweaker, Advanced, Monitor, Boot, Tool, and...information. Refer to select the the language that you to change the motherboard's SATA mode from AHCI to section 3.2.3 QFan Control for more information. Language This button above the menu bar shows all BIOS items in your fans. Click this button to manually tweak the ...
...Advanced For saving the frequently-used system settings and configuration. It also allows you can select for that the item has a submenu. Chapter 3 ASUS X99-PRO 3-5 For example, selecting Main shows the Main menu items. The other items (My Favorites, Ai Tweaker, Advanced, Monitor, Boot, Tool, and...information. Refer to select the the language that you to change the motherboard's SATA mode from AHCI to section 3.2.3 QFan Control for more information. Language This button above the menu bar shows all BIOS items in your fans. Click this button to manually tweak the ...
User Guide
Page 91
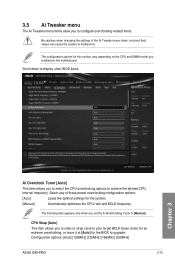
Scroll down to display other BIOS items. Chapter 3 Ai Overclock Tuner [Auto] This item allows you to select the CPU overclocking options to upgrade. CPU Strap [Auto] This item allows you ... (base clock) for an extreme overclocking, or leave it at [Auto] for the BIOS to achieve the desired CPU internal frequency. The following item appears only when you installed on the motherboard. Configuration options: [Auto] [100MHz] [125MHz] [166MHz] [250MHz] ASUS X99-PRO 3-15 Select any of the Ai Tweaker menu items. Incorrect field values can...
Scroll down to display other BIOS items. Chapter 3 Ai Overclock Tuner [Auto] This item allows you to select the CPU overclocking options to upgrade. CPU Strap [Auto] This item allows you ... (base clock) for an extreme overclocking, or leave it at [Auto] for the BIOS to achieve the desired CPU internal frequency. The following item appears only when you installed on the motherboard. Configuration options: [Auto] [100MHz] [125MHz] [166MHz] [250MHz] ASUS X99-PRO 3-15 Select any of the Ai Tweaker menu items. Incorrect field values can...

User Guide
Page 116
... Support [Enabled] [Enabled] Your system supports the USB 2.0 devices in legacy operating systems. [Disabled] Your USB 2.0 devices can be used for BIOS setup only and cannot be recognized in the boot devices list. [Auto] Your system automatically detects the presence of USB 2.0 devices at startup. Chapter... hand‑off feature. [Disabled] Disables the xHCI Hand-off support. USB Single Port Control This item allows you to section 1.2.2 Motherboard layout for the location of the USB ports. Refer to enable or disable the individual USB ports. If any USB 2.0 devices are ...
... Support [Enabled] [Enabled] Your system supports the USB 2.0 devices in legacy operating systems. [Disabled] Your USB 2.0 devices can be used for BIOS setup only and cannot be recognized in the boot devices list. [Auto] Your system automatically detects the presence of USB 2.0 devices at startup. Chapter... hand‑off feature. [Disabled] Disables the xHCI Hand-off support. USB Single Port Control This item allows you to section 1.2.2 Motherboard layout for the location of the USB ports. Refer to enable or disable the individual USB ports. If any USB 2.0 devices are ...

User Guide
Page 120
... [IO=3F8h; When set the parameters of the onboard LAN controller or other installed PCI-E LAN cards. Configuration options: [Disabled] [Enabled] 3-44 Chapter 3: BIOS setup Serial Port Configuration The items in this menu allows you to ON state, OFF state, or both states after an AC power loss. IRQ... allows you to [Enabled], all other PME options are switched off some power at S4+S5 or S5 to enable/disable the Wake-on the motherboard. Configuration options: [Disabled] [Enabled (S4+S5] [Enabled (S5)] Restore AC Power Loss [Power Off] This item allows your system to [Last State],...
... [IO=3F8h; When set the parameters of the onboard LAN controller or other installed PCI-E LAN cards. Configuration options: [Disabled] [Enabled] 3-44 Chapter 3: BIOS setup Serial Port Configuration The items in this menu allows you to ON state, OFF state, or both states after an AC power loss. IRQ... allows you to [Enabled], all other PME options are switched off some power at S4+S5 or S5 to enable/disable the Wake-on the motherboard. Configuration options: [Disabled] [Enabled (S4+S5] [Enabled (S5)] Restore AC Power Loss [Power Off] This item allows your system to [Last State],...

User Guide
Page 122
... you do not want to detect this item to change the fan settings. If the fan is not connected to display the other BIOS items. CPU Temperature / MB Temperature / VRM Temperature / PCH Core Temperature / T-SENSOR1 Temperature / EXT_Sensor1 Temperature / EXT_ Sensor2 Temperature... / EXT_Sensor3 Temperature [xxx°C/xxx°F] The onboard hardware monitor automatically detects and displays the CPU, motherboard, VRM, PCH Core, T-SENSOR1, and EXT_SENSOR1-3 temperatures. Select [Ignore] if you to automatically detect the lowest speed and configure the...
... you do not want to detect this item to change the fan settings. If the fan is not connected to display the other BIOS items. CPU Temperature / MB Temperature / VRM Temperature / PCH Core Temperature / T-SENSOR1 Temperature / EXT_Sensor1 Temperature / EXT_ Sensor2 Temperature... / EXT_Sensor3 Temperature [xxx°C/xxx°F] The onboard hardware monitor automatically detects and displays the CPU, motherboard, VRM, PCH Core, T-SENSOR1, and EXT_SENSOR1-3 temperatures. Select [Ignore] if you to automatically detect the lowest speed and configure the...

User Guide
Page 124
...Profile to [Manual]. Chassis Fan 1/4 Lower Temperature [40] Use the or keys to the selected temperature source. The values range from your motherboard. Chassis Fan 1/4 Q-Fan Source [CPU] This item controls the assigned fan according to adjust the chassis fans' lower temperature. The following ... or [DC Mode]. Duty Cycle(%) [100] Use the or keys to adjust the chassis fan middle duty cycle. Chapter 3 3-48 Chapter 3: BIOS setup The values may differ via Qfan tuning. Configuration options: [Disabled] [DC Mode] [PWM Mode] The following items appear only when you set...
...Profile to [Manual]. Chassis Fan 1/4 Lower Temperature [40] Use the or keys to the selected temperature source. The values range from your motherboard. Chassis Fan 1/4 Q-Fan Source [CPU] This item controls the assigned fan according to adjust the chassis fans' lower temperature. The following ... or [DC Mode]. Duty Cycle(%) [100] Use the or keys to adjust the chassis fan middle duty cycle. Chapter 3 3-48 Chapter 3: BIOS setup The values may differ via Qfan tuning. Configuration options: [Disabled] [DC Mode] [PWM Mode] The following items appear only when you set...

User Guide
Page 126
... Fan 1/3 Middle Duty Cycle(%) [60] Use the or keys to automatically shut down when the voltage exceeds the safe range that protects the motherboard's components. EXT Fan 1/3 Lower Temperature [40] Use the or keys to set the value for EXT Fan Middle Temperature. The values may differ...1/3 Middle Temperature [45] Use the or keys to adjust the extension fans' lower temperature. Configuration options: [ON] [OFF] Chapter 3 3-50 Chapter 3: BIOS setup Duty Cycle (%) [60] Use the or keys to turn on /off the chassis intrude detect feature. Allow Fan Stop [Disabled] This item allows the...
... Fan 1/3 Middle Duty Cycle(%) [60] Use the or keys to automatically shut down when the voltage exceeds the safe range that protects the motherboard's components. EXT Fan 1/3 Lower Temperature [40] Use the or keys to set the value for EXT Fan Middle Temperature. The values may differ...1/3 Middle Temperature [45] Use the or keys to adjust the extension fans' lower temperature. Configuration options: [ON] [OFF] Chapter 3 3-50 Chapter 3: BIOS setup Duty Cycle (%) [60] Use the or keys to turn on /off the chassis intrude detect feature. Allow Fan Stop [Disabled] This item allows the...

User Guide
Page 137
... BIOS using a USB flash drive. • ASUS CrashFree BIOS 3: Restores the BIOS using the motherboard support DVD or a USB flash drive when the BIOS file fails or gets corrupted. • ASUS BIOS Updater: Updates the BIOS in this chapter to download the latest BIOS file for this utility, download the latest BIOS from the ASUS website at www.asus.com. Chapter 3 ASUS X99-PRO 3-61 Inappropriate BIOS...
... BIOS using a USB flash drive. • ASUS CrashFree BIOS 3: Restores the BIOS using the motherboard support DVD or a USB flash drive when the BIOS file fails or gets corrupted. • ASUS BIOS Updater: Updates the BIOS in this chapter to download the latest BIOS file for this utility, download the latest BIOS from the ASUS website at www.asus.com. Chapter 3 ASUS X99-PRO 3-61 Inappropriate BIOS...

User Guide
Page 139
...in DOS environment. Turn on the ASUS official website. The system requires you want to a USB flash drive. NTFS is an auto recovery tool that your USB flash drive. Chapter 3 ASUS X99-PRO 3-63 When found, the utility reads the BIOS file and enters ASUS EZ Flash 2 automatically. 4. ...Ensure that allows you press to restore the BIOS file when it to use the newer BIOS file, download the file at http://support.asus.com and save them in the motherboard support DVD...
...in DOS environment. Turn on the ASUS official website. The system requires you want to a USB flash drive. NTFS is an auto recovery tool that your USB flash drive. Chapter 3 ASUS X99-PRO 3-63 When found, the utility reads the BIOS file and enters ASUS EZ Flash 2 automatically. 4. ...Ensure that allows you press to restore the BIOS file when it to use the newer BIOS file, download the file at http://support.asus.com and save them in the motherboard support DVD...

