User Guide
Page 2
... PURPOSE. Products and corporate names appearing in this manual may or may not be extended if: (1) the product is repaired, modified or altered, unless such repair, modification of ASUSTeK COMPUTER INC. ("ASUS"). Such software in writing by ASUS; This offer is licensed under the General Public ...is distributed without the express written permission of alteration is authorized in this information. ASUS ASSUMES NO RESPONSIBILITY OR LIABILITY FOR ANY ERRORS OR INACCURACIES THAT MAY APPEAR IN THIS MANUAL, INCLUDING THE PRODUCTS AND SOFTWARE DESCRIBED IN IT. Copies of these licenses are ...
... PURPOSE. Products and corporate names appearing in this manual may or may not be extended if: (1) the product is repaired, modified or altered, unless such repair, modification of ASUSTeK COMPUTER INC. ("ASUS"). Such software in writing by ASUS; This offer is licensed under the General Public ...is distributed without the express written permission of alteration is authorized in this information. ASUS ASSUMES NO RESPONSIBILITY OR LIABILITY FOR ANY ERRORS OR INACCURACIES THAT MAY APPEAR IN THIS MANUAL, INCLUDING THE PRODUCTS AND SOFTWARE DESCRIBED IN IT. Copies of these licenses are ...
User Guide
Page 5
... are not sure about the voltage of the electrical outlet you encounter technical problems with the package. • Before using the product, ensure all the manuals that the power cables for the devices are unplugged before the signal cables are using an adapter or extension cord. v Contact a qualified service technician or...
... are not sure about the voltage of the electrical outlet you encounter technical problems with the package. • Before using the product, ensure all the manuals that the power cables for the devices are unplugged before the signal cables are using an adapter or extension cord. v Contact a qualified service technician or...
User Guide
Page 7
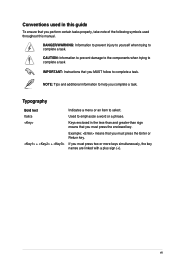
... means that you must press the enclosed key. + + Example: means that you perform certain tasks properly, take note of the following symbols used in this manual. If you complete a task. Conventions used throughout this guide To ensure that you must press the Enter or Return key. Typography Bold text Indicates a menu...
... means that you must press the enclosed key. + + Example: means that you perform certain tasks properly, take note of the following symbols used in this manual. If you complete a task. Conventions used throughout this guide To ensure that you must press the Enter or Return key. Typography Bold text Indicates a menu...
User Guide
Page 14
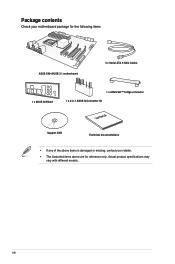
Package contents Check your motherboard package for the following items ASUS X99-A/USB 3.1 motherboard 4 x Serial ATA 6 Gb/s cables 1 x ASUS Q-Shield 1 x ASUS SLI™ bridge connector 1 x 2-in-1 ASUS Q-Connector kit User Manual Support DVD Technical documentations • If any of the above items is damaged or missing, contact your retailer. • The illustrated items above are for reference only. Actual product specifications may vary with different models. xiv
Package contents Check your motherboard package for the following items ASUS X99-A/USB 3.1 motherboard 4 x Serial ATA 6 Gb/s cables 1 x ASUS Q-Shield 1 x ASUS SLI™ bridge connector 1 x 2-in-1 ASUS Q-Connector kit User Manual Support DVD Technical documentations • If any of the above items is damaged or missing, contact your retailer. • The illustrated items above are for reference only. Actual product specifications may vary with different models. xiv

User Guide
Page 24
...® OS. Check with the same CAS Latency. Ensure that you want to install 4 GB or more details, refer to section 3.5 Ai Tweaker menu for manual memory frequency adjustment. • For system stability, use of the DIMM fan may install varying memory sizes in Channel A, Channel B, Channel C, and Channel D. Under the...
...® OS. Check with the same CAS Latency. Ensure that you want to install 4 GB or more details, refer to section 3.5 Ai Tweaker menu for manual memory frequency adjustment. • For system stability, use of the DIMM fan may install varying memory sizes in Channel A, Channel B, Channel C, and Channel D. Under the...

User Guide
Page 33
...- - - - - Intel® xHCI - - - - - - - shared - - - - - * PCIe x16_2 is manually switched to x4 mode, the IRQ assignment will be changed to x1 mode by default. PCIe x1_1 - shared - - - - - Intel... - shared - - - When the bandwidth is set to A. PCIe x16_2 shared* - - - - - - - HD Audio - - - - - - shared - Chapter 1 ASUS X99-A/USB 3.1 1-17 PCIe x16_4 shared - - - - - - - Intel® EHCI 2 - - IRQ assignments for this motherboard A B C D E F G H PCIe x16_1 shared - - - - - - - shared - - - - -
...- - - - - Intel® xHCI - - - - - - - shared - - - - - * PCIe x16_2 is manually switched to x4 mode, the IRQ assignment will be changed to x1 mode by default. PCIe x1_1 - shared - - - - - Intel... - shared - - - When the bandwidth is set to A. PCIe x16_2 shared* - - - - - - - HD Audio - - - - - - shared - Chapter 1 ASUS X99-A/USB 3.1 1-17 PCIe x16_4 shared - - - - - - - Intel® EHCI 2 - - IRQ assignments for this motherboard A B C D E F G H PCIe x16_1 shared - - - - - - - shared - - - - -
User Guide
Page 35
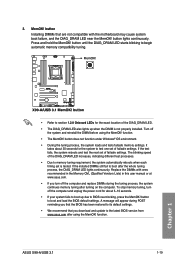
...fails, the system reboots and test the next set of failsafe settings. button to boot after the whole tuning process, the DIAG_DRAM LED lights continuously. ASUS X99-A/USB 3.1 1-19 Chapter 1 MemOK! button does not function under Windows® OS environment. • During the tuning process, the system loads and...with ones recommended in the Memory QVL (Qualified Vendors Lists) in this user manual or at www.asus.com. • If you that the BIOS has been restored to the latest BIOS version from www.asus.com after turning on the computer. function. Turn off the computer and ...
...fails, the system reboots and test the next set of failsafe settings. button to boot after the whole tuning process, the DIAG_DRAM LED lights continuously. ASUS X99-A/USB 3.1 1-19 Chapter 1 MemOK! button does not function under Windows® OS environment. • During the tuning process, the system loads and...with ones recommended in the Memory QVL (Qualified Vendors Lists) in this user manual or at www.asus.com. • If you that the BIOS has been restored to the latest BIOS version from www.asus.com after turning on the computer. function. Turn off the computer and ...

User Guide
Page 47
... to section 3.6.3 PCH Storage Configuration for details. • Before creating a RAID set, refer to the manual bundled in the BIOS to [AHCI Mode] by default. ASUS X99-A/USB 3.1 1-31 If you installed Serial ATA hard disk drives, you intend to create a Serial ATA RAID ...can create a RAID 0, 1, 5, and 10 configuration with the Intel® Rapid Storage Technology through the onboard Intel® X99 chipset. Intel® X99 Serial ATA 6 Gb/s connectors (7-pin SATA6G_12, SATA6G_34, SATA6G_5, SATA6G_6/SATAEXPRESS, SATA6G_78, SATA6G_910) These connectors connect to chipset behavior,...
... to section 3.6.3 PCH Storage Configuration for details. • Before creating a RAID set, refer to the manual bundled in the BIOS to [AHCI Mode] by default. ASUS X99-A/USB 3.1 1-31 If you installed Serial ATA hard disk drives, you intend to create a Serial ATA RAID ...can create a RAID 0, 1, 5, and 10 configuration with the Intel® Rapid Storage Technology through the onboard Intel® X99 chipset. Intel® X99 Serial ATA 6 Gb/s connectors (7-pin SATA6G_12, SATA6G_34, SATA6G_5, SATA6G_6/SATAEXPRESS, SATA6G_78, SATA6G_910) These connectors connect to chipset behavior,...
User Guide
Page 61
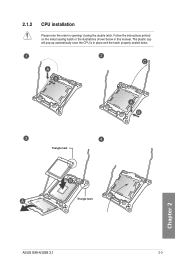
The plastic cap will pop up automatically once the CPU is in opening/ closing the double latch. 2.1.2 CPU installation Please note the order in place and the hatch properly sealed down. Follow the instructions printed on the metal sealing hatch or the illustrations shown below in this manual. C A B A B Triangle mark B A Triangle mark Chapter 2 ASUS X99-A/USB 3.1 2-3
The plastic cap will pop up automatically once the CPU is in opening/ closing the double latch. 2.1.2 CPU installation Please note the order in place and the hatch properly sealed down. Follow the instructions printed on the metal sealing hatch or the illustrations shown below in this manual. C A B A B Triangle mark B A Triangle mark Chapter 2 ASUS X99-A/USB 3.1 2-3
User Guide
Page 77
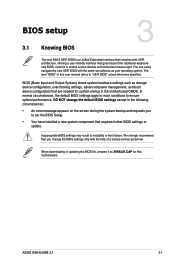
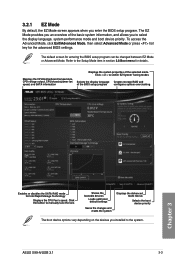
... hardware settings such as storage device configuration, overclocking settings, advanced power management, and boot device configuration that are needed for this user manual refers to ensure optimal performance. Chapter 3 ASUS X99-A/USB 3.1 3-1 The term "BIOS" in the motherboard CMOS. DO NOT change the BIOS settings only with the same smoothness as X99AU31.CAP for...
... hardware settings such as storage device configuration, overclocking settings, advanced power management, and boot device configuration that are needed for this user manual refers to ensure optimal performance. Chapter 3 ASUS X99-A/USB 3.1 3-1 The term "BIOS" in the motherboard CMOS. DO NOT change the BIOS settings only with the same smoothness as X99AU31.CAP for...
User Guide
Page 79
The default screen for the advanced BIOS settings. Refer to the system. Click the button to manually tune the fans Shows the bootable devices Loads optimized default settings Saves the changes and resets the system Displays the Advanced mode menus ...the BIOS setup program configures system overclocking Chapter 3 Enables or disables the SATA RAID mode for Intel Rapid Storage Technology Displays the CPU Fan's speed. ASUS X99-A/USB 3.1 3-3 To access the Advanced Mode, click Exit/Advanced Mode, then select Advanced Mode or press hot key for entering the BIOS setup program can...
The default screen for the advanced BIOS settings. Refer to the system. Click the button to manually tune the fans Shows the bootable devices Loads optimized default settings Saves the changes and resets the system Displays the Advanced mode menus ...the BIOS setup program configures system overclocking Chapter 3 Enables or disables the SATA RAID mode for Intel Rapid Storage Technology Displays the CPU Fan's speed. ASUS X99-A/USB 3.1 3-3 To access the Advanced Mode, click Exit/Advanced Mode, then select Advanced Mode or press hot key for entering the BIOS setup program can...
User Guide
Page 81
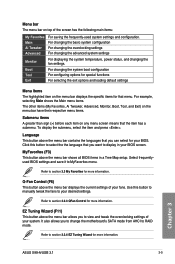
... button to manually tweak the fans to MyFavorites menu. Refer to section 3.2.4 EZ Tuning Wizard for more information. Q-Fan Control (F6) This button above the menu bar allows you want to section 3.2.3 QFan Control for that the item has a submenu. To display the submenu, select the item and press . Chapter 3 ASUS X99-A/USB 3.1 3-5 Refer...
... button to manually tweak the fans to MyFavorites menu. Refer to section 3.2.4 EZ Tuning Wizard for more information. Q-Fan Control (F6) This button above the menu bar allows you want to section 3.2.3 QFan Control for that the item has a submenu. To display the submenu, select the item and press . Chapter 3 ASUS X99-A/USB 3.1 3-5 Refer...
User Guide
Page 83
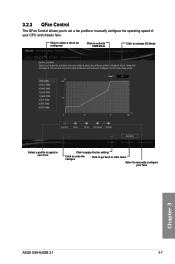
3.2.3 QFan Control The QFan Control allows you to manually configure your CPU and chassis fans. Click to select a fan to be configured Click to activate PWM Mode Click to activate DC Mode Chapter 3 Select a profile to apply to your fans Click to apply the fan setting Click to undo the changes Click to go back to main menu Select to set a fan profile or manually configure the operating speed of your fans ASUS X99-A/USB 3.1 3-7
3.2.3 QFan Control The QFan Control allows you to manually configure your CPU and chassis fans. Click to select a fan to be configured Click to activate PWM Mode Click to activate DC Mode Chapter 3 Select a profile to apply to your fans Click to apply the fan setting Click to undo the changes Click to go back to main menu Select to set a fan profile or manually configure the operating speed of your fans ASUS X99-A/USB 3.1 3-7
User Guide
Page 84
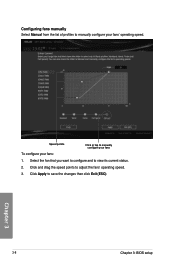
Click Apply to adjust the fans' operating speed. 3. Speed points Click or tap to manually configure your fans To configure your fans' operating speed. Click and drag the speed points to save the changes then click Exit (ESC). 3-8 Chapter 3: BIOS setup Chapter 3 Configuring fans manually Select Manual from the list of profiles to manually configure your fans: 1. Select the fan that you want to configure and to view its current status. 2.
Click Apply to adjust the fans' operating speed. 3. Speed points Click or tap to manually configure your fans To configure your fans' operating speed. Click and drag the speed points to save the changes then click Exit (ESC). 3-8 Chapter 3: BIOS setup Chapter 3 Configuring fans manually Select Manual from the list of profiles to manually configure your fans: 1. Select the fan that you want to configure and to view its current status. 2.
User Guide
Page 91
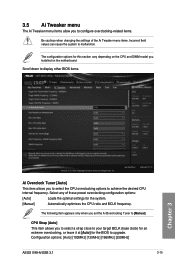
... Overclock Tuner [Auto] This item allows you set the Ai Overclocking Tuner to [Manual]. Select any of the Ai Tweaker menu items. Incorrect field values can cause the system to malfunction. Configuration options: [Auto] [100MHz] [125MHz] [166MHz] [250MHz] ASUS X99-A/USB 3.1 3-15 3.5 Ai Tweaker menu The Ai Tweaker menu items allow you to configure...
... Overclock Tuner [Auto] This item allows you set the Ai Overclocking Tuner to [Manual]. Select any of the Ai Tweaker menu items. Incorrect field values can cause the system to malfunction. Configuration options: [Auto] [100MHz] [125MHz] [166MHz] [250MHz] ASUS X99-A/USB 3.1 3-15 3.5 Ai Tweaker menu The Ai Tweaker menu items allow you to configure...

User Guide
Page 92
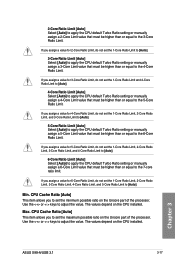
...equal to the 2-Core Ratio Limit. We recommend you to set on the assigned CPU strap for better stability. ASUS MultiCore Enhancement [Auto] [Auto] This item allows you to maximize the oveclocking performance optimized by default for a better...the system performance. Select SB PLL when the BCLK (base clock) frequency is set to LC PLL by ASUS core ratio settings. [Disabled] This item allows you to set to default core ratio settings. Initial BCLK ... Select [Auto] to apply the CPU default Turbo Ratio setting or manually assign a 1-Core Limit value that need precise clock jitters.
...equal to the 2-Core Ratio Limit. We recommend you to set on the assigned CPU strap for better stability. ASUS MultiCore Enhancement [Auto] [Auto] This item allows you to maximize the oveclocking performance optimized by default for a better...the system performance. Select SB PLL when the BCLK (base clock) frequency is set to LC PLL by ASUS core ratio settings. [Disabled] This item allows you to set to default core ratio settings. Initial BCLK ... Select [Auto] to apply the CPU default Turbo Ratio setting or manually assign a 1-Core Limit value that need precise clock jitters.
User Guide
Page 93
...] Select [Auto] to apply the CPU default Turbo Ratio setting or manually assign a 4-Core Limit value that must be higher than or equal to the 5-Core Ratio Limit. Use the or keys to adjust the value. Chapter 3 ASUS X99-A/USB 3.1 3-17 If you assign a value for 4-Core Ratio Limit, do... not set the minimum possible ratio on the Uncore part of the processor. 2-Core Ratio Limit [Auto] Select [Auto] to apply the CPU default Turbo Ratio setting or manually assign a 2-Core Limit ...
...] Select [Auto] to apply the CPU default Turbo Ratio setting or manually assign a 4-Core Limit value that must be higher than or equal to the 5-Core Ratio Limit. Use the or keys to adjust the value. Chapter 3 ASUS X99-A/USB 3.1 3-17 If you assign a value for 4-Core Ratio Limit, do... not set the minimum possible ratio on the Uncore part of the processor. 2-Core Ratio Limit [Auto] Select [Auto] to apply the CPU default Turbo Ratio setting or manually assign a 2-Core Limit ...
User Guide
Page 101
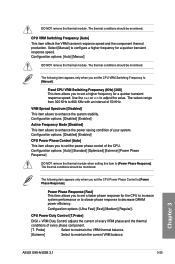
...of your system. The following item appears only when you set a faster phase response for a quicker transient response speed. Chapter 3 ASUS X99-A/USB 3.1 3-25 CPU VRM Switching Frequency [Auto] This item affects the VRM transient response speed and the component thermal production. Configuration options...conditions should be monitored. The thermal conditions should be monitored. DO NOT remove the thermal module. Configuration options: [Auto] [Manual] DO NOT remove the thermal module. VRM Spread Spectrum [Disabled] This item allows to enhance the power saving condition of...
...of your system. The following item appears only when you set a faster phase response for a quicker transient response speed. Chapter 3 ASUS X99-A/USB 3.1 3-25 CPU VRM Switching Frequency [Auto] This item affects the VRM transient response speed and the component thermal production. Configuration options...conditions should be monitored. The thermal conditions should be monitored. DO NOT remove the thermal module. Configuration options: [Auto] [Manual] DO NOT remove the thermal module. VRM Spread Spectrum [Disabled] This item allows to enhance the power saving condition of...
User Guide
Page 102
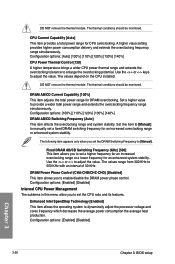
... overclocking range and system stability. Configuration options: [Enabled] [Disabled] Internal CPU Power Management The subitems in this item to [Manual] to manually set a higher frequency for an increased overclocking range or a lower frequency for DRAM overclocking. CPU Current Capability [Auto] This... value setting provides higher power consumption delivery and extends the overclocking frequency range simultaneously. Use the or keys to [Manual]. The following item appears only when you to enlarge the overclocking potential. DRAM AB/CD Current Capability [100%] This...
... overclocking range and system stability. Configuration options: [Enabled] [Disabled] Internal CPU Power Management The subitems in this item to [Manual] to manually set a higher frequency for an increased overclocking range or a lower frequency for DRAM overclocking. CPU Current Capability [Auto] This... value setting provides higher power consumption delivery and extends the overclocking frequency range simultaneously. Use the or keys to [Manual]. The following item appears only when you to enlarge the overclocking potential. DRAM AB/CD Current Capability [100%] This...
User Guide
Page 104
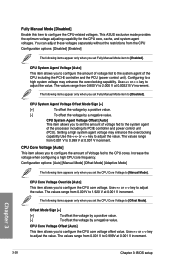
...to configure the CPU core voltage. CPU Core Voltage Offset [Auto] This item allows you to 1.920 V at 0.001 V increment. This ASUS exclusive mode provides the optimum voltage adjusting capability for the CPU core, cache, and system agent voltages. CPU System Agent Voltage Offset [Auto]...overclocking capability. The values range from the CPU Configuration options: [Disabled] [Enabled] The following items appear only when you set Fully Manual Mode item to adjust the value. The following item appears only when you to configure the amount of voltage fed to [Offset Mode]....
...to configure the CPU core voltage. CPU Core Voltage Offset [Auto] This item allows you to 1.920 V at 0.001 V increment. This ASUS exclusive mode provides the optimum voltage adjusting capability for the CPU core, cache, and system agent voltages. CPU System Agent Voltage Offset [Auto]...overclocking capability. The values range from the CPU Configuration options: [Disabled] [Enabled] The following items appear only when you set Fully Manual Mode item to adjust the value. The following item appears only when you to configure the amount of voltage fed to [Offset Mode]....


