

User Manual
Page 26
...you turn it back ON. Self Monitoring and Reporting Technology The S.M.A.R.T. (Self Monitoring and Reporting Technology) checks the hard disk drive during the splash screen, standard boot information such as a carrying bag. You can be seen. If warnings are still given during bootup, backup your Notebook PC before...is part of the Notebook PC's architecture. To run Windows disk checking program. Press [ESC] and you will display a message on the screen when you turn ON the Notebook PC, it will be correct when you receive the Notebook PC. If you press [Tab] during POST and...
...you turn it back ON. Self Monitoring and Reporting Technology The S.M.A.R.T. (Self Monitoring and Reporting Technology) checks the hard disk drive during the splash screen, standard boot information such as a carrying bag. You can be seen. If warnings are still given during bootup, backup your Notebook PC before...is part of the Notebook PC's architecture. To run Windows disk checking program. Press [ESC] and you will display a message on the screen when you turn ON the Notebook PC, it will be correct when you receive the Notebook PC. If you press [Tab] during POST and...

User Manual
Page 27
... drops below 95%. This prevents the battery from external power. A fully-charged battery pack provides the Notebook PC a few hours to charge the battery pack. Screen captures shown here are examples only and may take twice the time when the Notebook PC is disconnected from charging frequently. If you see in...
... drops below 95%. This prevents the battery from external power. A fully-charged battery pack provides the Notebook PC a few hours to charge the battery pack. Screen captures shown here are examples only and may take twice the time when the Notebook PC is disconnected from charging frequently. If you see in...
User Manual
Page 30
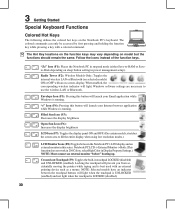
...on sleep button setting in power management setup). Radio Tower (F2): Wireless Models Only: Toggles the internal wireless LAN or Bluetooth (on -screen-display. NOTE: Selected models have an indicator between the Notebook PC's LCD display and an external monitor in suspend mode (either Save-to... wireless indicator will light when the touchpad is UNLOCKED (enabled) and not light when the touchpad is running . stretches the screen area to fill the entire display when using low resolution modes.) LCD/Monitor Icons (F8): Toggles between the touchpad buttons will light.
...on sleep button setting in power management setup). Radio Tower (F2): Wireless Models Only: Toggles the internal wireless LAN or Bluetooth (on -screen-display. NOTE: Selected models have an indicator between the Notebook PC's LCD display and an external monitor in suspend mode (either Save-to... wireless indicator will light when the touchpad is UNLOCKED (enabled) and not light when the touchpad is running . stretches the screen area to fill the entire display when using low resolution modes.) LCD/Monitor Icons (F8): Toggles between the touchpad buttons will light.
User Manual
Page 31
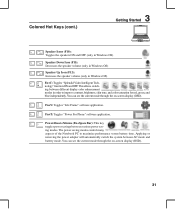
This allows switch- You can see the current mode through the on -screen display (OSD). The power saving modes control many aspects of the Notebook PC to improve contrast, brightness, skin tone, and color saturation for red, green, ... toggles power savings between AC mode and battery mode. Fn+T: Toggles "Power For Phone" software application. You can see the current mode through the on -screen display (OSD). 31 ing between different display color enhancement My Profile modes in Windows OS) Fn+C: Toggles "Splendid Video Intelligent Tech- Colored Hot Keys (cont...
This allows switch- You can see the current mode through the on -screen display (OSD). The power saving modes control many aspects of the Notebook PC to improve contrast, brightness, skin tone, and color saturation for red, green, ... toggles power savings between AC mode and battery mode. Fn+T: Toggles "Power For Phone" software application. You can see the current mode through the on -screen display (OSD). 31 ing between different display color enhancement My Profile modes in Windows OS) Fn+C: Toggles "Splendid Video Intelligent Tech- Colored Hot Keys (cont...

User Manual
Page 33
... aspects of the power switch can be customized in order to maximize performance versus battery time. The selected mode is best used with an on-screen display. Touchpad Lock Key Pressing this button will prevent you from accidentally moving the pointer while typing and is shown on the display. Locking the...
... aspects of the power switch can be customized in order to maximize performance versus battery time. The selected mode is best used with an on-screen display. Touchpad Lock Key Pressing this button will prevent you from accidentally moving the pointer while typing and is shown on the display. Locking the...

User Manual
Page 38
... scrolling knob PS/2 mice. therefore, mechanical failures can be used in place of the touchpad. Pointer Movement Left Click Right Click Fingerprint scanner (on the screen with the tip of your finger in the center of the touchpad and slide in place of a standard desktop mouse. Using the Touchpad Light pressure...
... scrolling knob PS/2 mice. therefore, mechanical failures can be used in place of the touchpad. Pointer Movement Left Click Right Click Fingerprint scanner (on the screen with the tip of your finger in the center of the touchpad and slide in place of a standard desktop mouse. Using the Touchpad Light pressure...

User Manual
Page 39
..., press the left button depressed, moving the pointer to the desired location, then release the button. Lightly strike the touchpad twice, sliding finger on the screen you select. The selected item will not be executed. Lightly but rapidly strike the touchpad. ton or tap the pad twice in rapid succession, and...
..., press the left button depressed, moving the pointer to the desired location, then release the button. Lightly strike the touchpad twice, sliding finger on the screen you select. The selected item will not be executed. Lightly but rapidly strike the touchpad. ton or tap the pad twice in rapid succession, and...

User Manual
Page 52
... (on paid television service, roof-mounted aerial antenna, or indoor "rabbit ears" to fit the slim Notebook PC. Cable distribution system should include bonding the screen of a Coaxial Cable - installation should be grounded (earthed) in accordance with ANSI/NFPA 70, the National Electrical Code (NEC), in base allows attachment to PAL...
... (on paid television service, roof-mounted aerial antenna, or indoor "rabbit ears" to fit the slim Notebook PC. Cable distribution system should include bonding the screen of a Coaxial Cable - installation should be grounded (earthed) in accordance with ANSI/NFPA 70, the National Electrical Code (NEC), in base allows attachment to PAL...

User Manual
Page 60
... Console icon on the bottom of the mouse. Select Add a Bluetooth Device on the bottom of the Bluetooth mouse. Or Launch Bluetooth Devices from this screen. Prepare the Bluetooth mouse. • Install two "AA" batteries. • Turn ON the power switch on the taskbar menu. 3b. A-4 4. A Appendix Bluetooth Mouse Setup (optional...
... Console icon on the bottom of the mouse. Select Add a Bluetooth Device on the bottom of the Bluetooth mouse. Or Launch Bluetooth Devices from this screen. Prepare the Bluetooth mouse. • Install two "AA" batteries. • Turn ON the power switch on the taskbar menu. 3b. A-4 4. A Appendix Bluetooth Mouse Setup (optional...

User Manual
Page 63
On the Security screen, select Change Supervisor or Change User Password. Type in a password and press [Enter]. 3. Security Setting 1. Leave the password field blank and press [Enter]. 4. Re-type the password and press [Enter]. 1. A-7 Select each item and press [Enter] to select a device. Password is then cleared. System BIOS Settings Boot Device A Appendix 1. On the Boot screen, select Boot Device Priority. 2. Password is then set. 2. To clear the password: 2.
On the Security screen, select Change Supervisor or Change User Password. Type in a password and press [Enter]. 3. Security Setting 1. Leave the password field blank and press [Enter]. 4. Re-type the password and press [Enter]. 1. A-7 Select each item and press [Enter] to select a device. Password is then cleared. System BIOS Settings Boot Device A Appendix 1. On the Boot screen, select Boot Device Priority. 2. Password is then set. 2. To clear the password: 2.
User Manual
Page 67
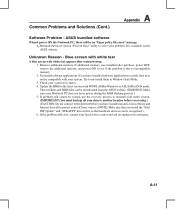
... white text A blue screen with WINFLASH in Windows or AFLASH in Windows Safe Mode....Problems and Solutions (Cont.) A Appendix Software Problem - Un-install software applications. Try to protect yourself from the ASUS website. (WARNING: Make sure your data to another location before recovering.) (CAUTION: Do not connect to the ... PC does not loose power during the BIOS flashing process.) 5. If additional memory was installed after system bootup. 1. ASUS bundled software When I power ON the Notebook PC, there will be recognized.) 6. Unknown Reason - These utilities and ...
... white text A blue screen with WINFLASH in Windows or AFLASH in Windows Safe Mode....Problems and Solutions (Cont.) A Appendix Software Problem - Un-install software applications. Try to protect yourself from the ASUS website. (WARNING: Make sure your data to another location before recovering.) (CAUTION: Do not connect to the ... PC does not loose power during the BIOS flashing process.) 5. If additional memory was installed after system bootup. 1. ASUS bundled software When I power ON the Notebook PC, there will be recognized.) 6. Unknown Reason - These utilities and ...

User Manual
Page 71
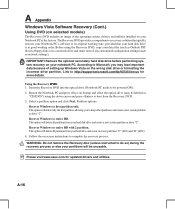
... installed on your hard disk drive used to keep other partitions, and create a new system partition as drive "C". Read the "ASUS Preload Wizard" screen and click Next. 4. Recover Windows to complete the recovery process. The Recovery Partition is in good working order. Select a partition...PST files) to floppy disks or to a network drive and make note of the operating system, drivers, and utilities installed on -screen instructions to entire HD with the recovery process. DO NOT delete the partition named "RECOVERY". A-15 A Appendix Windows Vista Software Recovery...
... installed on your hard disk drive used to keep other partitions, and create a new system partition as drive "C". Read the "ASUS Preload Wizard" screen and click Next. 4. Recover Windows to complete the recovery process. The Recovery Partition is in good working order. Select a partition...PST files) to floppy disks or to a network drive and make note of the operating system, drivers, and utilities installed on -screen instructions to entire HD with the recovery process. DO NOT delete the partition named "RECOVERY". A-15 A Appendix Windows Vista Software Recovery...
User Manual
Page 72
...partitions from the Recovery DVD. 3. Recover Windows to http://support.microsoft.com/kb/937251/en-us for updated drivers and utilities. Please visit www.asus.com for more details. Link to entire HD with 2 partition. Restart the Notebook PC and press on bootup and select the optical drive ...selected models) The Recovery DVD includes an image of the operating system, drivers, and utilities installed on your notebook PC. Follow the on-screen instructions to do so) during the recovery process or else your partitions will delete all partitions from your hard drive and create two new ...
...partitions from the Recovery DVD. 3. Recover Windows to http://support.microsoft.com/kb/937251/en-us for updated drivers and utilities. Please visit www.asus.com for more details. Link to entire HD with 2 partition. Restart the Notebook PC and press on bootup and select the optical drive ...selected models) The Recovery DVD includes an image of the operating system, drivers, and utilities installed on your notebook PC. Follow the on-screen instructions to do so) during the recovery process or else your partitions will delete all partitions from your hard drive and create two new ...


