VZ249 Series User Guide
Page 3
Table of Contents Notices...iv Safety Information v Care & Cleaning vi Takeback Services vii 1.1 Welcome 1-1 1.2 Package Contents 1-1 1.3 Assembling the Monitor Base 1-2 1.4 Connect Cables 1-3 1.4.1 Rear of the LCD Monitor 1-3 1.5 Monitor Introduction 1-4 1.5.1 Using the Control Buttons 1-4 1.5.2 QuickFit Function 1-6 2.1 Adjusting the Monitor 2-1 3.1 OSD (On-Screen Display) Menu 3-1 3.1.1 How to Reconfigure 3-1 3.1.2 OSD Function Introduction 3-2 3.2 Specifications 3-16 3.3 Troubleshooting (FAQ 3-17 3.4 Supported Timing List 3-18 iii
Table of Contents Notices...iv Safety Information v Care & Cleaning vi Takeback Services vii 1.1 Welcome 1-1 1.2 Package Contents 1-1 1.3 Assembling the Monitor Base 1-2 1.4 Connect Cables 1-3 1.4.1 Rear of the LCD Monitor 1-3 1.5 Monitor Introduction 1-4 1.5.1 Using the Control Buttons 1-4 1.5.2 QuickFit Function 1-6 2.1 Adjusting the Monitor 2-1 3.1 OSD (On-Screen Display) Menu 3-1 3.1.1 How to Reconfigure 3-1 3.1.2 OSD Function Introduction 3-2 3.2 Specifications 3-16 3.3 Troubleshooting (FAQ 3-17 3.4 Supported Timing List 3-18 iii

VZ249 Series User Guide
Page 5
..., do not try to cause cancer, and birth defects or other reproductive harm. Safety Information • Before setting up the monitor, carefully read all cables are correctly connected and the power cables are provided for a long period of California to open the... are not damaged. Contact a qualified service technician or your retailer. • Before using the product, make sure all the documentation that came with the monitor, contact a qualified service technician or your dealer immediately. • Slots and openings on a stable surface. • Unplug the unit during a lightning ...
..., do not try to cause cancer, and birth defects or other reproductive harm. Safety Information • Before setting up the monitor, carefully read all cables are correctly connected and the power cables are provided for a long period of California to open the... are not damaged. Contact a qualified service technician or your retailer. • Before using the product, make sure all the documentation that came with the monitor, contact a qualified service technician or your dealer immediately. • Slots and openings on a stable surface. • Unplug the unit during a lightning ...

VZ249 Series User Guide
Page 6
... task. Care & Cleaning • Before you lift or reposition your dealer or service center to fix it. When lifting or carrying the monitor, grasp the edges of the previous screen may find slightly uneven brightness on the screen depending on the screen, as it is displayed for ...in completing a task. CAUTION: Information to prevent damage to the components when trying to disconnect the cables and power cord. Clean the monitor surface with the monitor: • The screen may be removed with a cloth dampened with the LCD. Stubborn stains may flicker during the initial use with ...
... task. Care & Cleaning • Before you lift or reposition your dealer or service center to fix it. When lifting or carrying the monitor, grasp the edges of the previous screen may find slightly uneven brightness on the screen depending on the screen, as it is displayed for ...in completing a task. CAUTION: Information to prevent damage to the components when trying to disconnect the cables and power cord. Clean the monitor surface with the monitor: • The screen may be removed with a cloth dampened with the LCD. Stubborn stains may flicker during the initial use with ...

VZ249 Series User Guide
Page 8
...Introduction 1.1 Welcome! With these features, you ! 1.2 Package Contents Check your retailer immediately. Thank you for the following items: LCD monitor Monitor Base Quick Start Guide Warranty Card Adaptor Power Cord (optional) VGA cable DVI cable (optional) HDMI cable (optional) Audio cable (optional... cable (optional) •• If any of features that the monitor brings to you can enjoy the convenience and delightful visual experience that enhance your viewing experience. The latest widescreen LCD monitor from ASUS provides a crisper, broader, and brighter display, plus a host of...
...Introduction 1.1 Welcome! With these features, you ! 1.2 Package Contents Check your retailer immediately. Thank you for the following items: LCD monitor Monitor Base Quick Start Guide Warranty Card Adaptor Power Cord (optional) VGA cable DVI cable (optional) HDMI cable (optional) Audio cable (optional... cable (optional) •• If any of features that the monitor brings to you can enjoy the convenience and delightful visual experience that enhance your viewing experience. The latest widescreen LCD monitor from ASUS provides a crisper, broader, and brighter display, plus a host of...

VZ249 Series User Guide
Page 9
Turn the screw clockwise to the arm. 3. Have the front of the monitor face down on a table. 2. Attach the base to secure the base. 1.3 Assembling the Monitor Base 1. ASUS LCD Monitor VZ249 Series 1-2 Then adjust the monitor to the angle that is most comfortable for you. •• We recommend that you cover the table surface with soft cloth to prevent damage to the monitor.
Turn the screw clockwise to the arm. 3. Have the front of the monitor face down on a table. 2. Attach the base to secure the base. 1.3 Assembling the Monitor Base 1. ASUS LCD Monitor VZ249 Series 1-2 Then adjust the monitor to the angle that is most comfortable for you. •• We recommend that you cover the table surface with soft cloth to prevent damage to the monitor.
VZ249 Series User Guide
Page 10
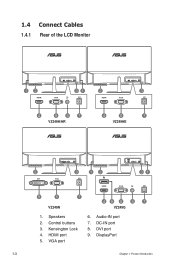
Kensington Lock 4. DisplayPort 1-3 Chapter 1: Product Introduction DVI port 9. Speakers 2. DC-IN port 8. 1.4 Connect Cables 1.4.1 Rear of the LCD Monitor 12 HDMI HDMI VGA 31 VGA 2 HDMI HDMI VGA 3 VGA 4 56 7 VZ249H/HR 4 5 7 VZ249HE DVI VGA HDMI VGA 2 DVI VGA 3 12 HDMI VGA 31 8 5 7 VZ249N 49 5 6 7 VZ249Q 1. VGA port 6. HDMI port 5. Control buttons 3. Audio-IN port 7.
Kensington Lock 4. DisplayPort 1-3 Chapter 1: Product Introduction DVI port 9. Speakers 2. DC-IN port 8. 1.4 Connect Cables 1.4.1 Rear of the LCD Monitor 12 HDMI HDMI VGA 31 VGA 2 HDMI HDMI VGA 3 VGA 4 56 7 VZ249H/HR 4 5 7 VZ249HE DVI VGA HDMI VGA 2 DVI VGA 3 12 HDMI VGA 31 8 5 7 VZ249N 49 5 6 7 VZ249Q 1. VGA port 6. HDMI port 5. Control buttons 3. Audio-IN port 7.

VZ249 Series User Guide
Page 11
...is a Shortcut key. See page 1-6 for alignment. • The QuickFit function contains several options of the monitor to adjust the image settings. ASUS LCD Monitor VZ249 Series 1-4 Press key 1-6 to activate the QuickFit function designed for details. 4. Shortcut Key1: •...only available for VZ249H/VZ249HE/VZ249Q model only): Switch the input source. Menu Close Input Select QuickFit Brightness Blue Light Filter Menu Close Auto AInuptuot ASdejluesct QuickFit BGraimghetPnleusss Blue Light Filter 123456 123456 1234567 VZ249H/VZ249HE/VZ249Q/VZ249HR 1234567 VZ249N ...
...is a Shortcut key. See page 1-6 for alignment. • The QuickFit function contains several options of the monitor to adjust the image settings. ASUS LCD Monitor VZ249 Series 1-4 Press key 1-6 to activate the QuickFit function designed for details. 4. Shortcut Key1: •...only available for VZ249H/VZ249HE/VZ249Q model only): Switch the input source. Menu Close Input Select QuickFit Brightness Blue Light Filter Menu Close Auto AInuptuot ASdejluesct QuickFit BGraimghetPnleusss Blue Light Filter 123456 123456 1234567 VZ249H/VZ249HE/VZ249Q/VZ249HR 1234567 VZ249N ...

VZ249 Series User Guide
Page 12
Close Button: • Exit the OSD menu. 6. Power Button/Power Indicator: • Press this button to turn the monitor on/off. • The color definition of the power indicator is as the table below. Menu Button: • Enter the OSD menu. 7. Status White Amber OFF Description ON Standby mode OFF 1-5 Chapter 1: Product Introduction 5.
Close Button: • Exit the OSD menu. 6. Power Button/Power Indicator: • Press this button to turn the monitor on/off. • The color definition of the power indicator is as the table below. Menu Button: • Enter the OSD menu. 7. Status White Amber OFF Description ON Standby mode OFF 1-5 Chapter 1: Product Introduction 5.

VZ249 Series User Guide
Page 13
1.5.2 QuickFit Function The QuickFit function contains three patterns: (1) Grid (2) Paper size (3) Photo size. 1. B5 Letter B5 Letter EXIT 3. Paper size: Provides users to accurately view and edit their documents in real size on the screen. 8x10 5x7 4x6 3x5 2x2 ASUS LCD Monitor VZ249 Series 1-6 Photo size: Provides photographers and other users to view their photos in real size on one page and achieve a consistent look and feel. Alignment Grid 2. Grid pattern: Facilitates designers and users to organize content and layout on the screen.
1.5.2 QuickFit Function The QuickFit function contains three patterns: (1) Grid (2) Paper size (3) Photo size. 1. B5 Letter B5 Letter EXIT 3. Paper size: Provides users to accurately view and edit their documents in real size on the screen. 8x10 5x7 4x6 3x5 2x2 ASUS LCD Monitor VZ249 Series 1-6 Photo size: Provides photographers and other users to view their photos in real size on one page and achieve a consistent look and feel. Alignment Grid 2. Grid pattern: Facilitates designers and users to organize content and layout on the screen.

VZ249 Series User Guide
Page 14
2.1 Adjusting the Monitor • For optimal viewing, we recommend that you look at the full face of the monitor, then adjust the monitor to the angle that is most comfortable for you. • Hold the stand to prevent the monitor from falling while changing its angle. • You can adjust the monitor's angle from -5˚ to 22˚. -5˚ to +22˚ •• It is normal that the monitor slightly shakes while you adjust the viewing angle. 2-1 Chapter 2: Setup
2.1 Adjusting the Monitor • For optimal viewing, we recommend that you look at the full face of the monitor, then adjust the monitor to the angle that is most comfortable for you. • Hold the stand to prevent the monitor from falling while changing its angle. • You can adjust the monitor's angle from -5˚ to 22˚. -5˚ to +22˚ •• It is normal that the monitor slightly shakes while you adjust the viewing angle. 2-1 Chapter 2: Setup
VZ249 Series User Guide
Page 15
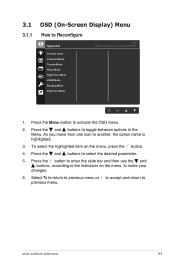
... move from one icon to previous menu. Select to return to previous menu or to accept and return to another, the option name is highlighted. 3. ASUS LCD Monitor VZ249 Series 3-1 Press the and buttons to select the desired parameter. 5. To select the highlighted item on the menu, to Reconfigure Splendid Scenery mode...
... move from one icon to previous menu. Select to return to previous menu or to accept and return to another, the option name is highlighted. 3. ASUS LCD Monitor VZ249 Series 3-1 Press the and buttons to select the desired parameter. 5. To select the highlighted item on the menu, to Reconfigure Splendid Scenery mode...
VZ249 Series User Guide
Page 17
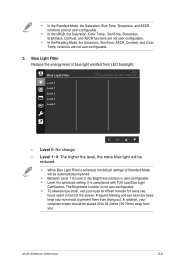
... inches (50-70cm) away from drying out. In addition, your eyes for fifteen minutes for every two hours spent in front of the screen. ASUS LCD Monitor VZ249 Series 3-3 Blue Light Filter Reduce the energy level of Standard Mode will be placed 20 to Level 3, the Brightness function is user-configurable. •...
... inches (50-70cm) away from drying out. In addition, your eyes for fifteen minutes for every two hours spent in front of the screen. ASUS LCD Monitor VZ249 Series 3-3 Blue Light Filter Reduce the energy level of Standard Mode will be placed 20 to Level 3, the Brightness function is user-configurable. •...
VZ249 Series User Guide
Page 19
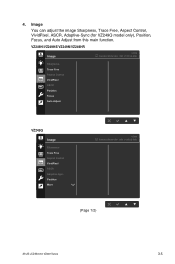
Image You can adjust the image Sharpness, Trace Free, Aspect Control, VividPixel, ASCR, Adaptive-Sync (for VZ249Q model only), Position, Focus, and Auto Adjust from this main function. VZ249H/VZ249HE/VZ249N/VZ249HR Image VZ249 Standard Mode VGA 1920 x 1080 @ 60Hz Sharpness Trace Free Aspect Control VividPixel ASCR Position Focus Auto Adjust VZ249Q Image Sharpness Trace Free Aspect Control VividPixel ASCR Adaptive-Sync Position More VZ249 Standard Mode VGA 1920 x 1080 @ 60Hz (Page 1/2) ASUS LCD Monitor VZ249 Series 3-5 4.
Image You can adjust the image Sharpness, Trace Free, Aspect Control, VividPixel, ASCR, Adaptive-Sync (for VZ249Q model only), Position, Focus, and Auto Adjust from this main function. VZ249H/VZ249HE/VZ249N/VZ249HR Image VZ249 Standard Mode VGA 1920 x 1080 @ 60Hz Sharpness Trace Free Aspect Control VividPixel ASCR Position Focus Auto Adjust VZ249Q Image Sharpness Trace Free Aspect Control VividPixel ASCR Adaptive-Sync Position More VZ249 Standard Mode VGA 1920 x 1080 @ 60Hz (Page 1/2) ASUS LCD Monitor VZ249 Series 3-5 4.
VZ249 Series User Guide
Page 21
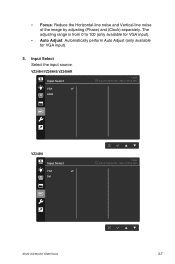
The adjusting range is from 0 to 100 (only available for VGA input). • Auto Adjust: Automatically perform Auto Adjust (only available for VGA input). 5. • Focus: Reduce the Horizontal-line noise and Vertical-line noise of the image by adjusting (Phase) and (Clock) separately. VZ249H/VZ249HE/VZ249HR Input Select VGA HDMI VZ249 Standard Mode VGA 1920 x 1080 @ 60Hz VZ249N Input Select VGA DVI VZ249 Standard Mode VGA 1920 x 1080 @ 60Hz ASUS LCD Monitor VZ249 Series 3-7 Input Select Select the input source.
The adjusting range is from 0 to 100 (only available for VGA input). • Auto Adjust: Automatically perform Auto Adjust (only available for VGA input). 5. • Focus: Reduce the Horizontal-line noise and Vertical-line noise of the image by adjusting (Phase) and (Clock) separately. VZ249H/VZ249HE/VZ249HR Input Select VGA HDMI VZ249 Standard Mode VGA 1920 x 1080 @ 60Hz VZ249N Input Select VGA DVI VZ249 Standard Mode VGA 1920 x 1080 @ 60Hz ASUS LCD Monitor VZ249 Series 3-7 Input Select Select the input source.
VZ249 Series User Guide
Page 23
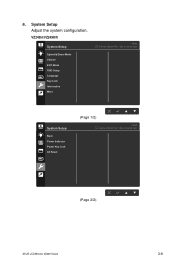
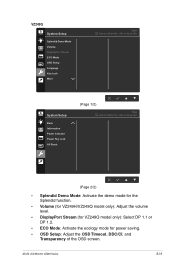
6. VZ249H/VZ249HR System Setup Splendid Demo Mode Volume ECO Mode OSD Setup Language Key Lock Information More VZ249 Standard Mode VGA 1920 x 1080 @ 60Hz System Setup Back Power Indicator Power Key Lock All Reset (Page 1/2) VZ249 Standard Mode VGA 1920 x 1080 @ 60Hz (Page 2/2) ASUS LCD Monitor VZ249 Series 3-9 System Setup Adjust the system configuration.
6. VZ249H/VZ249HR System Setup Splendid Demo Mode Volume ECO Mode OSD Setup Language Key Lock Information More VZ249 Standard Mode VGA 1920 x 1080 @ 60Hz System Setup Back Power Indicator Power Key Lock All Reset (Page 1/2) VZ249 Standard Mode VGA 1920 x 1080 @ 60Hz (Page 2/2) ASUS LCD Monitor VZ249 Series 3-9 System Setup Adjust the system configuration.
VZ249 Series User Guide
Page 25
ASUS LCD Monitor VZ249 Series 3-11 VZ249Q System Setup Splendid Demo Mode Volume DisplayPort Stream ECO Mode OSD Setup Language Key Lock More VZ249 Standard Mode VGA 1920 x ...
ASUS LCD Monitor VZ249 Series 3-11 VZ249Q System Setup Splendid Demo Mode Volume DisplayPort Stream ECO Mode OSD Setup Language Key Lock More VZ249 Standard Mode VGA 1920 x ...

VZ249 Series User Guide
Page 26
• Language: Select the OSD language. • Key Lock: Pressing the second button on the right for more than five seconds to activate the key lock function. • Information: Display the monitor information. • More: Return the next page of System Setting. • Back: Return the previous page of System Setting. • Power Indicator: Turn the power LED indicator on/off. • Power Key Lock: Disable/Enable the power key. • All Reset: Select YES to revert all settings to the factory default mode. 3-12 Chapter 3: General Instruction
• Language: Select the OSD language. • Key Lock: Pressing the second button on the right for more than five seconds to activate the key lock function. • Information: Display the monitor information. • More: Return the next page of System Setting. • Back: Return the previous page of System Setting. • Power Indicator: Turn the power LED indicator on/off. • Power Key Lock: Disable/Enable the power key. • All Reset: Select YES to revert all settings to the factory default mode. 3-12 Chapter 3: General Instruction

VZ249 Series User Guide
Page 27
7. Volume GamePlus Shortcut Shortcut 1 Shortcut 2 (Shortcut 1) VZ249 Standard Mode VGA 1920 x 1080 @ 60Hz Blue Light Filter Splendid Brightness Auto Adjust Contrast Color Temp. Volume GamePlus (Shortcut 2) ASUS LCD Monitor VZ249 Series 3-13 VZ249H/VZ249Q/VZ249HR Shortcut VZ249 Standard Mode VGA 1920 x 1080 @ 60Hz Shortcut 1 Shortcut 2 Blue Light Filter Splendid Brightness Auto Adjust Contrast Color Temp. Shortcut Assign the specific function to the two shortcut keys.
7. Volume GamePlus Shortcut Shortcut 1 Shortcut 2 (Shortcut 1) VZ249 Standard Mode VGA 1920 x 1080 @ 60Hz Blue Light Filter Splendid Brightness Auto Adjust Contrast Color Temp. Volume GamePlus (Shortcut 2) ASUS LCD Monitor VZ249 Series 3-13 VZ249H/VZ249Q/VZ249HR Shortcut VZ249 Standard Mode VGA 1920 x 1080 @ 60Hz Shortcut 1 Shortcut 2 Blue Light Filter Splendid Brightness Auto Adjust Contrast Color Temp. Shortcut Assign the specific function to the two shortcut keys.
VZ249 Series User Guide
Page 29
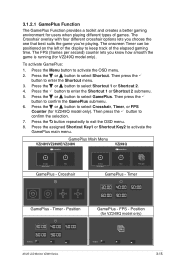
The onscreen Timer can be positioned on the left of the display to select Crosshair, Timer, or FPS Counter (for VZ249Q model only) Position ASUS LCD Monitor VZ249 Series Position FPS 3-15 To activate GamePlus: 1. Press the or button to exit the OSD menu. 8. Crosshair Crosshair Practice Mode Timer FPS FPS Counter... 1 or Shortcut 2 submenu. 5. Press the button to select Shortcut 1 or Shortcut 2. 4. Press the or button to keep track of games. GamePlus Main Menu VZ249H/VZ249HE/VZ249N VZ249Q GamePlus GamePlus Crosshair (Practice Mode) Timer GamePlus - Timer - FPS -
The onscreen Timer can be positioned on the left of the display to select Crosshair, Timer, or FPS Counter (for VZ249Q model only) Position ASUS LCD Monitor VZ249 Series Position FPS 3-15 To activate GamePlus: 1. Press the or button to exit the OSD menu. 8. Crosshair Crosshair Practice Mode Timer FPS FPS Counter... 1 or Shortcut 2 submenu. 5. Press the button to select Shortcut 1 or Shortcut 2. 4. Press the or button to keep track of games. GamePlus Main Menu VZ249H/VZ249HE/VZ249N VZ249Q GamePlus GamePlus Crosshair (Practice Mode) Timer GamePlus - Timer - FPS -

VZ249 Series User Guide
Page 31
...image is too light or dark • Adjust the Contrast and Brightness settings via OSD. ASUS LCD Monitor VZ249 Series 3-17 No sound or sound is low • Adjust the volume settings of your monitor or computer. • Make sure the computer sound card driver is properly installed and .... Screen image bounces or a wave • Make sure the signal cable is properly connected to pattern is present in the OSD menu. Model VZ249H/HR VZ249HE VZ249N VZ249Q Compliance and Standards UkrSEPRO, CE, CB, BSMI, FCC, CCC, VCCI, RCM(C-tick), UL/cUL, MSIP(KCC), Energy Star 7.0, HDMI, DP...
...image is too light or dark • Adjust the Contrast and Brightness settings via OSD. ASUS LCD Monitor VZ249 Series 3-17 No sound or sound is low • Adjust the volume settings of your monitor or computer. • Make sure the computer sound card driver is properly installed and .... Screen image bounces or a wave • Make sure the signal cable is properly connected to pattern is present in the OSD menu. Model VZ249H/HR VZ249HE VZ249N VZ249Q Compliance and Standards UkrSEPRO, CE, CB, BSMI, FCC, CCC, VCCI, RCM(C-tick), UL/cUL, MSIP(KCC), Energy Star 7.0, HDMI, DP...


