User Guide
Page 10
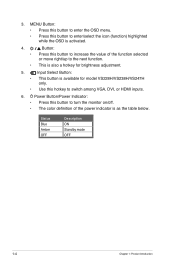
Power Button/Power Indicator: • Press this button to turn the monitor on/off. • The color definition of the power indicator is activated. 4. • • Button: Press this button to increase the value of the function ... OSD is as the table below. This is available for brightness adjustment. 5. Input Select Button: • This button is also a hotkey for model VS228H/VS238H/VS247H only. • Use this button to switch among VGA, DVI, or HDMI inputs. 6. 3. Status Blue Amber OFF Description ON Standby mode OFF 1-4 Chapter 1: Product Introduction...
Power Button/Power Indicator: • Press this button to turn the monitor on/off. • The color definition of the power indicator is activated. 4. • • Button: Press this button to increase the value of the function ... OSD is as the table below. This is available for brightness adjustment. 5. Input Select Button: • This button is also a hotkey for model VS228H/VS238H/VS247H only. • Use this button to switch among VGA, DVI, or HDMI inputs. 6. 3. Status Blue Amber OFF Description ON Standby mode OFF 1-4 Chapter 1: Product Introduction...

User Guide
Page 11
HDMI-In (Available for model VS228H, VS238H, VS247H only) ASUS LED Monitor VS228D/N/H, VS238N/H, VS247N/H 1-5 VGA-In 5. Earphone-Out (Available for model VS228H, VS238H, VS247H only) 3. 1.5.2 Rear of the LED monitor Screw Holes for model VS228N/H, VS238N/H, VS247N/H only) 4. DVI-In (Available for VESA Wall Mount 1 2 3 45 1. AC-In 2.
HDMI-In (Available for model VS228H, VS238H, VS247H only) ASUS LED Monitor VS228D/N/H, VS238N/H, VS247N/H 1-5 VGA-In 5. Earphone-Out (Available for model VS228H, VS238H, VS247H only) 3. 1.5.2 Rear of the LED monitor Screw Holes for model VS228N/H, VS238N/H, VS247N/H only) 4. DVI-In (Available for VESA Wall Mount 1 2 3 45 1. AC-In 2.

User Guide
Page 19
... H-Position or V-Position settings via OSD. No sound or sound is low (For model VS228H, VS238H, VS247H) • Make sure the audio cable is properly connected to automatically adjust the image (for two seconds to the monitor. • Adjust the volume settings of the pins are bent. • Perform Reset via OSD... check if the computer is blurry or fuzzy • Press the button for VGA mode only). • Adjust the Phase and Clock settings via OSD. ASUS LED Monitor VS228D/N/H, VS238N/H, VS247N/H 3-6 Screen image is properly working.
... H-Position or V-Position settings via OSD. No sound or sound is low (For model VS228H, VS238H, VS247H) • Make sure the audio cable is properly connected to automatically adjust the image (for two seconds to the monitor. • Adjust the volume settings of the pins are bent. • Perform Reset via OSD... check if the computer is blurry or fuzzy • Press the button for VGA mode only). • Adjust the Phase and Clock settings via OSD. ASUS LED Monitor VS228D/N/H, VS238N/H, VS247N/H 3-6 Screen image is properly working.


