VP247 Series User Guide
Page 2
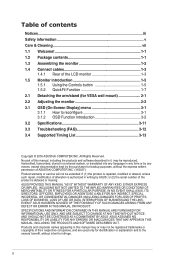
..., modified or altered, unless such repair, modification of alteration is defaced or missing. IN NO EVENT SHALL ASUS, ITS DIRECTORS, OFFICERS, EMPLOYEES OR AGENTS BE LIABLE FOR ANY INDIRECT, SPECIAL, INCIDENTAL, OR CONSEQUENTIAL DAMAGES ...of contents Notices...iii Safety information v Care & Cleaning vii 1.1 Welcome 1-1 1.2 Package contents 1-1 1.3 Assembling the monitor 1-2 1.4 Connect cables 1-3 1.4.1 Rear of the LCD monitor 1-3 1.5 Monitor introduction 1-5 1.5.1 Using the Controls button 1-5 1.5.2 QuickFit Function 1-7 2.1 Detaching the arm/stand (for identification or ...
..., modified or altered, unless such repair, modification of alteration is defaced or missing. IN NO EVENT SHALL ASUS, ITS DIRECTORS, OFFICERS, EMPLOYEES OR AGENTS BE LIABLE FOR ANY INDIRECT, SPECIAL, INCIDENTAL, OR CONSEQUENTIAL DAMAGES ...of contents Notices...iii Safety information v Care & Cleaning vii 1.1 Welcome 1-1 1.2 Package contents 1-1 1.3 Assembling the monitor 1-2 1.4 Connect cables 1-3 1.4.1 Rear of the LCD monitor 1-3 1.5 Monitor introduction 1-5 1.5.1 Using the Controls button 1-5 1.5.2 QuickFit Function 1-7 2.1 Detaching the arm/stand (for identification or ...

VP247 Series User Guide
Page 5
... Provide an earthing connection before the mains plug is connected to disconnect after pulling out the mains plug from damage due to open the monitor cabinet. Contact a qualified service technician or your dealer or local power company. • Use the appropriate power plug which complies with ...objects or spill liquid of the cabinet are not damaged. Do not block these slots. v Safety information • Before setting up the monitor, carefully read all cables are correctly connected and the power cables are provided for a long period of time. Never place this product near ...
... Provide an earthing connection before the mains plug is connected to disconnect after pulling out the mains plug from damage due to open the monitor cabinet. Contact a qualified service technician or your dealer or local power company. • Use the appropriate power plug which complies with ...objects or spill liquid of the cabinet are not damaged. Do not block these slots. v Safety information • Before setting up the monitor, carefully read all cables are correctly connected and the power cables are provided for a long period of time. Never place this product near ...

VP247 Series User Guide
Page 7
...components when trying to complete a task. The screen will recover slowly or you can turn off the Power Switch for hours, an afterimage of the monitor. Turn your dealer or service center to fix it is better to disconnect the cables and power cord. Care & Cleaning • Before you MUST... follow to complete a task. The following symptoms are normal with the monitor: • The screen may be removed with a cloth dampened with mild cleaner. • Avoid using a cleaner containing alcohol or acetone.
...components when trying to complete a task. The screen will recover slowly or you can turn off the Power Switch for hours, an afterimage of the monitor. Turn your dealer or service center to fix it is better to disconnect the cables and power cord. Care & Cleaning • Before you MUST... follow to complete a task. The following symptoms are normal with the monitor: • The screen may be removed with a cloth dampened with mild cleaner. • Avoid using a cleaner containing alcohol or acetone.

VP247 Series User Guide
Page 9
... Series 1-1 The latest widescreen LCD monitor from ASUS provides a crisper, broader, and brighter display, plus a host of features that the monitor brings you for the following items: LCD Monitor Monitor Base Quick Start Guide Warranty Card 1x Power Cord 1x Audio Cable (option) 1x HDMI Cable (option) 1x VGA Cable 1x DVI Cable (option) 1x... features, you can enjoy the convenience and delightful visual experience that enhance your retailer immediately. Thank you ! 1.2 Package contents Check your package for purchasing the ASUS® LCD monitor! 1.1 Welcome!
... Series 1-1 The latest widescreen LCD monitor from ASUS provides a crisper, broader, and brighter display, plus a host of features that the monitor brings you for the following items: LCD Monitor Monitor Base Quick Start Guide Warranty Card 1x Power Cord 1x Audio Cable (option) 1x HDMI Cable (option) 1x VGA Cable 1x DVI Cable (option) 1x... features, you can enjoy the convenience and delightful visual experience that enhance your retailer immediately. Thank you ! 1.2 Package contents Check your package for purchasing the ASUS® LCD monitor! 1.1 Welcome!

VP247 Series User Guide
Page 10
Adjust the monitor to join them tightly. Place the display flat on a cloth on the table, Then attach the base to the arm and fix with the screw to the angle that is most comfortable for you. -5 ~ 20 1 2 1-2 Chapter 1: Product Introduction You can easily tighten the screw by fingers. 2. 1.3 Assembling the monitor To assemble the monitor: 1.
Adjust the monitor to join them tightly. Place the display flat on a cloth on the table, Then attach the base to the arm and fix with the screw to the angle that is most comfortable for you. -5 ~ 20 1 2 1-2 Chapter 1: Product Introduction You can easily tighten the screw by fingers. 2. 1.3 Assembling the monitor To assemble the monitor: 1.

VP247 Series User Guide
Page 11
1.4 Connect cables 1.4.1 Rear of the LCD monitor 6 HDMI DVI VGA VP247H 1 2 3 45 DVI VGA VP247T 1 3 45 DVI VGA VP247N 1 3 4 VGA VP247D 1 4 HDMI VGA 7 2 4 VP247QG ASUS LCD Monitor VP247 Series 1-3
1.4 Connect cables 1.4.1 Rear of the LCD monitor 6 HDMI DVI VGA VP247H 1 2 3 45 DVI VGA VP247T 1 3 45 DVI VGA VP247N 1 3 4 VGA VP247D 1 4 HDMI VGA 7 2 4 VP247QG ASUS LCD Monitor VP247 Series 1-3

VP247 Series User Guide
Page 13
Power Button: • Press this button to adjust the image settings. ASUS LCD Monitor VP247 Series 1-5 Power Indicator: • The color definition of the monitor to turn the monitor on the back of the power indicator is as the below table. VP247H/VP247QG 8 76 5 43 21 VP247T/VP247N/VP247D Auto 9 1. 1.5 Monitor introduction 1.5.1 Using the Controls button Use the control button on /off. Status Description White ON Amber Standby mode OFF OFF 2.
Power Button: • Press this button to adjust the image settings. ASUS LCD Monitor VP247 Series 1-5 Power Indicator: • The color definition of the monitor to turn the monitor on the back of the power indicator is as the below table. VP247H/VP247QG 8 76 5 43 21 VP247T/VP247N/VP247D Auto 9 1. 1.5 Monitor introduction 1.5.1 Using the Controls button Use the control button on /off. Status Description White ON Amber Standby mode OFF OFF 2.

VP247 Series User Guide
Page 15
... Letter EXIT EXIT EXIT 3. Grid pattern: Facilitates designers and users to view their photos in real size on the screen. 8x10 5x7 4x6 3x5 2x2 ASUS LCD Monitor VP247 Series 1-7
... Letter EXIT EXIT EXIT 3. Grid pattern: Facilitates designers and users to view their photos in real size on the screen. 8x10 5x7 4x6 3x5 2x2 ASUS LCD Monitor VP247 Series 1-7

VP247 Series User Guide
Page 16
To detach the arm/stand 1. Use your fingers. 3. ASUS LCD Monitor VP247 Series 2-1 Carefully put the front of the base,and remove the base from the stand.And then remove the hinge cover from the monitor. • We recommend that you cover the table surface with soft cloth to prevent damage to loosen ...the screw located at the bottom of the monitor face down on a clean table. 2. Disconnect power and signal cables. Use a screwdriver to remove the two screw on the arm (Figure 1),and then detach ...
To detach the arm/stand 1. Use your fingers. 3. ASUS LCD Monitor VP247 Series 2-1 Carefully put the front of the base,and remove the base from the stand.And then remove the hinge cover from the monitor. • We recommend that you cover the table surface with soft cloth to prevent damage to loosen ...the screw located at the bottom of the monitor face down on a clean table. 2. Disconnect power and signal cables. Use a screwdriver to remove the two screw on the arm (Figure 1),and then detach ...

VP247 Series User Guide
Page 17
2.2 Adjusting the monitor • For optimal viewing, we recommend that you look at the full face of the monitor, then adjust the monitor to the angle that is most comfortable for you. • Hold the stand to prevent the monitor from falling when you change its angle. • You can adjust the monitor's angle from +20˚ to -5˚ -5 ~ 20 It is normal that the monitor slightly shakes while you adjust the viewing angle. 2-2 Chapter 2: Setup
2.2 Adjusting the monitor • For optimal viewing, we recommend that you look at the full face of the monitor, then adjust the monitor to the angle that is most comfortable for you. • Hold the stand to prevent the monitor from falling when you change its angle. • You can adjust the monitor's angle from +20˚ to -5˚ -5 ~ 20 It is normal that the monitor slightly shakes while you adjust the viewing angle. 2-2 Chapter 2: Setup

VP247 Series User Guide
Page 18
... the and buttons to reconfigure Splendid Scenery Mode Standard Mode Theater Mode Game Mode Night View Mode sRGB Mode Reading Mode Darkroom Mode ASUS VP247 Standard Mode VGA 1920x1080@60Hz 1. Press the button to enter the slide bar and then use the or buttons, according to make... the indicators on the menu press the button. 4. Select the to return to previous menu or to accept and return to activate the OSD menu. 2. ASUS LCD Monitor VP247 Series 3-1 Press the MENU button to previous menu.
... the and buttons to reconfigure Splendid Scenery Mode Standard Mode Theater Mode Game Mode Night View Mode sRGB Mode Reading Mode Darkroom Mode ASUS VP247 Standard Mode VGA 1920x1080@60Hz 1. Press the button to enter the slide bar and then use the or buttons, according to make... the indicators on the menu press the button. 4. Select the to return to previous menu or to accept and return to activate the OSD menu. 2. ASUS LCD Monitor VP247 Series 3-1 Press the MENU button to previous menu.

VP247 Series User Guide
Page 20
... Filter Adjust the energy level of continuous working for long hours. Blue Light Filter Level 0 Level 1 Level 2 Level 3 Level 4 ASUS VP247 Standard Mode VGA 1920x1080@60Hz • Level 0: No change. • Level 1~4: The higher the level,the more effective than ...configurable. • Level 4 is advised to eye strain and AMD (Age-Related Macular Degeneration). If eye strain continues please consult a physician. ASUS LCD Monitor VP247 Series 3-3 Eye exercises: (1) Repeating look up and down (2) Slowly roll your eyes (3) Move your eyes, users should take short breaks ...
... Filter Adjust the energy level of continuous working for long hours. Blue Light Filter Level 0 Level 1 Level 2 Level 3 Level 4 ASUS VP247 Standard Mode VGA 1920x1080@60Hz • Level 0: No change. • Level 1~4: The higher the level,the more effective than ...configurable. • Level 4 is advised to eye strain and AMD (Age-Related Macular Degeneration). If eye strain continues please consult a physician. ASUS LCD Monitor VP247 Series 3-3 Eye exercises: (1) Repeating look up and down (2) Slowly roll your eyes (3) Move your eyes, users should take short breaks ...

VP247 Series User Guide
Page 22
...aspect ratio to "Full", "4:3", "Overscan(Only For HDMI)". • VividPixel: ASUS Exclusive Technology that brings lifelike visuals for VGA input.) ASUS LCD Monitor VP247 Series 3-5 4. The adjusting range is from this main function. The ...adjusting range is from 0 to 100. • ASCR: Select ON or OFF to enable or disable dynamic contrast ratio function. • Adaptive-Sync/FreeSync: It can adjust the image Sharpness, Trace Free, Aspect Control, VividPixel, ASCR, Adaptive-Sync/Freesync (VP247QG...
...aspect ratio to "Full", "4:3", "Overscan(Only For HDMI)". • VividPixel: ASUS Exclusive Technology that brings lifelike visuals for VGA input.) ASUS LCD Monitor VP247 Series 3-5 4. The adjusting range is from this main function. The ...adjusting range is from 0 to 100. • ASCR: Select ON or OFF to enable or disable dynamic contrast ratio function. • Adaptive-Sync/FreeSync: It can adjust the image Sharpness, Trace Free, Aspect Control, VividPixel, ASCR, Adaptive-Sync/Freesync (VP247QG...

VP247 Series User Guide
Page 24
System Setup Splendid Demo Mode Volume GamePlus DisplayPort Stream ECO Mode OSD Setup Language Key Lock More ASUS VP247 Standard Mode VGA 1920x1080@60Hz ASUS LCD Monitor VP247 Series 3-7 Input Select VGA DVI HDMI DisplayPort ASUS VP247 Standard Mode VGA 1920x1080@60Hz 7. Input Select Select the input source from VGA, DVI(VP247H/T/N), HDMI(Only For VP247H/QG), DisplayPort(Only for VP247QG) input signal. System Setup Adjusts the system configuration. 6.
System Setup Splendid Demo Mode Volume GamePlus DisplayPort Stream ECO Mode OSD Setup Language Key Lock More ASUS VP247 Standard Mode VGA 1920x1080@60Hz ASUS LCD Monitor VP247 Series 3-7 Input Select VGA DVI HDMI DisplayPort ASUS VP247 Standard Mode VGA 1920x1080@60Hz 7. Input Select Select the input source from VGA, DVI(VP247H/T/N), HDMI(Only For VP247H/QG), DisplayPort(Only for VP247QG) input signal. System Setup Adjusts the system configuration. 6.

VP247 Series User Guide
Page 26
ASUS LCD Monitor VP247 Series 3-9 The selections are: English, French, German, Spanish, Italian, Dutch, , Russian, Poland, Czech, Croacia, Hungary, Romania, Portugal, Turkey, Simplified Chinese, Traditional Chinese, Japanese, Korean, ... button on the right for power saving. • OSD Setup: Adjusts the OSD Timeout, DDC/CI, and Transparency of System Setting. • Information:Displays the monitor information. • Power Indicator: Turn the power LED indicator on/off. • Power Key Lock: To disable / enable power key • All Reset: Selects "Yes...
ASUS LCD Monitor VP247 Series 3-9 The selections are: English, French, German, Spanish, Italian, Dutch, , Russian, Poland, Czech, Croacia, Hungary, Romania, Portugal, Turkey, Simplified Chinese, Traditional Chinese, Japanese, Korean, ... button on the right for power saving. • OSD Setup: Adjusts the OSD Timeout, DDC/CI, and Transparency of System Setting. • Information:Displays the monitor information. • Power Indicator: Turn the power LED indicator on/off. • Power Key Lock: To disable / enable power key • All Reset: Selects "Yes...
VP247 Series User Guide
Page 28
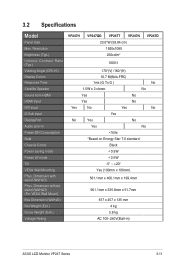
... Tilt VESA Wall Mounting Phys. Dimension without stand (WxHxD) (For VESA Wall Mount) Box Dimension (WxHxD) Net Weight (Esti.) Gross Weight (Esti.) Voltage Rating VP247H VP247QG VP247T VP247N 23.6"W (59.94 cm) 1920x1080 250cd/m2 VP247D 1000:1 170°(V) /160°(H) 16.7 M(6bit+FRC) 1ms (G To G ) No 1.5W x 2 stereo No Yes...
... Tilt VESA Wall Mounting Phys. Dimension without stand (WxHxD) (For VESA Wall Mount) Box Dimension (WxHxD) Net Weight (Esti.) Gross Weight (Esti.) Voltage Rating VP247H VP247QG VP247T VP247N 23.6"W (59.94 cm) 1920x1080 250cd/m2 VP247D 1000:1 170°(V) /160°(H) 16.7 M(6bit+FRC) 1ms (G To G ) No 1.5W x 2 stereo No Yes...
VP247 Series User Guide
Page 29
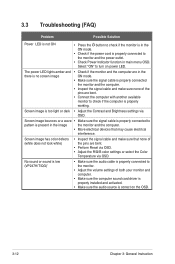
... Contrast and Brightness settings via OSD. No sound or sound is low (VP247H/T/QG)' • Make sure the audio cable is properly connected to the monitor. • Adjust the volume settings of the pins are bent. • Perform Reset via OSD. • Adjust the R/G/B color settings or select ...power LED. Screen image has color defects (white does not look white) • Inspect the signal cable and make sure none of both your monitor and computer. • Make sure the computer sound card driver is properly installed and activated. • Make sure the audio source is properly ...
... Contrast and Brightness settings via OSD. No sound or sound is low (VP247H/T/QG)' • Make sure the audio cable is properly connected to the monitor. • Adjust the volume settings of the pins are bent. • Perform Reset via OSD. • Adjust the R/G/B color settings or select ...power LED. Screen image has color defects (white does not look white) • Inspect the signal cable and make sure none of both your monitor and computer. • Make sure the computer sound card driver is properly installed and activated. • Make sure the audio source is properly ...
VP247 Series User Guide
Page 30
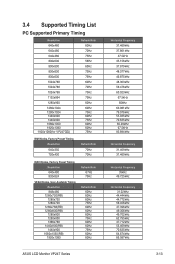
... Primary Timing Resolution 640x480 640x480 640x480 800x600 800x600 800x600 800x600 1024x768 1024x768 1024x768 1152x864 1280x960 1280x1024 1280x1024 1440x900 1440x900 1680x1050 1920x1080 1920x1080(for VP247QG) Refresh Rate 60Hz 72Hz 75Hz 56Hz 60Hz 72Hz 75Hz 60Hz 70Hz 75Hz 75Hz 60Hz 60Hz 75Hz 60Hz 75Hz 60Hz 60Hz 75Hz IBM Modes... 1680x1050(RB) 1920x1080 Refresh Rate 67Hz 75Hz Refresh Rate 60Hz 60Hz 60Hz 75Hz 60Hz 60Hz 60Hz 75Hz 60Hz 60Hz 75Hz 60Hz 60Hz ASUS LCD Monitor VP247 Series Horizontal Frequency 31.469kHz 37.861kHz 37.5kHz 35.156kHz 37.879kHz 48.077kHz 46.875kHz 48.363kHz 56.476kHz 60...
... Primary Timing Resolution 640x480 640x480 640x480 800x600 800x600 800x600 800x600 1024x768 1024x768 1024x768 1152x864 1280x960 1280x1024 1280x1024 1440x900 1440x900 1680x1050 1920x1080 1920x1080(for VP247QG) Refresh Rate 60Hz 72Hz 75Hz 56Hz 60Hz 72Hz 75Hz 60Hz 70Hz 75Hz 75Hz 60Hz 60Hz 75Hz 60Hz 75Hz 60Hz 60Hz 75Hz IBM Modes... 1680x1050(RB) 1920x1080 Refresh Rate 67Hz 75Hz Refresh Rate 60Hz 60Hz 60Hz 75Hz 60Hz 60Hz 60Hz 75Hz 60Hz 60Hz 75Hz 60Hz 60Hz ASUS LCD Monitor VP247 Series Horizontal Frequency 31.469kHz 37.861kHz 37.5kHz 35.156kHz 37.879kHz 48.077kHz 46.875kHz 48.363kHz 56.476kHz 60...


