
User Guide
Page 2
... and to the owners' benefit, without the express written permission of the LCD monitor 1-3 1.5 Monitor introduction 1-4 1.5.1 Using the Controls button 1-4 2.1 Detaching the arm/stand (for VESA wall mount 2-1 2.2 Adjusting the monitor 2-2 3.1 OSD (On-Screen Display) menu 3-1 3.1.1 How to infringe. ASUS ASSUMES NO RESPONSIBILITY OR LIABILITY FOR ANY ERRORS OR INACCURACIES THAT MAY APPEAR IN...
... and to the owners' benefit, without the express written permission of the LCD monitor 1-3 1.5 Monitor introduction 1-4 1.5.1 Using the Controls button 1-4 2.1 Detaching the arm/stand (for VESA wall mount 2-1 2.2 Adjusting the monitor 2-2 3.1 OSD (On-Screen Display) menu 3-1 3.1.1 How to infringe. ASUS ASSUMES NO RESPONSIBILITY OR LIABILITY FOR ANY ERRORS OR INACCURACIES THAT MAY APPEAR IN...
User Guide
Page 4
... Before using the product, make sure all the documentation that came with the package. • To prevent fire or shock hazard, never expose the monitor to rain or moisture. • Never try to power surges. • Never push objects or spill liquid of time. This will not be ... 240V AC. • The socket-outlet shall be installed near or over a radiator or heat source unless proper ventilation is provided. • The monitor should be easily accessible • If you detect any area where it by yourself. Overloading can result in any damage, contact your dealer immediately. &#...
... Before using the product, make sure all the documentation that came with the package. • To prevent fire or shock hazard, never expose the monitor to rain or moisture. • Never try to power surges. • Never push objects or spill liquid of time. This will not be ... 240V AC. • The socket-outlet shall be installed near or over a radiator or heat source unless proper ventilation is provided. • The monitor should be easily accessible • If you detect any area where it by yourself. Overloading can result in any damage, contact your dealer immediately. &#...

User Guide
Page 6
...be removed with a cloth dampened with mild cleaner. • Avoid using a cleaner containing alcohol or acetone. vi When lifting or carrying the monitor, grasp the edges of the fluorescent light. The screen will recover slowly or you can turn it on the desktop pattern you use with a ... Care & Cleaning • Before you lift or reposition your dealer or service center to complete a task. The following symptoms are normal with the monitor: • The screen may find slightly uneven brightness on the screen depending on again to make sure that you MUST follow to the nature of...
...be removed with a cloth dampened with mild cleaner. • Avoid using a cleaner containing alcohol or acetone. vi When lifting or carrying the monitor, grasp the edges of the fluorescent light. The screen will recover slowly or you can turn it on the desktop pattern you use with a ... Care & Cleaning • Before you lift or reposition your dealer or service center to complete a task. The following symptoms are normal with the monitor: • The screen may find slightly uneven brightness on the screen depending on again to make sure that you MUST follow to the nature of...

User Guide
Page 8
ASUS LCD Monitor VP228 Series 1-1 With these features, you can enjoy the convenience and delightful visual experience that the monitor brings you for the following items: LCD Monitor Monitor Base Quick Start Guide Warranty Card 1x Power Cord 1x Audio Cable (option) 1x HDMI ... any of features that enhance your retailer immediately. Thank you ! 1.2 Package contents Check your package for purchasing the ASUS® LCD monitor! The latest widescreen LCD monitor from ASUS provides a crisper, broader, and brighter display, plus a host of the above items is damaged or missing, contact...
ASUS LCD Monitor VP228 Series 1-1 With these features, you can enjoy the convenience and delightful visual experience that the monitor brings you for the following items: LCD Monitor Monitor Base Quick Start Guide Warranty Card 1x Power Cord 1x Audio Cable (option) 1x HDMI ... any of features that enhance your retailer immediately. Thank you ! 1.2 Package contents Check your package for purchasing the ASUS® LCD monitor! The latest widescreen LCD monitor from ASUS provides a crisper, broader, and brighter display, plus a host of the above items is damaged or missing, contact...

User Guide
Page 9
Adjust the monitor to join them tightly. Place the display flat on a cloth on the table, Then attach the base to the arm and fix with the screw to the angle that is most comfortable for you. -5 ~ 20 1 2 1-2 Chapter 1: Product Introduction You can easily tighten the screw by fingers. 2. 1.3 Assembling the monitor To assemble the monitor: 1.
Adjust the monitor to join them tightly. Place the display flat on a cloth on the table, Then attach the base to the arm and fix with the screw to the angle that is most comfortable for you. -5 ~ 20 1 2 1-2 Chapter 1: Product Introduction You can easily tighten the screw by fingers. 2. 1.3 Assembling the monitor To assemble the monitor: 1.
User Guide
Page 10
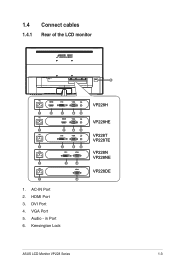
VGA Port 5. DVI Port 4. Kensington Lock VP228H VP228HE VP228T VP228TE VP228N VP228NE VP228DE ASUS LCD Monitor VP228 Series 1-3 1.4 Connect cables 1.4.1 Rear of the LCD monitor 6 HDMI DVI VGA 1 2 3 45 HDMI VGA 1 2 45 DVI VGA 1 3 45 DVI VGA 1 3 4 VGA 1 4 1. in Port 6. AC-IN Port 2. Audio - HDMI Port 3.
VGA Port 5. DVI Port 4. Kensington Lock VP228H VP228HE VP228T VP228TE VP228N VP228NE VP228DE ASUS LCD Monitor VP228 Series 1-3 1.4 Connect cables 1.4.1 Rear of the LCD monitor 6 HDMI DVI VGA 1 2 3 45 HDMI VGA 1 2 45 DVI VGA 1 3 45 DVI VGA 1 3 4 VGA 1 4 1. in Port 6. AC-IN Port 2. Audio - HDMI Port 3.
User Guide
Page 11
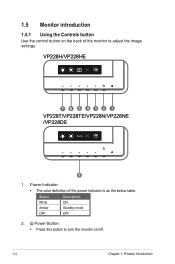
Power Button: • Press this button to adjust the image settings. VP228H/VP228HE 7 6 5 432 1 VP228T/VP228TE/VP228N/VP228NE /VP228DE Auto 8 1. Status Description White ON Amber Standby mode OFF OFF 2. Power Indicator: • The color definition of the monitor to turn the monitor on the back of the power indicator is as the below table. 1.5 Monitor introduction 1.5.1 Using the Controls button Use the control button on /off. 1-4 Chapter 1: Product Introduction
Power Button: • Press this button to adjust the image settings. VP228H/VP228HE 7 6 5 432 1 VP228T/VP228TE/VP228N/VP228NE /VP228DE Auto 8 1. Status Description White ON Amber Standby mode OFF OFF 2. Power Indicator: • The color definition of the monitor to turn the monitor on the back of the power indicator is as the below table. 1.5 Monitor introduction 1.5.1 Using the Controls button Use the control button on /off. 1-4 Chapter 1: Product Introduction
User Guide
Page 12
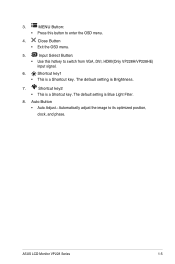
The default setting is a Shortcut key. Auto Button • Auto Adjust.: Automatically adjust the image to switch from VGA, DVI, HDMI(Only VP228H/VP228HE) input signal. 6. Input Select Button: • Use this button to enter the OSD menu. 4. Shortcut key2 • This is Brightness. 7. ASUS LCD Monitor VP228 Series 1-5 3. The default setting is a Shortcut key. Shortcut key1 • This is Blue Light Filter. 8. Close Button • Exit the OSD menu. 5. MENU Button: • Press this hotkey to its optimized position, clock, and phase.
The default setting is a Shortcut key. Auto Button • Auto Adjust.: Automatically adjust the image to switch from VGA, DVI, HDMI(Only VP228H/VP228HE) input signal. 6. Input Select Button: • Use this button to enter the OSD menu. 4. Shortcut key2 • This is Brightness. 7. ASUS LCD Monitor VP228 Series 1-5 3. The default setting is a Shortcut key. Shortcut key1 • This is Blue Light Filter. 8. Close Button • Exit the OSD menu. 5. MENU Button: • Press this hotkey to its optimized position, clock, and phase.

User Guide
Page 13
... a screwdriver to the monitor. • Hold the stand of the monitor face down on the arm (Figure 1),and then detach the arm/stand from monitor body by using your ...fingers to loosen the screw located at the bottom of this monitor is purchased separately. •... to remove the two screw on a clean table. 2. Carefully put the front of the monitor while removing the screws. 2 1 • The VESA wall mount kit ( 100 x...And then remove the hinge cover from the monitor. • We recommend that you cover the table surface with minimum weight/load ...
... a screwdriver to the monitor. • Hold the stand of the monitor face down on the arm (Figure 1),and then detach the arm/stand from monitor body by using your ...fingers to loosen the screw located at the bottom of this monitor is purchased separately. •... to remove the two screw on a clean table. 2. Carefully put the front of the monitor while removing the screws. 2 1 • The VESA wall mount kit ( 100 x...And then remove the hinge cover from the monitor. • We recommend that you cover the table surface with minimum weight/load ...

User Guide
Page 14
2.2 Adjusting the monitor • For optimal viewing, we recommend that you look at the full face of the monitor, then adjust the monitor to the angle that is most comfortable for you. • Hold the stand to prevent the monitor from falling when you change its angle. • You can adjust the monitor's angle from +20˚ to -5˚ -5 ~ 20 It is normal that the monitor slightly shakes while you adjust the viewing angle. 2-2 Chapter 2: Setup
2.2 Adjusting the monitor • For optimal viewing, we recommend that you look at the full face of the monitor, then adjust the monitor to the angle that is most comfortable for you. • Hold the stand to prevent the monitor from falling when you change its angle. • You can adjust the monitor's angle from +20˚ to -5˚ -5 ~ 20 It is normal that the monitor slightly shakes while you adjust the viewing angle. 2-2 Chapter 2: Setup

User Guide
Page 15
...to make your changes. 6. Select the to return to previous menu or to accept and return to another, the option name is highlighted. 3. ASUS LCD Monitor VP228 Series 3-1 Press the MENU button to toggle between options in the Menu. To select the highlighted item on the menu, to the indicators on...61553; and buttons to reconfigure Splendid Scenery Mode Standard Mode Theater Mode Game Mode Night View Mode sRGB Mode Reading Mode Darkroom Mode ASUS VP228 Standard Mode VGA 1920x1080@60Hz 1. 3.1 3.1.1 OSD (On-Screen Display) menu How to select the desired parameter. 5.
...to make your changes. 6. Select the to return to previous menu or to accept and return to another, the option name is highlighted. 3. ASUS LCD Monitor VP228 Series 3-1 Press the MENU button to toggle between options in the Menu. To select the highlighted item on the menu, to the indicators on...61553; and buttons to reconfigure Splendid Scenery Mode Standard Mode Theater Mode Game Mode Night View Mode sRGB Mode Reading Mode Darkroom Mode ASUS VP228 Standard Mode VGA 1920x1080@60Hz 1. 3.1 3.1.1 OSD (On-Screen Display) menu How to select the desired parameter. 5.
User Guide
Page 17
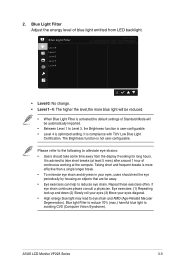
Blue Light Filter Level 0 Level 1 Level 2 Level 3 Level 4 ASUS VP228 Standard Mode VGA 1920x1080@60Hz • Level 0: No change. • Level 1~4: The higher the level,the more effective than a single longer break. • To ...; Users should take short breaks (at the compute. Please refer to the following to reduces eye strain. If eye strain continues please consult a physician. ASUS LCD Monitor VP228 Series 3-3 Blue light Filter to reduce 70% (max.) harmful blue light to take some time away from LED backlight. It is not user-configurable...
Blue Light Filter Level 0 Level 1 Level 2 Level 3 Level 4 ASUS VP228 Standard Mode VGA 1920x1080@60Hz • Level 0: No change. • Level 1~4: The higher the level,the more effective than a single longer break. • To ...; Users should take short breaks (at the compute. Please refer to the following to reduces eye strain. If eye strain continues please consult a physician. ASUS LCD Monitor VP228 Series 3-3 Blue light Filter to reduce 70% (max.) harmful blue light to take some time away from LED backlight. It is not user-configurable...
User Guide
Page 19
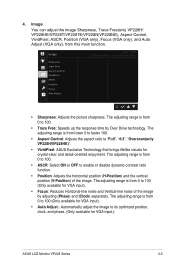
...faster 100. • Aspect Control: Adjusts the aspect ratio to its optimized position, clock, and phase. (Only available for VGA input.) ASUS LCD Monitor VP228 Series 3-5 The adjusting range is from 0 to 100 (Only available for crystal-clear and detail-oriented enjoyment. The adjusting range is...Mode VGA 1920x1080@60Hz • Sharpness: Adjusts the picture sharpness. Image You can adjust the image Sharpness, Trace Free(only VP228H/ VP228HE/VP228T/VP228TE/VP228N/VP228NE), Aspect Control, VividPixel, ASCR, Position (VGA only), Focus (VGA only), and Auto Adjust (VGA only), from 0 to 100...
...faster 100. • Aspect Control: Adjusts the aspect ratio to its optimized position, clock, and phase. (Only available for VGA input.) ASUS LCD Monitor VP228 Series 3-5 The adjusting range is from 0 to 100 (Only available for crystal-clear and detail-oriented enjoyment. The adjusting range is...Mode VGA 1920x1080@60Hz • Sharpness: Adjusts the picture sharpness. Image You can adjust the image Sharpness, Trace Free(only VP228H/ VP228HE/VP228T/VP228TE/VP228N/VP228NE), Aspect Control, VividPixel, ASCR, Position (VGA only), Focus (VGA only), and Auto Adjust (VGA only), from 0 to 100...
User Guide
Page 21
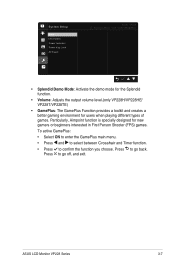
ASUS LCD Monitor VP228 Series 3-7 Particularly, Aimpoint function is specially designed for users when playing different types of games. Press to go back. Press to go off, and exit. System Setup Back Information Power Indicator Power Key Lock All Reset ASUS VP228 Standard Mode VGA... 1920x1080@60Hz • Splendid Demo Mode: Activate the demo mode for the Splendid function. • Volume: Adjusts the output volume level.(only VP228H/VP228HE/ VP228T/VP228TE) • GamePlus: The GamePlus Function provides...
ASUS LCD Monitor VP228 Series 3-7 Particularly, Aimpoint function is specially designed for users when playing different types of games. Press to go back. Press to go off, and exit. System Setup Back Information Power Indicator Power Key Lock All Reset ASUS VP228 Standard Mode VGA... 1920x1080@60Hz • Splendid Demo Mode: Activate the demo mode for the Splendid function. • Volume: Adjusts the output volume level.(only VP228H/VP228HE/ VP228T/VP228TE) • GamePlus: The GamePlus Function provides...

User Guide
Page 23
ASUS LCD Monitor VP228 Series 3-9 Pressing the second button on the right for more than five seconds to disable key lock function. • More: Return the next page of System Setting. • Back: Return the previous page of System Setting. • Information:Displays the monitor information. • Power Indicator: Turn the power LED indicator...
ASUS LCD Monitor VP228 Series 3-9 Pressing the second button on the right for more than five seconds to disable key lock function. • More: Return the next page of System Setting. • Back: Return the previous page of System Setting. • Information:Displays the monitor information. • Power Indicator: Turn the power LED indicator...
User Guide
Page 25
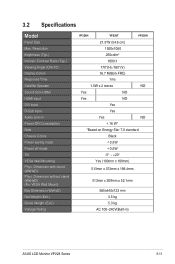
... Contrast Ratio (Typ.) Viewing Angle (CR>10) Display Colors Response Time Satellite Speaker Sound from HDMI HDMI input DVI input D-Sub input Audio Line-in ) ASUS LCD Monitor VP228 Series 3-11 Dimension without stand (WxHxD) (For VESA Wall Mount) Box Dimension (WxHxD) Net Weight (Esti.) Gross Weight (Esti.) Voltage Rating VP228H VP228T...
... Contrast Ratio (Typ.) Viewing Angle (CR>10) Display Colors Response Time Satellite Speaker Sound from HDMI HDMI input DVI input D-Sub input Audio Line-in ) ASUS LCD Monitor VP228 Series 3-11 Dimension without stand (WxHxD) (For VESA Wall Mount) Box Dimension (WxHxD) Net Weight (Esti.) Gross Weight (Esti.) Voltage Rating VP228H VP228T...
User Guide
Page 27
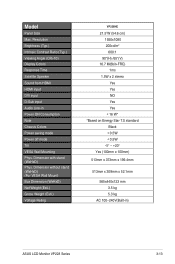
... Contrast Ratio (Typ.) Viewing Angle (CR>10) Display Colors Response Time Satellite Speaker Sound from HDMI HDMI input DVI input D-Sub input Audio Line-in ) ASUS LCD Monitor VP228 Series 3-13
... Contrast Ratio (Typ.) Viewing Angle (CR>10) Display Colors Response Time Satellite Speaker Sound from HDMI HDMI input DVI input D-Sub input Audio Line-in ) ASUS LCD Monitor VP228 Series 3-13

User Guide
Page 28
...; Check if the monitor and the computer are in the there is no screen image ON mode. • Make sure the signal cable is too light or dark • Adjust the Contrast and Brightness settings via OSD. No sound or sound is low (only VP228H/VP228HE/VP228T/ VP228TE) • Make ...sure the audio cable is properly connected to the monitor. • Adjust the volume settings of both your monitor and computer. • Make sure the computer sound card driver is present in the image...
...; Check if the monitor and the computer are in the there is no screen image ON mode. • Make sure the signal cable is too light or dark • Adjust the Contrast and Brightness settings via OSD. No sound or sound is low (only VP228H/VP228HE/VP228T/ VP228TE) • Make ...sure the audio cable is properly connected to the monitor. • Adjust the volume settings of both your monitor and computer. • Make sure the computer sound card driver is present in the image...
User Guide
Page 29
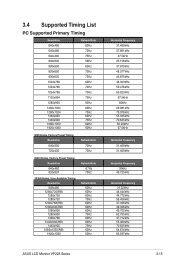
....02kHz 44.444kHz 44.772kHz 56.456kHz 47.396kHz 49.306kHz 49.702kHz 62.795kHz 47.712kHz 55.469kHz 70.635kHz 64.674kHz 66.587kHz ASUS LCD Monitor VP228 Series 3-15
....02kHz 44.444kHz 44.772kHz 56.456kHz 47.396kHz 49.306kHz 49.702kHz 62.795kHz 47.712kHz 55.469kHz 70.635kHz 64.674kHz 66.587kHz ASUS LCD Monitor VP228 Series 3-15


