
User Guide
Page 2
... 1-3 1.4.2 Rear of the LCD monitor 1-4 Chapter 2: Setup 2.1 Adjusting the monitor 2-1 2.2 Detaching the arm/stand (for VESA wall mount 2-2 Chapter 3: General Instruction 3.1 OSD (On-Screen Display) menu 3-1 3.1.1 How to infringe. ASUS ASSUMES NO RESPONSIBILITY OR LIABILITY FOR ANY ERRORS OR INACCURACIES THAT MAY APPEAR IN ...INFORMATIONAL USE ONLY, AND ARE SUBJECT TO CHANGE AT ANY TIME WITHOUT NOTICE, AND SHOULD NOT BE CONSTRUED AS A COMMITMENT BY ASUS. ASUS PROVIDES THIS MANUAL "AS IS" WITHOUT WARRANTY OF ANY KIND, EITHER EXPRESS OR IMPLIED, INCLUDING BUT NOT LIMITED TO THE IMPLIED...
... 1-3 1.4.2 Rear of the LCD monitor 1-4 Chapter 2: Setup 2.1 Adjusting the monitor 2-1 2.2 Detaching the arm/stand (for VESA wall mount 2-2 Chapter 3: General Instruction 3.1 OSD (On-Screen Display) menu 3-1 3.1.1 How to infringe. ASUS ASSUMES NO RESPONSIBILITY OR LIABILITY FOR ANY ERRORS OR INACCURACIES THAT MAY APPEAR IN ...INFORMATIONAL USE ONLY, AND ARE SUBJECT TO CHANGE AT ANY TIME WITHOUT NOTICE, AND SHOULD NOT BE CONSTRUED AS A COMMITMENT BY ASUS. ASUS PROVIDES THIS MANUAL "AS IS" WITHOUT WARRANTY OF ANY KIND, EITHER EXPRESS OR IMPLIED, INCLUDING BUT NOT LIMITED TO THE IMPLIED...

User Guide
Page 5
... or reposition your monitor, it may flicker during the initial use due to the nature of the fluorescent light. Clean the monitor surface with the LCD. Do not repair the screen by the stand or the cord. • Cleaning. Turn your dealer or service center to fix it. Never spray cleaner...
... or reposition your monitor, it may flicker during the initial use due to the nature of the fluorescent light. Clean the monitor surface with the LCD. Do not repair the screen by the stand or the cord. • Cleaning. Turn your dealer or service center to fix it. Never spray cleaner...
User Guide
Page 7
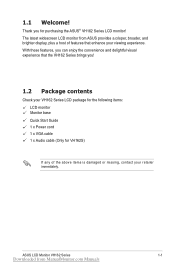
... from ManualMonitor.com Manuals Thank you ! 1.2 Package contents Check your VH162 Series LCD package for the following items: LCD monitor Monitor base Quick Start Guide 1 x Power cord 1 x VGA cable 1 x Audio cable (Only for purchasing the ASUS® VH162 Series LCD monitor! 1.1 Welcome! With these features, you can enjoy the convenience and delightful visual experience...
... from ManualMonitor.com Manuals Thank you ! 1.2 Package contents Check your VH162 Series LCD package for the following items: LCD monitor Monitor base Quick Start Guide 1 x Power cord 1 x VGA cable 1 x Audio cable (Only for purchasing the ASUS® VH162 Series LCD monitor! 1.1 Welcome! With these features, you can enjoy the convenience and delightful visual experience...

User Guide
Page 9
...enter/select the icon (function) highlighted while the OSD menu is also a hotkey for Contrast Ratio adjustment. 3. 1.4 Monitor introduction 1.4.1 Front of the LCD monitor 6 VH162S VH162D 1 2 3 4 5 1. / A Button: • Automatically adjust the image to its optimized position, clock, and phase by long pressing this... button for 2-4 seconds (for Volume adjustment. Button(for VH162D): • Press this button to increase the value of the function selected or move to the previous fuction. • This is ...
...enter/select the icon (function) highlighted while the OSD menu is also a hotkey for Contrast Ratio adjustment. 3. 1.4 Monitor introduction 1.4.1 Front of the LCD monitor 6 VH162S VH162D 1 2 3 4 5 1. / A Button: • Automatically adjust the image to its optimized position, clock, and phase by long pressing this... button for 2-4 seconds (for Volume adjustment. Button(for VH162D): • Press this button to increase the value of the function selected or move to the previous fuction. • This is ...
User Guide
Page 10
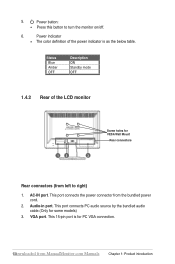
....(Only for VESA Wall Mount Rear connectors 3 Rear connectors (from the bundled power cord. 2. AC-IN port. Power indicator • The color definition of the LCD monitor 12 Screw holes for some models) 3. Power button: • Press this button to right) 1. This port connects the power connector from left to turn...
....(Only for VESA Wall Mount Rear connectors 3 Rear connectors (from the bundled power cord. 2. AC-IN port. Power indicator • The color definition of the LCD monitor 12 Screw holes for some models) 3. Power button: • Press this button to right) 1. This port connects the power connector from left to turn...
User Guide
Page 12
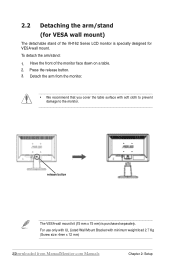
... Listed Wall Mount Bracket with soft cloth to prevent damage to the monitor. To detach the arm/stand: 1. Have the front of the VH162 Series LCD monitor is purchased separately.
... Listed Wall Mount Bracket with soft cloth to prevent damage to the monitor. To detach the arm/stand: 1. Have the front of the VH162 Series LCD monitor is purchased separately.


