
User Guide
Page 4
... Chapter 3: Starting up 3.1 Installing an operating system 3-2 3.2 Powering up 3-2 3.3 Support CD information 3-2 3.3.1 Drivers menu 3-3 3.3.2 Utilities menu 3-4 3.3.3 Make Disk menu 3-5 3.3.4 Manuals menu 3-6 3.3.5 ASUS Contact information 3-7 3.3.6 Other information 3-7 3.4 Software information 3-9 3.4.1 ASUS PC Probe II 3-9 3.4.2 Cool 'n' Quiet!™ Technology 3-16 3.4.3 ASUS Update utility 3-18 3.4.4 ASUS MyLogo 3-21 5.3.5 Using the Wireless LAN module 3-23 Chapter 4: Motherboard info 4.1 Motherboard information...
... Chapter 3: Starting up 3.1 Installing an operating system 3-2 3.2 Powering up 3-2 3.3 Support CD information 3-2 3.3.1 Drivers menu 3-3 3.3.2 Utilities menu 3-4 3.3.3 Make Disk menu 3-5 3.3.4 Manuals menu 3-6 3.3.5 ASUS Contact information 3-7 3.3.6 Other information 3-7 3.4 Software information 3-9 3.4.1 ASUS PC Probe II 3-9 3.4.2 Cool 'n' Quiet!™ Technology 3-16 3.4.3 ASUS Update utility 3-18 3.4.4 ASUS MyLogo 3-21 5.3.5 Using the Wireless LAN module 3-23 Chapter 4: Motherboard info 4.1 Motherboard information...
User Guide
Page 8
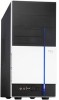
...that comes with hardware knowledge of the barebone system. Chapter 3: Starting up This chapter helps you power up the system and install drivers and utilities from the support CD. 4 . viii This guide is organized This guide contains the following parts: 1. Chapter 4: ...Motherboard information This chapter gives information about the ASUS Vintage2-AE1 barebone system. Chapter 2: Basic installation This chapter provides step-by-step instructions on the front and rear panel, and internal components. ...
...that comes with hardware knowledge of the barebone system. Chapter 3: Starting up This chapter helps you power up the system and install drivers and utilities from the support CD. 4 . viii This guide is organized This guide contains the following parts: 1. Chapter 4: ...Motherboard information This chapter gives information about the ASUS Vintage2-AE1 barebone system. Chapter 2: Basic installation This chapter provides step-by-step instructions on the front and rear panel, and internal components. ...

User Guide
Page 18
... 2: Basic installation Expansion card(s) 4. This LED lights up to install in soft-off mode, and not powered OFF. Floppy disk drive Tool Phillips (cross) screw driver 2.2 Before you proceed Take note of the following precautions before handling components to avoid damaging them due to static electricity. • Hold components by the...
... 2: Basic installation Expansion card(s) 4. This LED lights up to install in soft-off mode, and not powered OFF. Floppy disk drive Tool Phillips (cross) screw driver 2.2 Before you proceed Take note of the following precautions before handling components to avoid damaging them due to static electricity. • Hold components by the...

User Guide
Page 29
...shared - - - - - - - shared - - -- - - - shared - - - - - - IRQ assignments for the expansion card. When using PCI cards on shared slots, ensure that the drivers support "Share IRQ" or that the cards do not need IRQ assignments; Standard interrupt assignments IRQ Priority 0 1 1 2 2 - 3 11 4 12 5 13 6 14 7 15 8 3 9 4 ... will arise between the two PCI groups, making the system unstable and the card inoperable. ASUS Vintage2-AE1 2-13 2.6.2 Configuring an expansion card After installing the expansion card, configure it by adjusting the software settings. 1.
...shared - - - - - - - shared - - -- - - - shared - - - - - - IRQ assignments for the expansion card. When using PCI cards on shared slots, ensure that the drivers support "Share IRQ" or that the cards do not need IRQ assignments; Standard interrupt assignments IRQ Priority 0 1 1 2 2 - 3 11 4 12 5 13 6 14 7 15 8 3 9 4 ... will arise between the two PCI groups, making the system unstable and the card inoperable. ASUS Vintage2-AE1 2-13 2.6.2 Configuring an expansion card After installing the expansion card, configure it by adjusting the software settings. 1.
User Guide
Page 31
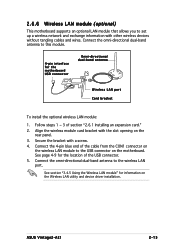
...band antenna to the USB connector on the motherboard. See page 4-9 for the location of section "2.6.1 Installing an expansion card." 2. ASUS Vintage2-AE1 2-15 See section "3.4.5 Using the Wireless LAN module" for the motherboard USB connector Omni-directional dual-band antenna Wireless LAN port ... with a screw. 4. Connect the 4-pin blue end of the cable from the CON1 connector on the Wireless LAN utility and device driver installation. Connect the omni-directional dual-band antenna to this module. 4-pin interface for information on the wireless LAN module to the wireless...
...band antenna to the USB connector on the motherboard. See page 4-9 for the location of section "2.6.1 Installing an expansion card." 2. ASUS Vintage2-AE1 2-15 See section "3.4.5 Using the Wireless LAN module" for the motherboard USB connector Omni-directional dual-band antenna Wireless LAN port ... with a screw. 4. Connect the 4-pin blue end of the cable from the CON1 connector on the Wireless LAN utility and device driver installation. Connect the omni-directional dual-band antenna to this module. 4-pin interface for information on the wireless LAN module to the wireless...
User Guide
Page 37
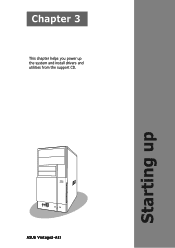
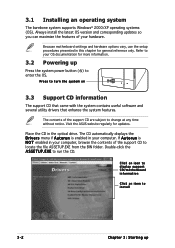
Chapter 3 This chapter helps you power up ASUS Vintage2-AE1 Starting up the system and install drivers and utilities from the support CD.
Chapter 3 This chapter helps you power up ASUS Vintage2-AE1 Starting up the system and install drivers and utilities from the support CD.
User Guide
Page 38
...turn the system on 3.3 Support CD information The support CD that came with the system contains useful software and several utility drivers that enhance the system features. 3.1 Installing an operating system The barebone system supports Windows® 2000/XP operating systems (OS). Visit the... ASUS website regularly for general reference only. The CD automatically displays the D r i v e r s menu if A u t o r u n is N O T enabled in your ...
...turn the system on 3.3 Support CD information The support CD that came with the system contains useful software and several utility drivers that enhance the system features. 3.1 Installing an operating system The barebone system supports Windows® 2000/XP operating systems (OS). Visit the... ASUS website regularly for general reference only. The CD automatically displays the D r i v e r s menu if A u t o r u n is N O T enabled in your ...

User Guide
Page 39
... be the same for the optional wireless LAN module. ASUS Vintage2-AE1 3-3 VIA Chipset Driver Program Installs the VIA Chipset Driver program. Realtek Audio Driver Executes the wizard to activate the devices. 3.3.1 Drivers menu The drivers menu shows the available device drivers if the system detects installed devices. Install the necessary drivers to install the Realtek® ALC653 audio...
... be the same for the optional wireless LAN module. ASUS Vintage2-AE1 3-3 VIA Chipset Driver Program Installs the VIA Chipset Driver program. Realtek Audio Driver Executes the wizard to activate the devices. 3.3.1 Drivers menu The drivers menu shows the available device drivers if the system detects installed devices. Install the necessary drivers to install the Realtek® ALC653 audio...
User Guide
Page 41
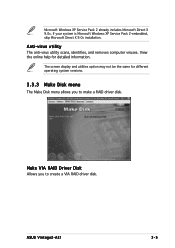
... same for detailed information. View the online help for different operating system versions. 3.3.3 Make Disk menu The Make Disk menu allows you to make a RAID driver disk. ASUS Vintage2-AE1 3-5 Make VIA RAID Driver Disk Allows you to create a VIA RAID...
... same for detailed information. View the online help for different operating system versions. 3.3.3 Make Disk menu The Make Disk menu allows you to make a RAID driver disk. ASUS Vintage2-AE1 3-5 Make VIA RAID Driver Disk Allows you to create a VIA RAID...

User Guide
Page 42
3.3.4 Manuals menu The Make Disk menu allows you to make a RAID driver disk. RTL8187 Wireless LAN User's Manual Allows you to open the Realtek® RTL8187 Wireless LAN user's manual. 3-6 Chapter 3: Starting up
3.3.4 Manuals menu The Make Disk menu allows you to make a RAID driver disk. RTL8187 Wireless LAN User's Manual Allows you to open the Realtek® RTL8187 Wireless LAN user's manual. 3-6 Chapter 3: Starting up

User Guide
Page 52
...: 1. Turn on the system and enter BIOS by pressing the key during the Power On Self-Tests (POST). 2. Refer to install the Cool 'n' Quiet!™ driver and application before using this feature. • The AMD Cool 'n' Quiet!™ technology supports AMD Athlon™ XP and higher processors only.
...: 1. Turn on the system and enter BIOS by pressing the key during the Power On Self-Tests (POST). 2. Refer to install the Cool 'n' Quiet!™ driver and application before using this feature. • The AMD Cool 'n' Quiet!™ technology supports AMD Athlon™ XP and higher processors only.

User Guide
Page 60
.... 3. When finished, restart your computer auto-detects the wireless LAN module during start-up Click R e a l t e k R T L 8 1 8 7 Wireless Ethernet Driver. 4. Click C a n c e l then proceed with the following instructions. Driver installation If you are using a Windows® operating system, your computer. 3-24 Chapter 3: Starting up and displays an A d d N e w H a r d w a r e W i z a r d window. Place the WiFi-TV card support ...
.... 3. When finished, restart your computer auto-detects the wireless LAN module during start-up Click R e a l t e k R T L 8 1 8 7 Wireless Ethernet Driver. 4. Click C a n c e l then proceed with the following instructions. Driver installation If you are using a Windows® operating system, your computer. 3-24 Chapter 3: Starting up and displays an A d d N e w H a r d w a r e W i z a r d window. Place the WiFi-TV card support ...
User Guide
Page 61
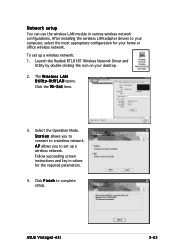
...ASUS Vintage2-AE1 3-25 Network setup You can use the wireless LAN module in values for your home or office wireless network. S e t item. 3. Follow succeeding screen instructions and key in various wireless network configurations. The W i r e l e s s L A N U t i l i t y - To set up a wireless network: 1. Launch the Realtek RTL8187 Wireless Network Driver...computer, select the most appropriate configuration for the required parameters. 4. After installing the wireless LAN adapter drivers to a wireless network. Click the W i - A P allows you to connect to your ...
...ASUS Vintage2-AE1 3-25 Network setup You can use the wireless LAN module in values for your home or office wireless network. S e t item. 3. Follow succeeding screen instructions and key in various wireless network configurations. The W i r e l e s s L A N U t i l i t y - To set up a wireless network: 1. Launch the Realtek RTL8187 Wireless Network Driver...computer, select the most appropriate configuration for the required parameters. 4. After installing the wireless LAN adapter drivers to a wireless network. Click the W i - A P allows you to connect to your ...